

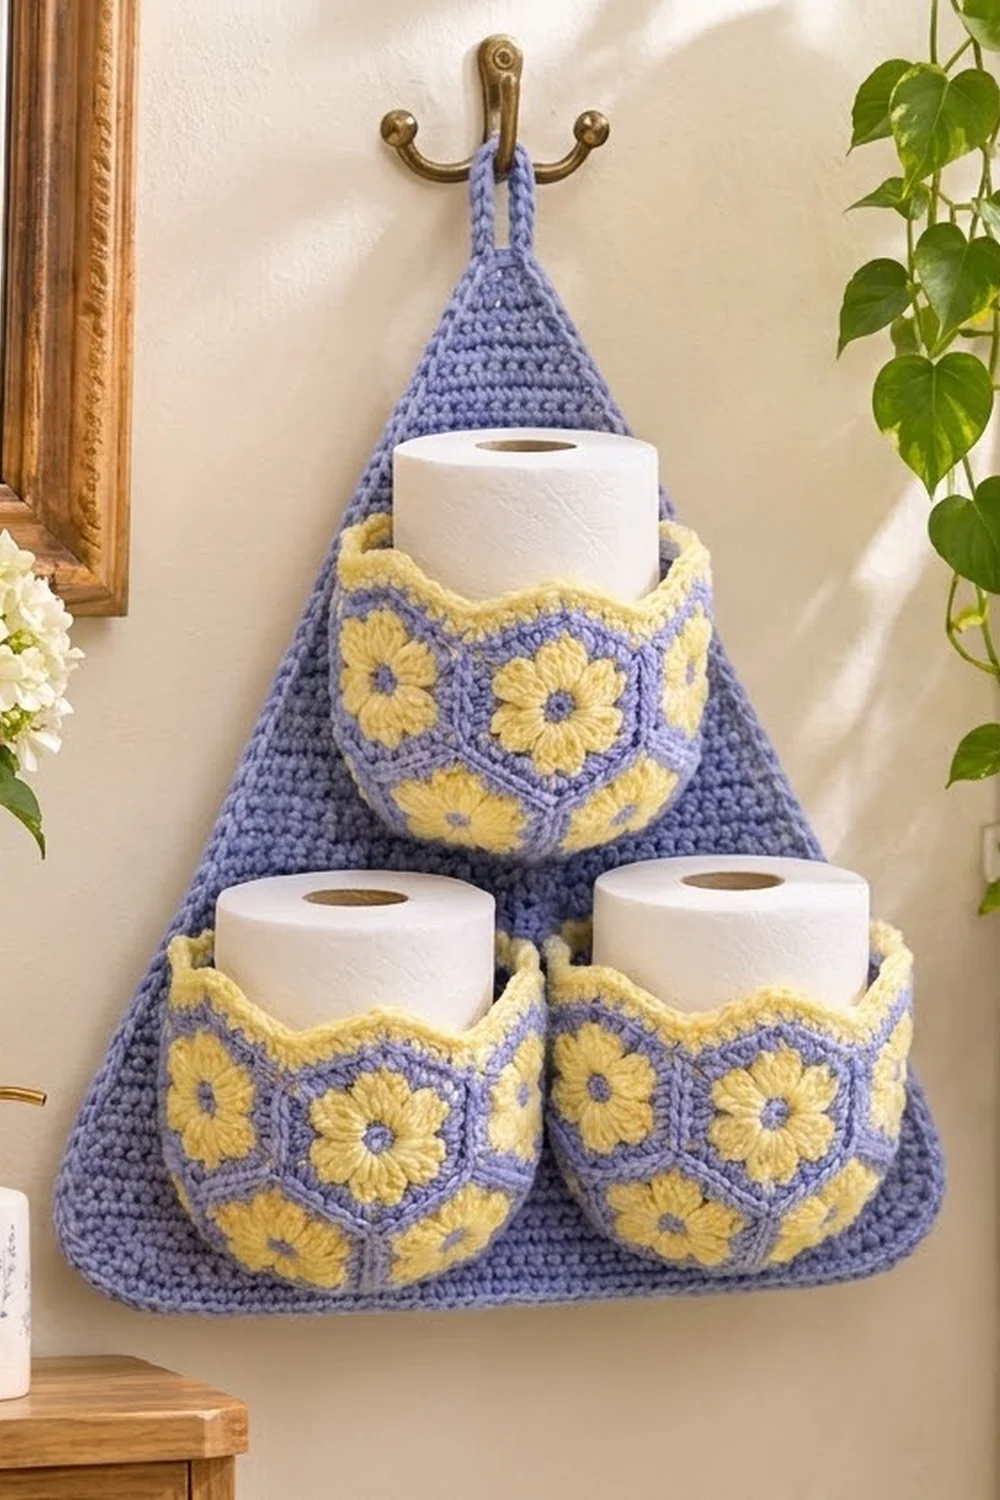
This hanging holder stores three spare toilet rolls. A periwinkle triangle hangs from a hook, and three round pockets made of daisy hexagons each hold one roll. One pocket sits at the top and two sit side by side below it.
The colors are periwinkle blue (Color A) and pale buttery yellow (Color B). Each hexagon has a yellow puff-petal flower around a blue center. Each pocket has a yellow corded rim that rises and dips with the hexagon points. The look is cottage-style and cheerful, and the cotton yarn suits a bathroom.
This pattern uses US crochet terms. The finished holder measures 17.4 in (44.2 cm) wide and 16.9 in (42.9 cm) tall, plus a 2 in (5.1 cm) hanging loop.
Construction overview: You make 12 hexagons and join them into three rings of four. Each ring gets a gathered base at the bottom and a corded rim at the top. Then you crochet the triangular panel in rows, add a border with a built-in loop, block everything, and sew on the pockets.
Finished Size and Construction
- Finished size: 17.4 in (44.2 cm) wide × 16.9 in (42.9 cm) tall, plus a 2 in (5.1 cm) loop
- Skill level: Intermediate
- Terminology: US
- Yarn weight: Worsted (#4), cotton
- Hook: 4.5 mm (US 7)
- Number of pieces: 1 back panel + 12 hexagons (3 pockets of 4 hexagons each)
- Layout: 1 pocket centered at the top, 2 pockets side by side at the bottom
- Hexagon size: 4 in (10.2 cm) point to point, 3.5 in (8.9 cm) flat to flat, 2 in (5.1 cm) per side
- Pocket size: 4.4 in (11.2 cm) diameter, 13.9 in (35.3 cm) around
- Panel size before border: 16 in (40.6 cm) wide × 15.5 in (39.4 cm) tall
- Border depth: 0.7 in (1.8 cm)
Materials
Use a smooth worsted-weight cotton or cotton blend of about 170 m per 100 g. Cotton holds its shape, stays firm, and copes with bathroom humidity. Avoid fuzzy yarns, because they hide the petal texture.
- Color A, periwinkle blue: 260 g (about 442 m)
- Color B, pale yellow: 60 g (about 102 m)
- 4.5 mm (US 7) crochet hook
- Tapestry needle
- 6–8 stitch markers
- Rustproof pins
- Scissors
- Blocking mat
- A toilet roll or jar about 4.4 in (11.2 cm) across, for shaping pockets
These quantities include a margin of about 15% for swatching and joining.
Abbreviations (US Terms)
- ch: chain
- sl st: slip stitch
- sc: single crochet
- dc: double crochet
- sc2tog: single crochet 2 together
- rsc: reverse single crochet (crab stitch)
- sp: space
- st(s): stitch(es)
- RS: right side
Puff stitch: [Yarn over, insert hook in st, yarn over, pull up a loop] 4 times (9 loops on hook). Yarn over and pull through all 9 loops, then ch 1 to lock. The locking ch does not count as a stitch.
Beginning puff: Ch 2. [Yarn over, insert hook in st, pull up a loop] 3 times (7 loops on hook). Yarn over and pull through all 7 loops, then ch 1 to lock. Counts as 1 puff.
Gauge and Checkpoints
Panel gauge: 16 sc × 18 rows = 4 in (10.2 cm).
Make one hexagon before anything else and measure it flat after a light steam:
- After Round 2: 2.25 in (5.7 cm) across
- After Round 3: 3.5 in (8.9 cm) point to point
- After Round 4: 4 in (10.2 cm) point to point, 2 in (5.1 cm) per side
If your hexagon is too big: go down to a 4 mm hook. Pockets will gape and drop rolls.
If it is too small: go up to a 5 mm hook. The ring must measure 13.9 in (35.3 cm) around to hold a standard roll.
For the panel, check that Row 1 measures 16 in (40.6 cm) and that Rows 1–8 measure 1.8 in (4.6 cm).
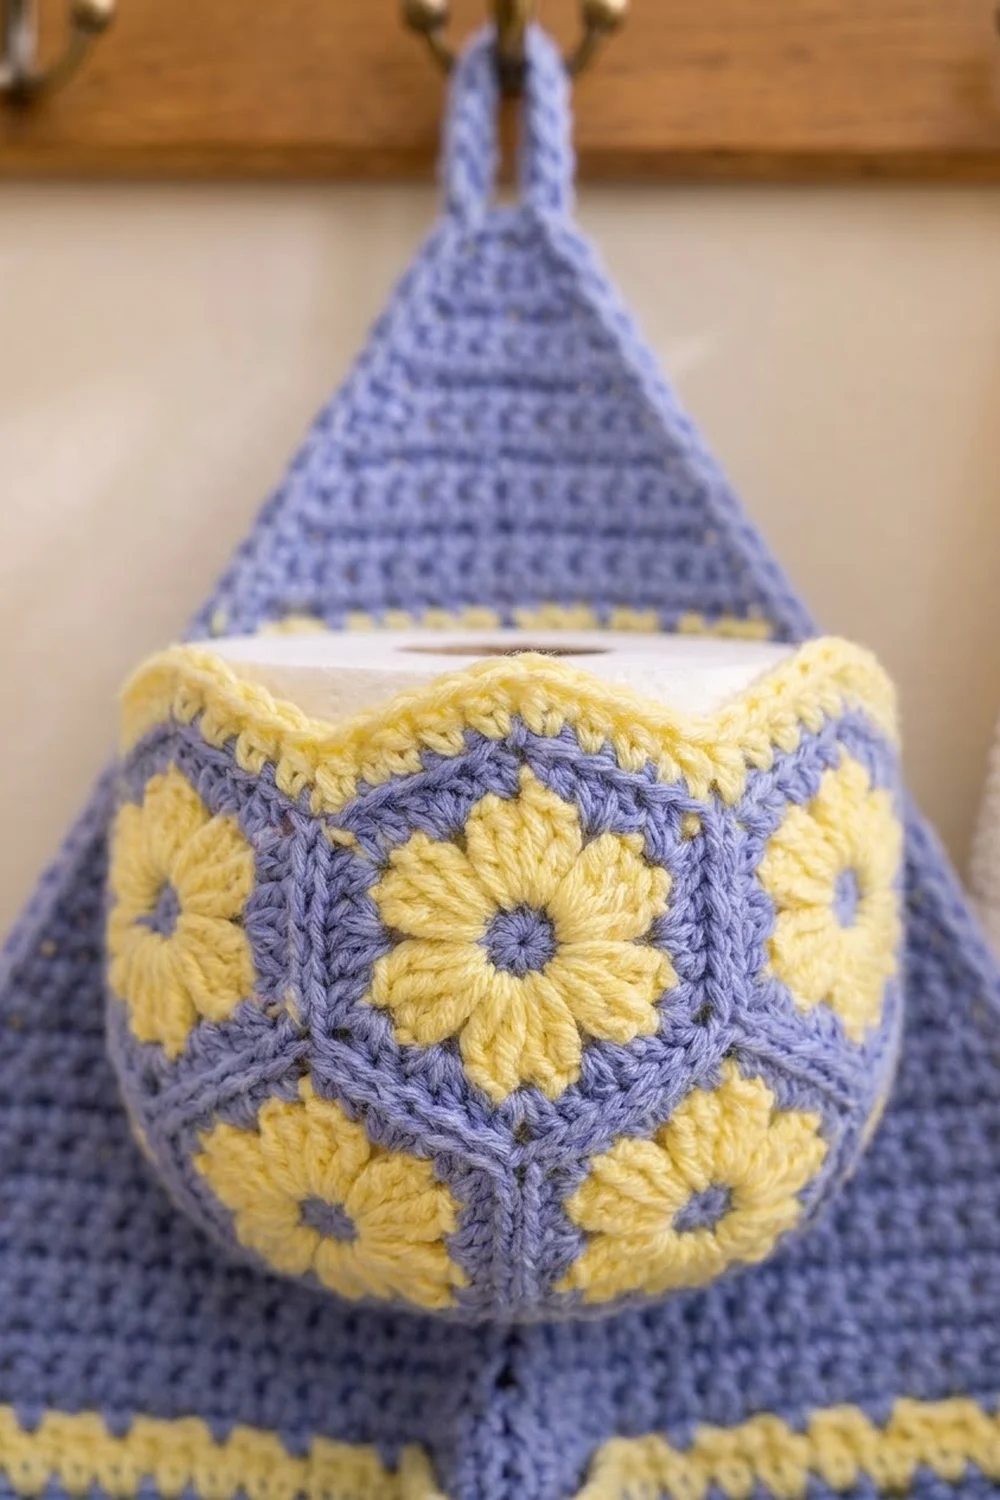
Hexagon Motif (Make 12)
Round 1 (A): Make a magic ring, ch 1, work 6 sc in the ring, then sl st to the first sc. Fasten off. (6 sc)
Round 2 (B): Join B in any sc. Work a beginning puff in the same st, ch 3. Puff in next sc, ch 3; repeat from * 4 more times. Sl st to the top of the beginning puff and fasten off. (6 puffs, 6 ch-3 sps)*
Round 3 (A): Join A in any ch-3 sp. Ch 3 (counts as dc), then (2 dc, ch 2, 3 dc) in the same sp. (3 dc, ch 2, 3 dc) in next ch-3 sp; repeat from * 4 more times. Sl st to the top of ch-3. (36 dc, 6 ch-2 corner sps; 6 dc per side)*
Round 4 (A): Ch 1. Sc in each dc around, working (sc, ch 2, sc) in each ch-2 corner sp. Sl st to the first sc and fasten off, leaving a 12 in (30.5 cm) tail. (48 sc, 6 ch-2 corner sps)
Round 4 is a conversion round: 36 sc worked one per dc, plus 12 extra sc (2 per corner), gives 48. Each side has 8 sc between corner spaces. In this pattern, the corner ch-2 spaces are not counted as stitches.
Make All Pieces
- Hexagons: 12 total. Rounds 1, 3, and 4 use A, and Round 2 uses B.
- Rings: 3 rings of 4 hexagons each.
- Panel: 1, worked in A.
Layout on the panel (each [P] is one pocket):
        /\
       /  \
      / [P] \
     /        \
    / [P]  [P] \
   (____________)
Joining the Pockets
Method: Whipstitch through the back loops with A, working on the wrong side.
Turn each hexagon point-up so it has two vertical sides. Place two hexagons right sides together and match their vertical sides stitch for stitch. Start with one pass through the corner ch-2 spaces, then whipstitch the 8 pairs of sc, and finish with one pass through the next pair of corner spaces. Join the four hexagons in a row, then join the fourth to the first to close the ring.
Tension: Pull each pass until the edges meet but do not ripple. Seams that are too tight make the ring smaller around.
Size checkpoint: The ring should measure 13.9 in (35.3 cm) around and 4 in (10.2 cm) tall at the points. You should see four downward points at the bottom and four upward points at the top.
Pocket Base (Work on Each Ring)
Round 1 (A): With the RS facing, join A at a bottom seam. Sc2tog through the two corner sps that meet there, counting as 1 st. Sc in next 8 sts, sc in the point ch-2 sp, sc in next 8 sts, sc2tog over the corner sps at the next seam; repeat from * around, leaving out the final sc2tog because you already worked it. Sl st to the first st. (18 sts per hexagon × 4 = 72 sts)*
Round 2: Ch 1. Sc in next 4 sts, sc2tog; repeat from * around. (60 sts)*
Round 3: Sc in next 3 sts, sc2tog; repeat around. (48 sts)*
Round 4: Sc in next 2 sts, sc2tog; repeat around. (36 sts)*
Round 5: Sc in next st, sc2tog; repeat around. (24 sts)*
Round 6: Sc2tog 12 times. (12 sts)
Round 7: Sc2tog 6 times. (6 sts)
Fasten off, then weave the tail through the front loops and pull it closed. These quick decreases pull the bottom points in and give the cup its rounded bottom.
Pocket Rim (Work on Each Ring)
Round 1 (B): Join B at a top seam. Sc2tog through the two corner sps that meet there. Sc in next 8 sts, 3 sc in the top point ch-2 sp, sc in next 8 sts, sc2tog at the next seam; repeat from * around, leaving out the final sc2tog. Sl st to the first st. (20 sts per hexagon × 4 = 80 sts)*
Round 2 (B): Ch 1. Work rsc in each st around, then sl st to join and fasten off. (80 rsc)
The rim count comes from the same per-hexagon count as the joining: 4 hexagons × 20 sts = 80. The 3 sc at each point keep the peaks sharp, and the sc2tog at each seam keeps the dips crisp.
Back Panel
Row 1 (A): Ch 65. Sc in 2nd ch from hook and in each ch across, then turn. (64 sc)
Rows 2–8: Ch 1, sc in each st across, turn. (64 sc)
Row 9 (decrease row): Ch 1, sc2tog, sc to the last 2 sts, sc2tog, turn. (62 sc)
Row 10: Ch 1, sc in each st across, turn. (62 sc)
Rows 11–68: Repeat Rows 9–10. Each odd row ends with (71 minus the row number) sts. (Row 29: 42 sc. Row 49: 22 sc. Row 67: 4 sc. Row 68: 4 sc.)
Row 69: Ch 1, sc2tog twice, turn. (2 sc)
Row 70: Ch 1, sc2tog. Do not fasten off. (1 sc, the apex)
Checkpoint: The panel is 16 in (40.6 cm) wide and 15.5 in (39.4 cm) tall. Each slanted edge has 69 row ends below the apex stitch.
Border
Border gauge: 4 sc per inch along the edges, the same as the panel.
Round 1: Ch 1. Work 3 sc in the apex st. Down the left side, sc once in each row end of Rows 69 to 1 (69 sc). Work 3 sc in the first foundation loop, which is the bottom corner. Sc in the next 62 foundation loops. Work 3 sc in the last foundation loop, the second bottom corner. Up the right side, sc once in each row end of Rows 1 to 69 (69 sc). Sl st to the first sc.
(Apex 3 + side 69 + corner 3 + bottom 62 + corner 3 + side 69 = 209 sts)
Round 2: Ch 1. Sc in each st, with these changes. At the apex, sc in the first st, work (sc, ch 20, sc) in the center st for the loop, then sc in the third st. At each bottom corner, work 2 sc in each of the 3 corner sts. Sl st to join.
(209 worked one per st + 7 extra = 216 sc, plus the ch-20 loop. Per side: 69 slanted, 62 bottom, 6 at each corner, 4 at the apex.)
Round 3: Ch 1. Sc in each sc around, and work 30 sc into the ch-20 loop. At each bottom corner, work (sc in next st, 2 sc in next st) 3 times over the 6 corner sts. Sl st to join and fasten off.
(216 worked one per st + 30 in the loop + 6 corner increases = 252 sts)
Why the math works: The bottom 3 + 62 + 3 uses all 64 foundation loops. Each slanted side uses one sc per row end. At 4 sc per inch, 69 sc covers 17.25 in (43.8 cm), while the slanted edge is about 17.7 in (45.0 cm) long. That slight easing keeps the long sides from rippling. Increasing at the corners on Rounds 2 and 3 rounds them off smoothly. Three rounds at 4.5 rounds per inch add 0.7 in (1.8 cm) on each side, so the width grows from 16 in to 17.4 in (40.6 cm to 44.2 cm).
Final Blocking
- Weave in all ends and leave the pockets unattached.
- Pin the panel on the mat at 17.4 in (44.2 cm) wide and 16.9 in (42.9 cm) tall, keeping the slanted sides straight.
- Shape each bottom corner into a smooth curve with pins.
- Mist the panel with water until it is damp, then let it dry completely.
- Slip each pocket over a roll or jar 4.4 in (11.2 cm) across. Pinch the rim points upward, mist, and let dry.
- Lay each pocket so one hexagon sits flat against the panel. This is its back hexagon.
- Bottom pockets: Center each back hexagon 2.5 in (6.4 cm) to the left or right of the center line, with its bottom point at Row 8, which is 1.8 in (4.6 cm) up from the bottom edge.
- Top pocket: Center the back hexagon on the center line, with its bottom point at Row 34, which is 7.6 in (19.3 cm) up.
- Use A to whipstitch around the back hexagon’s two vertical sides and two lower sides, then tack its top point. Sew snugly so the panel doesn’t pucker.
Final Quality-Control Checklist
- Each hexagon has 8 sc per side and measures 4 in (10.2 cm) point to point
- Each ring measures 13.9 in (35.3 cm) around
- Each base closes neatly with 6 sts
- Each rim has 80 sts with four sharp peaks
- The panel border counts 209, then 216, then 252 sts
- Bottom corners are rounded and the loop is fully covered
- The three pockets are level and evenly spaced
- A roll slides in easily and stays put
Troubleshooting
The puffs look flat. Pull up each loop to the height of the ch-3 before working the next one.
The hexagon cups. Check that each Round 3 group is (3 dc, ch 2, 3 dc), or loosen your tension.
The hexagon ruffles. Use a smaller hook or work the Round 4 corners as (sc, ch 1, sc).
The roll doesn’t fit. Your ring is under 13.9 in (35.3 cm). Rework the hexagons with a bigger hook.
The slanted edges wave. Check that you worked only 69 sc per side on Border Round 1.
The panel sags under the pockets. Tighten the whipstitching and tack each base’s center to the panel.
Care
Hand wash in cool water and reshape while damp. Dry flat, then rehang.
Final Notes
Everything depends on the hexagon. If you get 8 sc per side and 2 in (5.1 cm) sides, each ring measures 13.9 in (35.3 cm) around. Then 72 stitches gather into the base and 80 form the rim. The panel works the same way: 64 sc gives 16 in (40.6 cm) of width, 70 rows give 15.5 in (39.4 cm) of height, and the 209/216/252 border brings the panel to 17.4 × 16.9 in (44.2 × 42.9 cm). Check each measurement before moving to the next stage, and your three periwinkle pockets will hold their rolls neatly.
Happy crocheting!