

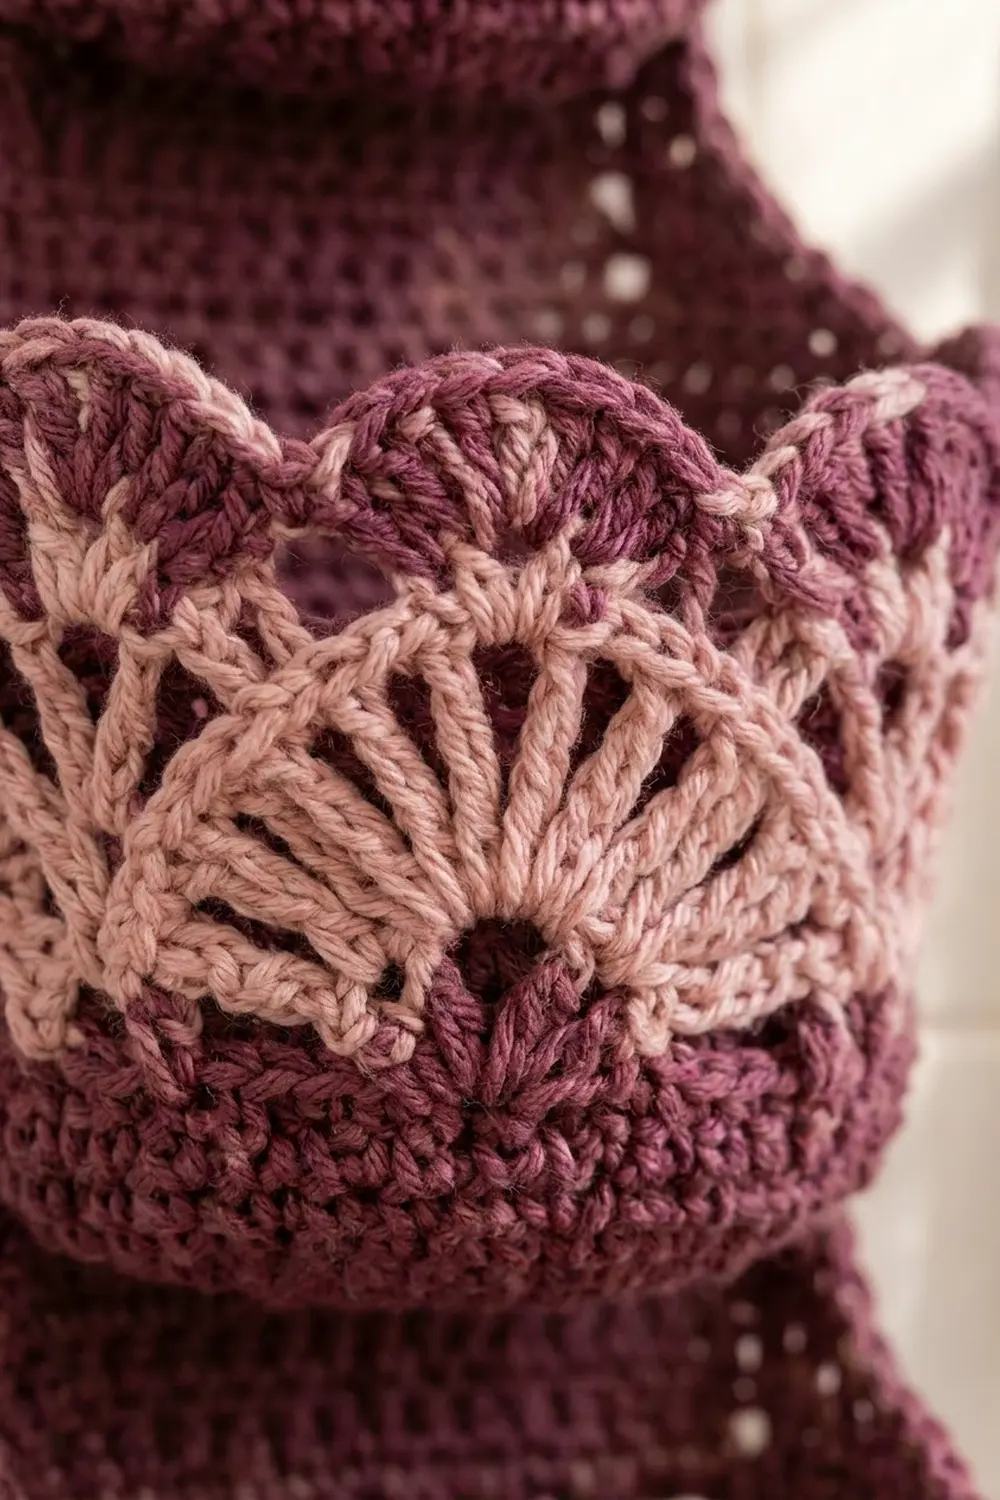
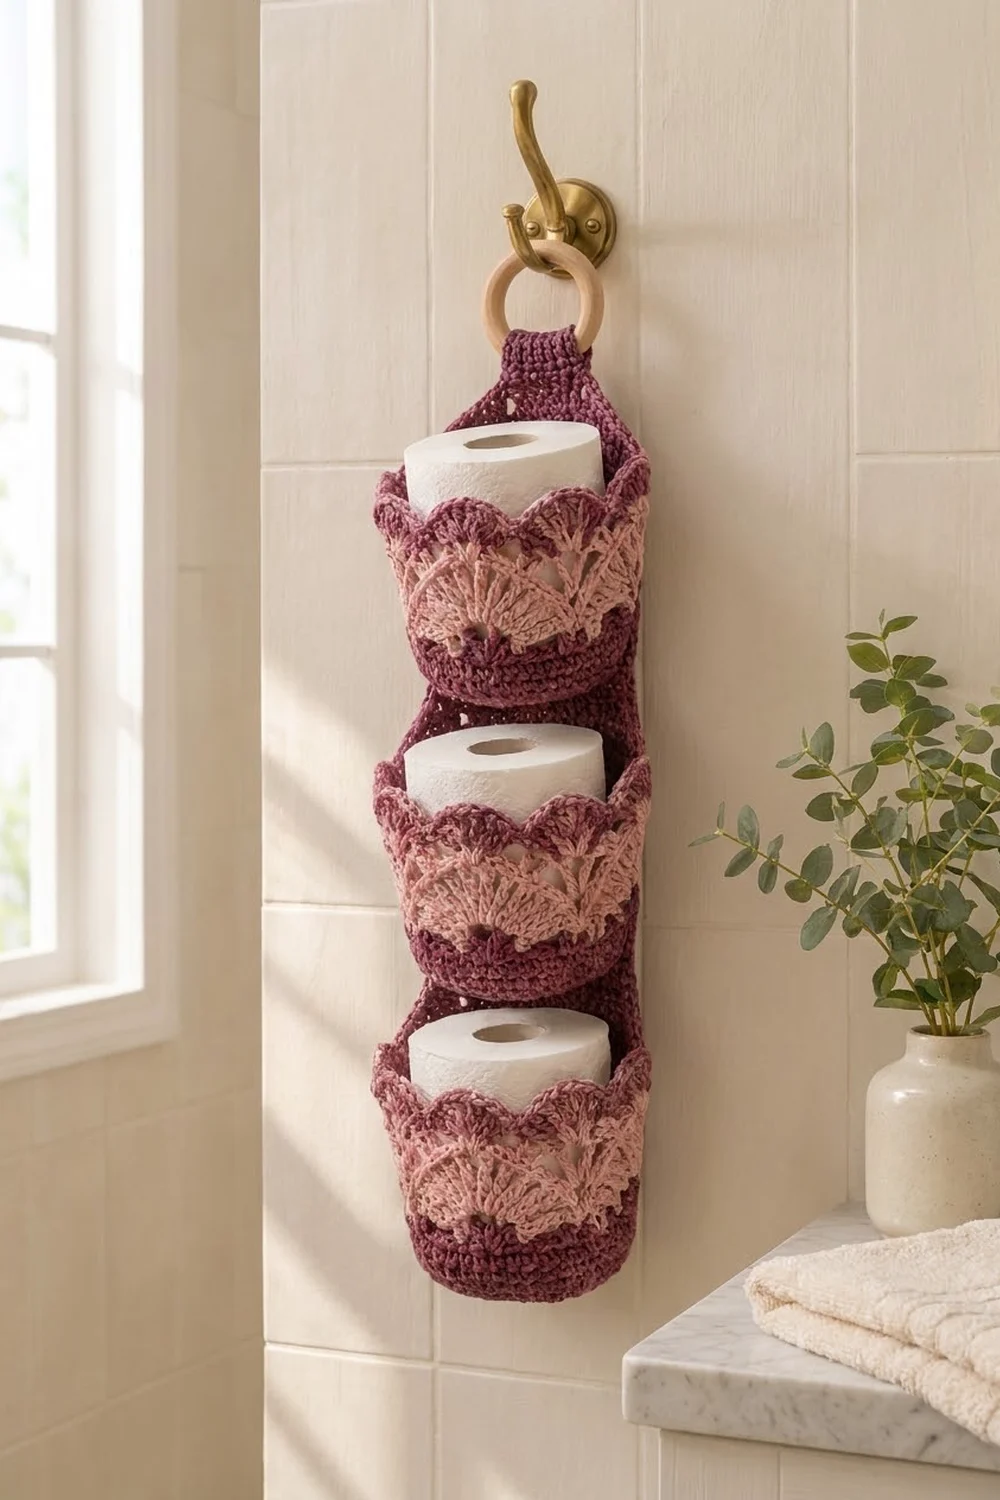
This hanging toilet paper holder has three flared cup baskets stacked on one narrow back panel. Each cup is worked in two shades. It starts with a solid plum base and lower wall, then has a band of open blush-pink fans, a row of pink scallops, and a plum scalloped edge. The whole holder hangs from a wooden ring on a short tab, so it fits on a towel hook, robe hook, or door hook.
The colors are deep plum and soft dusty pink. Together they look vintage and a little romantic, and they still suit a modern bathroom. Cotton yarn gives the fans clear definition and makes the holder firm enough to carry three full rolls.
This pattern uses US crochet terms. The finished back panel measures 4.75 in (12.1 cm) wide by 16.75 in (42.5 cm) tall. With the hanging loop, the holder is about 18.25 in (46.4 cm) tall, not counting the ring. Each basket is about 4 in (10.2 cm) tall, and its rim flares to about 6 in (15.2 cm) across.
You’ll make five pieces: three baskets worked in the round, one rectangular back panel worked in rows, and one hanging tab. The panel gets a two-round border. Then you sew the baskets to the front of the panel and wrap the tab around the ring.
Finished Size and Construction
- Finished size: 4.75 in (12.1 cm) wide x 18.25 in (46.4 cm) tall, including the hanging loop
- Skill level: Intermediate
- Terminology: US
- Yarn weight: Worsted (#4) cotton
- Hook: 4.0 mm (G-6)
- Number of pieces: 5 (3 baskets, 1 back panel, 1 tab)
- Layout: 3 baskets stacked in one vertical column
- Basket size: base 4.5 in (11.4 cm) across, height 4 in (10.2 cm), rim 6 in (15.2 cm) across
- Panel size before border: 4 in (10.2 cm) x 16 in (40.6 cm)
- Border depth: 0.375 in (1.0 cm) on each side
Materials
Use a smooth, mercerized or matte worsted cotton, about 1.5 m per gram (roughly 109 m per 71 g ball). Cotton holds its shape and stands up to steamy bathrooms better than acrylic.
- Color A, Plum: 120 g / 180 m
- Color B, Dusty Pink: 50 g / 75 m
The quantities above include about a 20% margin.
Tools:
– 4.0 mm (G-6) crochet hook
– Wooden ring, 3 in (7.6 cm) across
– Tapestry needle
– 6 locking stitch markers
– Scissors
– Measuring tape
– Pins and a blocking mat
Abbreviations (US Terms)
- ch – chain
- sl st – slip stitch
- sc – single crochet
- hdc – half double crochet
- dc – double crochet
- tr – treble crochet
- BLO – back loop only
- MR – magic ring
- sk – skip
- sp – space
- st(s) – stitch(es)
- rev sc – reverse single crochet (crab stitch)
Special stitch – Open Fan: In the same stitch, work (dc, ch 1) 6 times, then dc once more. This gives 7 dc and 6 ch-1 spaces.
Gauge and Checkpoints
Gauge: 16 sc x 18 rows = 4 in (10.2 cm) in sc rows.
Make one basket before you start anything else. All the later measurements depend on it.
- After Round 10 (base): The flat circle is 4.5–4.75 in (11.4–12.1 cm) across.
- After Round 16: The plum wall is 1.25 in (3.2 cm) tall from the base edge.
- After Round 18: The wall is 2.75 in (7.0 cm) tall.
- Finished basket: 4 in (10.2 cm) tall, with a rim 6 in (15.2 cm) across.
If your piece is too big, the roll will sit loose and the cup will sag. Go down to a 3.75 mm hook. If it’s too small, a standard 4.25 in (10.8 cm) roll won’t fit. Go up to a 4.5 mm hook. Measure the panel after 18 rows too. It should be 4 in (10.2 cm) wide and 4 in (10.2 cm) tall.
Basket (Make 3)
Join every round with a sl st to the first st. The beginning ch 1 never counts as a stitch. Beginning ch 3 or ch 4 counts as a stitch where the pattern says so.
Base (Color A)
Round 1: MR, 6 sc in ring. (6 sts)
Round 2: 2 sc in each st around. (12 sts)
Round 3: Sc in next st, 2 sc in next st around. (18 sts)
Round 4: Sc in next 2 sts, 2 sc in next st around. (24 sts)
Round 5: Sc in next 3 sts, 2 sc in next st around. (30 sts)
Round 6: Sc in next 4 sts, 2 sc in next st around. (36 sts)
Round 7: Sc in next 5 sts, 2 sc in next st around. (42 sts)
Round 8: Sc in next 6 sts, 2 sc in next st around. (48 sts)
Round 9: Sc in next 7 sts, 2 sc in next st around. (54 sts)
Round 10: Sc in next 8 sts, 2 sc in next st around. (60 sts)
Check the base against the measurement in the checkpoints. It should lie flat with no ruffling.
Lower Wall (Color A)
Round 11: Ch 1, sc in BLO of each st around. (60 sts) This round turns the edge up into a wall.
Rounds 12–16: Ch 1, sc in each st around. (60 sts each round)
Fasten off Color A.
Fan Band (Color B)
Round 17: Join B in any st. Ch 1, sc in same st, sk 5 sts, Open Fan in next st, sk 5 sts, sc in next st. Repeat from * around, but end the last repeat with sk 5 sts instead of sc. Join to the first sc. (5 sc, 5 fans: 5 sc + 35 dc + 30 ch-1 sps)
Each repeat uses 12 base stitches (1 + 5 + 1 + 5), and 60 / 12 = 5 fans. The skipped plum stitches show between the fans as small dark wedges.
Round 18: Ch 4 (counts as tr). Sk the first dc of the fan, (dc in next ch-1 sp, ch 2) 5 times, dc in last ch-1 sp, tr in next sc. Repeat from * around, but skip the final tr and join to the top of ch-4. (5 tr + 30 dc + 25 ch-2 sps)
Fasten off B.
Rim (Colors A and B)
Round 19 (Color A): This is a conversion round. Join A in the top of any tr. Ch 1, 2 sc in same tr, [sc in next dc, 2 sc in next ch-2 sp] 5 times, sc in next dc, 2 sc in next tr. Repeat around, but leave out the last 2 sc. Join.
Count: 1 sc in each of the 35 sts (30 dc + 5 tr), plus 1 extra sc in each tr (5), plus 2 sc in each of the 25 ch-2 sps (50) = 90 sts. That is 18 sts per fan. This plum band outlines the tops of the fans and makes the rim flare.
Fasten off A.
Round 20 (Color B): Join B in the first sc of any fan repeat. Ch 1, sc in same st, sk 2 sts, 5 dc in next st, sk 2 sts, sc in next st. Repeat around, but end the last repeat after the second sk 2. Join. (15 sc + 75 dc = 90 sts, 15 scallops)
Each scallop uses 6 sts, and 90 / 6 = 15. That gives exactly 3 scallops above each fan.
Fasten off B.
Round 21 (Color A): This is a trim round. Join A in any sc. Sl st in sc, hdc in next dc, dc in next dc, (dc, ch 1, dc) in center dc, dc in next dc, hdc in next dc. Repeat around and join.
Count: 1 st in each of the 90 existing sts, plus 15 extra dc at the scallop tips, = 105 sts, plus 15 ch-1 sps.
Fasten off and weave in the ends. Check your first basket against the checkpoints, then make 2 more.
Back Panel (Color A)
Foundation: Ch 17.
Row 1: Sc in 2nd ch from hook and in each ch across. Turn. (16 sts)
Rows 2–72: Ch 1, sc in each st across. Turn. (16 sts each row)
Don’t fasten off. Keep the working loop for the border.
Checkpoint: 4 in (10.2 cm) x 16 in (40.6 cm). There are 72 rows, and 72 / 18 x 4 in = 16 in.
Hanging Tab (Color A)
Foundation: Ch 9.
Row 1: Sc in 2nd ch from hook and in each ch across. Turn. (8 sts)
Rows 2–27: Ch 1, sc in each st across. Turn. (8 sts each row)
The tab is 2 in (5.1 cm) wide x 6 in (15.2 cm) long. Fasten off and leave a 16 in (40.6 cm) tail for sewing.
Make All Pieces
- Baskets: 3, each using about 26 m of A and 12 m of B
- Back panel: 1, Color A only
- Hanging tab: 1, Color A only
Layout grid (front view, top to bottom):
        [ wooden ring ]
        [  tab loop   ]
+-----------------------+  panel top
|  Basket 3 (row 48)    |
|  Basket 2 (row 26)    |
|  Basket 1 (row 4)     |
+-----------------------+  panel bottom
Each row number marks where that basket’s base seam sits on the panel, counted from the foundation edge.
Border (Back Panel)
Border gauge: The border follows the main gauge. You work 4 sc per 1 in (2.5 cm) along the stitch edges and 8 sc per 9 row ends along the sides.
Round 1: With the working loop at the top edge, ch 1. Work 3 sc in the first st, sc in the next 14 sts, and 3 sc in the last st. Rotate and work 64 sc down the side, working 1 sc in each row end but skipping every 9th row end. Along the foundation edge, work 3 sc in the first ch, sc in the next 14 ch, and 3 sc in the last ch. Work 64 sc up the second side the same way. Join. (168 sts)
Counts per side, including both corner stitches:
– Top: 18 sts
– Bottom: 18 sts
– Each long side: 68 sts
Check: 4 corner sts + 2 x 16 short-side sts + 2 x 66 long-side sts = 168.
Round 2: Ch 1, rev sc in each st around. Don’t increase at the corners. Join. (168 sts)
Why the math works: The gauge ratio is 16 sts to 18 rows, which is 8 sts to 9 rows. Skipping every 9th row end puts 64 sc along 72 rows, so the sides stay the same length as the panel and won’t flare or pucker. The 3-sc corners turn the corners flat, and the crab stitch adds a corded edge with no extra stitches. The finished panel measures 4.75 in (12.1 cm) x 16.75 in (42.5 cm).
Joining
Method: Whipstitch with Color A and a tapestry needle.
- Lay the panel right side up. Place markers on panel rows 4, 26, and 48, counted from the foundation edge. Find each basket’s center back and place a marker in Round 11.
- Base seam: Flatten the back of the basket against the panel, with its Round 11 ridge on the marked panel row. Sew 14 basket stitches to panel stitches 2–15, matching one stitch to one stitch. This leaves 1 panel stitch free on each side, so the basket sits centered.
- Rim tacks: Count up 13 rows from the base seam. Tack the center back stitch of Round 19 to that row. Then tack the Round 19 stitches 7 sts to the left and 7 sts to the right of center. This keeps the flared rim upright and away from the panel.
- Repeat for all 3 baskets.
Tension: Pull each stitch snug, but not so tight that the panel puckers. The panel should still lie flat between the baskets.
Checkpoint: The top rim sits about 14.75 in (37.5 cm) above the panel’s bottom edge. That leaves about 2 in (5.1 cm) of panel above it.
Tab: Thread the tab through the ring and fold it in half. Lay both ends against the back of the panel top, overlapping it by 1.5 in (3.8 cm). Sew around all edges of the overlap through all layers. The loop rises about 1.5 in (3.8 cm) above the panel.
Final Blocking
- Weave in all remaining ends, keeping each color inside its own color area.
- Lightly spray the whole holder with water until it’s damp.
- Pin the panel flat at 4.75 in (12.1 cm) x 16.75 in (42.5 cm).
- Put a toilet roll, or a jar wrapped in a towel, in each basket so the cup keeps its round shape.
- Open each fan with your fingers and pin the 15 scallop tips on each rim outward.
- Let it dry completely, about 24 hours, before you hang it up.
Final Quality-Control Checklist
- Each basket has 60 sts at the base, 90 sts at Round 19, and 105 sts at Round 21.
- Each basket has 5 even fans, with 3 scallops over each one.
- The panel is 4.75 in (12.1 cm) x 16.75 in (42.5 cm) after the border.
- The border has 168 sts, and the corners lie flat.
- The baskets are centered and evenly spaced at rows 4, 26, and 48.
- The tab is sewn securely, and the ring sits centered.
- All ends are woven in and nothing shows on the front.
Troubleshooting
- The base cups or ruffles: Your tension changed. Re-check the increase spacing, or try a hook 0.25 mm smaller or larger.
- The fans lean: You missed a skip in Round 17. Count 5 sts between each sc and fan.
- The scallops don’t line up over the fans: Round 19 should have 90 sts. Recount the 2-sc in each tr.
- The panel sides ripple: You have too many border sts. Keep skipping every 9th row end.
- The baskets droop forward: Add 2 more rim tacks.
- The roll won’t fit: Your gauge is too tight. Remake with a larger hook.
Care
Hand wash in cool water with mild soap. Press out the water in a towel, then reshape and dry flat with the baskets filled to keep their shape.
Final Notes
Each measurement depends on the one before it. A gauge of 16 sc x 18 rows = 4 in (10.2 cm) gives a 60-stitch base that fits a standard roll. Five 12-stitch fan repeats open into a 90-stitch rim with 15 scallops. The 16 x 72 panel measures 4 in (10.2 cm) x 16 in (40.6 cm), and the 168-stitch border brings it to 4.75 in (12.1 cm) x 16.75 in (42.5 cm). With the tab loop added, the holder is 18.25 in (46.4 cm) tall. Check your gauge first and keep your counts steady, and the three baskets will stack neatly.
Happy crocheting!