

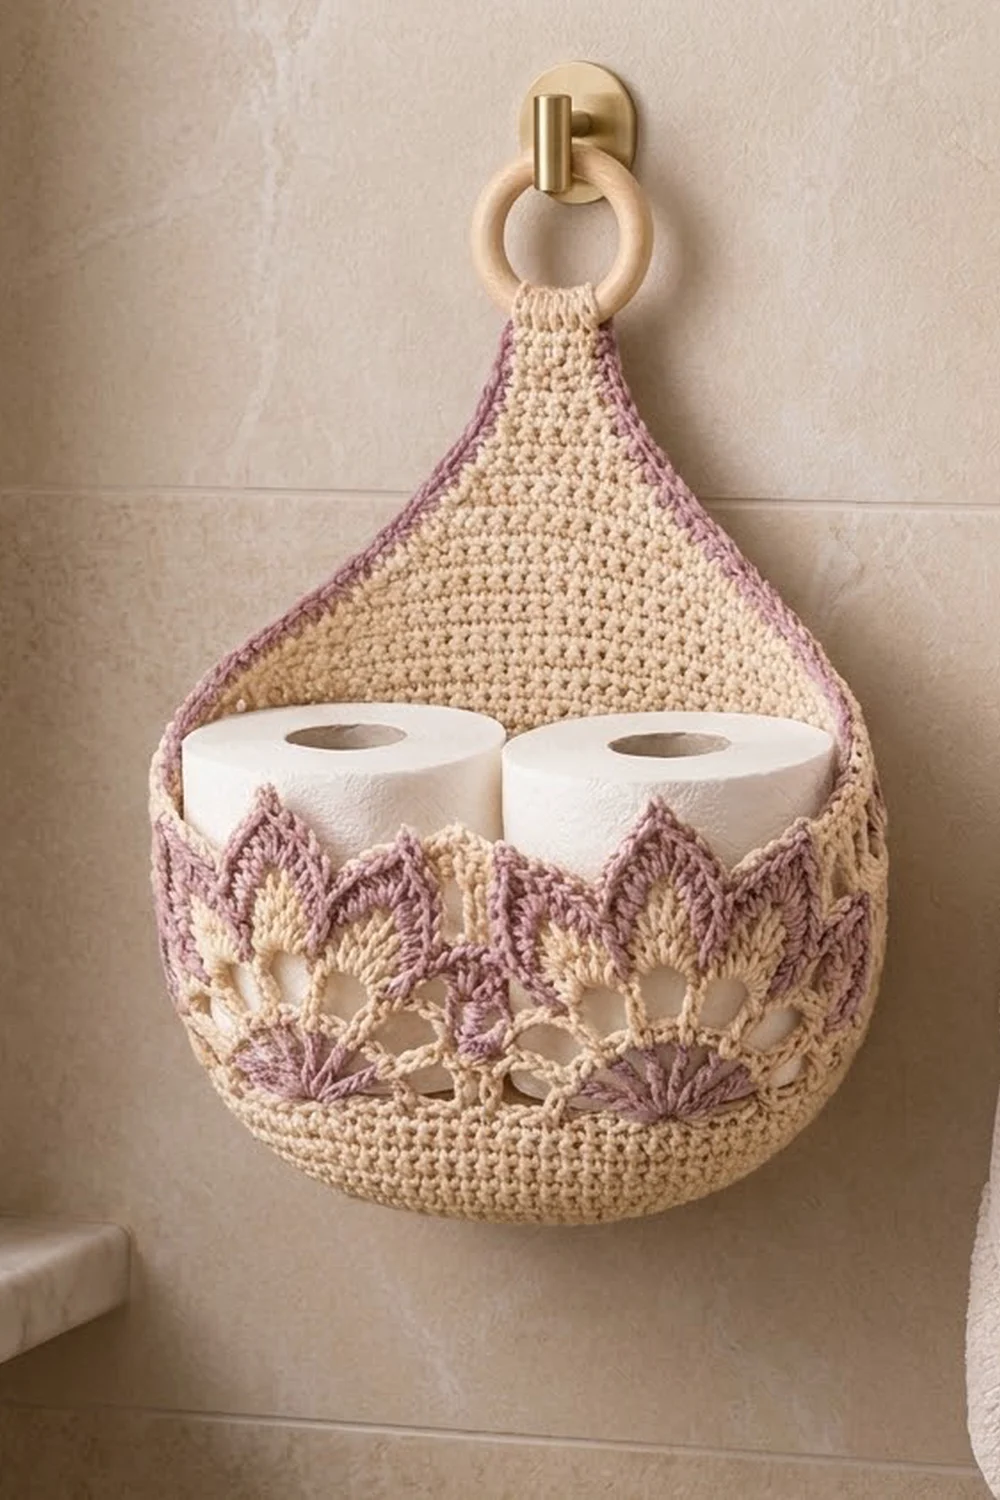
This hanging holder keeps two spare rolls on the wall in a lacy pocket. A solid cream back panel narrows into a teardrop top, with a strap that wraps around a wooden ring. A rounded pocket sits low on the panel, topped with lotus fans: mauve shells, cream openwork arches, and pointed petals outlined in mauve.
You need two colors of worsted-weight cotton, cream and dusty mauve. The look is romantic and vintage. Everything below the lace is plain single crochet, so the holder is strong enough for two standard rolls.
The pattern uses US crochet terms. The finished back panel is 10.5 in (26.7 cm) wide and 10.25 in (26.0 cm) tall. From the bottom edge to the top of the ring it measures about 14 in (35.6 cm). The pocket base is 9 in (22.9 cm) by 4.5 in (11.4 cm), and the pocket is about 4 in (10.2 cm) tall to the petal tips.
The back panel is worked flat in rows from the bottom up. The pocket is worked in joined rounds: it starts as an oval base, turns upward at a back-loop ridge, and ends with five lace rounds. You then sew the two parts together, add the ring, and work a mauve edging.
Finished Size and Construction
- Finished size: panel 10.5 x 10.25 in (26.7 x 26.0 cm); about 14 in (35.6 cm) tall including ring
- Skill level: Intermediate
- Terminology: US
- Yarn weight: worsted (#4) cotton
- Hook: 4.0 mm (G-6)
- Number of pieces: 2 crocheted parts (back panel, pocket) plus 1 wooden ring
- Layout: pocket centered on the lower half of the panel, ring at the top
- Piece sizes: panel 10 x 10 in (25.4 x 25.4 cm) before edging; pocket base 9 x 4.5 in (22.9 x 11.4 cm), walls 4 in (10.2 cm) tall
- Size before border: 10 x 10 in (25.4 x 25.4 cm)
- Border depth: 0.25 in (0.6 cm), one row of mauve sc
Materials
Use a smooth combed or mercerized worsted cotton with about 85 m per 50 g. Cotton holds its shape well in a humid bathroom.
- Cream (main color): 140 g / 238 m
- Dusty mauve (contrast): 40 g / 68 m
Tools:
- 4.0 mm (G-6) crochet hook
- 1 wooden ring, 2.5 in (6.4 cm) outer diameter
- Tapestry needle
- 4 locking stitch markers
- Scissors and tape measure
- Rust-proof pins and a spray bottle
These amounts include about 25 percent extra to allow for differences in gauge.
Abbreviations (US Terms)
- ch chain
- sl st slip stitch
- sc single crochet
- hdc half double crochet
- dc double crochet
- tr treble crochet
- sc2tog single crochet 2 together
- BLO back loop only
- st(s) stitch(es); sp(s) space(s); lp(s) loop(s)
- rep repeat; RS right side; WS wrong side
Special stitches:
- Shell: 7 dc in the same st.
- Petal: (hdc, dc, tr, dc, hdc) in the same ch-4 lp.
- Point: (2 tr, ch 2, 2 tr) in the same st.
Gauge and Checkpoints
Gauge: 16 sc and 18 rows = 4 in (10.2 cm). Each sc row or round is about 0.22 in tall.
Make the pocket first and use it as your test piece. Its base will show you quickly whether your gauge is right.
- Pocket base after Rnd 10: about 9 x 4.5 in (22.9 x 11.4 cm).
- Walls after Rnd 16: about 1.3 in (3.3 cm) above the ridge.
- Pocket after Rnd 21: about 4 in (10.2 cm) tall to the tips. The lace band alone is about 2.7 in (6.9 cm).
- Panel after Row 6: 10 in (25.4 cm) wide.
- Panel after Row 45: 10 in (25.4 cm) tall.
If the base comes out more than 0.5 in (1.3 cm) too big, use a 3.5 mm hook. If it is more than 0.5 in (1.3 cm) too small, use a 4.5 mm hook. Use the same hook for both parts so the stitches line up when you sew them together.
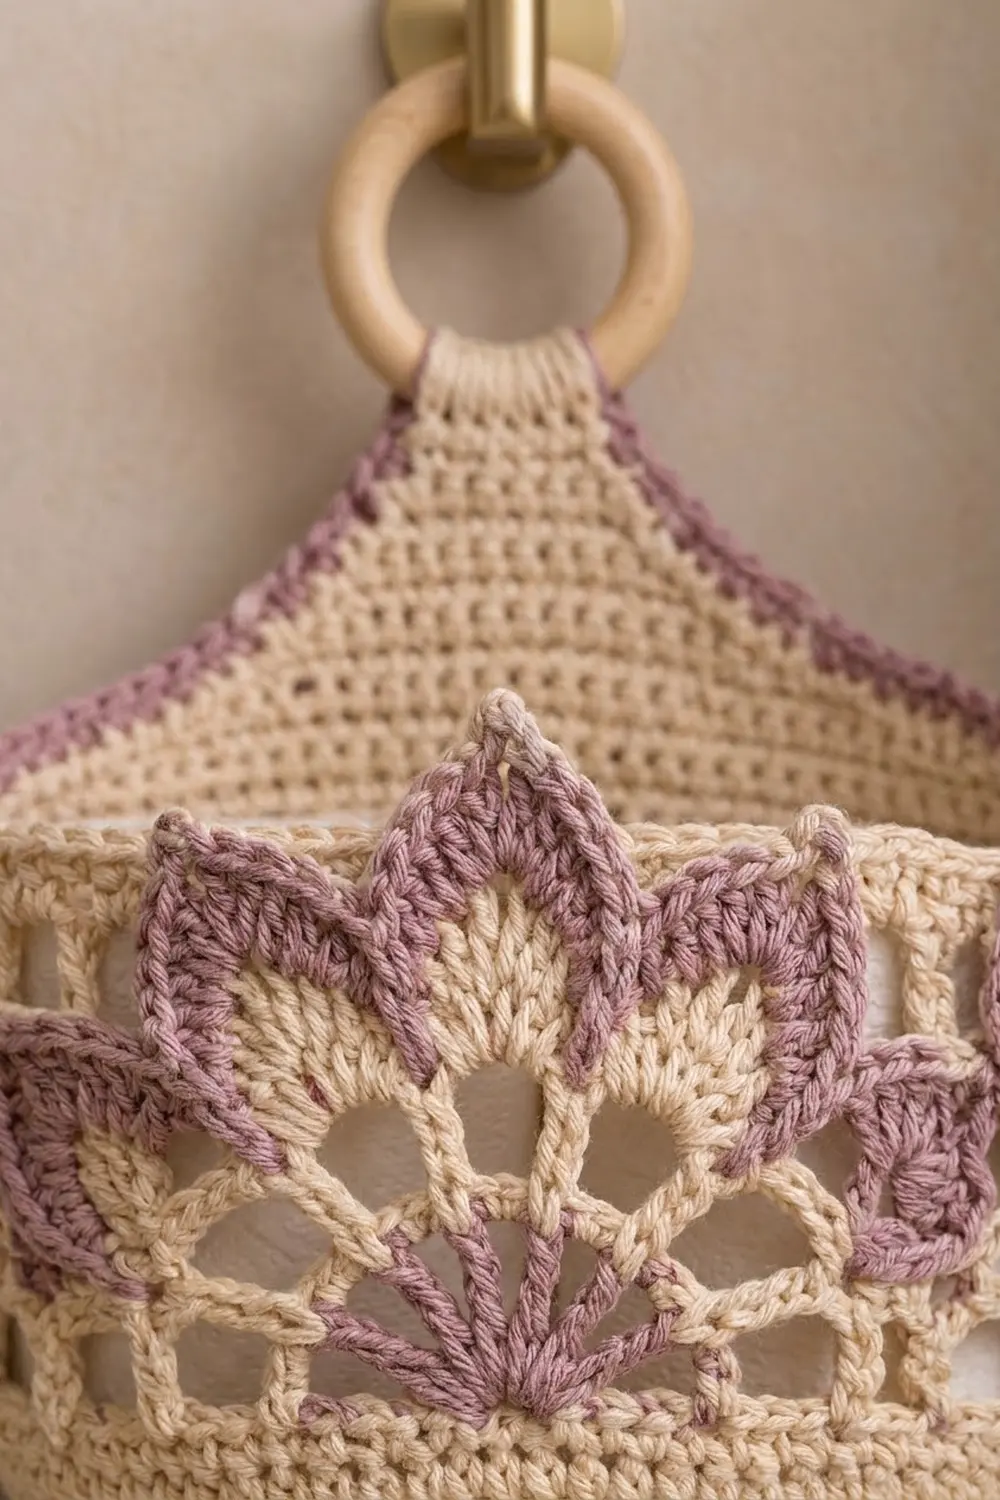
The base is a flat oval with two straight sides of 18 sts. Every round adds 3 increases at each curved end, for 6 increases per round.
With cream, ch 21.
Rnd 1: Sc in 2nd ch from hook and in next 18 ch, 3 sc in last ch. Working along the opposite side of the foundation ch, sc in next 18 ch, 2 sc in last ch (the same ch as the first sc); join with sl st in first sc. (42 sts)
Rnds 2–10: Ch 1, sc in next (R − 2) sts, 2 sc in next st, sc in next 18 sts, [sc in next (R − 2) sts, 2 sc in next st] 3 times, sc in next 18 sts, [sc in next (R − 2) sts, 2 sc in next st] 2 times; join with sl st in first sc.
R is the round number. In Rnd 2, (R − 2) is 0, so you work only the increases.
Stitch count for each round is 36 + 6 x R:
- Rnd 2: 48
- Rnd 3: 54
- Rnd 4: 60
- Rnd 5: 66
- Rnd 6: 72
- Rnd 7: 78
- Rnd 8: 84
- Rnd 9: 90
- Rnd 10: 96
Now check the base against checkpoint 1.
Rnd 11 (turning ridge): Ch 1, sc in BLO of each st around; join. (96)
Rnds 12–16: Ch 1, sc in each st around; join. (96) Fasten off cream.
Number the Rnd 16 sts from the first st after the join. Sts 11–28 form one straight side, and sts 59–76 form the other. Place a marker in st 8.
Rnd 17 (mauve shells): Join mauve with sl st in marked st 8. Ch 1, sc in same st, sk 3 sts, shell in next st, sk 3 sts, sc in next st, ch 6, sk 7 sts, sc in next st, sk 3 sts, shell in next st, sk 3 sts, sc in next st, ch 6, sk 7 sts; rep from * 4 more times; join with sl st in first sc. Fasten off. (6 shells: 42 dc, 12 sc, 6 ch-6 sps)*
Each repeat uses 16 sts, and 6 x 16 = 96. Starting at st 8 puts a ch-6 sp at the center of each straight side. That gives two full fans on each side, with half fans wrapping around the ends.
Rnd 18 (cream fans): Join cream with sl st in first dc of any shell. Ch 4 (counts as dc and ch 1), [dc in next dc, ch 1] 5 times, dc in last dc of shell, ch 3, sc in next ch-6 sp, ch 3, dc in first dc of next shell, [ch 1, dc in next dc] 6 times, ch 3, sc in next ch-6 sp, ch 3; rep from * 4 more times; join with sl st in 3rd ch of beg ch-4. (42 dc, 36 ch-1 sps, 6 sc, 12 ch-3 sps)*
Rnd 19 (arches): Sl st in next ch-1 sp, ch 1, sc in same sp, [ch 4, sc in next ch-1 sp] 5 times, ch 2, dc in next sc, ch 2, sc in next ch-1 sp, [ch 4, sc in next ch-1 sp] 5 times, ch 2, dc in next sc, ch 2; rep from * 4 more times; join with sl st in first sc. (36 sc, 30 ch-4 lps, 6 dc, 12 ch-2 sps)*
Rnd 20 (petals): Sl st in next ch-4 lp, ch 2 (counts as hdc), (dc, tr, dc, hdc) in same lp, [petal in next ch-4 lp] 4 times, sk ch-2 sp, point in next dc, sk ch-2 sp, [petal in next ch-4 lp] 5 times, sk ch-2 sp, point in next dc, sk ch-2 sp; rep from * 4 more times; join with sl st in top of beg ch-2. Fasten off. (30 petals and 6 points: 150 petal sts + 24 tr = 174 sts, plus 6 ch-2 sps)*
Rnd 21 (mauve outline): Join mauve with sl st in first hdc of any group of 5 petals. Ch 1, [sc in hdc, sc in dc, (sc, ch 2, sc) in tr, sc in dc, sc in hdc] 5 times, sc in each of next 2 tr, (sc, ch 3, sc) in ch-2 sp, sc in each of next 2 tr; rep from * 5 more times; join with sl st in first sc. Fasten off. (216 sc, 30 ch-2 tips, 6 ch-3 tips; 36 sc per repeat x 6)*
Back Panel
With cream, ch 31.
Row 1 (RS): Sc in 2nd ch from hook and in each ch across; turn. (30)
Row 2: Ch 1, 2 sc in first st, sc in next 28 sts, 2 sc in last st; turn. (32)
Rows 3–6: Ch 1, 2 sc in first st, sc in each st to last st, 2 sc in last st; turn. Row 3: 34, Row 4: 36, Row 5: 38, Row 6: 40. Check checkpoint 4.
Rows 7–24: Ch 1, sc in each st across; turn. (40) The panel is now about 5.3 in (13.5 cm) tall.
Row 25: Ch 1, sc2tog, sc in each st to last 2 sts, sc2tog; turn. (38)
Row 26: Ch 1, sc in each st across; turn. (38)
Rows 27–32: Rep Rows 25–26 three more times. Row 28: 36, Row 30: 34, Row 32: 32.
Rows 33–45: Ch 1, sc2tog, sc in each st to last 2 sts, sc2tog; turn. Each row is 2 sts shorter than the last: Row 33: 30, Row 34: 28, and so on to Row 45: 6.
Rows 25–32 decrease slowly to round the shoulders. Rows 33–45 decrease every row to form the teardrop top. Check checkpoint 5.
Rows 46–61 (strap): Ch 1, sc in each st across; turn. (6) The strap is 1.5 in (3.8 cm) wide and about 3.5 in (8.9 cm) long. Fasten off, leaving a 12 in (30.5 cm) tail.
Make All Pieces
- Cream: 1 back panel; pocket Rnds 1–16 and 18–20
- Mauve: pocket Rnds 17 and 21; panel edging
Layout, front view:
        ( ring )
          |  |        strap
         /    \       teardrop
        |^^^^^^|      petal tips
        | lace |      pocket
        |______|      Rnd 16 sewn to Row 9
         \____/       ridge sewn to Row 3
Joining
Pocket to panel. Choose either straight side of the pocket to be the back. You will sew 24 sts on that side: its 18 straight sts plus 3 sts at each curved end (sts 8–31 on side 1).
- Mark the center 24 sts of panel Row 3 (sts 6–29 of 34) and the center 24 sts of Row 9 (sts 9–32 of 40).
- With cream, whipstitch the 24 unused front loops of Rnd 10, just below the ridge, to the marked sts of Row 3, one stitch to one stitch.
- Whipstitch the same 24 sts of Rnd 16 to the marked sts of Row 9, one stitch to one stitch.
- Tack the three ch-3 point tips on the back of the pocket to the panel.
Joining 24 sts to 24 sts keeps the panel flat. Pull each stitch snug but not tight; if the panel puckers, you are sewing too firmly. The curved ends of the pocket stay unattached and bow forward to make the bowl shape.
Ring. Fold the strap over the ring toward the WS so Row 61 meets Row 46. Use the tail to whipstitch the two rows together across all 6 sts.
Size checkpoint: The pocket base should sit about 0.5 in (1.3 cm) above the panel’s bottom edge. The strap loop should be about 1.8 in (4.6 cm) long.
Border
Border gauge: 4 sc per inch along stitch edges. Along row edges, work 1 sc per row end (rows are 4.5 per inch).
Edging row (mauve): With RS facing, join mauve in the right-hand row end of Row 45, at the base of the strap.
- Right side: Ch 1, 1 sc in each row end from Row 45 down to Row 2. (44 sc)
- Bottom: 3 sc in first foundation st, sc in next 28 sts, 3 sc in last foundation st. (30 worked 1 per st + 4 extra = 34 sc)
- Left side: 1 sc in each row end from Row 2 up to Row 45. (44 sc)
Fasten off. Total: 44 + 34 + 44 = 122 sc. Leave the strap edges cream.
Why the math works: Each side has 45 row ends. The 3-sc corner covers Row 1’s end, so 44 sc remain on each side. The bottom works each of the 30 foundation sts once, plus 2 extra sts at each corner to turn the curve. The edging adds 0.25 in (0.6 cm) at each edge. That brings the panel from 10 x 10 in (25.4 x 25.4 cm) to 10.5 x 10.25 in (26.7 x 26.0 cm).
Final Blocking
- Soak the holder in cool water for 10 minutes, then roll it in a towel to press out the water. Do not wring.
- Lay the panel flat and pin the sides straight, 10.5 in (26.7 cm) apart.
- Fill the pocket with two rolls wrapped in plastic bags, or with a rolled towel of the same size.
- Pin each petal tip and point tip upward and outward.
- Mist the strap and smooth the teardrop curve.
- Let it dry completely, about 24 hours, before removing the pins.
Final Quality-Control Checklist
- Rnd 10 has 96 sts, and the base is about 9 x 4.5 in (22.9 x 11.4 cm).
- Rnd 17 has 6 evenly spaced shells.
- Rnd 21 has 216 sc, 30 ch-2 tips, and 6 ch-3 tips.
- Each straight side of the pocket shows two full fans.
- Panel Rows 6–24 have 40 sts, and Row 45 has 6.
- Both seam lines join 24 sts to 24 sts with no puckers.
- The edging totals 122 sc, and the panel is 10.5 x 10.25 in (26.7 x 26.0 cm).
- All tails are woven in for at least 2 in (5.1 cm).
Troubleshooting
- Base cups upward: The increases are too tight. Use a hook 0.5 mm larger for Rnds 1–10, or work the increases more loosely.
- Base ruffles: There are extra sts. Each end should gain exactly 3 sts per round.
- Fans are off-center: Rnd 17 was started in the wrong st. Rejoin at st 8.
- Petals curl inward: Block over the rolled towel with the tips pinned outward.
- Edging ripples on the teardrop: Work more loosely, or skip 1 row end in every 4 along Rows 33–45.
- Panel sags: Tighten the Row 9 seam, or work the panel with a hook 0.5 mm smaller.
Care
Hand wash in cool water with mild soap, reshape with the rolls inside, and dry flat. Don’t put it in the dryer, which can shrink cotton and flatten the petals.
Final Notes
All the measurements come from one gauge: 16 sc and 18 rows to 4 in (10.2 cm). At this gauge, the pocket base has 96 sts and measures 9 x 4.5 in (22.9 x 11.4 cm). The 96 sts divide into six 16-st lotus repeats, finished with 216 mauve sc. The same gauge gives a 10 x 10 in (25.4 x 25.4 cm) panel. Sewing 24 sts to 24 sts keeps the panel flat, and the 122-sc edging brings it to 10.5 x 10.25 in (26.7 x 26.0 cm).
Happy crocheting!