

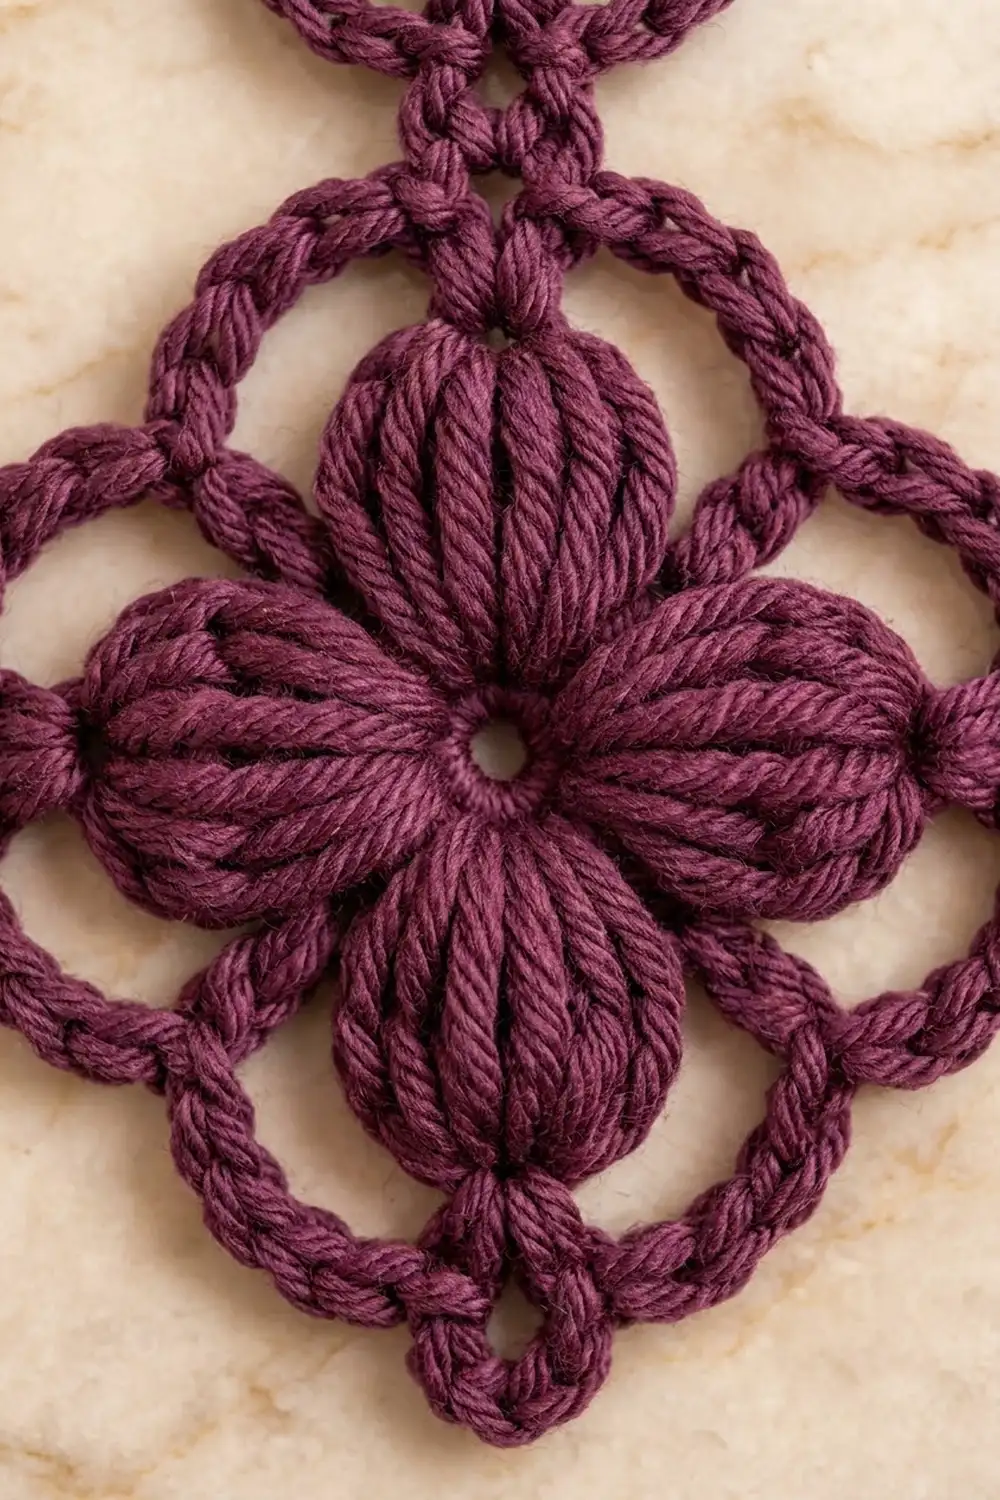
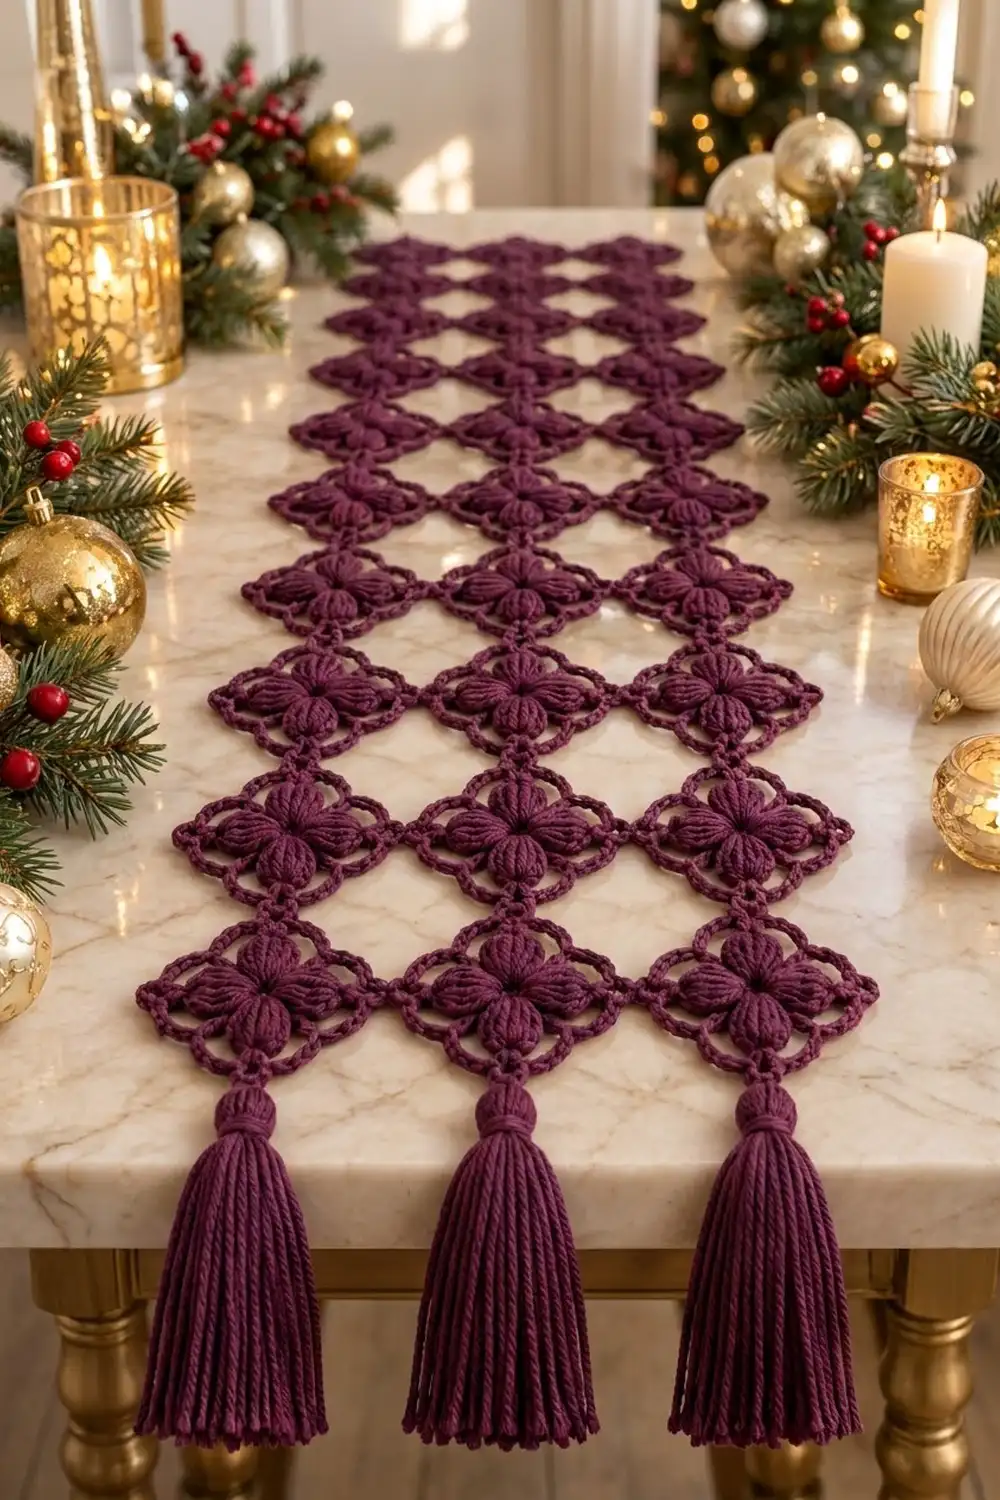
The Plum Blossom Lattice Table Runner is an open, lacy runner made of on-point puff flower motifs. Each motif has four plump puff petals around a small open center, framed by a ring of chain arcs and finished with a scalloped chain edge. Neighboring motifs meet tip to tip, which leaves a row of open diamonds between them and gives the whole runner a light lattice look.
The sample uses one deep plum color. A single dark shade keeps the focus on the texture: the puffs catch the light, and the chain lattice reads like lace on the table. Three full tassels finish one end and give the runner a little weight.
This pattern uses US crochet terms. The finished runner is 15 in (38.1 cm) wide and 50 in (127.0 cm) long without the tassels, and 55 in (139.7 cm) long with them.
You’ll make 30 motifs in four rounds each. The first motif is finished on its own, and every motif after that joins to its neighbors on the last round (join-as-you-go). No sewing or border rounds are needed. Tassels go on last.
Finished Size and Construction
- Finished size: 15 in x 50 in (38.1 cm x 127.0 cm), plus 5 in (12.7 cm) tassels
- Skill level: Easy-intermediate
- Terminology: US crochet terms
- Yarn weight: Worsted (#4)
- Hook: 5.0 mm (H-8)
- Number of pieces: 30 identical motifs, plus 3 tassels
- Layout: 3 motifs wide x 10 motifs long, set on point
- Piece size: 5 in (12.7 cm) from tip to tip, with 3.5 in (8.9 cm) sides
- Size before border: 15 in x 50 in (38.1 cm x 127.0 cm)
- Border depth: 0 in (0 cm). The scalloped edges of the motifs are the finished edge.
Materials
Yarn: Use a smooth worsted-weight cotton or cotton-blend yarn. A tightly plied yarn shows the puff stitches clearly and won’t split when you pull up the long loops. Avoid fuzzy yarns, because they blur the lattice.
- Plum: 260 g, about 455 m (498 yd). That’s about 6 g / 12 m per motif, plus 15 g / 26 m per tassel.
The quantities include a margin of about 15% for swatching, weaving in ends and trimming tassels.
Tools:
– 5.0 mm (H-8) crochet hook
– Tapestry needle
– Scissors
– Stiff card 6 in (15.2 cm) tall, for the tassels
– Blocking mats and rustproof pins
– Spray bottle
– Measuring tape
Abbreviations (US Terms)
- ch – chain
- sl st – slip stitch
- sc – single crochet
- sk – skip
- sp(s) – space(s)
- st(s) – stitch(es)
- MR – magic ring
- Lg Puff – large puff stitch (see below)
Large Puff Stitch (Lg Puff): (Yo, insert hook in the stitch, yo and pull up a loop to about 0.75 in / 1.9 cm tall) 5 times. You now have 11 loops on the hook. Yo and pull through all 11 loops, then ch 1 tightly to close. The closing ch-1 does not count as a stitch, but you’ll work into it on Round 3. Pulling every loop up to the same height gives the smooth, striped petals shown in the photo.
Gauge and Checkpoints
Make one complete motif before anything else and block it lightly. Gauge here is measured per motif, not over a stitch swatch.
Checkpoints:
– After Round 1: the ring is 1 in (2.5 cm) across.
– After Round 2: 2.75 in (7.0 cm) from puff tip to puff tip.
– After Round 3: 4 in (10.2 cm) from tip to tip.
– After Round 4: 5 in (12.7 cm) from tip to tip, with 3.5 in (8.9 cm) sides.
Motif too big? Go down to a 4.5 mm (7) hook, or pull the puff loops up a little shorter. If it’s 0.25 in (0.6 cm) too big per motif, the runner ends up 2.5 in (6.4 cm) too long.
Motif too small? Go up to a 5.5 mm (I-9) hook. Keep the chain arcs loose. Tight chains are the most common reason a motif comes out small.
Motif Pattern
Make one motif exactly as written. Motifs 2–30 follow the same steps, then join on Round 4 (see Joining).
Round 1: Make a MR, ch 1, work 8 sc in the ring, then sl st to the first sc. Pull the ring nearly closed but leave a small hole in the center. (8 sc)
Round 2: Ch 2 (does not count as a stitch). Lg Puff in the same st, ch 3, sk next sc. [Lg Puff in next sc, ch 3, sk next sc] 3 times. Sl st to the top of the first puff, not the ch-2. (4 puffs, 4 ch-3 sps)
The four puffs are the petals. Each one points toward a future tip of the diamond.
Round 3 (first frame): Sl st into the closing ch-1 of the first puff. Ch 1. [(Sc, ch 3, sc) in the closing ch-1 of the puff, ch 6, sc in the next ch-3 sp, ch 6] 4 times. Sl st to the first sc. (12 sc, 4 ch-3 corner sps, 8 ch-6 sps)
Each repeat is 3 sc: the 2 corner sc plus 1 sc in the ch-3 space, for 3 x 4 = 12 sc. The ch-3 corners sit right on top of the petals, so the petals point into the tips.
Round 4 (scalloped edge), Motif 1 only: Sl st into the next ch-3 corner sp. Ch 1. [(Sc, ch 5, sc) in the corner ch-3 sp, ch 4, sc in the next ch-6 sp, ch 4, sc in the next ch-6 sp, ch 4] 4 times. Sl st to the first sc and fasten off. (16 sc, 4 ch-5 tip loops, 12 ch-4 arcs)
Count per side: Each side runs from one tip to the next: 1 corner sc, ch 4, sc, ch 4, sc, ch 4, 1 corner sc. That’s 4 sc and 3 ch-4 arcs per side, and the 4 sc include that side’s 2 corner sc. Each tip holds 2 corner sc, one for each side it touches. So 4 sides x 4 sc = 16 sc, with nothing counted twice.
The ch-5 tip loops are the joining points. The ch-4 arcs make the small scallops along each side.
Make All Pieces
Make 30 plum motifs in total. Finish Motif 1 completely. Work Rounds 1–3 of every other motif as written, then join it on Round 4 as you go.
Layout grid (3 wide x 10 long, every motif on point):
Row 1:   ◇  ◇  ◇
Row 2:   ◇  ◇  ◇
Row 3:   ◇  ◇  ◇
Row 4:   ◇  ◇  ◇
Row 5:   ◇  ◇  ◇
Row 6:   ◇  ◇  ◇
Row 7:   ◇  ◇  ◇
Row 8:   ◇  ◇  ◇
Row 9:   ◇  ◇  ◇
Row 10:  ◇  ◇  ◇
          T  T  T   (tassels on the bottom tips of Row 10)
Work across each row from left to right, starting with Row 1.
Joining
Method: Join as you go at the ch-5 tip loops only. Every tip touches at most one neighbor: the left and right tips join to motifs beside it, and the top and bottom tips join to motifs above and below. The sides never join, which is what leaves the open diamonds.
How to join a tip: On Round 4, when you reach a corner that needs to join, work the first sc in the corner ch-3 sp. Then ch 2, sl st into the matching ch-5 tip loop of the finished neighbor, ch 2, and work the second sc in the same corner ch-3 sp. The 2 ch + 1 sl st + 2 ch take the place of the ch 5, so the tip stays the same size and the motif keeps its 16 sc and 12 ch-4 arcs.
Which tips to join:
– Row 1: Motif 1 has no joins. Join Motif 2’s left tip to Motif 1’s right tip, and Motif 3’s left tip to Motif 2’s right tip.
– Rows 2–10: The first motif in the row joins only its top tip. The second and third motifs join their top tip and their left tip.
Total joins: 2 side-to-side joins per row x 10 rows = 20, plus 3 top-to-bottom joins x 9 row gaps = 27, for 47 joins in all.
Tension: Make the sl st snug but don’t pull it tight. If the joining chains are too tight, the tips bunch up and the diamonds between motifs close up.
Size checkpoint: A finished row of 3 motifs should measure 15 in (38.1 cm) from tip to tip, and 2 rows should measure 10 in (25.4 cm) long. Check after Row 2 and again after Row 5. The full runner should be 15 in x 50 in (38.1 cm x 127.0 cm).
Border
This runner has no added border rounds, and that’s on purpose. As the photo shows, the edge is the scalloped Round 4 edge of the outer motifs. A straight border would need filler triangles in every notch along the edge, which would hide the zigzag outline.
Edge gauge: Each motif side is 3.5 in (8.9 cm) long and has 3 ch-4 arcs, so there’s about 1 arc for every 1.2 in (3.0 cm).
Long edge, each side: Each of the 10 motifs along the edge shows 1 free ch-5 tip loop and its 2 outward-facing sides of 3 ch-4 arcs each. That’s 10 tip loops and 10 x 2 x 3 = 60 ch-4 arcs per long side.
Short end: The 3 end motifs each have 1 free bottom ch-5 tip loop, and the tassels hang from those 3 loops. Motif 1, Motif 2 and Motif 3 each have a free top tip loop at the top end.
Why the math works: Each long-edge motif adds exactly 5 in (12.7 cm) of length. The joins sit inside the tip loops and the motif count is unchanged, so 10 motifs x 5 in = 50 in (127.0 cm). In the same way, 3 x 5 in = 15 in (38.1 cm) of width.
Tassels (make 3): Wrap yarn 30 times around the 6 in (15.2 cm) card. Slide a 10 in (25.4 cm) tie strand under the wraps at the top and knot it tight. Cut the loops at the bottom. Wrap a second strand 6 times around the bundle 0.75 in (1.9 cm) below the top, knot it, and bury the ends inside the tassel. Trim to 5 in (12.7 cm). Use the top tie to tie each tassel firmly to the bottom ch-5 tip loop of one Row 10 motif.
Final Blocking
- Weave in all ends before blocking. Weave along the chain arcs so the tails don’t show.
- Lay the runner on blocking mats and mark a guide 15 in x 50 in (38.1 cm x 127.0 cm).
- Mist the runner evenly until it’s damp but not soaked.
- Pin every ch-5 tip loop to a 5 in (12.7 cm) grid, so the tips line up in straight rows and columns.
- Gently open each diamond-shaped gap with your fingers.
- Pat the puffs so they stand rounded. Don’t flatten them.
- Let it dry completely, then unpin.
- Steam the tassels lightly, comb them straight and trim them evenly to 5 in (12.7 cm).
Final Quality-Control Checklist
- 30 motifs, 3 wide x 10 long
- Each motif has 4 puffs, 12 sc on Round 3 and 16 sc on Round 4
- Every side has 3 ch-4 arcs
- 47 joins, and no sides joined by mistake
- All open diamonds are the same size
- Runner measures 15 in x 50 in (38.1 cm x 127.0 cm)
- 3 tassels, each 5 in (12.7 cm), tied firmly to the bottom tips
- All ends woven in and invisible
Troubleshooting
Puffs look lumpy or uneven: Pull up all 5 loops to the same height before you yo, and close each puff firmly with the ch-1.
Center hole is too big: Pull the magic ring tighter before you join Round 1, and stitch over the tail.
Motif curls or cups: The chains are too tight. Loosen the chain arcs or go up 0.5 mm.
Motif ruffles: The chains are too loose. Go down a hook size for Rounds 3–4.
Tips bunch at the joins: Make the joining sl st a little looser and keep both 2-ch segments the same size.
Runner is skewed: Check that each top join goes into the bottom tip of the motif directly above, not one column over.
Tassels look thin: Wrap 35 times instead of 30. Add about 3 g per tassel.
Care
Hand wash in cool water with mild soap, press out the water in a towel, and dry flat. Re-pin the tips while damp if needed.
Final Notes
The size of the whole runner depends on getting each motif right. Round 1 should be 1 in (2.5 cm), Round 2 2.75 in (7.0 cm), Round 3 4 in (10.2 cm) and Round 4 5 in (12.7 cm) from tip to tip. Joining 3 motifs across gives 15 in (38.1 cm) of width. Ten rows give 50 in (127.0 cm) of length, and the tassels bring the total to 55 in (139.7 cm). Check each step and the runner will come out straight, open and even.
Happy crocheting!