

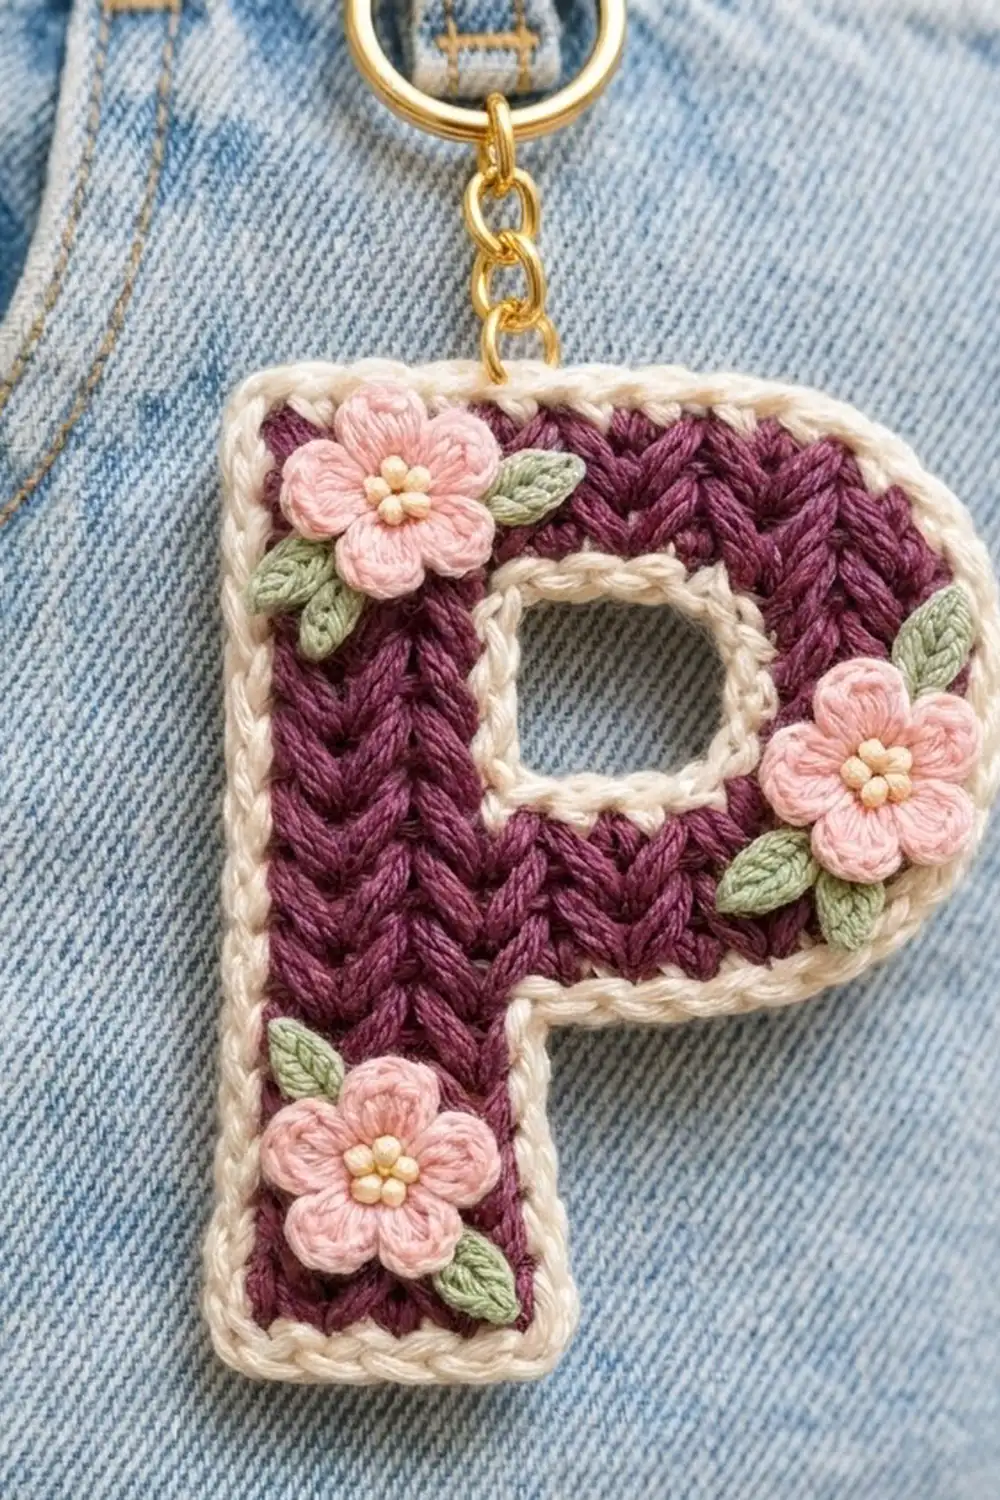
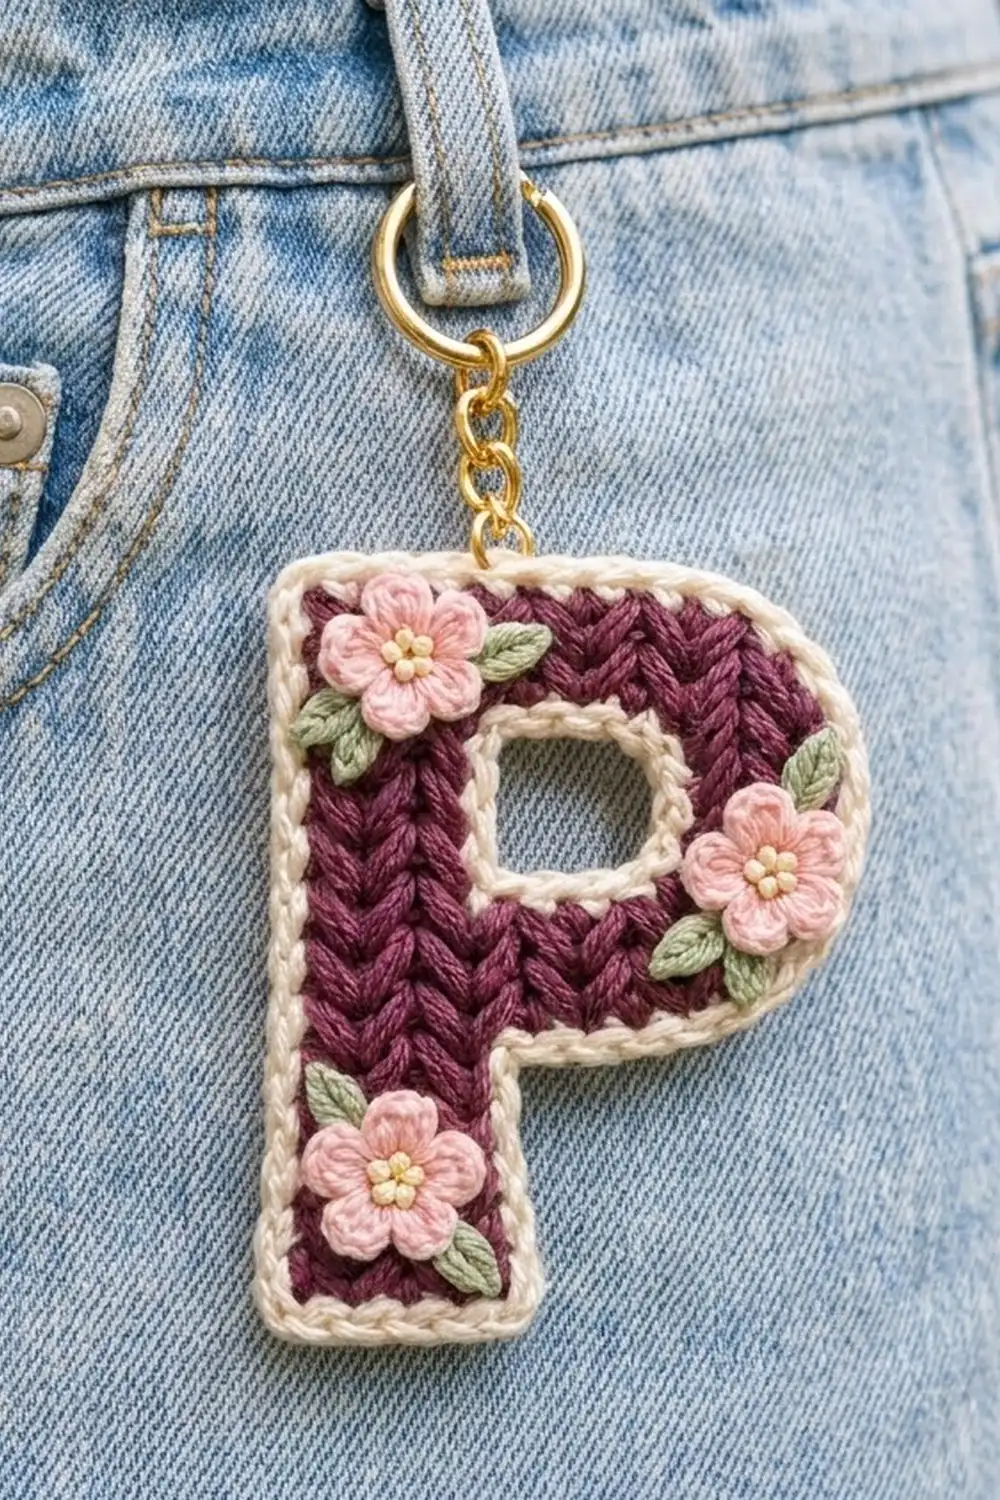
This little keychain is a bold capital “P” in deep plum. It’s worked in a knit-look texture that forms neat vertical V-columns. A cream rope-style edge frames the outside of the letter, and a single cream round outlines the hole, so the shape stays clear even from a distance.
Three tiny pink five-petal flowers with pale yellow knot centers and sage-green leaves are sewn onto the front. They soften the graphic letter and make it a sweet gift for anyone whose name starts with P. A gold key ring and short chain finish it off for keys, bags, or a belt loop.
The pattern uses US crochet terms. The finished keychain measures 3.1 in wide by 4.0 in tall (7.9 cm by 10.2 cm), not counting the hardware.
Construction is simple and flat. You work the letter in rows from the bottom of the stem up. Each textured right-side row is followed by a plain single crochet row. A chain extension adds the bowl, two short columns form the hole, and a joining row closes the top. Then you add the cream border, the hole trim, the flowers, and the hardware.
Finished Size and Construction
- Finished size: 3.1 in wide x 4.0 in tall (7.9 cm x 10.2 cm)
- Skill level: Intermediate
- Terminology: US crochet terms
- Yarn weight: DK (light #3) cotton for the letter; fingering (super fine #1) cotton for flowers and leaves
- Hooks: 3.5 mm (E-4) for the letter and border; 2.25 mm (B-1) for the appliqués
- Number of pieces: 1 letter, plus 3 flowers and 6 leaves sewn on
- Layout: single standalone letter, no joining
- Letter size before border: 2.6 in x 3.5 in (6.6 cm x 8.9 cm), 13 sts wide x 21 rows tall
- Border depth: 0.25 in (0.6 cm) on every outer side
Materials
Choose a smooth, mercerized or combed cotton. It shows the V-columns crisply, holds its shape on a keychain, and doesn’t fuzz with handling.
- Plum DK cotton (MC): 10 g, about 22 m
- Cream DK cotton (CC): 5 g, about 11 m
- Light pink fingering cotton: 3 g, about 10 m
- Sage green fingering cotton: 2 g, about 7 m
- Pale yellow embroidery floss or fingering cotton: about 1 m
The quantities include a generous margin for gauge checks and tails.
Tools:
- 3.5 mm (E-4) and 2.25 mm (B-1) crochet hooks
- Tapestry needle and a sharp embroidery needle
- Gold split key ring, 1 in (2.5 cm), with a short attached chain
- One 8 mm gold jump ring
- Two pairs of flat-nose pliers
- 2 locking stitch markers
- Rustproof pins, foam blocking mat, spray bottle
Abbreviations (US Terms)
- ch – chain
- sl st – slip stitch
- sc – single crochet
- hdc – half double crochet
- dc – double crochet
- sc2tog – single crochet 2 together
- rev sc – reverse single crochet (crab stitch)
- st(s) – stitch(es)
- RS / WS – right side / wrong side
- MC / CC – main color / contrast color
Special stitch – knit stitch (ks): Insert the hook from front to back through the center of the next stitch, between its two vertical legs (not under the top loops). Yarn over, pull up a loop, yarn over, and pull through both loops. Each ks sits directly on the stitch below, so the V-shapes stack into straight columns.
The beginning ch 1 never counts as a stitch.
Gauge and Checkpoints
Gauge: 5 sts and 6 rows = 1 in (2.5 cm), in the knit-look pattern (ks rows alternating with sc rows) with the 3.5 mm hook.
Work the stem first and use it as your swatch. Check these as you go:
- After Row 7: stem is 1.0 in (2.5 cm) wide and about 1.2 in (3.0 cm) tall.
- After Row 10: piece is 2.6 in (6.6 cm) wide and about 1.7 in (4.3 cm) tall.
- After Row 16: piece is about 2.7 in (6.9 cm) tall; the hole is 1.0 in (2.5 cm) wide.
- After Row 21: 2.6 in x 3.5 in (6.6 cm x 8.9 cm).
If the stem is wider than 1.0 in (2.5 cm), go down to a 3.25 mm hook. If it is narrower, or the fabric feels as stiff as cardboard, go up to a 3.75 mm hook. Knit stitch naturally works up tight, so relax your loops slightly when you pull through.
Letter Body
Use MC and the 3.5 mm hook.
Stem
Foundation: Ch 6.
Row 1 (WS): Sc in 2nd ch from hook and in each ch across, turn. (5 sts)
Row 2 (RS): Ch 1, ks in each st across, turn. (5 sts)
Row 3 (WS): Ch 1, sc in each st across, turn. (5 sts)
Rows 4–7: Repeat Rows 2–3 twice. Do not turn at the end of Row 7. (5 sts)
With the RS facing you, your hook is now at the right-hand edge of the stem. This is where the bowl begins.
Bowl, lower bar
Row 8 (RS): Ch 8, turn. Sc in 2nd ch from hook and in next 6 ch (7 sc), ks in each of the 5 stem sts, turn. (12 sts)
Row 9 (WS): Ch 1, sc in next 11 sts, 2 sc in last st, turn. (13 sts)
The increase sits at the outer right edge and shapes the rounded lower-right corner of the bowl.
Row 10 (RS): Ch 1, ks in each st across, turn. (13 sts)
Hole section
To make the hole, work the stem column and the right column separately for 6 rows.
Stem column:
Row 11 (WS): Ch 1, sc in first 5 sts, turn. Leave the remaining 8 sts unworked. (5 sts)
Rows 12–16: Work Row 2, Row 3, Row 2, Row 3, Row 2 on these 5 sts. (5 sts)
Do not fasten off. Put the live loop on a locking marker.
Right column:
Row 11 (WS): With WS facing, skip the next 5 sts of Row 10 after the stem column (these form the bottom of the hole). Join MC in the next st, ch 1, sc in same st and in last 2 sts, turn. (3 sts)
Rows 12–16: Work Row 2, Row 3, Row 2, Row 3, Row 2 on these 3 sts. (3 sts) Fasten off, leaving a 4 in (10.2 cm) tail.
Bowl, upper bar
Row 17 (WS): Return the stem column’s live loop to the hook. Ch 1, turn, sc in each of the 5 stem sts, ch 5, sc in each of the 3 right-column sts, turn. (8 sc + 5 ch = 13 sts)
The ch 5 spans the top of the hole. The hole now measures 5 sts x 6 rows, or 1.0 in x 1.0 in (2.5 cm x 2.5 cm).
Row 18 (RS): Ch 1, ks in first 3 sts, sc in each of next 5 ch, ks in last 5 sts, turn. (13 sts)
Row 19 (WS): Ch 1, sc in each st across, turn. (13 sts)
Row 20 (RS): Ch 1, ks in each st across, turn. (13 sts)
Row 21 (WS): Ch 1, sc in next 11 sts, sc2tog over last 2 sts. (11 sc + 1 sc2tog = 12 sts)
The decrease shapes the rounded top-right corner. The top-left corner stays square. Fasten off and weave in all MC tails on the WS.
Outer Border
Use CC and the 3.5 mm hook. Border gauge: 6 sc = 1 in (2.5 cm) along the edges.
Work 1 sc per stitch along the top and bottom edges and 1 sc per row end along the side edges. “Corner” means 3 sc in that one stitch or row end.
Round 1 (RS): Join CC in the bottom-left corner of the stem (with the RS facing you, the left end of the foundation chain).
- Bottom of stem: 3 sc in corner, sc in next 3 foundation ch, 3 sc in bottom-right stem corner. (9 sc)
- Right side of stem: sc in the ends of Rows 2–7. (6 sc)
- Underside of bowl: working into the free loops of the Row 8 chain, sc in first 6 ch, 3 sc in last ch for the bowl’s lower-right corner. (9 sc)
- Right side of bowl: sc in the ends of Rows 9–20. (12 sc)
- Top edge: 3 sc in last st of Row 21, sc in next 10 sts, 3 sc in first st of Row 21. (16 sc)
- Left side: sc in the ends of Rows 20–2. (19 sc)
Sl st to first sc to join. (71 sts)
Check the math: the edge sc are 3 + 6 + 6 + 12 + 10 + 19 = 56. The 5 corners at 3 sc each add 15, so 56 + 15 = 71. Each side’s count above already includes its own corner groups, and no corner is counted twice.
Don’t add stitches at the inner corner where the stem meets the bowl underside. That corner curves inward, and working straight through it keeps it from rippling.
Round 2 (RS): Ch 1, rev sc in each st around. Sl st to first st. (71 sts) Fasten off and weave in.
Why the math works: The side edges have 6 rows per inch. One sc per row end at a border gauge of 6 sc per inch lets the sides lie flat. The top and bottom edges have 5 sts per inch, and the corner groups take up the slightly looser sc spacing there. Round 2 is worked 1 rev sc per st, so it adds depth without changing the count. Together the two rounds add 0.25 in (0.6 cm) per side. That brings 2.6 in x 3.5 in (6.6 cm x 8.9 cm) up to 3.1 in x 4.0 in (7.9 cm x 10.2 cm).
Hole Trim
Use CC and the 3.5 mm hook. With RS facing, join in the first free st at the bottom-left of the hole.
Round 1: Sc in each of the 5 free sts of Row 10, sc in the 6 row ends of the right column, sc in the free loops of the 5 ch from Row 17, sc in the 6 row ends of the stem column. Sl st to first sc. (5 + 6 + 5 + 6 = 22 sts)
Work only 1 sc into each corner stitch, because extra stitches inside a small hole make it cup. Fasten off and weave in.
The trim takes 0.125 in (0.3 cm) from each side. That leaves an opening of about 0.75 in x 0.75 in (1.9 cm x 1.9 cm) with softly rounded corners.
Flowers (Make 3)
Use light pink and the 2.25 mm hook.
Round 1: Make a magic ring, ch 1, 5 sc in ring. Sl st to first sc. Pull ring closed. (5 sts)
Round 2: *(Sl st, ch 2, 2 dc, ch 2, sl st) in next st; repeat from * 4 more times. (5 petals)
Fasten off with a 6 in (15.2 cm) tail. Each flower measures about 0.75 in (1.9 cm) across.
Center: With pale yellow, work 5 French knots in a tight cluster over the magic ring. Wrap twice around the needle for each knot.
Leaves (Make 6)
Use sage green and the 2.25 mm hook.
Ch 5. Sl st in 2nd ch from hook, sc in next ch, hdc in next ch, sc in last ch. (4 sts)
Fasten off with a 6 in (15.2 cm) tail. Each leaf is about 0.5 in (1.3 cm) long with a pointed tip.
Assembly
- Top flower: Center it on the upper-left part of the stem, overlapping the inner edge of the border. Tuck one leaf behind its lower-left edge and one behind its right edge.
- Side flower: Place it on the lower-right curve of the bowl, overlapping the border slightly. Tuck one leaf above it and one below-left.
- Bottom flower: Place it near the bottom of the stem, 0.25 in (0.6 cm) above the border. Tuck one leaf at upper-left and one at lower-right.
- Pin all pieces. Sew each leaf first, then each flower. Use small stitches through the petal bases only, so the petals sit up slightly.
- Hardware: Open the jump ring with the two pliers. Pass it through Round 1 of the outer border at the top edge, just right of center above the hole. Add the end link of the key ring chain and close the jump ring fully.
Final Blocking
- Lightly mist the letter with water until damp, not soaked.
- Pin it flat, RS up, to 3.1 in x 4.0 in (7.9 cm x 10.2 cm).
- Pin the bottom of the stem and the top-left corner square. Ease the right-hand corners into smooth curves.
- Pin the hole open to 0.75 in (1.9 cm) square.
- Don’t flatten the flowers; mist around them instead.
- Let it dry completely, about 6–8 hours, before removing the pins.
Final Quality-Control Checklist
- Letter body counts: 5 sts (stem), 13 sts (bowl), 12 sts at Row 21
- Outer border: 71 sts on both rounds
- Hole trim: 22 sts
- Size: 3.1 in x 4.0 in (7.9 cm x 10.2 cm)
- V-columns run straight up the stem with no slanting
- All tails woven in on the WS and trimmed
- Flowers and leaves sewn securely; no loose petals
- Jump ring fully closed with no gap
Troubleshooting
V-columns lean to one side: You are working the ks under the top loops. Insert the hook between the two legs of the stitch instead.
Fabric is too stiff to sew through: Go up half a hook size and keep your loops relaxed.
Border ruffles: Your border is looser than 6 sc per inch. Use a smaller hook for the border only.
Border pulls the edge inward: Use a slightly larger hook, or work Round 2 more loosely.
Hole looks lopsided: Recount the right column. It must start exactly 5 sts after the stem column.
Flower petals curl up: Steam them lightly and press flat with your fingers before sewing.
Care
Spot clean with mild soap and cool water, then reshape and air dry flat. Remove the key ring hardware before any deeper wash.
Final Notes
The measurement chain is short and easy to check. The stem is 5 sts = 1.0 in (2.5 cm) wide. The full body is 13 sts x 21 rows = 2.6 in x 3.5 in (6.6 cm x 8.9 cm). The 71-stitch outer border adds 0.25 in (0.6 cm) per side, for a finished size of 3.1 in x 4.0 in (7.9 cm x 10.2 cm). The 22-stitch hole trim leaves a 0.75 in (1.9 cm) opening.
Once you know the shaping, you can chart other letters the same way: chain extensions for bowls and split columns for holes.
Happy crocheting!