

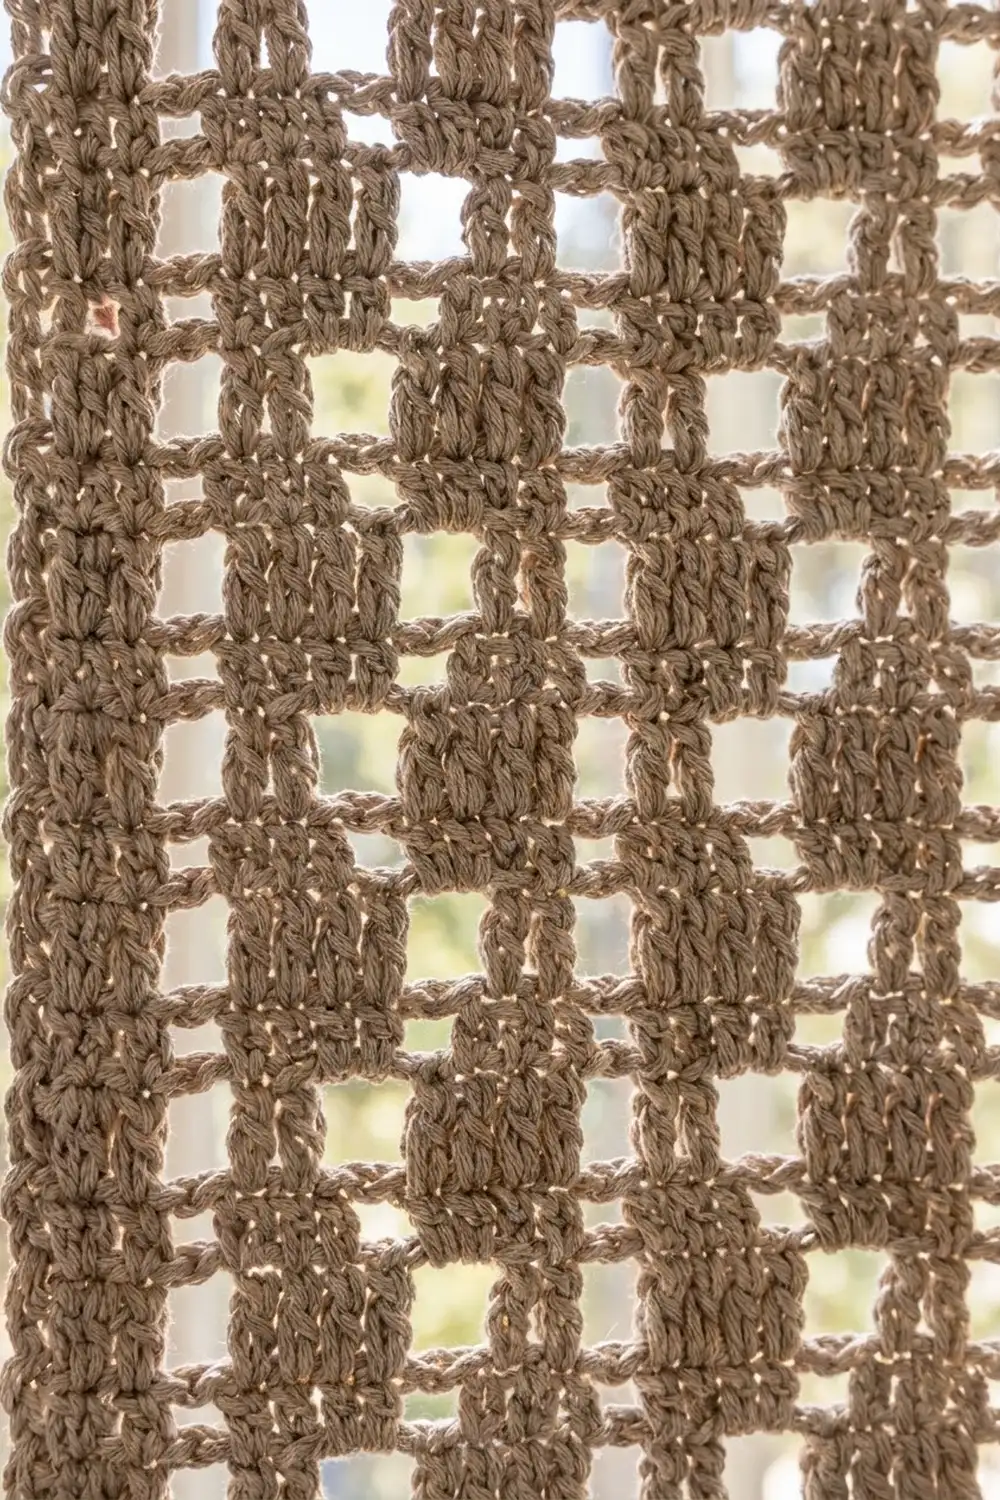
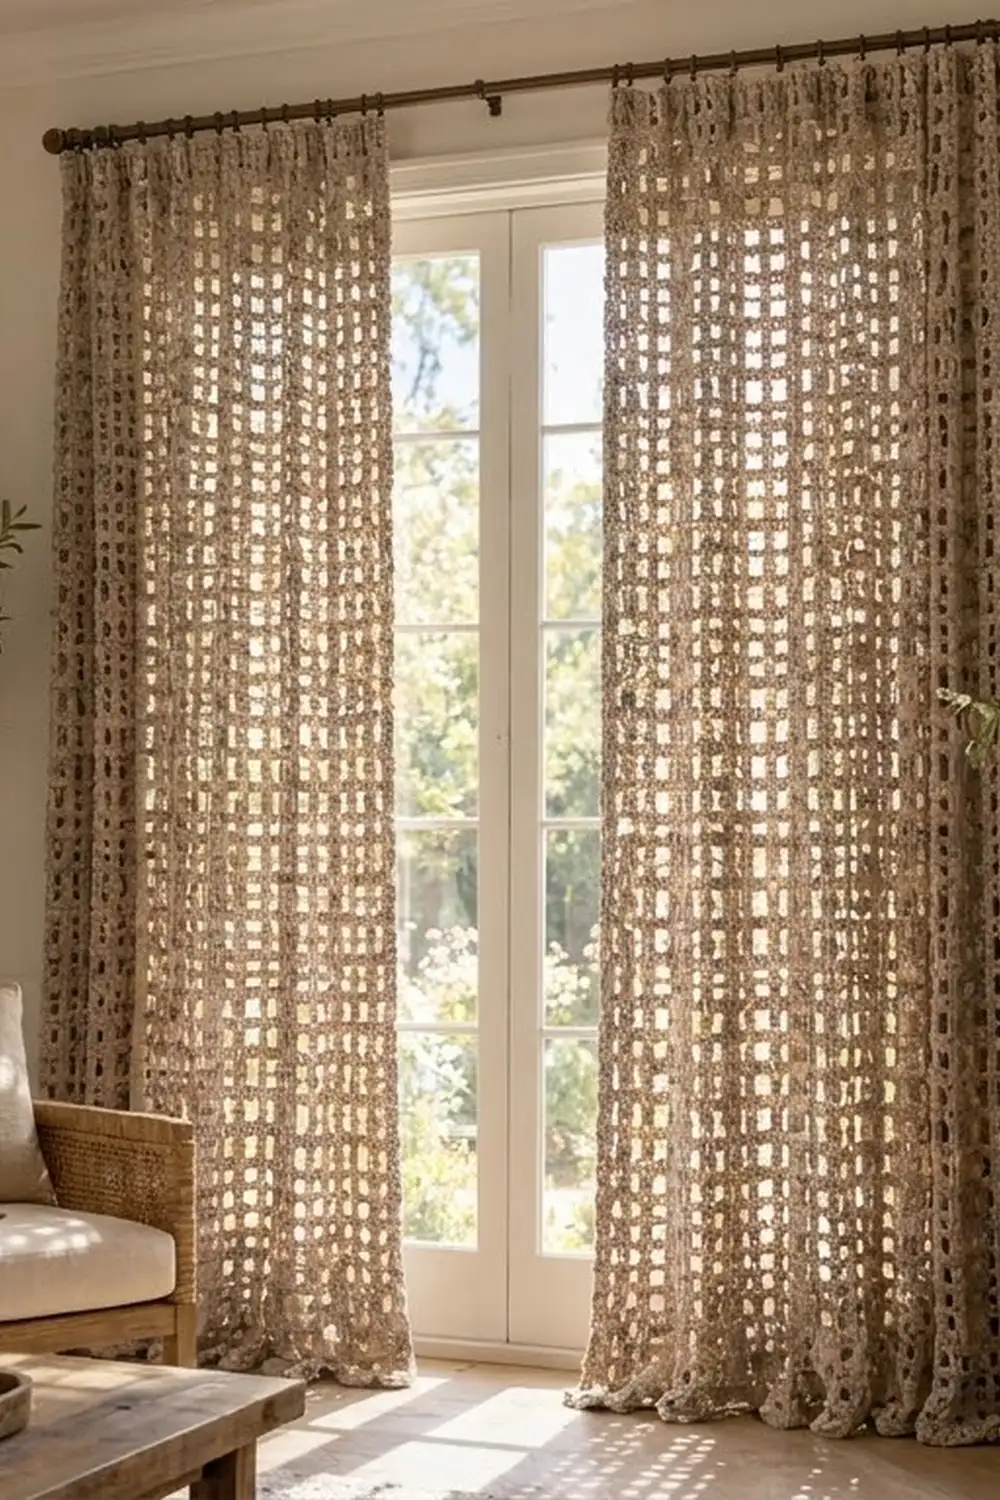
The Linen Lattice Curtain Panel is a filet crochet curtain with a calm windowpane grid. Open square meshes let daylight through. Stacked solid blocks form soft vertical bars, and a fully open row crosses them every few inches. When the sun hits it, the curtain throws a checkered shadow across the floor.
The sample uses one warm taupe yarn in a chunky cotton blend. The look is earthy and textured, and it fits farmhouse, Scandinavian or boho rooms. All instructions use US crochet terms.
Each finished panel measures 41.5 in × 80.5 in (105.4 cm × 204.5 cm) after the border and blocking. The photo shows a pair. Each panel is its own single piece, so you make two and hang them side by side without joining them.
You work each panel flat in rows from the hem up, using a simple 3-stitch filet grid. You then add a two-round single crochet border around all four edges, block the panel and hang it with clip rings.
Finished Size and Construction
- Finished size (one panel): 41.5 in × 80.5 in (105.4 cm × 204.5 cm)
- Skill level: Easy to Intermediate (repetitive, but you need to track rows)
- Terminology: US crochet terms
- Yarn weight: Bulky (#5), cotton or cotton blend
- Hook: 6 mm (US J-10)
- Number of pieces: 1 per panel (make 2 for a pair; the panels are never joined)
- Layout: Single rectangle, 40 meshes wide × 79 rows tall
- Piece size before border: 40 in × 79 in (101.6 cm × 200.7 cm)
- Border depth: 0.75 in (1.9 cm) on every edge
Materials
Yarn: Use a bulky cotton or cotton-blend yarn with a matte, slightly rope-like twist. Cotton holds the square grid well and doesn’t stretch as much as acrylic under its own weight. Avoid fuzzy or highly elastic yarns, because they blur the open meshes.
- Taupe (single color): 700 g / 840 m per panel (seven 100 g / 120 m skeins), so 1,400 g / 1,680 m for the pair
These quantities include a margin of roughly 10% beyond the estimated use. Buy all skeins from the same dye lot.
Tools:
– 6 mm (US J-10) crochet hook
– Tapestry needle
– Stitch markers (4 or more)
– Row counter
– Measuring tape
– Rust-proof pins and a large blocking surface (floor with towels or foam mats)
– Spray bottle
– 10 curtain clip rings per panel
Abbreviations (US Terms)
- ch – chain
- sl st – slip stitch
- sc – single crochet
- dc – double crochet
- sk – skip
- sp – space
- st(s) – stitch(es)
- tch – turning chain
- RS / WS – right side / wrong side
Special stitches (filet meshes):
– Block (B): Dc in the next 2 sts, then dc in the next dc. If the mesh below is open, work 2 dc in the ch-2 sp, then dc in the next dc.
– Open mesh (O): Ch 2, sk the next 2 sts (or the ch-2 sp), then dc in the next dc.
Every row starts with ch 3, which counts as the first dc. Each mesh after that adds exactly 3 sts, so a row of 40 meshes always has 1 + (40 × 3) = 121 sts. Chains count as stitches.
Gauge and Checkpoints
Gauge: 4 meshes (12 sts) = 4 in (10.2 cm) wide, and 4 rows = 4 in (10.2 cm) tall, in filet pattern. One mesh is 1 in × 1 in (2.5 cm × 2.5 cm).
Test swatch: Ch 15. Row 1: Dc in the 4th ch from the hook and in each ch across (13 sts). Rows 2–6: Ch 3, turn, then work B, O, O, B (13 sts). Block the swatch lightly and let it dry.
Measure across the 4 meshes and over 4 rows in the middle of the swatch.
- If the swatch is too big (more than 4 in / 10.2 cm), go down one hook size.
- If it’s too small, go up one hook size.
- If the width is right but the rows are short, pull up a slightly taller loop on each dc rather than changing the hook.
Checkpoints:
– After Row 1: 40 in (101.6 cm) wide
– After Row 5: 5 in (12.7 cm) tall
– After Row 41: 41 in (104.1 cm) tall
– After Row 79: 79 in (200.7 cm) tall
– After the border: 41.5 in × 80.5 in (105.4 cm × 204.5 cm)
Panel Pattern
The panel uses three row types.
- Solid Row: 40 B
- Open Row: B, 38 O, B
- Bar Row: B, then (O, O, B) 13 times
In the Bar Rows, blocks sit at meshes 1, 4, 7 and so on, up to mesh 40. Every third mesh is solid and both edges are solid. Stacking three Bar Rows makes the vertical bars, and the Open Rows cut across them.
Foundation: Ch 123.
Row 1 (RS, Solid Row): Dc in the 4th ch from the hook (the skipped 3 ch count as the first dc) and in each ch across. Turn. (121 sts: 40 blocks)
Row 2 (Open Row): Ch 3 (counts as dc), dc in the next 3 sts (first B). Work ch 2, sk 2 sts, dc in the next dc 38 times. Dc in the next 2 sts, then dc in the top of the tch (last B). Turn. (121 sts: 2 B, 38 O)
Row 3 (Bar Row): Ch 3, dc in the next dc, 2 dc in the next ch-2 sp… (stop: the first mesh sits over a block, so work it as written below)
Work Row 3 as follows: Ch 3, dc in the next 3 dc (B). Then repeat 13 times: [ch 2, sk 2 sts or the ch-2 sp, dc in the next dc] twice, then 2 dc in the next ch-2 sp and dc in the next dc (B). On the final repeat, that last dc goes into the top of the tch. Turn. (121 sts: 14 B, 26 O)
Count check: 4 sts + 13 × 9 sts = 121.
Rows 4–5 (Bar Rows): Work as Row 3. Each block now sits over a block, so work it as dc in the next 3 dc. (121 sts each row)
Rows 6–77: Repeat Rows 2–5 another 18 times. The full Open-Bar-Bar-Bar sequence is now complete 19 times, ending with Row 77, a Bar Row. (121 sts every row)
Row 78 (Open Row): Work as Row 2. (121 sts)
Row 79 (Solid Row): Ch 3, dc in the next 3 dc. Then repeat 38 times: 2 dc in the next ch-2 sp, dc in the next dc. Dc in the next 2 dc, then dc in the top of the tch. (121 sts: 40 blocks) Fasten off.
The panel starts and ends with a Solid Row and an Open Row, so the grid is symmetrical top to bottom. It measures 40 in × 79 in (101.6 cm × 200.7 cm).
Row-tracking tip: Put a marker in each Open Row. Every 5 markers equals 20 rows, or 20 in (50.8 cm).
Second panel: Work a second panel exactly the same way. Before adding borders, lay both panels side by side and check that they have the same row count and length.
Border
Border gauge: 3 sc = 1 in (2.5 cm), the same as the dc spacing. Along the side edges, each dc row-end is 1 in (2.5 cm) tall, so it takes 3 sc. Two rounds of sc add 0.75 in (1.9 cm) to every edge.
Corner rule: Each corner is a 3-sc group, and the center sc of that group is the corner stitch. The counts below are the stitches between corner stitches, so no corner is counted twice.
Rnd 1 (RS): With the RS facing, join yarn with a standing sc in the first st of Row 79, at the top right corner.
- Top edge: Work 2 more sc in that same st to complete the corner group. Sc in the next 119 sts, then 3 sc in the last st.
- First side: Work 3 sc evenly into the side of each row-end, 237 sc in total.
- Bottom edge: Work 3 sc in the first ch base, sc in the next 119 ch bases, then 3 sc in the last ch base.
- Second side: Work 237 sc across the row-ends, 3 per row.
- Sl st to the first sc.
Counts between corner stitches:
– Top and bottom: 121 sc each (1 from each corner group + 119)
– Sides: 239 sc each (1 from each corner group + 237)
– Corners: 4
Total: 4 + (2 × 121) + (2 × 239) = 724 sts
Rnd 2: Ch 1. Sc in each sc around, working 3 sc in each corner stitch. Sl st to the first sc and fasten off.
Counts between corner stitches:
– Top and bottom: 123 sc each
– Sides: 241 sc each
– Corners: 4
Total: 4 + (2 × 123) + (2 × 241) = 732 sts (724 + 8 = 732)
Why the math works:
– The panel body has 121 sts across, and Rnd 1 uses exactly one sc per stitch along the top and bottom edges. The width doesn’t change.
– Along the sides, 79 rows × 3 sc = 237 sc. That matches 79 in × 3 sc per inch, so the sides lie flat with no ruffling or puckering.
– The two 3-sc corner groups per round each add 2 sts per edge, which is just enough to turn the corners square.
Final Blocking
- Weave in all the ends along the solid block columns, where they hide best.
- Lay the panel flat on towels or foam mats. Because of its size, the floor works best.
- Pin the four corners to 41.5 in × 80.5 in (105.4 cm × 204.5 cm).
- Pin along each edge every 6 in (15.2 cm), keeping the edges perfectly straight.
- Use your fingers to square up any open meshes that look slanted.
- Mist the panel evenly until it’s damp but not soaked.
- Let it dry completely, which takes about 24 hours.
- Unpin the panel and check the measurements again.
- Block the second panel and compare the two.
Final Quality-Control Checklist
- Every row has 121 sts and 40 meshes.
- The vertical bars line up straight from hem to top, with no drifting.
- Both side edges are solid block columns.
- The panel has 79 rows: Solid Rows at Rows 1 and 79, and Open Rows every 4th row starting at Row 2.
- Border Rnd 1 has 724 sts and Rnd 2 has 732 sts.
- The corners are square and the edges lie flat.
- The panel measures 41.5 in × 80.5 in (105.4 cm × 204.5 cm).
- Both panels match within 0.5 in (1.3 cm).
- All the ends are secure and hidden.
Troubleshooting
The bars lean to one side. You probably missed the dc in the top of the tch at the end of a row. Count to 121 sts on every row.
The open meshes look like rectangles instead of squares. Your dc is too short or too tall compared with the width. Adjust your loop height, or change the hook and swatch again.
The edges wave after the border. You worked too many sc along the sides. Rip back and work exactly 3 sc per row-end.
The edges pull in. You worked too few sc. Check that each side has 237 sc in Rnd 1.
The panel grows longer while hanging. Heavy cotton relaxes over time. Hang the panel for 48 hours before trimming the rod height. If needed, take out the last Bar-Bar-Bar-Open sequence before adding the border, which shortens the panel by 4 in (10.2 cm).
The panels are different lengths. Compare the row counts first. If the rows match, re-block the shorter panel to the target size.
Care
Hand wash or machine wash on a cold, gentle cycle inside a large mesh bag. Lay the panels flat to dry in shape, and never hang them wet.
Final Notes
The measurement chain is straightforward:
– 3 sts = 1 mesh = 1 in (2.5 cm), and 1 row = 1 in (2.5 cm).
– 40 meshes and 121 sts give 40 in (101.6 cm) of width.
– 79 rows give 79 in (200.7 cm) of length.
– Two sc border rounds add 0.75 in (1.9 cm) per edge, for a finished panel of 41.5 in × 80.5 in (105.4 cm × 204.5 cm).
If your gauge holds at each checkpoint, the grid, the bars and the border will all come out right. Clip 10 rings evenly along the top edge, about 4.5 in (11.4 cm) apart, and let the light come through.
Happy crocheting!