

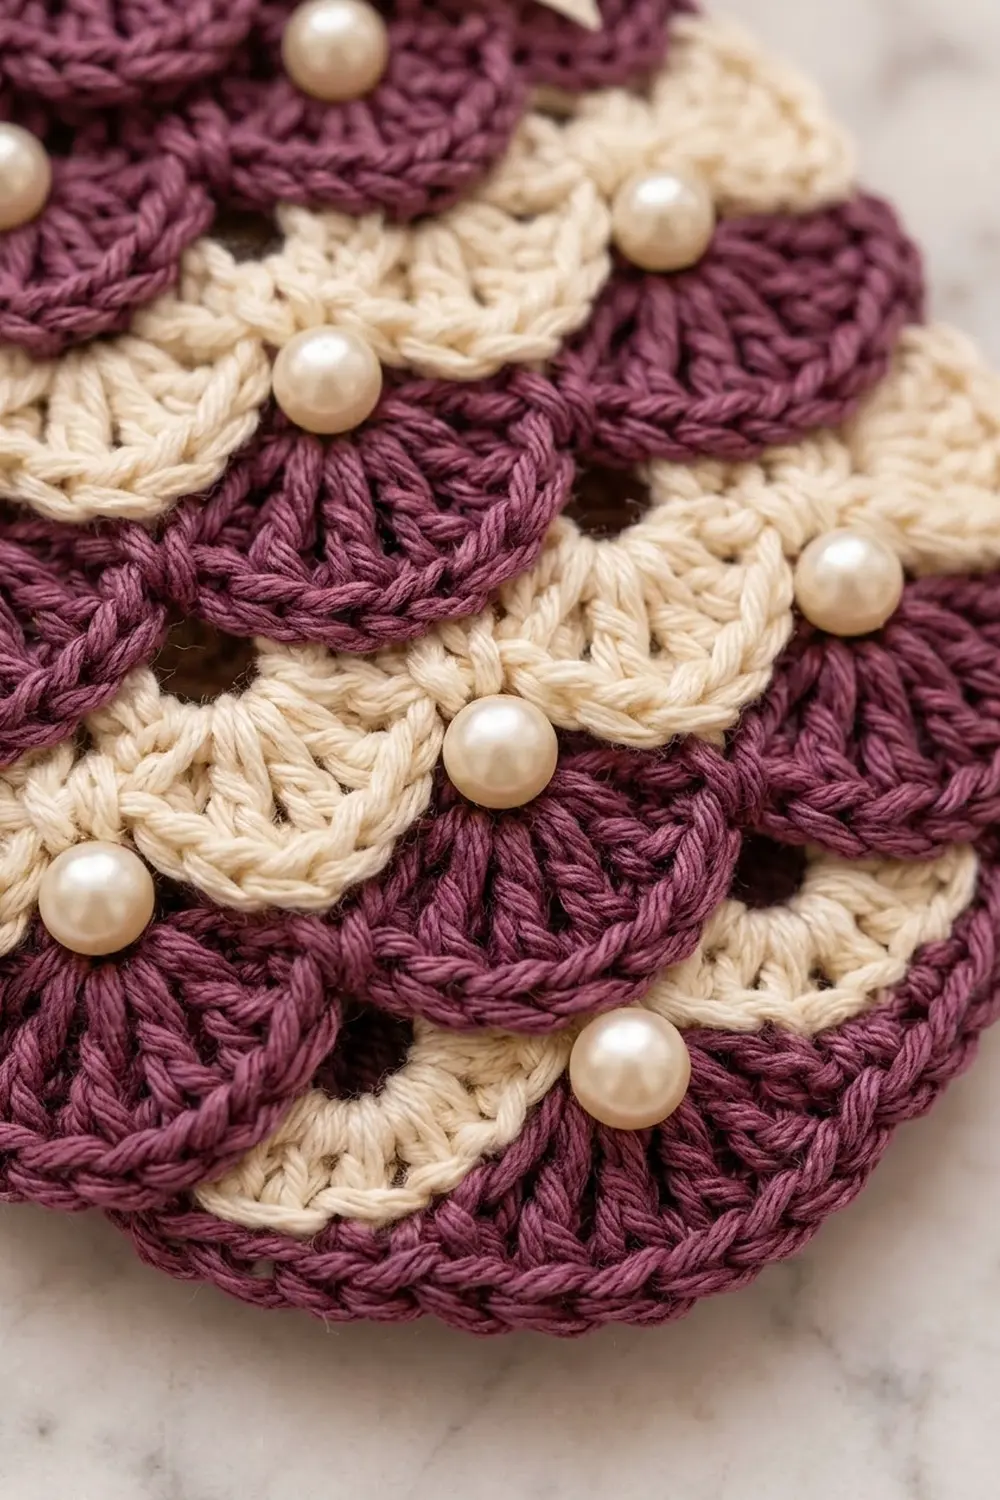
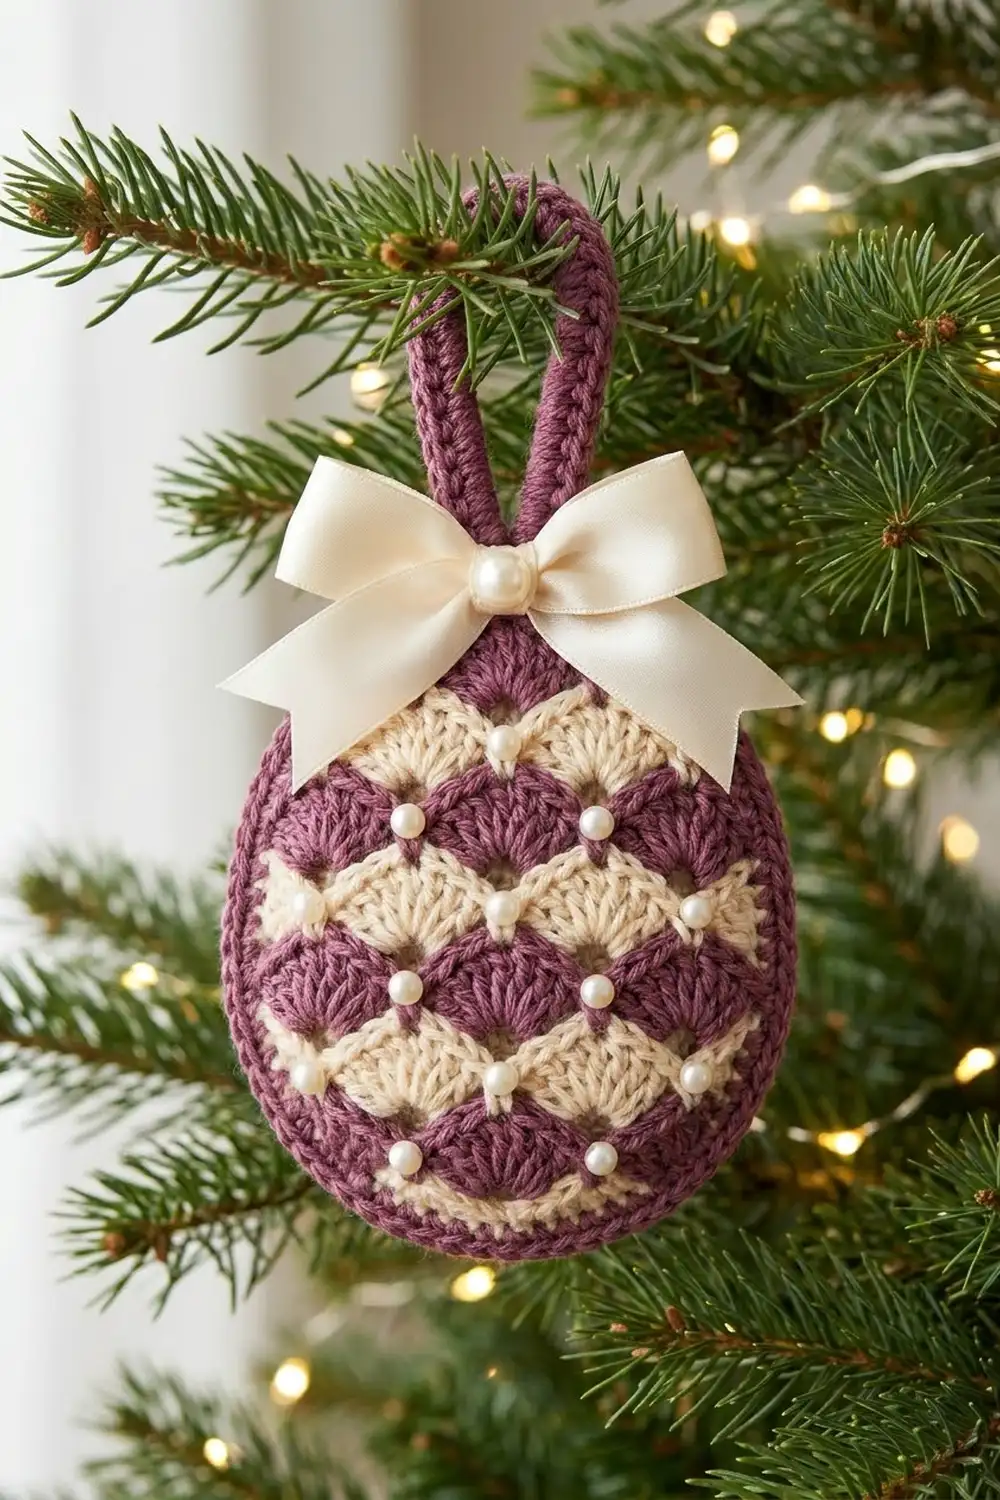
This little egg-shaped ornament is made from overlapping shell fans in deep plum and warm cream. The fans sit like scales: each row’s shells are centered between the shells of the row above. The result looks like a pinecone or a vintage Fabergé-style egg. Small pearl beads at the fan points and a cream satin bow finish the look.
The style is elegant and a little vintage. It works well on a holiday tree, as a gift-wrap tie-on or as a seasonal hanging decoration. It is a quick make that uses only small amounts of two colors.
All instructions use US crochet terms. The finished ornament measures 3.5 in (8.9 cm) wide by 4.75 in (12.1 cm) tall, without the hanging loop. The loop adds about 1.5 in (3.8 cm).
The ornament is one flat piece worked in rows from the top down. You start with a single shell and increase by adding shells at the edges until the row is 4 shells wide. Then you narrow back to 1 shell to round the bottom. A single plum edging round neatens the outline. Last, you add a crocheted hanging loop, a ribbon bow and pearl beads.
Finished Size and Construction
- Finished size: 3.5 in (8.9 cm) wide x 4.75 in (12.1 cm) tall, plus a 1.5 in (3.8 cm) loop
- Skill level: Easy to intermediate
- Terminology: US crochet terms
- Yarn weight: Sport (#2), cotton or cotton blend
- Hook: 3.0 mm (C/2–D/3)
- Number of pieces: 1 ornament body, plus 1 hanging loop
- Layout: Single piece. No joining is needed.
- Piece size before border: 3.25 in (8.3 cm) wide x 4.5 in (11.4 cm) tall
- Border depth: 1/8 in (0.3 cm) on every side
- Rows: 13 shell rows, then 1 edging round
Materials
Yarn: Use a smooth sport-weight cotton or cotton blend so the shells look crisp and well defined. Mercerized cotton gives a soft sheen that matches the satin bow. Avoid fuzzy yarns, because they blur the scallop edges.
- Plum (Color A): 12 g, about 37 m
- Cream (Color B): 6 g, about 19 m
The quantities include a margin for swatching and for weaving in the extra ends from color changes.
Tools and notions:
- 3.0 mm crochet hook
- Tapestry needle
- Scissors
- 12 ivory pearl beads, 5–6 mm, sew-on type (11 for the body and 1 for the bow), plus 2 spares
- Sewing needle and cream or ivory thread
- Cream satin ribbon, 1 in (2.5 cm) wide, 10 in (25.4 cm) long
- Rust-proof pins and a blocking mat or folded towel
- Spray bottle
Abbreviations (US Terms)
- ch: chain
- sl st: slip stitch
- sc: single crochet
- dc: double crochet
- st(s): stitch(es)
- tch: turning chain
- RS: right side
Special stitches
- Shell: 5 dc in the same stitch. When a row begins with a shell, ch 3 counts as the first dc and you work 4 dc in the same stitch.
- Half shell: 3 dc in the same stitch. When a row begins with a half shell, ch 3 counts as the first dc and you work 2 dc in the same stitch.
- Standing sc: Start with a slip knot on the hook. Insert the hook in the stitch, yarn over, pull up a loop, yarn over and pull through both loops.
- Center of shell: The 3rd dc of a 5-dc shell.
Gauge and Checkpoints
Exact gauge is not critical for an ornament, but it does control the final size. Work Rows 1–4 as a test piece and measure before you continue.
- One shell fan: about 0.8 in (2.0 cm) wide
- One row: about 0.35 in (0.9 cm) tall
- After Row 2: 1.6 in (4.1 cm) wide x 0.7 in (1.8 cm) tall
- After Row 4: 1.6 in (4.1 cm) wide x 1.4 in (3.6 cm) tall
- After Row 7: 2.4 in (6.1 cm) wide x about 2.5 in (6.4 cm) tall
- After Row 10: 3.25 in (8.3 cm) wide x 3.5 in (8.9 cm) tall
- After Row 13: 3.25 in (8.3 cm) wide x 4.5 in (11.4 cm) tall
If your piece is too big: Change to a 2.75 mm hook, or check that you are not pulling your dc loops up tall.
If your piece is too small: Change to a 3.25 mm hook.
Change hooks after the test piece and start again. Do not switch hook size partway through the ornament.
Ornament Pattern
Row structure in one sentence: shells go into the sc of the row below, and each sc goes into the center of a shell from the row below. That offset is what stacks the fans like scales.
At every color change, fasten off the old color at the end of the row. Join the new color in the first stitch of the next row with a sl st, then work the row’s starting chain. Leave 6 in (15.2 cm) tails.
Top Cap (Plum)
Row 1 (plum): Ch 4. Work 4 dc in the 4th ch from the hook (the skipped ch count as the first dc). Turn. (5 sts: 1 shell)
The fan opens downward from the chain. The chain point is the top of the ornament.
Row 2 (plum): Ch 3 (counts as dc). Work 4 dc in the first st to make the first shell. Sc in the center dc (3rd st). Shell in the last st (top of the tch). Turn. (11 sts: 2 shells, 1 sc)
Row 3 (plum): Ch 3 (counts as dc). Work 2 dc in the first st to make a half shell. Sc in the 3rd st (center of shell). Shell in the next sc. Sc in the center of the next shell. Half shell in the last st. Turn. (13 sts: 2 half shells, 1 shell, 2 sc)
First Cream Band
Row 4 (cream): Ch 1. Sc in the first st. Shell in the next sc, sc in the center of the next shell. Repeat from * once more, working the last sc in the top of the tch. Turn. (13 sts: 2 shells, 3 sc)
Row 5 (cream): Ch 3 (counts as dc). Work 4 dc in the first sc. Sc in the center of the next shell, shell in the next sc. Repeat from * once more. Turn. (17 sts: 3 shells, 2 sc)
Checkpoint: the piece should now be 2.4 in (6.1 cm) wide.
Plum Band
Row 6 (plum): Ch 3 (counts as dc). Work 2 dc in the first st. Sc in the center of the first shell. Shell in the next sc, sc in the center of the next shell. Repeat from * once more. Half shell in the last st. Turn. (19 sts: 2 half shells, 2 shells, 3 sc)
Row 7 (plum): Ch 1. Sc in the first st. Shell in the next sc, sc in the center of the next shell. Repeat from * twice more, working the last sc in the top of the tch. Turn. (19 sts: 3 shells, 4 sc)
Second Cream Band (Widest Section)
Row 8 (cream): Ch 3 (counts as dc). Work 4 dc in the first sc. Sc in the center of the next shell, shell in the next sc. Repeat from * twice more. Turn. (23 sts: 4 shells, 3 sc)
Row 9 (cream): Ch 3 (counts as dc). Work 2 dc in the first st. Sc in the center of the first shell. Shell in the next sc, sc in the center of the next shell. Repeat from * twice more. Half shell in the last st. Turn. (25 sts: 2 half shells, 3 shells, 4 sc)
Lower Plum Band
Row 10 (plum): Ch 1. Sc in the first st. Shell in the next sc, sc in the center of the next shell. Repeat from * 3 more times, working the last sc in the top of the tch. Fasten off. (25 sts: 4 shells, 5 sc)
Checkpoint: the piece is now 3.25 in (8.3 cm) wide x 3.5 in (8.9 cm) tall. This is the widest point of the ornament.
Rounded Bottom (Decrease Rows)
Each decrease row starts in the center of the first shell, so 3 stitches are left unworked at each end. Those exposed fan edges become the stepped scallops along the lower curve.
Row 11 (plum): Turn. Join plum with a standing sc in the 4th st (center of the first shell). Shell in the next sc, sc in the center of the next shell. Repeat from * twice more. Leave the last 3 sts unworked. Fasten off. (19 sts: 3 shells, 4 sc)
Row 12 (cream): Turn. Join cream with a standing sc in the 4th st. Shell in the next sc, sc in the center of the next shell. Repeat from * once more. Leave the last 3 sts unworked. Fasten off. (13 sts: 2 shells, 3 sc)
Row 13 (plum): Turn. Join plum with a standing sc in the 4th st. Shell in the next sc. Sc in the center of the next shell. Leave the last 3 sts unworked. Fasten off. (7 sts: 1 shell, 2 sc)
Weave in all ends along the row edges where they will be covered by the border. Check the size: 3.25 in (8.3 cm) x 4.5 in (11.4 cm).
Border
Border gauge: Work 2 sc per dc-height row end, 1 sc per sc row end, and 1 sc per exposed stitch. The border adds 1/8 in (0.3 cm) on every side.
Choose the neater face of the piece as the RS. With the RS facing, work around the whole outline in plum.
Border round (plum):
- Top: Join with a standing sc in the base of Row 1, the chain point at the top center. (1 sc)
- First side, working down:
- Row ends of Rows 1, 2 and 3: 2 sc each (6 sc).
- Row 4: 1 sc in the end sc.
- Rows 5 and 6: 2 sc each (4 sc).
- Row 7: 1 sc in the end sc.
- Rows 8 and 9: 2 sc each (4 sc).
- This makes 16 sc so far on this side.
- Rows 10, 11 and 12: work 1 sc in the end sc and 1 sc in each of the 2 exposed dc for each row (9 sc).
- First side total: 25 sc.
- Bottom (Row 13): Sc in the end sc. Sc in each of the next 2 dc. Work 2 sc in the center dc. Sc in each of the next 2 dc. Sc in the end sc. (8 sc)
- Second side, working up: Mirror the first side. Work 3 sc each across the exposed edges of Rows 12, 11 and 10 (2 dc and the end sc each time). Then work 2, 2, 1, 2, 2, 1, 2, 2, 2 sc into the row ends of Rows 9 down to 1. (25 sc)
- Sl st to the first sc. Fasten off.
Total: 1 + 25 + 8 + 25 = 59 sc.
Why the math works:
- A dc row is about as tall as 2 sc, so 2 sc per dc row end keeps the sides flat. A sc row end needs only 1.
- The exposed fan edges already curve outward, so 1 sc per stitch follows them without ruffling.
- The single increase at the bottom center dc lets the edging turn the tightest curve without cupping.
- The top needs only 1 sc because the bow and loop cover it.
Hanging Loop
With plum, ch 31. Sl st in the 2nd ch from the hook and in each ch across. (30 sl st)
This makes a firm cord about 3 in (7.6 cm) long. Fold it in half and sew both ends to the back of the top border sc. The loop should stand 1.5 in (3.8 cm) above the ornament.
Pearls and Bow
Sew one pearl with ivory thread at each of these sc fan points:
- Row 3: 2 pearls
- Row 5: 2 pearls
- Row 9: 4 pearls
- Row 12: 3 pearls
That makes 11 pearls.
Tie the ribbon into a bow about 2.75 in (7.0 cm) wide. Trim the tails at an angle. Sew the bow over the base of the loop and sew the last pearl to its center knot.
Final Blocking
- Lightly mist the ornament until it is damp, not soaked.
- Lay it RS up on the blocking mat.
- Pin the top point and the bottom center, then pin the widest point of Rows 8–10 to 3.5 in (8.9 cm) across.
- Pin the bottom scallops into an even curve. Check that the total height is 4.75 in (12.1 cm).
- Use your fingertips to open each fan so its curved edge lies flat.
- Let it dry completely, then remove the pins.
Block before sewing on the pearls and bow, or keep the ribbon dry while blocking.
Final Quality-Control Checklist
- [ ] Row counts match: 5, 11, 13, 13, 17, 19, 19, 23, 25, 25, 19, 13, 7
- [ ] Each shell sits on an sc, and each sc sits in a shell center
- [ ] Before the border: 3.25 in (8.3 cm) x 4.5 in (11.4 cm)
- [ ] Border has 59 sc: 25 per side, 8 at the bottom, 1 at the top
- [ ] Finished size: 3.5 in (8.9 cm) x 4.75 in (12.1 cm)
- [ ] Loop is firmly attached and centered
- [ ] Pearls are secure and evenly placed
- [ ] All ends are woven in invisibly
Troubleshooting
- Fans ruffle: Your dc may be too loose, or you put a shell in the wrong stitch. Recount: 2 sts are skipped between every sc and shell.
- Fans cup or pucker: Your dc may be too tight. Go up 0.25 mm in hook size.
- The egg looks lopsided: You may have started a decrease row in the 3rd or 5th stitch instead of the 4th. Rework it so 3 stitches are unworked at each end.
- Border waves: You worked too many sc. Use 2 sc per dc row end, not 3.
- Border pulls the edge in: You may have skipped exposed stitches. Each one needs 1 sc.
- Color stripes look jagged: Join each new color in the first stitch of the row, not in the turning chain.
Care
Spot clean only with cool water and mild soap, then reshape the ornament and let it dry flat. Store it flat or hanging so the bow keeps its shape.
Final Notes
Here is the measurement chain:
- Each fan is about 0.8 in (2.0 cm) wide, and each row is 0.35 in (0.9 cm) tall.
- Four fans make the 3.25 in (8.3 cm) widest row.
- Thirteen rows make the 4.5 in (11.4 cm) body.
- The 1/8 in (0.3 cm) border brings the ornament to 3.5 in (8.9 cm) x 4.75 in (12.1 cm).
- The loop adds 1.5 in (3.8 cm) on top.
Check your test piece, and the rest will follow. Make one for every branch or every gift.
Happy crocheting!