

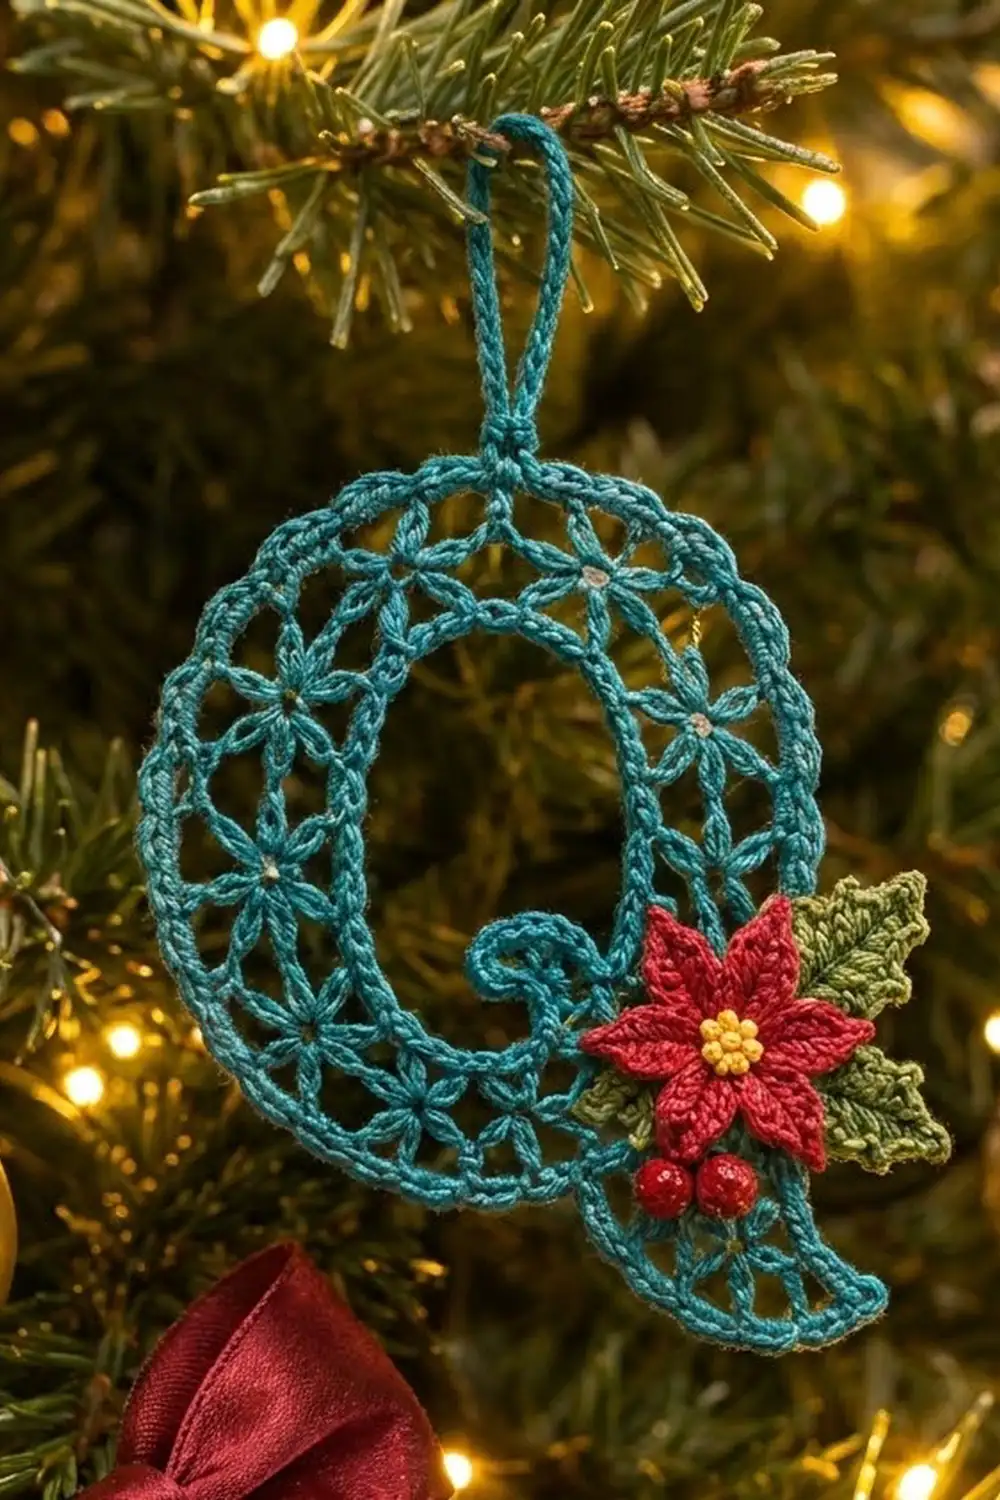
This lacy letter Q is a small heirloom ornament for the tree, a gift tag or a monogram on a wrapped present. The letter is crocheted in deep teal thread with a ring of tiny star flowers, and its rope-like edges help it keep a crisp shape.
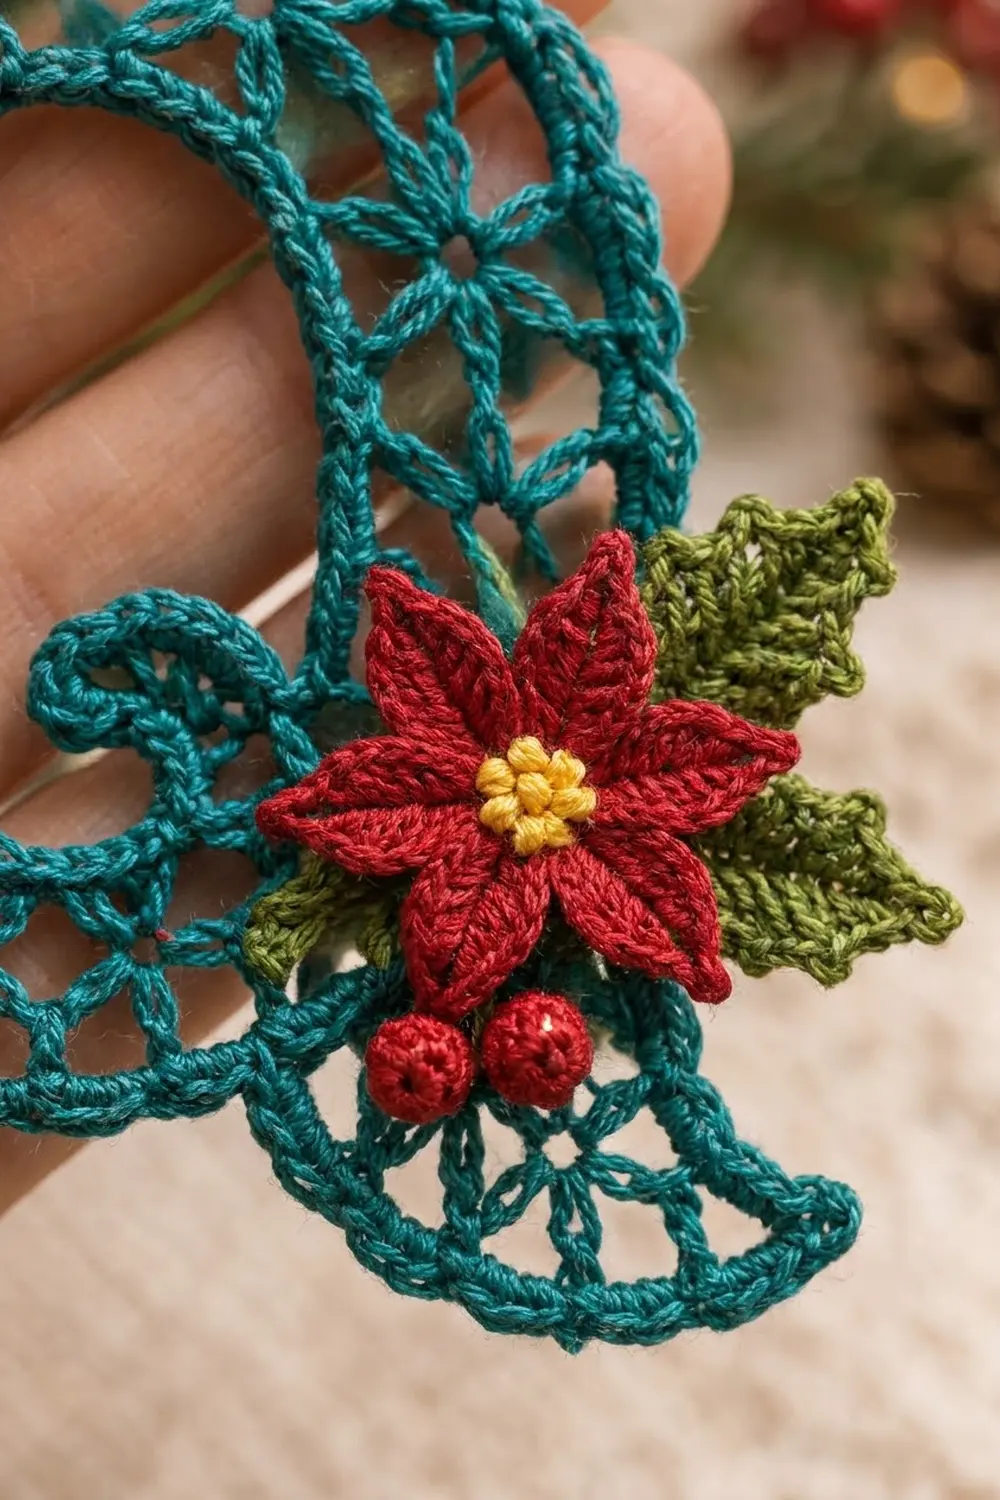
A red poinsettia with a yellow center sits where the curled tail of the Q meets the ring. Two holly leaves and two red berries finish the corner. The colors are traditional, but the teal makes the ornament feel fresh rather than plain red and green.
The pattern uses US crochet terms. The finished Q measures 3.25 in (8.3 cm) wide and 5 in (12.7 cm) tall including the tail. The hanging loop adds 1 in (2.5 cm).
You work the ring in joined rounds outward from a chain foundation. Then you crochet a crescent tail, a poinsettia, two leaves and two berries separately and sew them on. Blocking turns the round ring into the oval shape of the letter.
Finished Size and Construction
- Finished ring (oval): 3.25 in × 4.25 in (8.3 cm × 10.8 cm)
- Full height with tail: 5 in (12.7 cm); 6 in (15.2 cm) with the hanging loop
- Full width with leaves: 3.75 in (9.5 cm)
- Skill level: Intermediate
- Terminology: US
- Yarn weight: Lace (0), size 10 crochet thread
- Hook: 1.75 mm steel hook
- Number of pieces: 1 ornament: the ring, plus a tail, poinsettia, 2 leaves and 2 berries sewn on
- Layout: a single letter; nothing is joined in a grid
- Ring size before border: 3 in × 4 in (7.6 cm × 10.2 cm) after blocking
- Border depth: 1/8 in (0.3 cm) on each edge
Materials
Use mercerized cotton thread in size 10. It holds starch well and makes the star flowers stand out clearly. Avoid fuzzy or very soft acrylic thread, which blurs the lace.
- Teal: 6 g, about 38 m (ring, tail, hanging loop)
- Red: 2 g, about 13 m (poinsettia, berries)
- Green: 2 g, about 13 m (holly leaves)
- Yellow: 1 g, about 6 m (flower center)
Tools:
- 1.75 mm steel hook
- Fine tapestry needle
- Scissors
- Rustproof pins
- Foam blocking board
- Spray starch or stiffener
- Small amount of fiberfill or thread scraps (optional, for the berries)
The quantities include a margin of about 25% for your gauge swatch and weaving in ends.
Abbreviations (US Terms)
- ch chain
- sl st slip stitch
- sc single crochet
- hdc half double crochet
- dc double crochet
- tr treble crochet
- sp space
- st(s) stitch(es)
- mr magic ring
- rev sc reverse single crochet (crab stitch): working from left to right, insert the hook into the next stitch to the right, pull up a loop, then yarn over and pull through both loops
- dc2tog double crochet 2 together
Special stitch: Star cluster (dc2tog across loops). Yarn over, insert the hook into the next loop, pull up a loop, yarn over and pull through 2. Yarn over, insert the hook into the following loop, pull up a loop, yarn over and pull through 2. Yarn over and pull through all 3 loops.
Eye: ch 1 pulled snug right after a star cluster. It forms the open center of the flower.
Picot: ch 3, sl st in the 3rd ch from the hook.
Gauge and Checkpoints
Gauge: 9 sc = 1 in (2.5 cm) with size 10 thread and a 1.75 mm hook.
Work Rounds 1–3 as a test before you commit to the whole ring. Measure each round laid flat as a circle, before blocking:
- After Round 1: inner ring about 2.1 in (5.3 cm) across
- After Round 3: about 2.75 in (7.0 cm) across
- After Round 5: about 3.5 in (8.9 cm) across; this blocks into a 3 in × 4 in (7.6 cm × 10.2 cm) oval
If your work is too big, go down to a 1.5 mm hook. If it is too small or cups, go up to a 2 mm hook. Change the hook, not the stitch counts. The border math depends on the counts staying exactly as written.
Ring of the Q
With teal, ch 60 and sl st into the first ch to form a ring. Take care not to twist the chain.
Round 1: Ch 1, sc in each ch around, sl st to the first sc. (60 sc)
Round 2 (mesh): Ch 5 (counts as dc + ch 2), skip next sc. Dc in next sc, ch 2, skip next sc. Repeat from * 29 times. Sl st to the 3rd ch of the beginning ch-5. (30 dc, 30 ch-2 sps)
Round 3: Ch 1, sc in the same st. Ch 4, sc in next dc. Repeat from * 29 times. Ch 4, sl st to the first sc. (30 sc, 30 ch-4 loops)
Round 4 (star round, inward spokes): Sl st into the first ch-4 loop. Ch 2, then work a dc leg into the next ch-4 loop, finishing as for dc2tog (this counts as the first star cluster). Ch 1 for the eye.
Ch 5, star cluster over the next 2 loops, ch 1 for the eye. Repeat from * 14 times. Ch 5, sl st to the top of the first cluster. (15 star clusters, 15 eyes, 15 ch-5 sps)
Each cluster pulls two loops together into one point. These are the two lower spokes of each star.
Round 5 (star round, outward spokes): Sl st into the first eye. Ch 3 (counts as dc), then [ch 2, dc] twice in the same eye. Sc in the 3rd ch of the next ch-5.
[Dc, ch 2, dc, ch 2, dc] in the next eye, sc in the 3rd ch of the next ch-5. Repeat from * 14 times. Sl st to the top of the beginning ch-3. (15 fans: 45 dc, 30 ch-2 sps, 15 sc)
The three dc fan out from each eye. Together with the two spokes from Round 4, each flower becomes a five-spoke star.
Checkpoint: Lay the ring flat. It should measure about 3.5 in (8.9 cm) across.
Tail of the Q
With teal, ch 22.
Row 1: Sc in the 2nd ch from the hook and in the next ch. Hdc in the next 2 ch, dc in the next 3 ch, tr in the next 7 ch, dc in the next 3 ch, hdc in the next 2 ch, sc in the last 2 ch. (21 sts)
The taller stitches in the middle bow the row into a crescent.
Row 2: Ch 1, turn. Sc in the first st, ch 3, skip 1 st, sc in the next st. Repeat from * 9 times. (11 sc, 10 ch-3 loops)
Row 3: Ch 1, turn. Work 3 sc in each ch-3 loop across. (30 sc)
Row 4: Do not turn. Ch 1, rev sc in each sc back across. (30 rev sc)
Curl: You are now at the narrow starting end. Ch 10, sc in the 2nd ch from the hook, then 2 sc in each of the next 8 ch. (17 sc) The increases make the strip spiral. Sl st at the base of the curl.
Fasten off, leaving a 12 in (30.5 cm) tail for sewing.
Tail size: about 2.25 in (5.7 cm) along the curve and 0.75 in (1.9 cm) wide at the widest point.
Poinsettia
Round 1: With yellow, mr, ch 1, 5 sc in the ring. Pull the ring closed and sl st to the first sc. Fasten off. (5 sc)
Round 2 (petals): Join red in any sc. Ch 8, sl st in the 2nd ch from the hook, sc in the next ch, hdc in the next ch, dc in the next 2 ch, hdc in the next ch, sc in the last ch. Sl st in the next center sc. Repeat from * 4 more times. (5 petals, 7 sts each)
Fasten off, leaving a 10 in (25.4 cm) tail. The flower is about 1.5 in (3.8 cm) across.
Holly Leaves (make 2)
With green, ch 10.
Side 1: Sc in the 2nd ch from the hook, hdc in the next ch, dc in the next ch, picot. Dc in the next 2 ch, picot. Dc in the next ch, hdc in the next ch, sc in the next ch. Work (sc, ch 2, sc) in the last ch.
Side 2: Working in the free loops on the other side of the chain: sc in the next ch, hdc in the next ch, dc in the next ch, picot. Dc in the next 2 ch, picot. Dc in the next ch, hdc in the next ch, sc in the next ch. Sl st to the first sc.
Count: 18 sts and 4 picots per leaf.
Fasten off, leaving a 6 in (15.2 cm) tail. Each leaf is about 1 in (2.5 cm) long.
Berries (make 2)
Round 1: With red, mr, ch 1, 6 sc in the ring. (6 sc)
Round 2: Sc in each sc around. (6 sc)
Fasten off. Tuck the starting tail and a pinch of fiberfill or thread scraps inside. Weave the working tail through the front loops and pull tight to make a ball about 0.3 in (0.8 cm) wide.
Border
The rope-like edge comes from one sc round followed by one round of reverse sc. Border gauge: 9 sc per inch (2.5 cm), the same as the body.
Outer Round 6: Join teal in the top of the beginning ch-3 of Round 5, or continue from there if you have not fastened off. Ch 1.
Sc in the next dc, 2 sc in the ch-2 sp, sc in the next dc, 2 sc in the ch-2 sp, sc in the next dc, skip the sc. Repeat from * around. Sl st to the first sc.
Count: (45 sc worked 1 per dc) + (60 sc worked 2 per ch-2 sp) = 105 sc, which is 7 sc in each of the 15 fan sections.
Outer Round 7: Ch 1, rev sc in each sc around. (105 rev sc) Sl st to join and fasten off.
Inner edge: Join teal in any free loop of the foundation chain. Ch 1, rev sc in each free loop around. (60 rev sc) Sl st to join and fasten off.
Why the math works: 105 sc ÷ 9 sc per inch = 11.7 in (29.7 cm). The edge of a 3.25 in × 4.25 in (8.3 cm × 10.8 cm) oval measures about 11.8 in (30.0 cm), so the border lies flat with no ruffling or pulling.
On the inside, 60 stitches give about 6.7 in (17.0 cm), and the 1.5 in × 2.4 in (3.8 cm × 6.1 cm) hole needs about 6.2 in (15.7 cm). This slight extra length lets the inner edge stretch into its oval without tightening.
Reverse sc goes into each stitch exactly once, so it does not change the counts. It adds about 1/8 in (0.3 cm) on each side, taking the 3 in × 4 in (7.6 cm × 10.2 cm) ring to 3.25 in × 4.25 in (8.3 cm × 10.8 cm).
Hanging Loop
Position the ring so one fan section is centered at the top. Join teal in the 4th (center) rev sc of that section.
Ch 26, then sl st in the same st to form a loop. Ch 1 and work 30 sc over the chain loop. Sl st to the first sc.
Fasten off. The loop stands about 1 in (2.5 cm) tall.
Final Blocking
- Wet the ring, tail and leaves. Roll them in a towel to press out the water.
- Draw a 3.25 in × 4.25 in (8.3 cm × 10.8 cm) oval on paper and place it under plastic wrap on your board.
- Pin the ring to the outline at the 15 fan centers. Use the hanging loop as 12 o’clock.
- Gently pull each star eye open with the tip of a pin.
- Pin the tail into its crescent shape. Coil the curl flat into a spiral and pin it.
- Pin each holly leaf at its picots.
- Spray with starch, let it dry completely, then repeat for a stiffer ornament.
- Unpin when fully dry.
Assembly after blocking:
- Lay the tail across the lower right of the ring. Its concave foundation edge should overlap the outer border by 1/4 in (0.6 cm). The point should extend about 0.75 in (1.9 cm) below the ring, and the curl should point up toward the center hole.
- Whipstitch the tail in place along the overlap.
- Sew the leaves behind the spot where the tail meets the ring, one angled up and one angled down.
- Sew the poinsettia on top of the leaves, stitching through its center and petal bases.
- Sew the two berries just below the yellow center.
- Weave in all ends.
Final Quality-Control Checklist
- The ring has 60 stitches inside and 105 outside, with all 15 stars evenly spaced.
- Each star shows a clear open eye.
- The oval measures 3.25 in × 4.25 in (8.3 cm × 10.8 cm).
- The full height with the tail is 5 in (12.7 cm).
- The hanging loop is centered at the top, and the ornament hangs straight from it.
- The tail curl lies flat and is tacked down.
- The poinsettia has 5 petals evenly spaced around a yellow center.
- Both leaves show 4 picots.
- No ends show on the front.
Troubleshooting
- Ring cups: Your tension is too tight on Rounds 3–5. Loosen up or use a hook one size larger.
- Ring ruffles: Your chains are too loose. Snug up the ch-4 and ch-5 spaces.
- Stars look closed: Pull the eye chain snug, but not tight, and open it with a pin while blocking.
- Tail is too straight: Check that you worked the 7 tr in the middle of Row 1.
- Curl won’t lie flat: Starch it heavily and tack it down at two points.
- Petals curl: Steam them and press them flat under a book.
- Ornament tilts: The loop is off-center. Move it to the middle of the top fan section.
Care
Hand wash in cool water, roll in a towel, and re-block with starch. Store flat in tissue between holiday seasons.
Final Notes
Each stage depends on the one before it:
- 9 sc per inch gives a 60-stitch inner ring about 2.1 in (5.3 cm) across.
- The 15 stars spread the work to about 3.5 in (8.9 cm) across.
- Blocking turns that circle into a 3 in × 4 in (7.6 cm × 10.2 cm) oval.
- The 105-stitch border finishes the oval at 3.25 in × 4.25 in (8.3 cm × 10.8 cm).
- The tail brings the full height to 5 in (12.7 cm).
If you check each stage as you go, your Q will hang flat and evenly. Happy crocheting!