

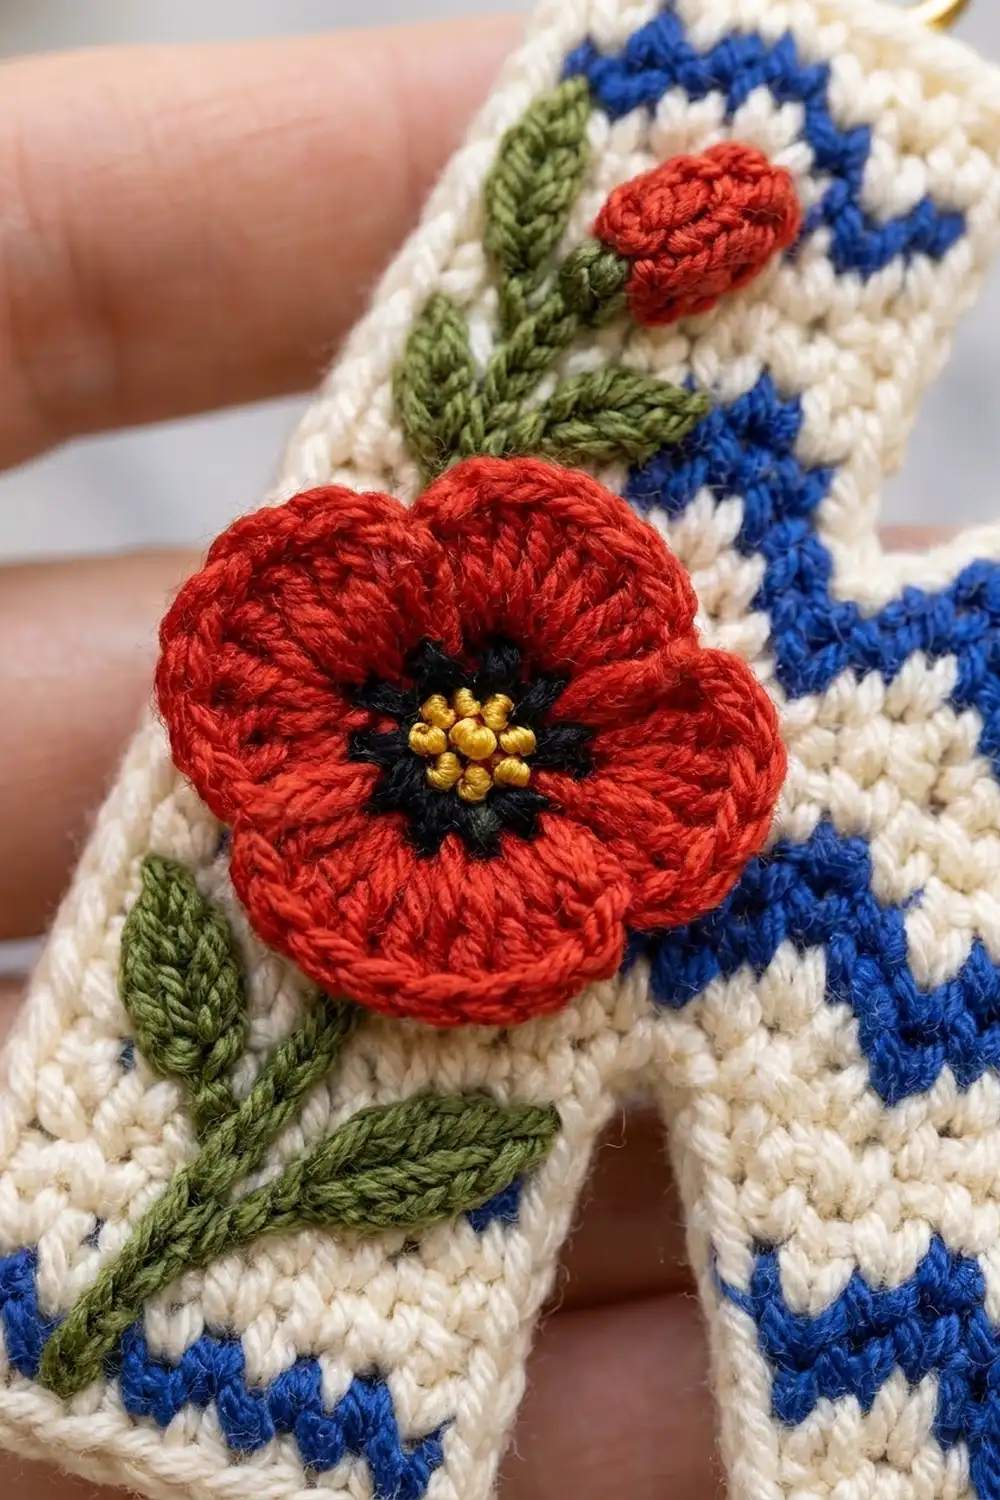
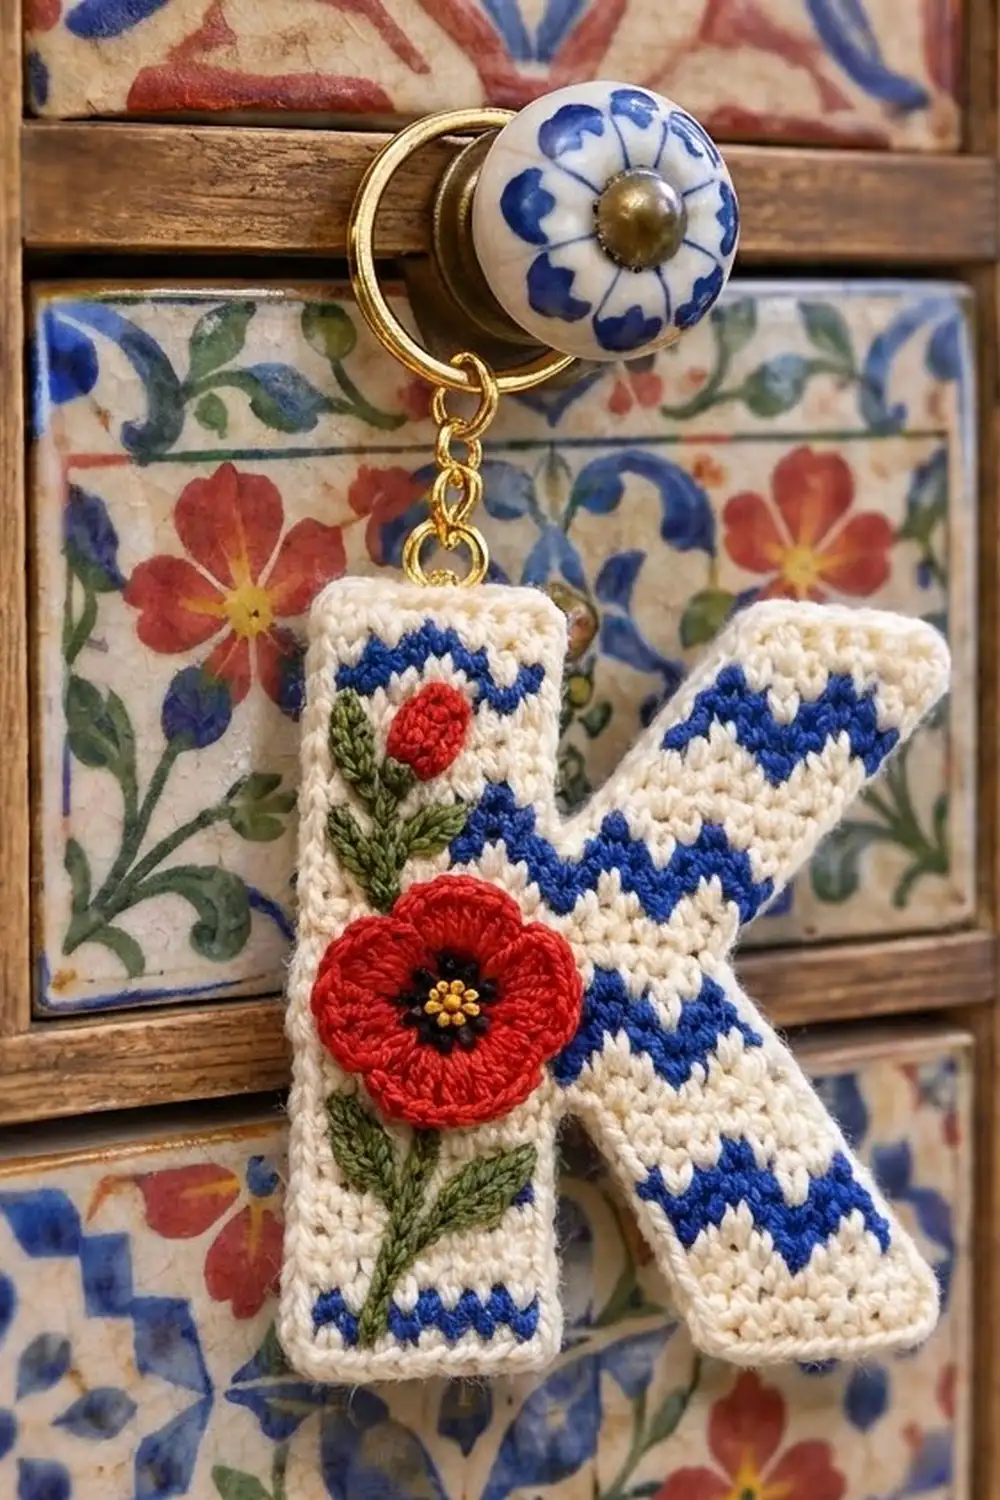
This letter K keychain is a small, sturdy charm with a lot of personality. The body is cream single crochet with bold cobalt-blue zigzag bands. A bright red poppy sits across the stem and waist of the letter, and a green stem with four small leaves and a red bud climbs the upright. A gold ring hangs from the top.
The colors are cream, cobalt blue, poppy red, leaf green, black, and a touch of yellow. The look borrows from painted folk tiles: crisp geometry in the background and one soft flower in front.
This pattern uses US crochet terms. The finished keychain measures 4.25 in (10.8 cm) tall and 3.25 in (8.3 cm) wide, not counting hardware.
You work the letter flat, in rows of tapestry single crochet, from the bottom up. You make the stem base and the diagonal leg separately and join them into one waist section. Then you split again for the upper arm and the stem top. One round of cream sc borders the outline. The poppy, bud, leaves, and stem cords are made separately and sewn on.
Finished Size and Construction
- Finished size: 4.25 in (10.8 cm) tall x 3.25 in (8.3 cm) wide
- Skill level: Intermediate (tapestry crochet, simple shaping)
- Terminology: US
- Yarn weight: Sport-weight (#2) cotton
- Hook: 2.5 mm
- Number of pieces: One letter, plus small appliqués (1 poppy, 1 bud, 4 leaves, 2 stem cords)
- Layout: Single piece; no motifs to join
- Size before border: 4 in (10.2 cm) x 3 in (7.6 cm), which is 28 rows x 18 columns
- Border depth: 1 round of sc, about 0.125 in (0.3 cm) per edge
Materials
Choose a smooth, mercerized sport-weight cotton. Cotton holds the sharp letter outline and the zigzag edges, and it resists fuzzing on a keyring. Avoid splitty or very soft yarns.
- Cream (MC): 8 g / 24 m
- Cobalt blue (CC1): 4 g / 12 m
- Poppy red (CC2): 3 g / 9 m
- Leaf green (CC3): 2 g / 6 m
- Black (CC4): 1 g / 3 m
- Yellow (CC5): 1 g / 3 m (sport yarn or 6-strand embroidery floss)
All quantities include extra for tails and a gauge check.
Tools:
- 2.5 mm crochet hook
- Tapestry needle and a sharp embroidery needle
- Gold split key ring, 1 in (2.5 cm) diameter, with a short chain
- Gold jump ring, 0.25 in (0.6 cm)
- Two pairs of jewelry pliers
- Stitch markers
- Gridded blocking mat, rustproof pins, spray bottle
Abbreviations (US Terms)
- ch – chain
- sl st – slip stitch
- sc – single crochet
- hdc – half double crochet
- dc – double crochet
- sc2tog – single crochet 2 together
- st(s) – stitch(es)
- RS / WS – right side / wrong side
- MC / CC – main color / contrast color
Tapestry sc: Lay the unused color along the tops of the stitches and work each sc over it, so the strand is hidden inside. To change color, work the last sc of the old color until 2 loops remain, then finish it with the new color.
Shift row: A 6-st row that moves a strip over by one column. The 2-sc increase sits on the leading edge and the sc2tog sits on the trailing edge, so the count stays at 6.
Gauge and Checkpoints
Gauge: 6 sts and 7 rows = 1 in (2.5 cm) in tapestry sc.
Section 1 of the letter doubles as your test piece. Measure it before you go on.
- Checkpoint 1: Stem base (6 sts x 12 rows) = 1 in (2.5 cm) wide x about 1.75 in (4.4 cm) tall.
- Checkpoint 2: After Row 16, the waist is 2 in (5.1 cm) wide and the piece is about 2.25 in (5.7 cm) tall.
- Checkpoint 3: Before the border, the letter is 4 in (10.2 cm) tall x 3 in (7.6 cm) wide.
- Checkpoint 4: After the border and blocking, it is 4.25 in (10.8 cm) x 3.25 in (8.3 cm).
If the stem base is too big, change to a 2.25 mm hook. If it is too small, change to a 2.75 mm hook. Tapestry sc tightens as you carry yarn, so keep the carried strand relaxed.
The Letter K
Reading the Color Bands
Number the columns 1 to 18 as seen from the RS, with column 1 at the left edge of the stem. Every stitch belongs to one column, so the bands line up across all sections, even on the shifted strips.
Rows 1, 5–7, 11–13, 17–19, and 23–25 are all cream. Rows 2–4, 8–10, 14–16, 20–22, and 26–28 form five zigzag bands:
- Band row a (Rows 2, 8, 14, 20, 26): blue in columns 1, 4, 5, 8, 9, 12, 13, 16, 17; cream in all others.
- Band row b (Rows 3, 9, 15, 21, 27): all blue, with cream carried inside.
- Band row c (Rows 4, 10, 16, 22, 28): blue in columns 2, 3, 6, 7, 10, 11, 14, 15, 18; cream in all others.
Row a makes the low points, row b the solid middle, and row c the high points. When a 2-sc increase spans two columns, each sc takes its own column’s color. Cut blue after each band, leaving a 6 in (15.2 cm) tail.
Odd rows are RS rows, worked from the right edge toward the left. Even rows are WS rows.
Section 1: Stem Base (Columns 1–6)
With MC, ch 7.
Row 1 (RS): Sc in 2nd ch from hook and in each ch across, turn. (6 sts)
Rows 2–12: Ch 1, sc in each st across, following the bands, turn. (6 sts per row)
Fasten off with a 6 in (15.2 cm) tail. Check Checkpoint 1.
Section 2: Lower Leg (Columns 13–18, Moving Left)
With MC, ch 7.
Row 1 (RS): Sc in 2nd ch from hook and in each ch across, turn. (6 sts; columns 13–18)
Row 2: Ch 1, sc in each st across, turn. (6 sts)
Row 3 (shift row): Ch 1, sc2tog over first 2 sts, sc in next 3 sts, 2 sc in last st, turn. (6 sts; columns 12–17)
Row 4: Ch 1, sc in each st across, turn. (6 sts)
Rows 5–12: Repeat Rows 3–4 four more times. (6 sts per row)
Rows 5–6 sit in columns 11–16, Rows 7–8 in columns 10–15, Rows 9–10 in columns 9–14, and Rows 11–12 in columns 8–13. The sc2tog is always on the outer edge, and the increase always faces the stem. Do not fasten off.
Section 3: Waist (Columns 1–12)
Row 13 (RS, joining row): Ch 1, sc2tog over first 2 leg sts, sc in next 3 leg sts, 2 sc in last leg st (the leg now fills columns 7–12). With the RS of the stem base facing, sc in each of the 6 sts across its top, turn. (6 leg sts + 6 stem sts = 12 sts)
Rows 14–16: Ch 1, sc in each st across, turn. (12 sts per row)
Use the stem-base tail to close any small gap at the join. Check Checkpoint 2.
Section 4: Upper Arm (Columns 8–13, Moving Right)
Row 17 (RS, split row): Ch 1, 2 sc in first st (column 12), sc in next 3 sts, sc2tog over next 2 sts (columns 8 and 7), turn. Leave the last 6 sts unworked. (6 sts; columns 8–13)
Row 18: Ch 1, sc in each st across, turn. (6 sts)
Row 19 (shift row): Ch 1, 2 sc in first st, sc in next 3 sts, sc2tog over last 2 sts, turn. (6 sts; columns 9–14)
Row 20: Ch 1, sc in each st across, turn. (6 sts)
Rows 21–28: Repeat Rows 19–20 four more times. (6 sts per row; the arm ends in columns 13–18)
On this section, the increase is on the outer edge and the sc2tog faces the stem. Fasten off.
Section 5: Stem Top (Columns 1–6)
Row 17 (RS): Join MC in the first unworked st of Row 16 (column 6). Ch 1, sc in the same st and in each of the next 5 sts, turn. (6 sts)
Rows 18–28: Ch 1, sc in each st across, following the bands, turn. (6 sts per row)
Fasten off. Weave in all ends on the WS. Check Checkpoint 3.
Poppy
Rnd 1 (black): Magic ring, ch 1, 10 sc in ring, sl st to first sc. (10 sts) Fasten off.
Rnd 2 (red): Join red in any st, ch 1, 2 sc in each st around, sl st to first sc. (20 sts)
Rnd 3 (petals): *Sl st in next st, (hdc, 2 dc) in next st, (2 dc, hdc) in next st, sl st in next st; repeat from * 4 more times. (5 petals of 8 sts = 40 sts)
Fasten off with a long tail. The poppy measures about 1.25 in (3.2 cm) across. With yellow, work 6 French knots (2 wraps each) evenly around the black center.
Bud
With red, ch 4. Work 4 dc in 4th ch from hook, ch 3, sl st in the same ch. Fasten off with a long tail. The bud is about 0.5 in (1.3 cm) tall. After you sew it on, add 2 lazy-daisy sepals at its base in green.
Leaves (Make 4)
With green, ch 5. Sc in 2nd ch from hook, hdc in next ch, dc in next ch, sc in last ch. (4 sts) Fasten off with a long tail. Each leaf is about 0.6 in (1.5 cm) long.
Stem Cords
Lower stem: With green, ch 12. Sl st in the back bump of the 2nd ch from hook and of each ch across. (11 sl sts; about 1.75 in / 4.4 cm)
Upper stem: With green, ch 7. Sl st in the back bump of the 2nd ch from hook and of each ch across. (6 sl sts; about 1 in / 2.5 cm)
Border
Border gauge: One sc per row end on the sides, one sc per stitch on the top and bottom edges, 3 sc in each of the 8 outer corner stitches, and one sc2tog at each of the 2 inner notches.
Border round (MC): With RS facing, join MC in the bottom-left corner st of the stem. Work counterclockwise:
- Stem bottom: 3 sc in corner st, sc in next 4 sts, 3 sc in corner st. (10 sts)
- Lower notch: Sc in next 11 row ends up the stem’s right side, sc2tog over the last stem row end and the first leg row end, sc in next 11 row ends down the leg’s inner edge. (23 sts)
- Leg bottom: 3 sc in corner st, sc in next 4 sts, 3 sc in corner st. (10 sts)
- Right side: Sc in 12 leg row ends, 4 waist row ends (Rows 13–16), and 12 arm row ends. (28 sts)
- Arm top: 3 sc in corner st, sc in next 4 sts, 3 sc in corner st. (10 sts)
- Upper notch: Sc in next 11 row ends down the arm’s inner edge, sc2tog over the last arm row end and the first stem row end, sc in next 11 row ends up the stem. (23 sts)
- Stem top: 3 sc in corner st, sc in next 4 sts, 3 sc in corner st. (10 sts)
- Left side: Sc in each of the 28 row ends. (28 sts)
Sl st to first sc. Fasten off. (142 sts)
Why the math works: Each 6-st edge becomes 10 sts: the edge’s own 6 sts plus 2 extra at each corner, with each corner st counted only once. Each side gets one sc per row end. The left side (28 rows) gets 28, and the right side (12 + 4 + 12 rows) also gets 28. Each notch has 24 row ends, and the sc2tog turns them into 23. Total: 4 x 10 + 2 x 28 + 2 x 23 = 142. One sc round adds about 0.125 in (0.3 cm) per edge. That takes 4 in (10.2 cm) x 3 in (7.6 cm) to 4.25 in (10.8 cm) x 3.25 in (8.3 cm).
Final Blocking
- Spray the letter until it is evenly damp but not dripping.
- Pin it RS up on the grid to 4.25 in (10.8 cm) x 3.25 in (8.3 cm).
- Pin each of the 8 outer corners square, and keep both diagonals at matching angles.
- Straighten the zigzag bands so they run level across all sections.
- Let it dry completely.
- Sew on the lower stem along columns 3–4, from about Row 3 up to Row 15. Sew the poppy over columns 2–8 at Rows 11–18 so it overlaps the top of the stem.
- Sew the upper stem from the poppy up to Row 24, then sew the bud at Rows 24–27. Sew 2 leaves on the lower stem and 2 on the upper stem, alternating sides.
- Open the jump ring with both pliers. Pass it through the border at the top of the stem, between columns 3 and 4, add the chain and split ring, and close it fully.
Final Quality-Control Checklist
- The letter measures 4.25 in (10.8 cm) x 3.25 in (8.3 cm).
- The border has 142 sts.
- All five zigzag bands line up across the stem, leg, and arm.
- No carried strands show on the RS.
- Both diagonals step over 1 column every 2 rows.
- The poppy has 5 even petals and 6 yellow knots.
- All appliqués are sewn down at their edges.
- The jump ring is fully closed.
Troubleshooting
Blue peeks through cream stitches: Hold the carried strand flatter, toward the back of the stitch tops.
Diagonal looks wavy: Check that every shift row has the 2-sc increase and the sc2tog on the correct edges.
Bands don’t line up after a shift: Recount columns from the RS. Each increase covers 2 columns.
Piece curls: Your carried strand is too tight. Reblock with more moisture, and carry more loosely next time.
Border ruffles: Work the border only with a 2.25 mm hook.
Notches look gappy: Pull the sc2tog snug, or close the gap with a tail.
Care
Hand wash in cool water with mild soap, press out the water in a towel, and dry flat. Do not tumble dry, because heat can loosen the appliqués.
Final Notes
The measurement chain is simple. A gauge of 6 sts and 7 rows per 1 in (2.5 cm) gives a stem base of 1 in (2.5 cm) x 1.75 in (4.4 cm). The waist is 2 in (5.1 cm) wide at 2.25 in (5.7 cm) tall, and the letter is 4 in (10.2 cm) x 3 in (7.6 cm) before the border. The 142-st border brings it to 4.25 in (10.8 cm) x 3.25 in (8.3 cm). If each checkpoint matches, your K will be crisp, flat, and ready for your keys.
Happy crocheting!