

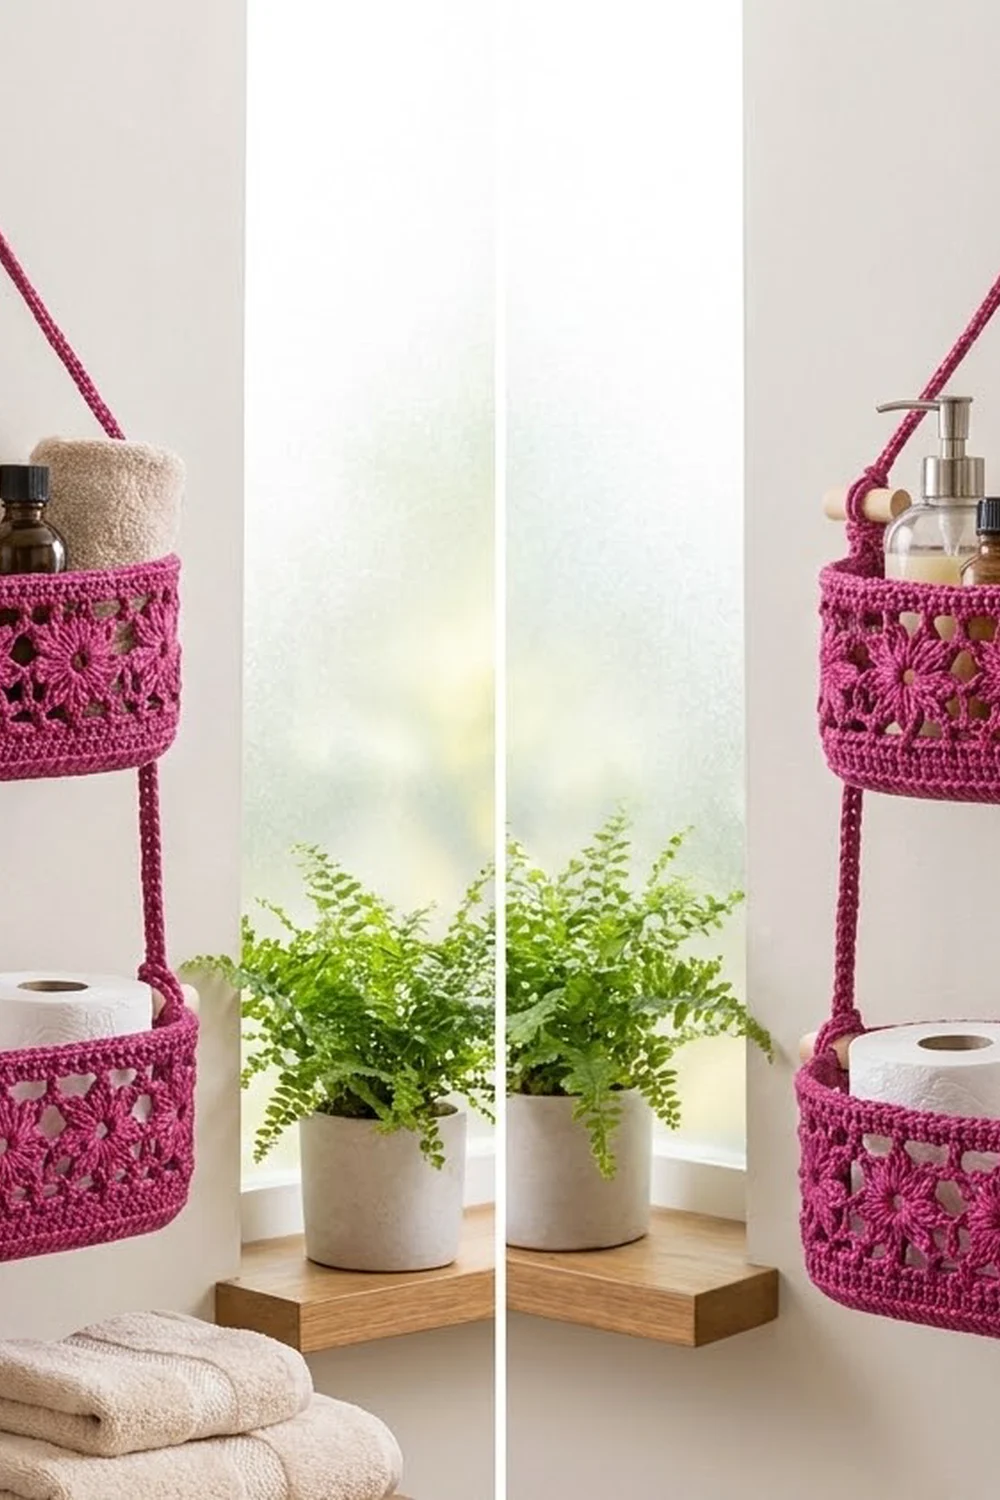
The Raspberry Bloom organizer is a pair of oval baskets that hang on a wall, one above the other. Each basket has a solid single crochet base, a band of open flower motifs around the middle and a firm rounded rim. Natural wooden pegs at each end hold the hanging cords.
It is worked in one saturated raspberry-magenta cotton. The flowers give it a vintage look, and the solid base and rim make it strong enough for bottles, brushes and toilet rolls. This pattern uses US crochet terms throughout.
Each basket measures 10 in (25.4 cm) long, 4.75 in (12.1 cm) wide and 5.75 in (14.6 cm) tall. Hung up, the whole organizer is about 24.75 in (62.9 cm) from hook to bottom. It is 12.5 in (31.8 cm) wide, measured from peg tip to peg tip.
For each basket, you crochet an oval base, work the lower wall upward and make a ring of ten flower motifs, joining them as you go. You then attach the ring to the wall, work the top section and finish with a rim border. Two long cords and four pegs join the baskets into one hanging piece.
Finished Size and Construction
- Finished size: each basket 10 in x 4.75 in x 5.75 in (25.4 x 12.1 x 14.6 cm); full organizer 24.75 in (62.9 cm) tall
- Skill level: Intermediate
- Terminology: US
- Yarn weight: worsted (#4) cotton
- Hook: US H-8 (5.0 mm)
- Number of pieces: 2 baskets, 20 flower motifs, 2 cords and 4 wooden pegs
- Layout: the two baskets stacked vertically and linked by cords
- Piece size (one basket): 10 in x 4.75 in base; walls 5.75 in (14.6 cm) tall
- Size before border: walls 5.25 in (13.3 cm) tall
- Border depth: 0.5 in (1.3 cm), 2 rounds
Materials
Yarn: Use a smooth worsted-weight cotton or cotton blend. Cotton holds the basket’s shape and doesn’t sag under weight. Avoid acrylic, which stretches when loaded.
- Raspberry/magenta: 300 g, about 465 m (509 yd)
The quantity includes about a 20% safety margin. One basket uses about 115 g (178 m), and the two cords use about 15 g (23 m).
Tools:
– US H-8 (5.0 mm) hook
– 4 wooden dowel pegs, 3/8 in (1.0 cm) diameter x 2 in (5.1 cm) long, sanded smooth
– Stitch markers (at least 4)
– Tapestry needle
– Scissors and a tape measure
– 1 wall hook rated for at least 5 lb (2.3 kg)
Abbreviations (US Terms)
- ch – chain
- sl st – slip stitch
- sc – single crochet
- hdc – half double crochet
- dc – double crochet
- tr – treble crochet
- BLO – back loop only
- inc – 2 sc in the same stitch
- rev sc – reverse single crochet (crab stitch)
- st(s) – stitch(es)
- sk – skip
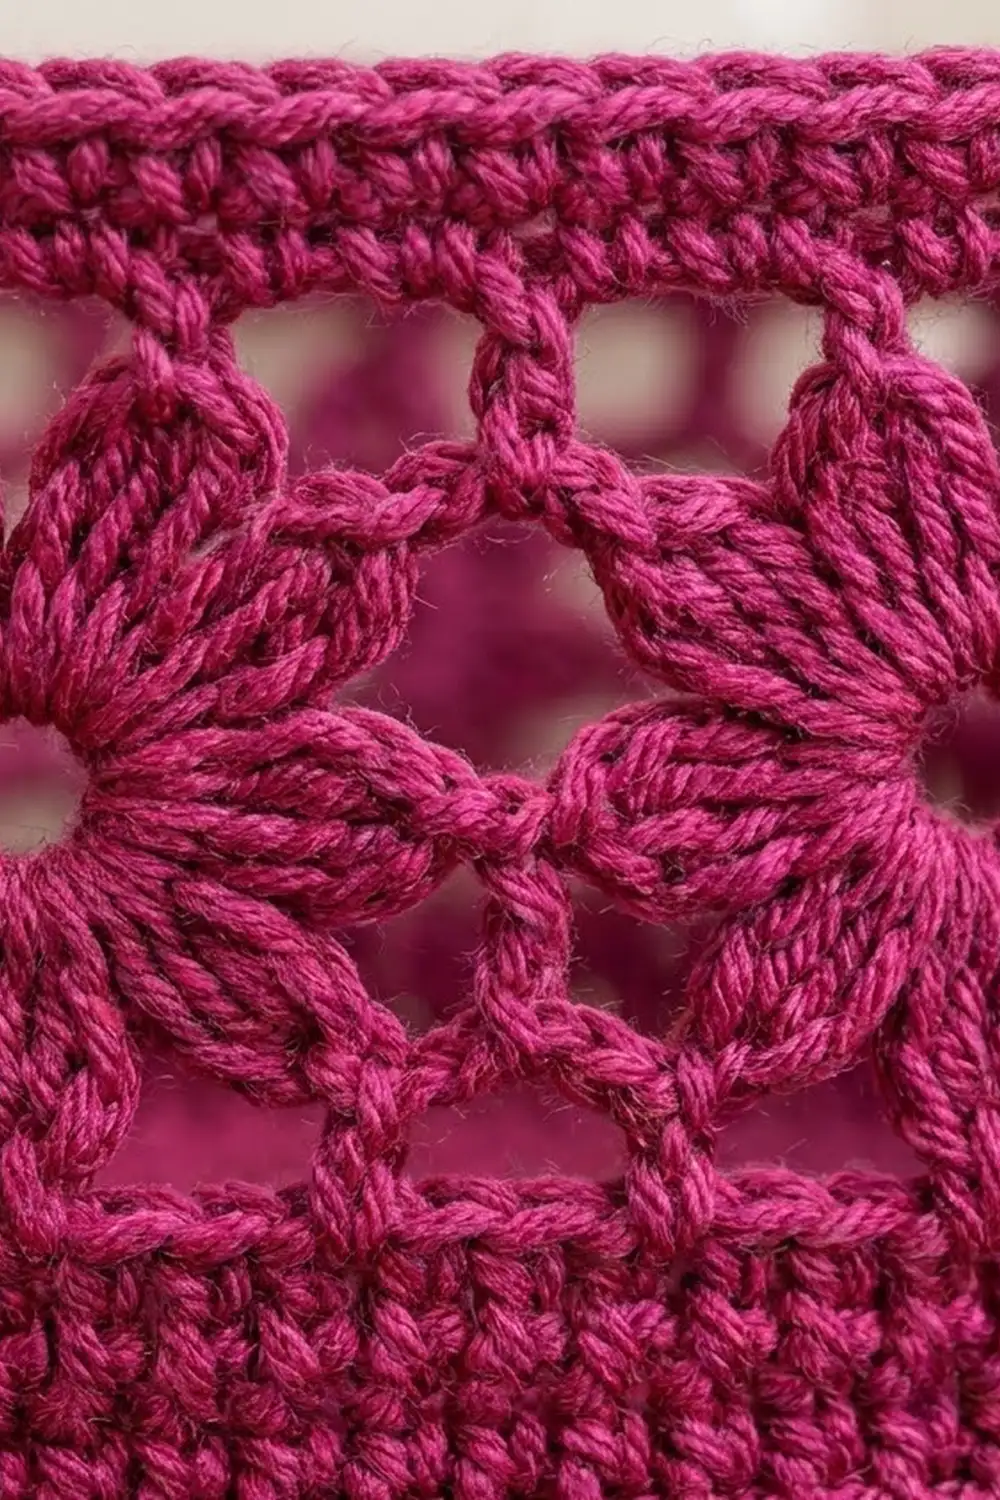
Special stitch: Petal. Work (hdc, dc, tr, dc, hdc) all into the same stitch. The tr is the tip of the petal.
Gauge and Checkpoints
Gauge: 14 sc x 16 rounds = 4 in (10.2 cm), which works out to 3.5 sts per inch and 0.25 in (0.6 cm) per round.
Before committing to a full basket, make one flower motif and the first 5 rounds of the base.
Checkpoints:
– Flower motif after Round 1: 1.25 in (3.2 cm) across
– Flower motif after Round 3: 2.5 in (6.4 cm) across
– Base after Round 5: about 8 in x 2.75 in (20.3 x 7.0 cm)
– Base after Round 9: 10 in x 4.75 in (25.4 x 12.1 cm), lying flat
– Height after wall Round 15: 1.5 in (3.8 cm) above the base ridge
If your piece is too big, go down a half size to a 4.5 mm hook. If it’s too small, go up to a 5.5 mm hook. The flower ring must fit 90 wall stitches, so match the base before you make any motifs.
Basket Base (Make 2)
Ch 21.
Rnd 1: Sc in 2nd ch from hook, sc in next 18 ch, 3 sc in last ch. Turn the chain and work along its opposite side: sc in next 18 ch, then 2 sc in the last ch (the same ch as the first sc). Join with a sl st to the first sc. (42 sts)
Each end now has 3 stitches and each straight side has 18. In every round below, ch 1 to start (it does not count as a stitch) and join with a sl st to the first sc. The pattern is always: 1 increase group, 18 straight sts, 3 increase groups, 18 straight sts, 2 increase groups.
Rnd 2: Inc in first st, sc in next 18, inc in each of next 3, sc in next 18, inc in each of last 2. (48)
Rnd 3: (Sc, inc) once, sc in next 18, (sc, inc) 3 times, sc in next 18, (sc, inc) twice. (54)
Rnd 4: (Sc 2, inc) once, sc 18, (sc 2, inc) 3 times, sc 18, (sc 2, inc) twice. (60)
Rnd 5: (Sc 3, inc) once, sc 18, (sc 3, inc) 3 times, sc 18, (sc 3, inc) twice. (66)
Rnd 6: (Sc 4, inc) once, sc 18, (sc 4, inc) 3 times, sc 18, (sc 4, inc) twice. (72)
Rnd 7: (Sc 5, inc) once, sc 18, (sc 5, inc) 3 times, sc 18, (sc 5, inc) twice. (78)
Rnd 8: (Sc 6, inc) once, sc 18, (sc 6, inc) 3 times, sc 18, (sc 6, inc) twice. (84)
Rnd 9: (Sc 7, inc) once, sc 18, (sc 7, inc) 3 times, sc 18, (sc 7, inc) twice. (90)
Each end now has 27 stitches and each straight side 18, for a total of 18 + 27 + 18 + 27 = 90. The base should measure 10 in x 4.75 in (25.4 x 12.1 cm).
Lower Wall
Rnd 10: Ch 1, sc in BLO of each st around, then join. (90) This forms the turning ridge.
Rnds 11–15: Ch 1, sc in each st around, then join. (90)
Fasten off. The wall is now 1.5 in (3.8 cm) tall.
Place 4 markers to divide the round into sections. Count 36 sts centered on each straight side (the 18 straight sts plus the 9 sts on either side of them). That leaves 9 sts at the center of each end: 36 + 9 + 36 + 9 = 90.
Flower Motifs (Make 10 per basket, joined as you go)
Motif 1:
Ch 6 and join with a sl st to form a ring.
Rnd 1: Ch 3 (counts as dc), 23 dc in the ring, then join to the top of ch-3. (24 dc)
Rnd 2: Sc in next st, Petal in next st, sc in next st. Repeat from * around, then join. (8 petals)
Rnd 3: Sl st up to the tr at the first petal tip. Ch 5, sc in the tr of the next petal. Repeat from * around, ending with the last sc in the first tip. (8 ch-5 loops) Fasten off.
The open center ring and the 8 radiating petals match the flower in the photo.
Numbering the loops: Lay the motif with loops 1–3 across the top, loop 4 at the right, loops 5–7 across the bottom and loop 8 at the left.
Motifs 2–9: Work Rounds 1–2, then work Round 3 as written until you reach loop 8. For loop 8, ch 2, sl st into loop 4 of the previous motif, ch 2, then sc in the next tip.
Motif 10: Join loop 8 to loop 4 of Motif 9 as above. Also join its loop 4 to loop 8 of Motif 1 (ch 2, sl st, ch 2), which closes the strip into a ring.
Check that all the right sides face outward and that the ring isn’t twisted.
Make All Pieces
- Baskets: 2 (base and lower wall worked as above)
- Flower motifs: 20 in total, as 2 rings of 10
- Cords: 2
- Pegs: 4
- Color: raspberry for every piece
Layout of one basket’s flower ring (seen from above):
        [M1][M2][M3][M4]        <- long side: 4 motifs = 36 sts
  [M10]                  [M5]   <- each end: 1 motif = 9 sts
        [M9][M8][M7][M6]        <- long side: 4 motifs = 36 sts
Organizer layout (front view):
            hook
           /    \
     peg-[ basket A ]-peg
         |            |
     peg-[ basket B ]-peg
Joining
Rnd 16 (attaching the ring to the wall): Slip the flower ring over the wall so that Motif 10 lines up with one end section. Join the yarn at the first st of that end section.
Sc in next st, ch 2, sl st in the next bottom loop of the motif, ch 2, sk 2 sts. Repeat from * around.
Each motif’s 3 bottom loops use 3 x 3 = 9 wall sts, and 10 motifs x 9 = 90 sts, so the round uses every stitch. (30 sc and 30 joined loops)
Rnd 17 (top conversion round): Join the yarn in loop 1 of any motif. Work 3 sc in each of the 3 top loops of every motif. Pull the first sc of each new motif snug so the triangular gap below it stays open but the round doesn’t gape.
This round has 30 loops x 3 sc = 90 sc (90). The long sides have 36 sts and the ends 9.
Rnds 18–20: Ch 1, sc around, then join. (90)
Tension advice: Keep the ch-2 bridges in Rnd 16 relaxed. If they’re too tight, the flowers will cup inward.
Checkpoint: Before the border, the wall should be 5.25 in (13.3 cm) tall and the top opening about 25.7 in (65.3 cm) around.
Border
Border gauge: same as the body, 3.5 sts per inch. The reverse sc round adds about 0.25 in (0.6 cm).
Rnd 21 (eyelet round): Ch 1. Work each section in turn:
– Long sides: sc in each of the 36 sts.
– Ends: sc 3, ch 3, sk 3, sc 3. That is 6 sc worked 1-per-stitch + 3 ch replacing the 3 skipped sts, for 9.
Join. (36 + 9 + 36 + 9 = 90)
Rnd 22: Ch 1 and work rev sc in each sc. At each end, work 3 rev sc into the ch-3 eyelet. Join and fasten off. (36 + 9 + 36 + 9 = 90)
Why the math works: Every round from Rnd 9 to Rnd 22 holds 90 sts. The motifs take up 9 sts each, the conversion round puts back exactly 9 per motif, and each eyelet replaces 3 skipped stitches with 3 chains. Because nothing is added or lost, the rim stays straight instead of flaring or puckering.
Weave in all ends.
Cords and Assembly
Cord (make 2): Ch 109. Sl st in the back bump of the 2nd ch from hook and in each ch to the end. (108 sl sts) Each cord should measure about 27 in (68.6 cm).
Lower pegs: Push a peg through one end eyelet of Basket B so that 1.25 in (3.2 cm) sticks out and 0.75 in (1.9 cm) sits inside. Repeat at the other end.
Lay the end of a cord against the outside of the peg. Wrap it 5 times around the peg and the rim together, then sew the 2 in (5.1 cm) tail flat inside the basket. Repeat with the second cord at the other end.
Upper pegs: Measure 11 in (27.9 cm) up each cord. Insert pegs into Basket A in the same way, and lash each cord 5 times around its peg at that point. Don’t cut the cords; let them continue upward.
Hanging loop: Bring the two cord tops together about 8 in (20.3 cm) above Basket A. Ch 10, sl st into the top of the second cord, then work 14 sc into the ch-10 space. Fasten off and sew all tails firmly.
Final Blocking
- Lightly mist each basket with water.
- Stuff each basket with towels or a box measuring 10 x 4.75 in (25.4 x 12.1 cm).
- Pin each flower flat and open its center ring.
- Ease each end of the rim into a smooth curve.
- Let everything dry fully, for 24 hours.
- Hang the organizer empty for 1 hour to let the cords settle, then check that the baskets hang level.
Final Quality-Control Checklist
- Each base measures 10 x 4.75 in (25.4 x 12.1 cm) and lies flat.
- Every wall round holds 90 sts.
- Each ring has 10 motifs, and all 8 loops on every motif are joined or worked.
- No flower is twisted, and the right sides face out.
- Each rim is 36 / 9 / 36 / 9 with an eyelet centered at each end.
- The pegs project evenly, 1.25 in (3.2 cm) on each side.
- The vertical drop is 11 in (27.9 cm) on both sides.
- The hanging loop is secure, with ends woven at least 2 in (5.1 cm).
Troubleshooting
- Base ruffles: You’re increasing too tightly or your hook is too large. Rework with a 4.5 mm hook.
- Base cups: Your tension is too tight. Go up a hook size.
- Ring doesn’t fit the wall: Your motif gauge is off. Remake the motifs with an adjusted hook until each one is 2.5 in (6.4 cm) across.
- Petals curl: Block the flowers flat and dampen them fully.
- Basket tilts: One cord is longer than the other. Re-lash the upper peg so the drops are equal.
- Peg slips: Add 2 more wraps and a few stitches through the wraps.
Care
Remove the pegs, then hand wash in cool water and dry flat, reshaping over a box. Don’t tumble dry.
Final Notes
The measurement chain is simple:
- Gauge: 3.5 sts per inch.
- Base: 90 sts, 10 x 4.75 in (25.4 x 12.1 cm).
- Flower ring: 10 motifs x 9 sts = 90.
- Top: 30 loops x 3 sc = 90, and the border stays at 90.
- Hanging: an 11 in (27.9 cm) drop between baskets and an 8 in (20.3 cm) triangle to the hook.
Check each link as you go, and your organizer will hang level and hold its shape for years.
Happy crocheting!