
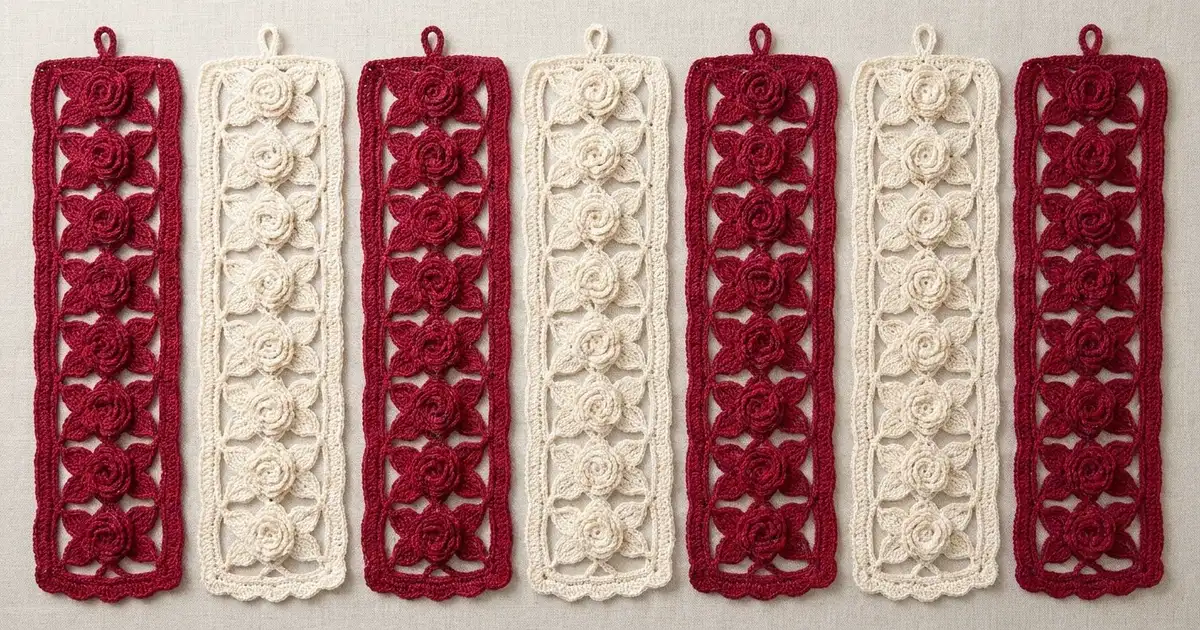
The Rosa Lattice curtain is made of seven separate lace strips. Each strip is a column of ten layered roses linked by open chain diamonds. Every rose has a leaf on each side, and a firm single-crochet rail runs down both long edges.
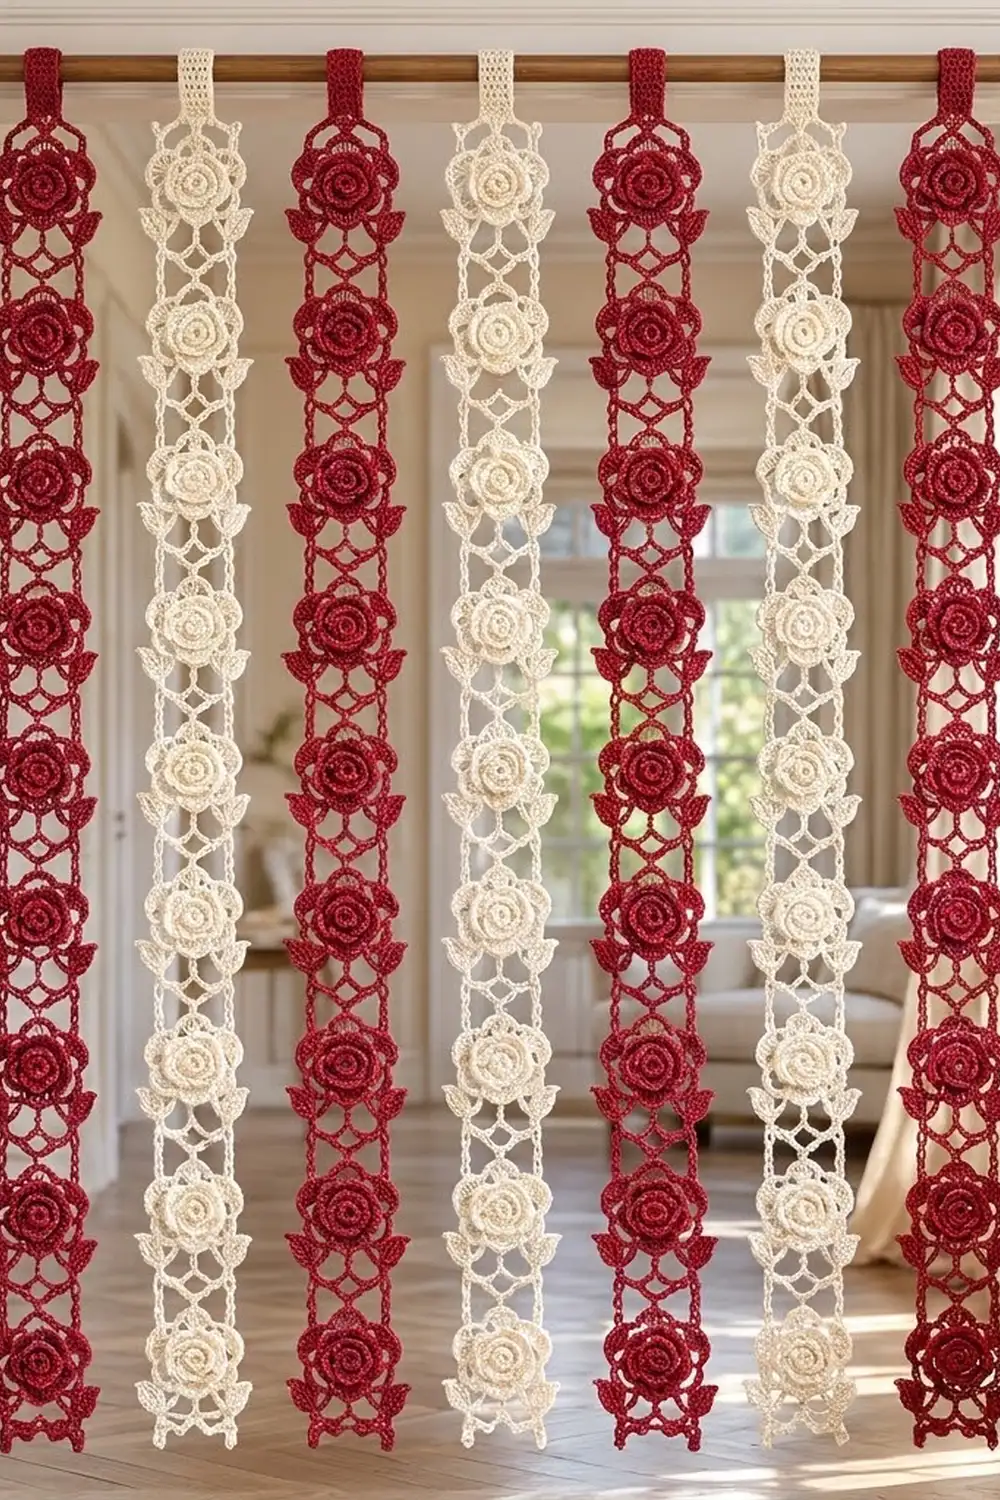
The strips alternate between deep cranberry red and soft cream: four red, three cream. Smooth cotton keeps the roses sculpted and the lattice light and airy.
This pattern uses US crochet terms. Each finished strip measures 4.5 in (11.4 cm) wide at the rails, 7 in (17.8 cm) across the leaves, and 74.5 in (189.2 cm) long including its hanging tab. Hung with their centers 7 in (17.8 cm) apart, the seven strips cover about 46.5 in (118.1 cm) of rod.
Construction is modular. You crochet each rose medallion in the round and connect the medallions with worked lace links. Then you add a rail along each long edge, crochet a hanging tab, and sew on the leaves last.
Finished Size and Construction
- Finished strip: 4.5 in (11.4 cm) wide x 74.5 in (189.2 cm) long, including tab
- Finished curtain: 7 strips, about 46.5 in (118.1 cm) wide on the rod
- Skill level: Intermediate
- Terminology: US
- Yarn weight: DK (3) cotton
- Hook: 3.5 mm (E-4)
- Pieces per strip: 10 rose medallions, 9 lace links, 20 leaves, 1 tab
- Layout: 1 column x 10 medallions per strip; 7 strips hang side by side and are not joined to each other
- Medallion size: 4 in (10.2 cm) across
- Strip size before border: 4 in (10.2 cm) x 71.5 in (181.6 cm)
- Border depth: 0.25 in (0.6 cm) per long side
Materials
Choose a mercerized or smooth combed DK cotton of about 112 m per 50 g. Cotton holds the petals upright and blocks flat. Avoid fuzzy yarns, which blur the lattice.
- Red: 550 g (1,232 m), for 4 strips
- Cream: 450 g (1,008 m), for 3 strips
These quantities include about 10% extra for swatching and differences in tension.
Tools:
– 3.5 mm (E-4) crochet hook
– Tapestry needle
– Stitch markers
– Rustproof pins and a blocking board
– Spray bottle
– Measuring tape
– Curtain rod, up to 1.5 in (3.8 cm) in diameter and at least 48 in (121.9 cm) long
Abbreviations (US Terms)
- ch – chain
- sl st – slip stitch
- sc – single crochet
- hdc – half double crochet
- dc – double crochet
- tr – treble crochet
- sp – space
- st(s) – stitch(es)
- RS / WS – right side / wrong side
Special stitch – sc around post: Insert your hook from back to front to back around the post of the stitch named, yarn over, pull up a loop, yarn over, and pull through both loops. This anchors each petal layer behind the one before it.
Gauge and Checkpoints
Gauge: 20 sc and 24 rows = 4 in (10.2 cm). One finished medallion (Rounds 1–9) = 4 in (10.2 cm) across.
Make one medallion first and measure it lying flat, without stretching it.
- After Round 3: 1.5 in (3.8 cm)
- After Round 5: 2.25 in (5.7 cm)
- After Round 7: 3 in (7.6 cm)
- After Round 9: 4 in (10.2 cm)
If the medallion is larger than this, go down half a hook size. If it is smaller, go up half a size. Being off by just 0.25 in (0.6 cm) per medallion adds up to 2.5 in (6.4 cm) over one strip.

Rose Medallion (make 10 per strip)
Use the strip color throughout.
Round 1: Make a magic ring, ch 1, work 12 sc in the ring, sl st to first sc. Pull the ring closed. (12 sc)
Round 2: Ch 1, sc in first sc, ch 3, skip next sc, sc in next sc, ch 3, skip next sc; repeat from * 4 more times, sl st to first sc. (6 sc, 6 ch-3 sps)
Round 3 (first petals): Sl st in first ch-3 sp, ch 1, work (sc, hdc, 3 dc, hdc, sc) in each ch-3 sp around, sl st to first sc. (6 petals, 42 sts)
Round 4: Working behind the petals, ch 1, sc around post of first Round 2 sc, ch 5, sc around post of next Round 2 sc, ch 5; repeat from * 4 more times, sl st to first sc. (6 sc, 6 ch-5 sps)
Round 5 (second petals): Sl st in first ch-5 sp, ch 1, work (sc, hdc, 5 dc, hdc, sc) in each ch-5 sp around, sl st to first sc. (6 petals, 54 sts)
Round 6: Working behind the petals, ch 1, sc around post of first Round 4 sc, ch 7, sc around post of next Round 4 sc, ch 7; repeat from * 4 more times, sl st to first sc. (6 sc, 6 ch-7 sps)
Round 7 (third petals): Sl st in first ch-7 sp, ch 1, work (sc, hdc, 7 dc, hdc, sc) in each ch-7 sp around, sl st to first sc. (6 petals, 66 sts)
Round 8 (frame loops): Sl st in next hdc and in next 4 dc. You are now in the 4th (center) dc of the first petal. Ch 1, sc in same dc, ch 6, sc in the gap between this petal and the next, ch 6, sc in center dc of next petal, ch 6, sc in gap before the following petal, ch 6; repeat from * 4 more times, sl st to first sc. (12 sc, 12 ch-6 loops)
Turn the medallion so that one petal-center sc is at 12 o’clock. The 12 loops now sit at clock positions 12:30, 1:30, 2:30, and so on around to 11:30. The rest of the pattern uses these clock positions to name the scallops.
Round 9 (scalloped frame): Sl st in first ch-6 loop, ch 1, work (2 sc, hdc, dc, ch 3, dc, hdc, 2 sc) in each loop around, sl st to first sc. Fasten off and weave in the ends. (96 sts, 12 ch-3 picots)
Checkpoint: the medallion measures 4 in (10.2 cm) across and lies flat without ruffling.
Leaf (make 20 per strip)
Ch 10.
Round 1: Sc in 2nd ch from hook, hdc in next ch, dc in next ch, tr in next 2 ch, dc in next 2 ch, hdc in next ch, 3 sc in last ch. Now work along the other side of the foundation chain: hdc in next ch, dc in next 2 ch, tr in next 2 ch, dc in next ch, hdc in next ch, sc in last ch. Ch 3, sl st in first sc to make the tip picot. (19 sts plus a ch-3 picot)
Fasten off and leave a 10 in (25.4 cm) tail for sewing. Each leaf is 2 in (5.1 cm) long and 1 in (2.5 cm) wide.
Make All Pieces
| Color | Strips | Medallions | Links | Leaves | Tabs |
|---|---|---|---|---|---|
| Red | 4 | 40 | 36 | 80 | 4 |
| Cream | 3 | 30 | 27 | 60 | 3 |
Curtain layout, left to right:
[R] [C] [R] [C] [R] [C] [R]
Each strip, from top to bottom:
Tab / M1 / L / M2 / L / ... / L / M10
M = medallion, L = lace link (9 links per strip).
Joining: Lace Links
Each link is worked directly between two medallions: Medallion A above and Medallion B below. Lay both flat, RS up, with 12 o’clock at the top.
Row 1 (RS): Join yarn with sc in the picot of A’s 4:30 scallop, ch 7, sc in picot of next scallop; repeat from * 2 more times (5:30, 6:30, 7:30). (4 sc, 3 ch-7 loops)
Row 2 (WS): Ch 8 (counts as tr and ch 4), turn, sc in 4th ch of first ch-7 loop, ch 7, sc in 4th ch of next loop; repeat from * once more, ch 4, tr in last sc. (2 tr, 3 sc; 2 ch-4 sps, 2 ch-7 loops)
Row 3 (RS): Ch 1, turn, sc in first tr, ch 7, sc in 4th ch of next ch-7 loop; repeat from * once more, ch 7, sc in 4th ch of turning ch-8. (4 sc, 3 ch-7 loops)
Row 4 (WS, joining row): Ch 1, turn, sc in first sc. Now zigzag between the lattice and Medallion B, working B’s top picots from left to right as they face you: ch 4, sc in B’s 10:30 picot, ch 4, sc in 4th ch of next loop, ch 4, sc in B’s 11:30 picot, ch 4, sc in 4th ch of next loop, ch 4, sc in B’s 12:30 picot, ch 4, sc in 4th ch of next loop, ch 4, sc in B’s 1:30 picot, ch 4, sc in last sc. Fasten off. (9 sc, 8 ch-4 sps; 4 picots joined)
How the stitches line up: Row 1 uses A’s four lower picots. In Row 4, five lattice points alternate with B’s four upper picots. Nothing is added or skipped, so the link stays centered.
Tension: Keep the chains even. Each link should measure 3.5 in (8.9 cm) from A’s lower edge to B’s upper edge.
Size checkpoint: 3 medallions and 2 links measure 19 in (48.3 cm). 5 medallions and 4 links measure 34 in (86.4 cm). All 10 medallions and 9 links measure 71.5 in (181.6 cm).
Border: Side Rails
Border gauge: 5 sc = 1 in (2.5 cm), worked over chains.
Each rail attaches to every medallion twice and to every link once.
Row 1 (right rail): With RS facing, join with sc in the picot of M1’s 2:30 scallop, ch 4, sc in M1’s 3:30 picot. Ch 15, sc in the edge tr of the next link’s Row 2, ch 15, sc in 2:30 picot of next medallion, ch 4, sc in 3:30 picot of same medallion; repeat from * 8 more times. (29 anchor sc: 10 medallions x 2 + 9 links x 1; 10 ch-4 sps; 18 ch-15 sps)
Row 2: Ch 1, turn, sc in first sc, 4 sc in ch-4 sp, sc in next sc, (15 sc in ch-15 sp, sc in next sc) twice; repeat from * 8 more times, 4 sc in last ch-4 sp, sc in last sc. Fasten off. (339 sc)
Count check: 29 anchors + (10 x 4) + (18 x 15) = 29 + 40 + 270 = 339 sc.
Left rail: Work the same two rows down the other side. Join in M1’s 9:30 picot, then work into its 8:30 picot, and continue down the strip. (Row 1: 29 anchor sc; Row 2: 339 sc)
Why the math works: The rail runs from M1’s side picots to M10’s side picots, about 68.5 in (174.0 cm). At 5 sc per inch, 339 sc measure 67.8 in (172.2 cm). That is within 1%, so the rail sits slightly taut and keeps the strip straight without puckering.
Hanging Tab
Row 1: With RS facing, join with sc in M1’s 12:30 picot, ch 8, sc in M1’s 11:30 picot. (2 sc, 1 ch-8 sp)
Row 2: Ch 1, turn, sc in first sc, 8 sc in ch-8 sp, sc in last sc. (10 sc)
Rows 3–37: Ch 1, turn, sc in each sc across. (10 sc)
The tab is 2 in (5.1 cm) wide and 6 in (15.2 cm) long. Fold it to the back and sew Row 37 to Row 2. This makes a 3 in (7.6 cm) loop that fits a rod up to 1.5 in (3.8 cm) in diameter.
Leaves: Sew one leaf to the back of each medallion at 4 o’clock and one at 8 o’clock, tucking the base under the frame. Angle each leaf out and up at 45 degrees so it lies over the rail.
Final Blocking
- Weave in all ends.
- Pin the rails straight and 4.5 in (11.4 cm) apart, blocking one half of the strip at a time if needed.
- Pin the strip to 71.5 in (181.6 cm) long, from the top of M1 to the bottom of M10.
- Pin the frame picots so each medallion is round at 4 in (10.2 cm), and pin each lattice diamond open.
- Spray until damp, then shape the petals upward with your fingers.
- Let the strip dry completely before you unpin it.
Final Quality-Control Checklist
- Every medallion is 4 in (10.2 cm) across and has 12 picots.
- Every strip has 10 medallions, 9 links, and 20 leaves.
- Every link is 3.5 in (8.9 cm).
- Each rail has 29 anchor sc in Row 1 and 339 sc in Row 2.
- Strips hang at 74.5 in (189.2 cm) and match within 0.5 in (1.3 cm).
- The color order is R, C, R, C, R, C, R.
Troubleshooting
Petals flop forward: Work the post sc in Rounds 4 and 6 firmly, then steam the petals into a cup shape.
Frame ruffles: The ch-6 loops are too long for your tension. Try ch 5.
Strip curves sideways: One rail is tighter than the other. Rework it, keeping 15 sc in each ch-15.
Strips differ in length: Measure each link and redo any that is off by more than 0.25 in (0.6 cm).
Tab stretches: Crochet the tab with a smaller hook.
Care
Hand wash in cool water with mild soap, then press out the water in a towel. Dry flat and re-pin if needed. Never hang wet strips, because their weight will stretch them.
Final Notes
The whole curtain follows one chain of measurements. Each repeat is a 4 in (10.2 cm) medallion plus a 3.5 in (8.9 cm) link. Ten medallions and nine links make 71.5 in (181.6 cm). Two 339-sc rails keep that length straight at 4.5 in (11.4 cm) wide. The tab adds 3 in (7.6 cm), so each strip hangs at 74.5 in (189.2 cm). Check each stage and all seven strips will hang evenly.
Happy crocheting!