

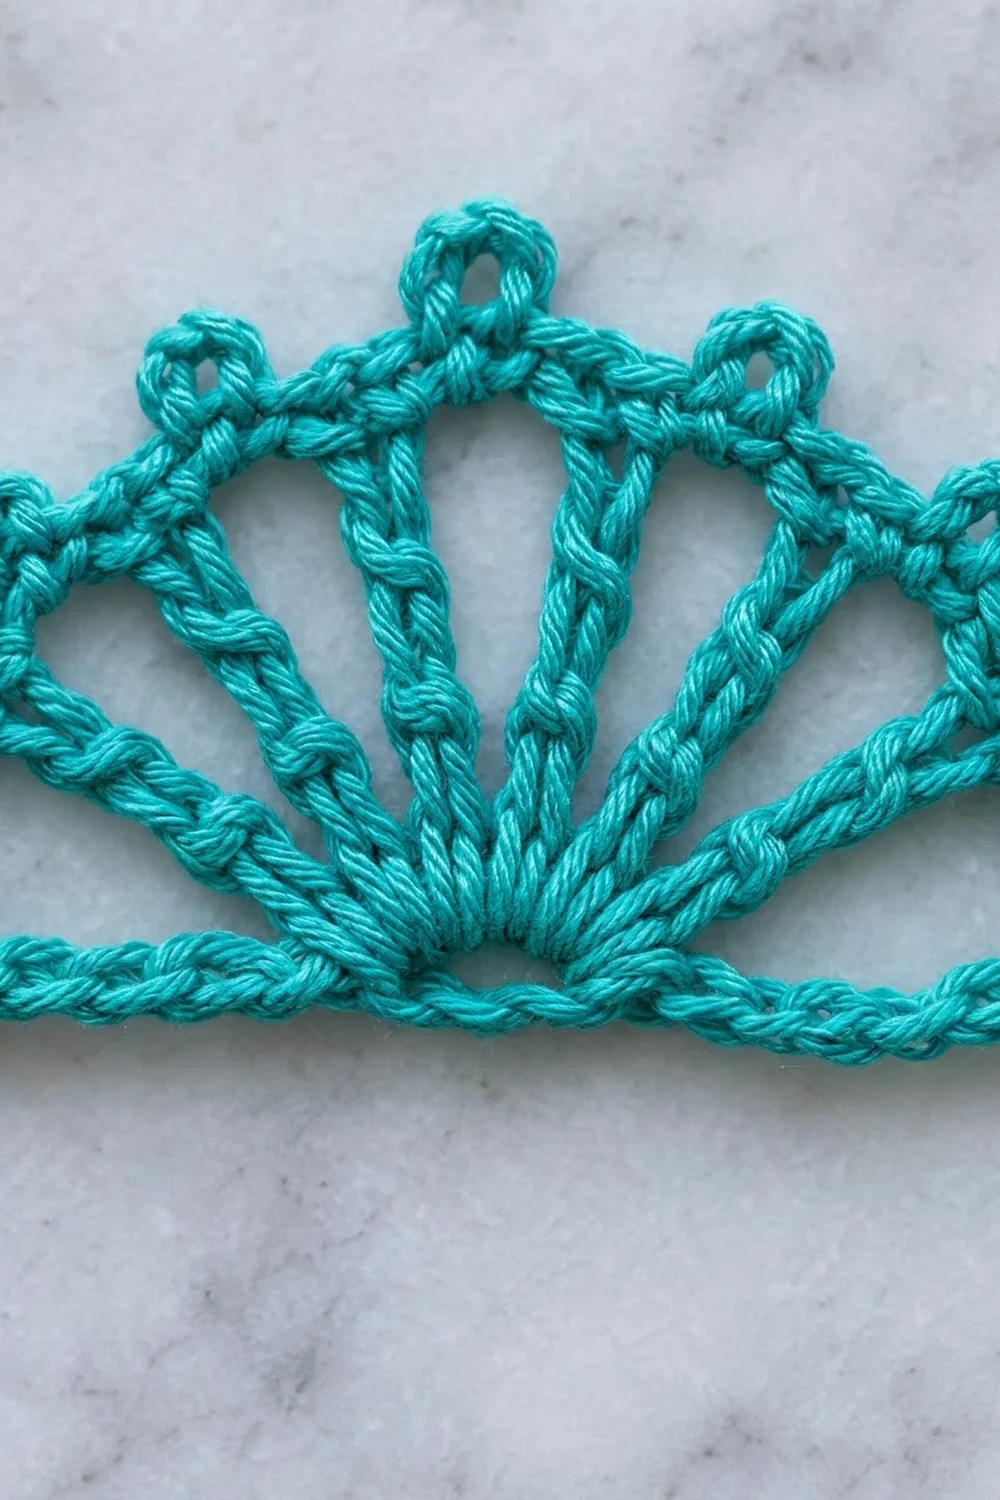
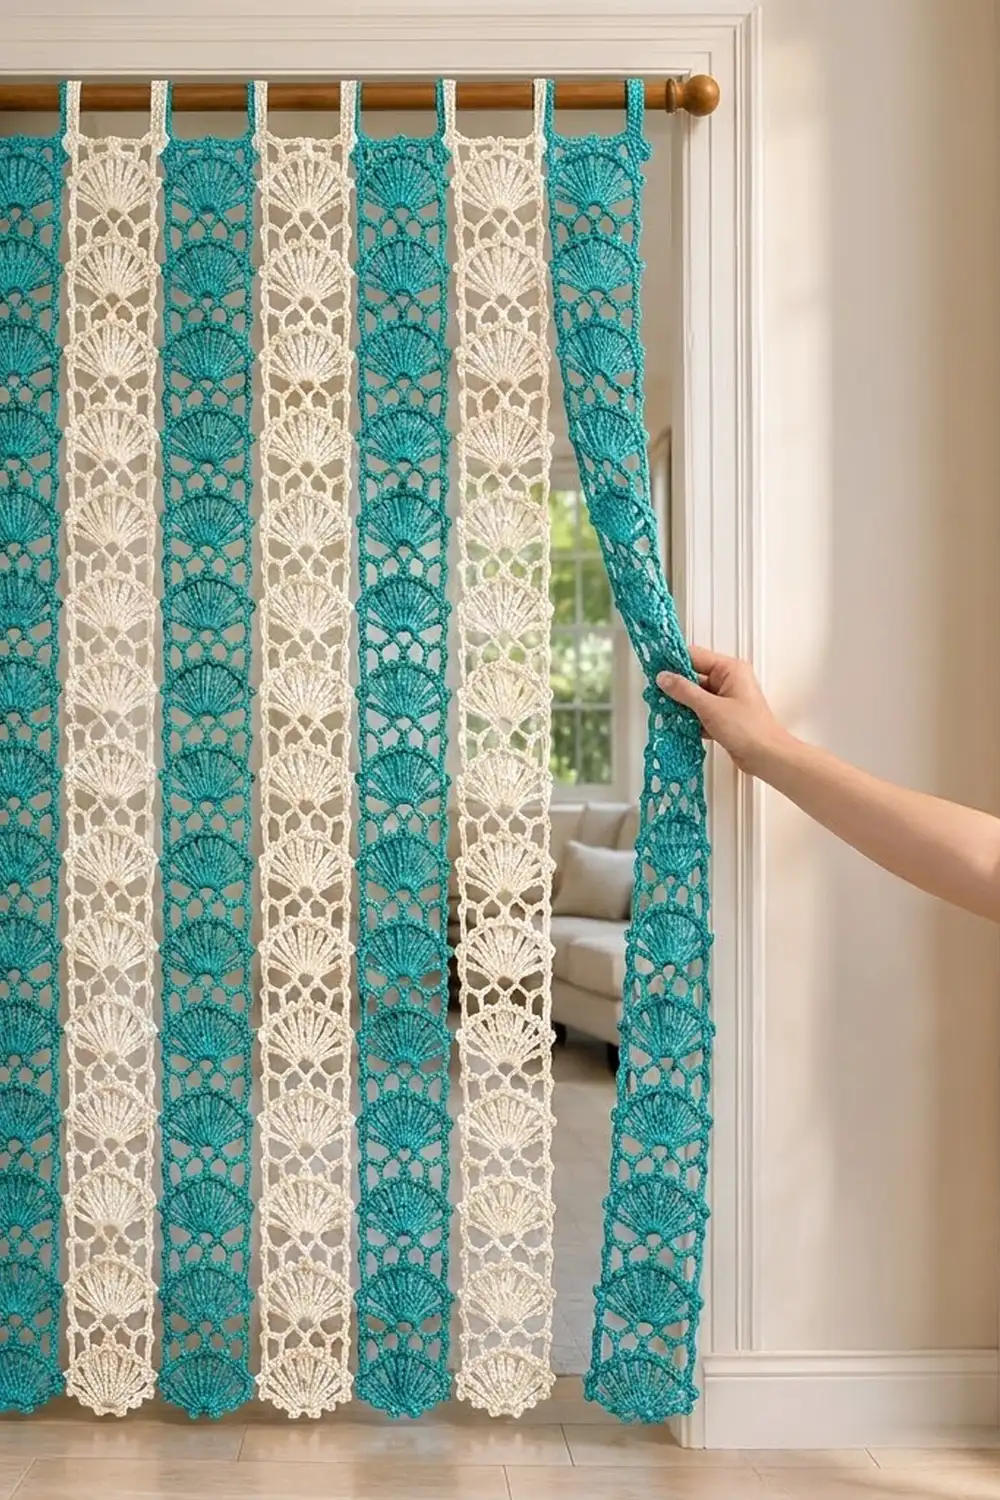
This door curtain is made of seven separate lace strips that hang side by side from a rod. Each strip is a tall column of open fans. Every fan has nine treble spokes, each spoke ends in a tiny picot, and chain arches form a light lattice between the fans. The strips move easily, let light through, and you can walk through them like a bead curtain.
The sample alternates deep teal and warm cream: four teal strips and three cream ones. The look is coastal and a bit vintage, but you can use any two colors you like. Smooth mercerized cotton shows the picots and spokes clearly and keeps its shape over many months of use.
All instructions use US crochet terms. Each finished strip measures 5 in (12.7 cm) wide and 78.5 in (199.4 cm) long below the rod tab. The tab adds about 2 in (5.1 cm), so each strip is about 80.5 in (204.5 cm) from the top of the tab. Hung with 0.25 in (0.6 cm) gaps, the seven strips fill a rod span of 36.5 in (92.7 cm).
Each strip starts with a single-crochet foundation row. Then you repeat a 3-row block 31 times: a fan row, a picot row, and a lattice row. After a single-crochet top row, you work the rod tab straight up, fold it, and sew it down. A 2-row picot edging finishes the sides and bottom.
Finished Size and Construction
- Finished strip size: 5 in (12.7 cm) wide x 78.5 in (199.4 cm) long, plus a 2 in (5.1 cm) tab
- Full curtain: 36.5 in (92.7 cm) wide on the rod
- Skill level: Intermediate
- Terminology: US
- Yarn weight: DK (#3) cotton
- Hook: 3.5 mm (E-4)
- Number of pieces: 7 strips (4 teal, 3 cream)
- Layout: 7 strips in one row, not joined to each other
- Strip size before edging: 4 in (10.2 cm) x 78 in (198.1 cm)
- Edging depth: 0.5 in (1.3 cm) on each long side and on the bottom
Materials
Use a smooth DK-weight mercerized cotton, about 115 m per 50 g. Cotton holds the fan shapes, doesn’t stretch much, and stands up to being handled in a doorway. Don’t use acrylic or loosely spun yarns, because long strips of them can stretch over time.
- Teal (Color A): 700 g (about 1610 m), for 4 strips
- Cream (Color B): 550 g (about 1265 m), for 3 strips
Each strip uses about 155 g. These quantities include a margin for your gauge swatch and small tension differences.
Tools:
– 3.5 mm (E-4) crochet hook
– Tapestry needle
– Stitch markers
– Measuring tape
– Rust-proof pins and a long blocking surface
– Curtain rod, up to 1 in (2.5 cm) in diameter
Abbreviations (US Terms)
- ch – chain
- sl st – slip stitch
- sc – single crochet
- tr – treble crochet
- sp(s) – space(s)
- st(s) – stitch(es)
- RS / WS – right side / wrong side
Special stitches:
- Picot: Ch 3, then sl st into the front loop and left leg of the sc you just made.
- Fan: In one stitch, work [tr, (ch 1, tr) 8 times]. That is 9 tr and 8 ch-1 spaces.
Gauge and Checkpoints
Gauge: 21 sc = 4 in (10.2 cm). One 3-row fan repeat = 2.5 in (6.4 cm) tall.
The rows in one repeat measure about:
– Fan row: 1 in (2.5 cm)
– Picot row: 0.5 in (1.3 cm)
– Lattice row: 1 in (2.5 cm)
Make a swatch first. Work Rows 1–10 below. That’s the foundation row plus 3 fan repeats. Measure it before you commit to seven strips.
Checkpoints:
– After Row 1: 4 in (10.2 cm) wide
– After Row 4: 2.75 in (7.0 cm) long
– After Row 10 (swatch): 7.75 in (19.7 cm) long
– After 20 fans: 50.25 in (127.6 cm) long
– After Row 94: 77.75 in (197.5 cm) long
– After Row 95: 78 in (198.1 cm) long
– After the edging: 5 in (12.7 cm) wide and 78.5 in (199.4 cm) long
If your swatch is too big: If Row 1 measures 4.25 in (10.8 cm) or more, go down half a hook size. If only the length is too long, make your trebles shorter by not pulling up the first loop as high.
If it is too small: If Row 1 measures 3.75 in (9.5 cm) or less, go up half a hook size. Count every fan tr, because a missing spoke pulls the arc in.
Being off by 0.25 in (0.6 cm) in width is fine. The length can be off by 1 in (2.5 cm), and you can correct it by adding or leaving out one repeat.
Strip Pattern (Make 7)
Each strip is worked flat in rows from the bottom up. The turning chains count as stitches where noted.
Foundation: Ch 22.
Row 1 (RS): Sc in 2nd ch from hook and in each ch across. Turn. (21 sc)
Number these stitches 1 to 21. Stitch 11 is the center.
Row 2 (first fan row): Ch 4 (counts as tr), ch 4, skip sts 2–10, Fan in st 11, ch 4, skip sts 12–20, tr in st 21. Turn.
(11 tr: 2 edge tr + 9 fan tr; 8 ch-1 sps; 2 ch-4 sps)
Row 3 (picot row): Ch 1, sc in first tr, ch 3, (sc, picot) in first fan tr, ch 2, (sc, picot) in next fan tr; repeat from * 7 more times, ch 3, sc in 4th ch of turning ch. Turn.
(11 sc; 9 picots; 8 ch-2 sps; 2 ch-3 sps)
The 9 picots sit on the tips of the 9 spokes. This gives each fan its beaded edge.
Row 4 (lattice row): Ch 7 (counts as tr + ch 3), sc in the 3rd fan sc, ch 5, sc in the 5th (center) fan sc, ch 5, sc in the 7th fan sc, ch 3, tr in the last sc. Turn.
(2 tr; 3 sc; 2 ch-3 sps; 2 ch-5 sps)
The two ch-5 arches and the ch-3 side spaces form the open lattice. The center sc is the base for the next fan, so each fan starts at the center of the one below.
Row 5 (fan row): Ch 4 (counts as tr), ch 4, skip the ch-3 sp, sc, and ch-5 sp, Fan in the center sc, ch 4, skip the ch-5 sp, sc, and ch-3 sp, tr in 4th ch of turning ch-7. Turn.
(11 tr: 2 edge tr + 9 fan tr; 8 ch-1 sps; 2 ch-4 sps)
Rows 6–92: Work Rows 3, 4, and 5 in that order 29 more times. (Row 92 is a fan row.)
Row 93: Work as Row 3. (11 sc; 9 picots)
Row 94: Work as Row 4. (2 tr; 3 sc; 2 ch-3 sps; 2 ch-5 sps)
Fan count check: Row 2, plus Rows 5 through 92 (every third row), gives 1 + 30 = 31 fans.
Row 95 (top row): Ch 1, sc in the first tr, 3 sc in the ch-3 sp, sc in the sc, 5 sc in the ch-5 sp, sc in the sc, 5 sc in the ch-5 sp, sc in the sc, 3 sc in the ch-3 sp, sc in 4th ch of turning ch-7. Turn.
(1 + 3 + 1 + 5 + 1 + 5 + 1 + 3 + 1 = 21 sc)
This brings the top back to the same 21 stitches as Row 1, so the top edge is as wide as the bottom. The strip now measures 4 in x 78 in (10.2 cm x 198.1 cm): 0.25 in (0.6 cm) for Row 1, plus 31 repeats x 2.5 in (6.4 cm), plus 0.25 in (0.6 cm) for Row 95.
Rod Tab
Rows 96–111: Ch 1, sc in each sc across. Turn. (21 sc in each of 16 rows)
The tab is now 4 in (10.2 cm) long. Fasten off and leave a 16 in (40.6 cm) tail. Fold the tab to the WS and whipstitch Row 111 to the back of Row 95, one stitch to one stitch (21 stitch pairs). This makes a tunnel about 2 in (5.1 cm) tall that fits rods up to 1 in (2.5 cm) in diameter. Leave both sides of the tunnel open.
Make All Pieces
- Teal (Color A): 4 strips
- Cream (Color B): 3 strips
Layout, left to right:
| A | B | A | B | A | B | A |
Teal strips are on both outer edges, so the curtain looks balanced from either side of the doorway.
Joining (Hanging Method)
The strips are not sewn or crocheted together. Each strip hangs on its own, so you can push it aside as you walk through and it settles back into place.
- Slide the strips onto the rod through their tunnels, in layout order.
- Space them about 0.25 in (0.6 cm) apart. Seven strips at 5 in (12.7 cm) is 35 in (88.9 cm). Six gaps at 0.25 in (0.6 cm) add 1.5 in (3.8 cm), for a total of 36.5 in (92.7 cm).
- If your doorway is wider, spread the gaps evenly rather than leaving all the extra space at the ends.
Tension: Sew the tab seam with even, moderate tension. If you pull the whipstitch tight, the top of the strip will pucker and the strip will hang crooked.
Size check: Before you hang them, lay all seven strips side by side. Their lengths should match within 1 in (2.5 cm).
Border (Side and Bottom Edging)
The edging goes down one long side, across the bottom, and up the other side. It is not worked across the tab.
Border gauge: 7 sc per 2.5 in (6.4 cm) fan repeat along the side.
Edging Row 1: With RS facing, join yarn at the right-hand end of Row 95. Work down the side as follows:
– 1 sc in the end of Row 95
– For each of the 31 repeats: 3 sc around the lattice-row tr post, 1 sc in the end of the picot row, and 3 sc around the fan-row tr post (7 sc per repeat)
– 1 sc in the end of Row 1
Ch 2 for the corner. Work 1 sc in each of the 21 foundation chains. Ch 2 for the corner. Work up the second side the same way. Turn.
Counts: Each side has 1 + (31 x 7) + 1 = 219 sc. The bottom has 21 sc. There is a ch-2 corner space at each bottom corner.
Edging Row 2: Ch 1. On the first side, (sc, picot) in next sc, ch 2, skip next 2 sc; repeat from * 73 times. Work (sc, ch 3, sc) in the corner sp. On the bottom, repeat from * 7 times. Work (sc, ch 3, sc) in the corner sp. On the last side, repeat from * 73 times, but after the final ch 2, sl st in the last sc. Fasten off.
Counts: 73 + 7 + 73 = 153 picots, plus 2 corner ch-3 loops.
Why the math works: Each edging repeat uses exactly 3 stitches. Each side has 219 = 73 x 3 stitches and the bottom has 21 = 7 x 3, so every section ends cleanly at a corner with no partial repeat. The corner spaces are extra chains, not part of the side counts, so they are never counted twice. The two edging rows add 0.5 in (1.3 cm) to each long side, which takes the width from 4 in (10.2 cm) to 5 in (12.7 cm). They also add 0.5 in (1.3 cm) at the bottom, which takes the length from 78 in (198.1 cm) to 78.5 in (199.4 cm).
Final Blocking
- Weave in all ends along the side edging or inside the tab, never through the middle of a fan.
- Soak each strip in cool water for 10 minutes. Press the water out gently. Don’t wring.
- Roll the strip in a towel to remove extra water.
- Lay the strip flat on a long surface. You can block it in sections of about 24 in (61.0 cm) at a time.
- Pin the long sides straight at 5 in (12.7 cm) wide.
- Open each fan so the 9 spokes are evenly spaced. Pin the center picot of each fan if needed.
- Pin the side picots so they point outward.
- Check that the length is 78.5 in (199.4 cm) below the tab. Don’t stretch the strip past this length.
- Let it dry completely before you hang it.
Final Quality-Control Checklist
- [ ] Every strip has 31 fans
- [ ] Every fan has 9 spokes and 9 picots
- [ ] Each fan starts from the center sc of the lattice row below
- [ ] Rows 1 and 95 each have 21 sc
- [ ] Each strip is 4 in (10.2 cm) wide before edging and 5 in (12.7 cm) wide after
- [ ] Each side has 219 sc in Edging Row 1 and 73 picots in Edging Row 2
- [ ] The tab tunnel is open at both sides and fits the rod
- [ ] All seven strips are the same length, within 1 in (2.5 cm)
- [ ] Colors run A B A B A B A
Troubleshooting
Fans lean to one side: The fan was worked into the wrong lattice sc. It must go into the center sc of the three.
Fan edges ruffle: The ch-1 spaces are too loose, or the fan has an extra spoke. Check that there are exactly 9 tr.
Fans cup inward: Your tension is too tight, or a spoke is missing. Go up half a hook size for the fan rows only.
Sides wave after Edging Row 1: The side count is off. Recount to 219 sc and spread them evenly, 7 per repeat.
Strips are different lengths: Compare the strips fan by fan. Block the shorter strip slightly longer, or add or remove one repeat.
Tab twists the strip: Sew the tab again, matching stitch 1 to stitch 1 and stitch 21 to stitch 21.
Care
Hand wash in cool water with mild soap and lay flat to dry, reshaping the fans. Don’t hang the strips to dry while they’re wet, because the weight of the water can stretch them.
Final Notes
Every size in this pattern comes from one measurement chain. First, get 21 sc to measure 4 in (10.2 cm) and one fan repeat to measure 2.5 in (6.4 cm). Then 31 repeats plus the two sc rows give 78 in (198.1 cm). The 0.5 in (1.3 cm) edging brings each strip to 5 in x 78.5 in (12.7 cm x 199.4 cm). Seven strips with 0.25 in (0.6 cm) gaps fill 36.5 in (92.7 cm) of rod. If you check the swatch first and count every fan, all seven strips will hang evenly.
Happy crocheting!