

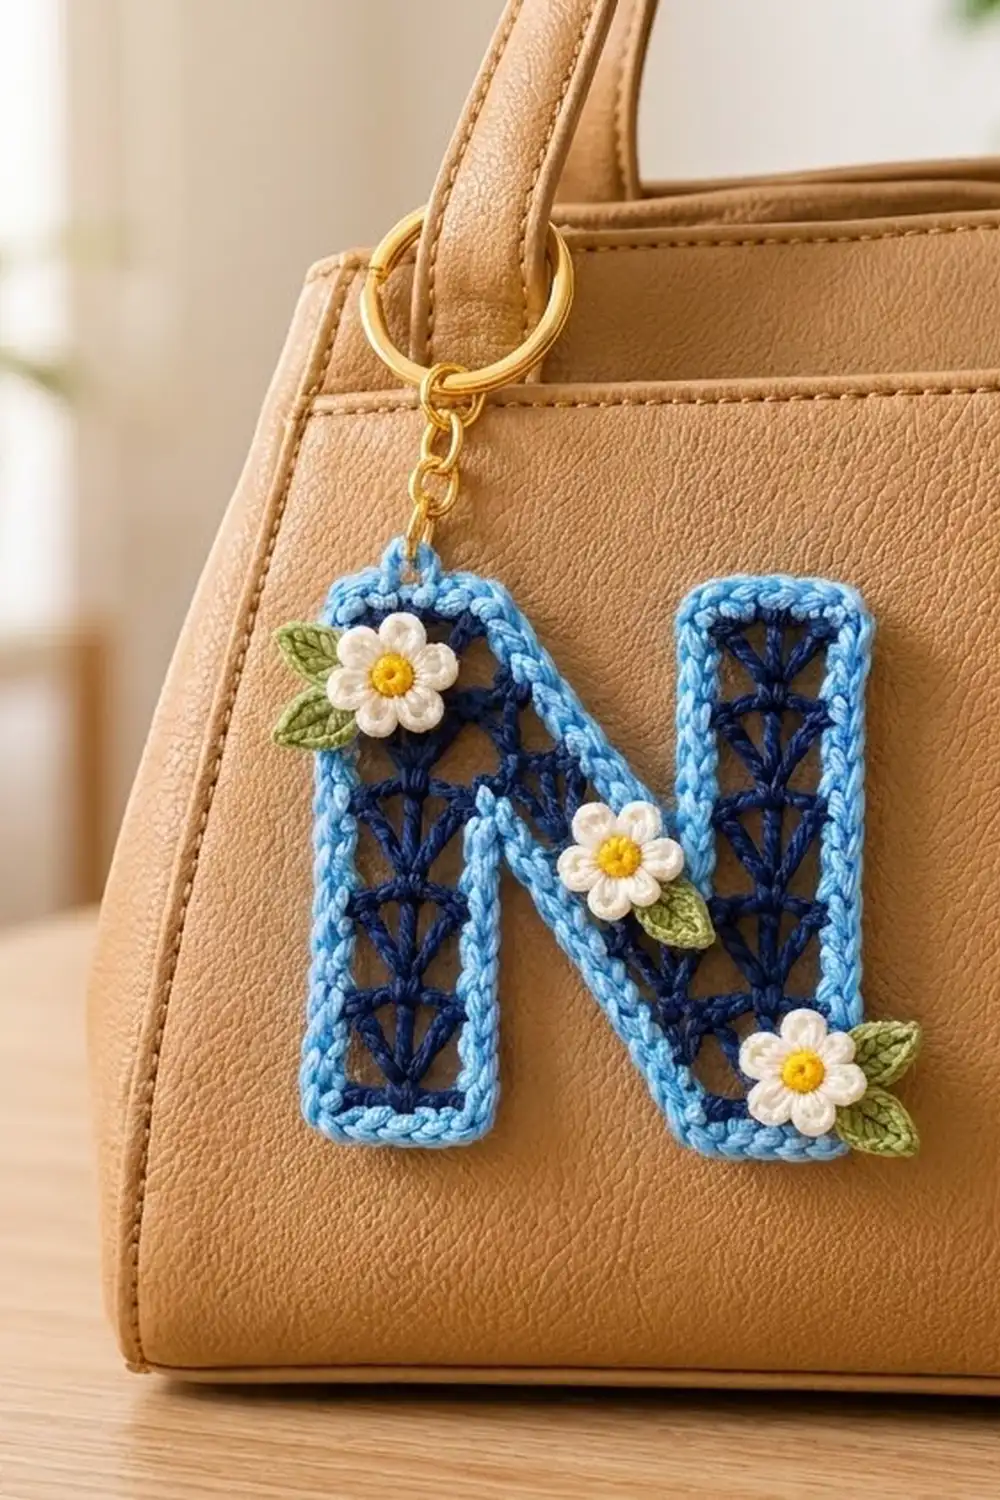
This little letter N is a quick and satisfying make. Navy fans stack up inside the letter like lace, and a light blue outline frames the whole shape. Three tiny daisies with green leaves finish it off. A gold key ring turns it into a keychain or bag charm.
The colors are cool and fresh: navy fan stitches, a sky blue border, white daisy petals with sunny yellow centers, and leaf green accents. The fans look like rows of open “V” shapes with soft horizontal bars between them, so the letter feels airy but keeps a clear outline.
This pattern uses US crochet terms. The finished letter measures about 3.25 in (8.3 cm) wide by 3.5 in (8.9 cm) tall after the border, not counting the hardware.
Construction is simple. You crochet three navy sections in rows: two straight legs and one stepped diagonal. You whipstitch the diagonal between the legs, then work two rounds of light blue single crochet around the whole N. Last, you sew on the daisies and leaves and attach the key ring.
Finished Size and Construction
- Finished size: about 3.25 in (8.3 cm) wide x 3.5 in (8.9 cm) tall
- Skill level: Easy-intermediate (shaped edges, working around steps)
- Terminology: US crochet terms
- Yarn weight: Super fine / fingering (#1) cotton
- Hook: 2.25 mm (US B-1)
- Number of pieces: One letter, made from 3 navy sections joined into a single piece, plus 3 daisies and 5 leaves as appliqués
- Layout: Left leg, diagonal and right leg, side by side in an N shape
- Section size: Each section is 5 sts wide (0.6 in / 1.5 cm) and 11 rows tall (3 in / 7.6 cm)
- Size before border: about 2.75 in (7.0 cm) wide x 3 in (7.6 cm) tall
- Border depth: 2 rounds, about 0.25 in (0.6 cm) on every edge
Materials
Choose a smooth, mercerized cotton in fingering weight. Cotton gives crisp fans and a firm outline, and it holds up well on a key ring. Avoid fuzzy or very stretchy fibers, because the fans lose their shape.
- Navy (fans): 6 g, about 20 m
- Light blue (border): 5 g, about 17 m
- White (petals): 2 g, about 7 m
- Yellow (flower centers): 1 g, about 3 m
- Green (leaves): 1 g, about 3 m
These amounts include extra yarn for a gauge check and for weaving in ends.
Tools:
– 2.25 mm (US B-1) crochet hook
– Tapestry needle
– 1 in (2.5 cm) gold split key ring
– Short gold chain, about 0.75 in (1.9 cm) long, plus 2 small jump rings
– Two pairs of flat-nose pliers
– Rust-proof pins and a blocking mat
– Scissors
– Optional: spray starch or diluted fabric stiffener
Abbreviations (US Terms)
- ch – chain
- sl st – slip stitch
- sc – single crochet
- hdc – half double crochet
- dc – double crochet
- sc2tog – single crochet 2 together
- st(s) – stitch(es)
- RS / WS – right side / wrong side
Fan: 3 dc worked into the same stitch.
Shift row: A single crochet row that adds 2 new stitches past the starting edge and leaves the last 2 stitches unworked. The row still has 5 stitches, but the strip moves 2 stitches sideways.
Gauge and Checkpoints
Gauge matters here because the three sections must line up and the border must lie flat.
Section gauge: 5 sts = 0.6 in (1.5 cm) wide; Rows 1–11 = 3 in (7.6 cm) tall.
Make one leg first and measure it before you go on. That leg is your gauge swatch.
- After Row 1: the strip is 0.6 in (1.5 cm) wide.
- After Row 5: the strip is about 1.25 in (3.2 cm) tall.
- After Row 11: the strip is about 3 in (7.6 cm) tall.
If your leg is too big, go down to a 2 mm hook. If it is too small, go up to a 2.5 mm hook. Height matters most. If only the height is off, change how far you pull up your dc loops instead of changing hooks.

Left and Right Legs (make 2)
With navy:
Ch 6.
Row 1 (RS): Sc in 2nd ch from hook and in each ch across. Turn. (5 sc)
Row 2 (fan row): Ch 3 (counts as dc), skip next sc, 3 dc in next sc, skip next sc, dc in last sc. Turn. (5 sts: ch-3, 3 dc, dc)
Row 3: Ch 1, sc in first dc, sc in each of next 3 dc, sc in top of ch-3. Turn. (5 sc)
Rows 4–11: Repeat Rows 2–3 four more times. (5 sts in every row)
Fasten off and weave in ends. Each leg has 5 fans, with a sc bar above each one.
Checkpoint: 0.6 in (1.5 cm) x 3 in (7.6 cm).
Diagonal
With navy:
Ch 6.
Row 1 (RS): Sc in 2nd ch from hook and in each ch across. Turn. (5 sc)
Row 2 (fan row): Ch 3 (counts as dc), skip next sc, 3 dc in next sc, skip next sc, dc in last sc. Turn. (5 sts)
Row 3 (shift row): Ch 3, sc in 2nd ch from hook and in next ch (2 new sts), sc in each of next 3 sts. Leave the last 2 sts unworked. Turn. (5 sc)
Row 4: Repeat Row 2. (5 sts)
Rows 5–10: Repeat Rows 3–4 three more times. (5 sts in every row)
Row 11: Ch 1, sc in each st across. (5 sc)
Fasten off and weave in ends.
You made 4 shift rows (Rows 3, 5, 7 and 9), and each one moved the strip 2 sts. That puts the top 8 sts (about 1 in / 2.5 cm) to one side of the bottom. Rows 9–11 all sit in the same position.
Orientation: Lay the diagonal with Row 1 at the bottom and the top leaning to the upper left. If it leans the other way, turn it over. The fans look the same on both sides.
Checkpoint: 5 sts wide in every row, about 3 in (7.6 cm) tall, with stepped long edges.
Joining the Sections
Lay the pieces out in an N shape, with Row 1 of all three at the bottom.
- Top join: Place the left edge of diagonal Rows 9–11 against the right edge of left leg Rows 9–11, with the tops flush. With navy, whipstitch the row ends together through the outer loops.
- Bottom join: Place the right edge of diagonal Rows 1–2 against the left edge of right leg Rows 1–2, with the bottoms flush. Whipstitch the same way.
Keep your stitches snug but not tight so the seam lies flat. Weave in ends.
Layout in stitch columns (23 total):
- Left leg: columns 1–5
- Diagonal: Rows 9–11 in columns 6–10, then 2 columns to the right for every 2 rows going down, ending with Rows 1–2 in columns 14–18
- Right leg: columns 19–23
Checkpoint: about 2.75 in (7.0 cm) wide x 3 in (7.6 cm) tall. There is a stepped notch opening downward under the diagonal and another opening upward above it.
Border
Border gauge: 2 rounds of sc = 0.25 in (0.6 cm) deep.
Edge rules for Round 1:
- Work 1 sc in the end of each sc row and 2 sc in the end of each fan row.
- Work 1 sc in each st along the tops and bottoms. Work the bottoms into the free loops of the starting chain.
- Work 1 sc in each st along each 2-st step. Keep the steps flat, with no extra sts.
- At outer corners, work 3 sc in the corner st.
Round 1: With RS facing, join light blue at the bottom-left corner of the left leg. Work clockwise around the letter using the edge rules, in this order:
| Edge | Edge sc |
|---|---|
| Left leg outer side (6 sc rows + 5 fan rows) | 16 |
| Top: left leg + diagonal Row 11 | 10 |
| Upper notch: diagonal right edge Rows 11–9 (4), step (2), Rows 8–7 (3), step (2), Rows 6–5 (3), step (2), Rows 4–3 (3), step (2), right leg inner side Rows 3–11 (13) | 34 |
| Right leg top | 5 |
| Right leg outer side | 16 |
| Bottom: right leg + diagonal Row 1 | 10 |
| Lower notch: diagonal left edge Rows 1–2 (3), step (2), Rows 3–4 (3), step (2), Rows 5–6 (3), step (2), Rows 7–8 (3), step (2), left leg inner side Rows 8–1 (12) | 32 |
| Left leg bottom | 5 |
| Total edge positions | 128 |
The 8 outer corners are at the ends of the four top and bottom edges:
- left leg top-left and diagonal top-right
- right leg top-left and top-right
- right leg bottom-right and diagonal bottom-left
- left leg bottom-right and bottom-left
Each corner st gets 3 sc instead of 1 (+2 each, +16 total).
At the base of each notch, sc2tog over the last edge position of one edge and the first edge position of the next (−1 each, −2 total).
Sl st to first sc to join.
Round 1 total: 126 sts from the 128 edge positions (after 2 sc2tog) + 16 extra corner sts = 142 sts.
Round 2: Ch 1, sc in each st around. Work 3 sc in the center sc of each 3-sc corner. At each notch base, sc2tog over the sc2tog and the st before it. Sl st to first sc. Fasten off.
Round 2 total: 142 sts worked 1 per st, minus 2 for the sc2tog, plus 16 extra corner sts = 156 sts.
Why the math works:
- A sc row is about as tall as 1 sc, and a fan row is about as tall as 2 sc. Working 1 or 2 sc to match keeps the side edges flat.
- Three sc at an outer corner turn it 90 degrees without cupping.
- The notch bases are inside corners. A decrease there keeps the border stitches from crowding.
- Two rounds add 0.25 in (0.6 cm) on each side: 2.75 + 0.5 = 3.25 in (8.3 cm) wide and 3 + 0.5 = 3.5 in (8.9 cm) tall.
- The border also fills the narrowest tip of each notch, which gives clean V-shaped openings.
Checkpoint: 3.25 in (8.3 cm) x 3.5 in (8.9 cm).
Daisies (make 3)
Center: With yellow, make a magic ring. Ch 1, 5 sc in ring. Pull the ring closed and sl st to first sc. Fasten off. (5 sc)
Petals: Join white in any sc. *(Sl st, ch 2, 2 dc, ch 2, sl st) in same sc, then move to next sc; repeat from * 4 more times. Fasten off. (5 petals)
Each daisy is about 0.6 in (1.5 cm) across.
Leaves (make 5)
With green, ch 6.
Side 1: Sl st in 2nd ch from hook, sc in next ch, hdc in next ch, dc in next ch, hdc in last ch.
Side 2: Ch 1, rotate and work along the other side of the starting chain: hdc in first ch, dc in next ch, hdc in next ch, sc in next ch, sl st in last ch. Fasten off. (10 sts plus ch-1 at the base)
Each leaf is about 0.5 in (1.3 cm) long.
Assembly
- Top daisy: Over the top-left corner of the left leg, with 2 leaves tucked behind its left side.
- Middle daisy: At the center of the diagonal, with 1 leaf below it and to the right.
- Bottom daisy: At the bottom of the diagonal where it meets the right leg, with 2 leaves to the right.
Sew on each leaf first, then each daisy. Use the yarn tails and stitch through the border or fans so your stitches hide under the petals. Keep the back neat.
Hardware: Open a jump ring with the two pliers. Pass it through Round 2 above the center of the left leg top, add one end of the chain, and close the ring. Use the second jump ring to join the key ring to the other end of the chain.
Final Blocking
- Block before you attach the hardware if possible.
- Mist the letter lightly with water.
- Pin it RS up on a mat to 3.25 in (8.3 cm) x 3.5 in (8.9 cm).
- Pin each outer corner square and open each notch into a clean V.
- Ease each fan open so it shows as a clear “V”.
- For a stiffer charm, spray lightly with starch.
- Let it dry completely, about 2–4 hours, then unpin.
Final Quality-Control Checklist
- Every section row has 5 sts.
- Each leg has 5 fans, and the diagonal has 5 fans and 4 shift steps.
- The diagonal top is flush with the left leg, and its bottom is flush with the right leg.
- Size before border: about 2.75 in (7.0 cm) x 3 in (7.6 cm).
- Round 1 = 142 sts; Round 2 = 156 sts.
- Finished size: 3.25 in (8.3 cm) x 3.5 in (8.9 cm).
- Edges lie flat, with no ruffling or cupping.
- All 3 daisies and 5 leaves are secure.
- Jump rings are fully closed.
- All ends are woven in and trimmed.
Troubleshooting
The diagonal leans the wrong way. Turn it over. The fans look the same from both sides.
The diagonal does not reach the right leg. Count your shift rows. You need exactly 4, and each one adds 2 new sts and leaves 2 unworked.
The sides ruffle. You worked too many sc at the fan-row ends. Use exactly 2.
The sides pull in. Work a little looser, and check that you put 2 sc (not 1) at each fan-row end.
The corners curl. Make sure you worked 3 sc at all 8 outer corners in both rounds.
The notches bunch up. Check that you worked the sc2tog at each notch base in both rounds.
The fans look closed. Block the letter and ease each fan open with a pin.
The letter is floppy. Use starch or fabric stiffener after blocking.
Care
Spot clean with cool water and mild soap, then press flat and let air dry. Don’t soak the metal hardware.
Final Notes
Here is the full measurement chain:
- Each section is 5 sts and 11 rows: 0.6 in (1.5 cm) x 3 in (7.6 cm).
- Joined, the three sections span 23 stitch columns: about 2.75 in (7.0 cm) x 3 in (7.6 cm).
- Border Round 1 has 142 sts and Round 2 has 156 sts, adding 0.25 in (0.6 cm) on each side.
- The finished letter measures 3.25 in (8.3 cm) x 3.5 in (8.9 cm).
Check each number as you go, and your letter will come out square, flat and ready for its daisies.
Happy crocheting!