

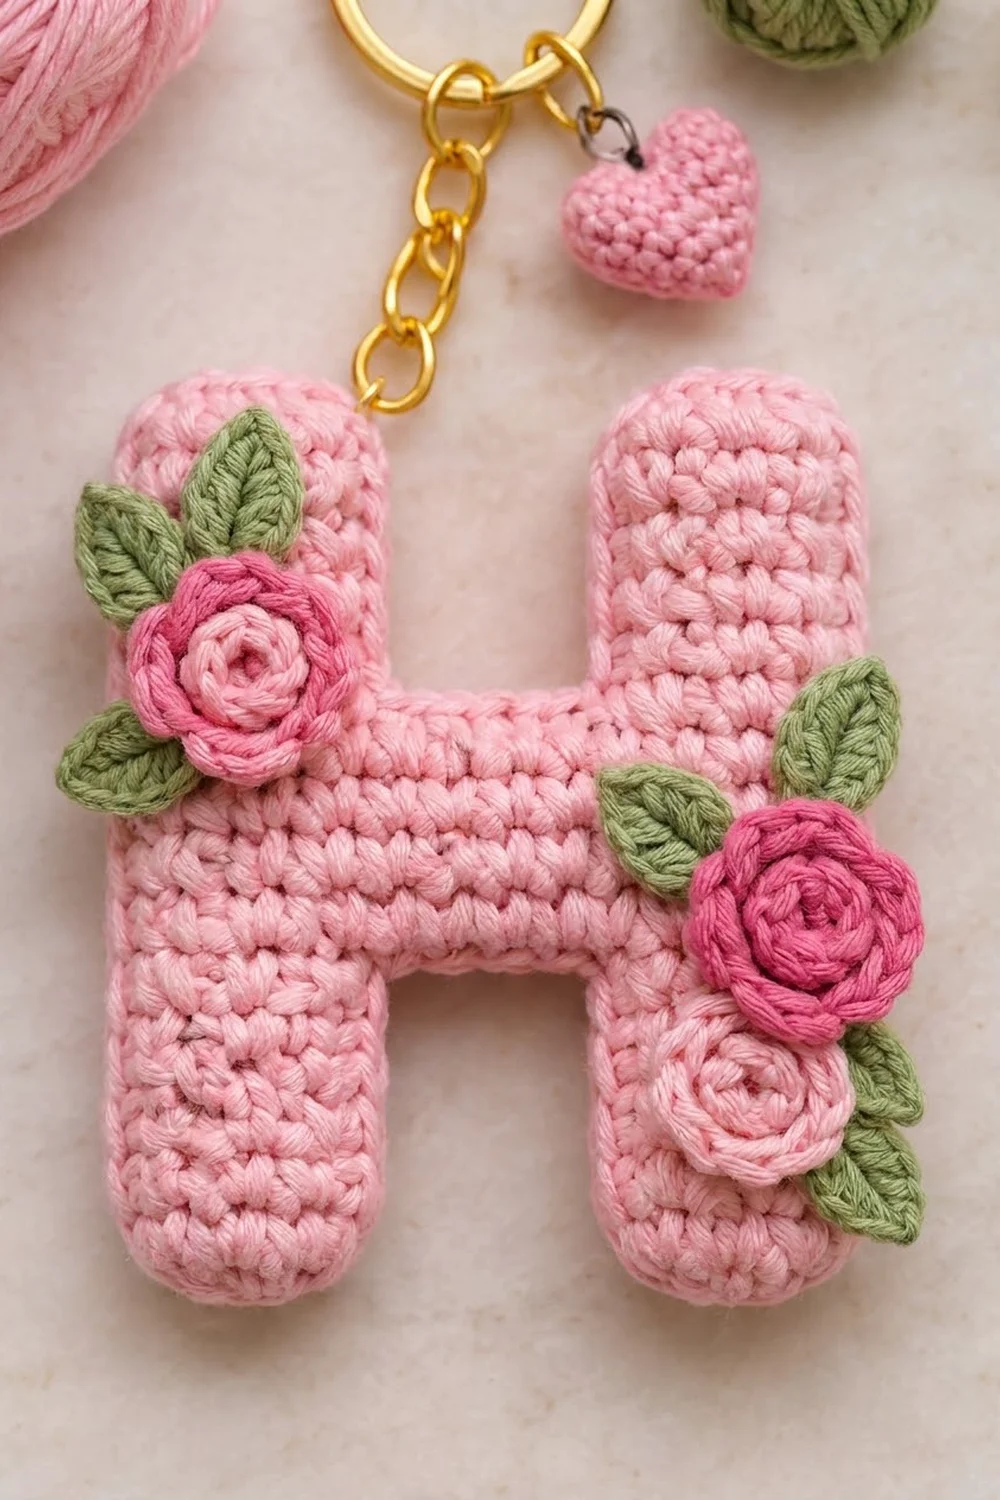
This keychain is a soft, puffy capital letter H in light pink, decorated with tiny rolled roses and sage green leaves. A gold key ring with a short chain and a small pink heart charm finish it off. It can hang from a bag handle, a backpack zipper or your keys.
The letter and one rose are light pink, two roses are raspberry pink and the leaves are sage green. The style is sweet and cottage-inspired, with neat single crochet texture and rounded ends on all four legs of the letter.
The pattern uses US crochet terms. The finished letter is 3.25 in wide x 3.75 in tall (8.3 cm x 9.5 cm) and about 0.75 in (1.9 cm) thick when lightly stuffed.
You crochet two identical flat H panels in rows of single crochet. Then you hold them together and work one edging round through both layers, stuffing as you go. Last, you sew on the roses and leaves and add the hardware and heart charm.
Finished Size and Construction
- Finished size: 3.25 in wide x 3.75 in tall (8.3 cm x 9.5 cm), about 0.75 in (1.9 cm) thick
- Skill level: Easy
- Terminology: US crochet terms
- Yarn weight: DK (light worsted, #3) cotton
- Hook: 3.25 mm (US D/3)
- Number of pieces: 1 single letter (two matching layers closed by the edging round), plus 3 roses, 5 leaves and 1 heart charm
- Layout: one stand-alone letter H, with roses at the upper left and lower right
- Panel size: 15 sts wide x 21 rows tall
- Size before edging: 3 in x 3.5 in (7.6 cm x 8.9 cm)
- Edging depth: about 0.125 in (0.3 cm) on every side
Materials
Choose a smooth mercerized or combed cotton in DK weight. Cotton shows each stitch clearly and holds the letter shape. Avoid fuzzy yarns, which blur the edges and the roses.
- Light pink (main color): 12 g, about 30 m
- Raspberry pink: 3 g, about 8 m
- Sage green: 3 g, about 8 m
These quantities include a margin of about 20 percent for swatching and yarn tails.
Tools:
- 3.25 mm (US D/3) crochet hook
- Polyester fiberfill, about 5 g
- Tapestry needle
- 1 gold split key ring, 1 in (2.5 cm) across, with a 1.5 in (3.8 cm) chain
- 2 gold jump rings, 6 mm
- 2 pairs of flat-nose pliers
- Stitch markers
- Scissors and a ruler
Abbreviations (US Terms)
- ch: chain
- sl st: slip stitch
- sc: single crochet
- hdc: half double crochet
- dc: double crochet
- tr: treble crochet
- inc: 2 sc in the same stitch
- sc2tog: single crochet 2 together. Insert hook in next st, yarn over, pull up a loop. Insert hook in following st, yarn over, pull up a loop. Yarn over and pull through all 3 loops.
- MR: magic ring
- st(s): stitch(es)
- sp(s): space(s)
- RS / WS: right side / wrong side
Special technique: edging through two layers. Hold the panels with wrong sides together and edges lined up. Insert the hook through the matching stitch or row end of both panels and work 1 sc as usual.
Gauge and Checkpoints
Gauge: 5 sc and 6 rows = 1 in (2.5 cm) in sc rows.
Make one complete panel before you start the second. It works as your gauge swatch and your first real piece at the same time.
Checkpoints:
- After Row 8 of a leg: 5 sts, 1 in (2.5 cm) wide and about 1.3 in (3.3 cm) tall
- After Row 13: 15 sts, 3 in (7.6 cm) wide and about 2.2 in (5.6 cm) tall
- After Row 21: 3 in x 3.5 in (7.6 cm x 8.9 cm)
- After edging and stuffing: 3.25 in x 3.75 in (8.3 cm x 9.5 cm)
If the panel is too big: switch to a 3.0 mm hook or hold your yarn more tightly.
If the panel is too small: switch to a 3.5 mm hook.
Keep the fabric firm. The fiberfill should not show between stitches, so it is better to crochet a little too tight than too loose.
Letter Panel (make 2)
Use light pink. Each panel has two lower legs, a crossbar and two upper legs. The ch 1 at the start of a row does not count as a stitch.
Lower Leg 1
Row 1 (RS): Ch 4, sc in 2nd ch from hook and in each ch across. (3 sts)
Row 2: Ch 1, turn, inc in first st, sc in next st, inc in last st. (5 sts)
Rows 3-8: Ch 1, turn, sc in each st across. (5 sts)
Fasten off. The increases in Row 2 round off the bottom of the leg.
Lower Leg 2
Work Rows 1-8 exactly as for Lower Leg 1. (5 sts) Do not fasten off.
Checkpoint: each leg is 1 in (2.5 cm) wide and about 1.3 in (3.3 cm) tall.
Crossbar
Row 9: Ch 1, turn, sc in each of the 5 sts of Leg 2, ch 5. Then work across Row 8 of Leg 1, with the same side facing as Leg 2: sc in each of the 5 sts. (10 sc + 5 ch = 15 sts)
Row 10: Ch 1, turn, sc in each of the 5 sc, sc in each of the 5 ch, sc in each of the 5 sc. (15 sts)
Rows 11-13: Ch 1, turn, sc in each st across. (15 sts)
The crossbar is 5 rows deep, about 0.8 in (2.0 cm). The 5 ch make the 1 in (2.5 cm) gap between the lower legs.
Checkpoint: 3 in (7.6 cm) wide and about 2.2 in (5.6 cm) tall.
Upper Leg A
Row 14: Ch 1, turn, sc in first 5 sts, leave remaining 10 sts unworked. (5 sts)
Rows 15-19: Ch 1, turn, sc in each st across. (5 sts)
Row 20: Ch 1, turn, sc2tog, sc in next st, sc2tog. (3 sts)
Row 21: Ch 1, turn, sc in each st across. (3 sts)
Fasten off.
Upper Leg B
Row 14: Use the same side facing as for Row 14 of Upper Leg A. Skip the 5 middle sts of Row 13 after Leg A and join light pink in the 11th st. Ch 1, sc in the same st and in each of the next 4 sts. (5 sts)
Rows 15-21: Work as for Rows 15-21 of Upper Leg A. (3 sts in Rows 20 and 21)
Fasten off and weave in all ends on the WS.
Checkpoint: the panel is 15 sts wide and 21 rows tall, 3 in x 3.5 in (7.6 cm x 8.9 cm). The 5 unworked middle sts of Row 13 form the top edge of the crossbar.
Make a second panel exactly the same way. Lightly steam both panels flat before joining so the edges line up.
Roses (make 3)
Make 2 roses in raspberry pink and 1 in light pink.
Row 1: Ch 13, 2 sc in 2nd ch from hook and in each ch across. (12 ch worked x 2 = 24 sts)
Fasten off, leaving an 8 in (20.3 cm) tail. The strip ruffles by itself. Start at the end without the tail and roll the strip into a tight coil. Stitch through the base several times to hold it. Each rose is about 0.6 in (1.5 cm) across.
Leaves (make 5)
Use sage green.
Rnd 1: Ch 6. Working in the back bumps, sc in 2nd ch from hook, hdc in next ch, dc in next ch, hdc in next ch, 3 sc in last ch. Turn the piece and work along the other side of the foundation chain: hdc in next ch, dc in next ch, hdc in next ch, sc in last ch. Sl st to first sc. (4 + 3 + 4 = 11 sts)
Fasten off, leaving a 6 in (15.2 cm) tail. Each leaf is about 0.75 in (1.9 cm) long with a pointed tip.
Heart Charm (make 2 layers)
Use light pink.
Rnd 1: MR, ch 3 (counts as first tr), 2 tr, 3 dc, ch 1, tr, ch 1, 3 dc, 2 tr, ch 3, sl st in ring. (12 sts: 6 tr and 6 dc, plus 2 ch-1 sps and the closing ch-3)
Pull the ring tight to form the dip at the top of the heart. Make a second heart. Hold the two hearts together and whipstitch around the edge, adding a pinch of fiberfill before you close it. The heart is about 0.75 in (1.9 cm) wide.
Edging Round (Border)
Edging gauge: 1 sc per row end matches the panel’s 6 rows per inch. 1 sc per stitch matches its 5 sts per inch. Use the same 3.25 mm hook.
Place the two panels with wrong sides together and the RS of each facing out. Work through both layers with light pink.
Rnd 1: Join at the bottom of the left outer edge (the Row 1 end of Lower Leg 1). Work each section in this order:
- Left outer edge: 1 sc in each of the 21 row ends. (21 sts)
- Top of left leg: 2 sc in first st, sc in next st, 2 sc in last st. (5 sts)
- Inner edge of left upper leg: 1 sc in each of the 8 row ends, from Row 21 down to Row 14. (8 sts)
- Top of crossbar: sc in each of the 5 unworked sts of Row 13. (5 sts)
- Inner edge of right upper leg: 1 sc in each of the 8 row ends. (8 sts)
- Top of right leg: work as for section 2. (5 sts)
- Right outer edge: 1 sc in each of the 21 row ends. (21 sts)
Stop here and lightly stuff the upper legs, the crossbar and the right lower leg, using small tufts.
- Bottom of right leg: 2 sc in first foundation st, sc in next st, 2 sc in last st. (5 sts)
- Inner edge of right lower leg: 1 sc in each of the 8 row ends. (8 sts)
- Underside of crossbar: sc in each of the 5 foundation ch of Row 9. (5 sts)
- Inner edge of left lower leg: 1 sc in each of the 8 row ends. (8 sts)
Stuff the left lower leg.
- Bottom of left leg: work as for section 8. (5 sts)
Sl st to the first sc. Total: 104 sts.
Why the math works:
- The two outer edges have 21 sts each, for 42.
- The four inner leg edges have 8 sts each, for 32.
- The top and underside of the crossbar have 5 sts each, for 10.
- The four leg ends have 5 sts each, for 20.
42 + 32 + 10 + 20 = 104.
Each leg end is a conversion section: 3 sts worked once each, plus 2 added sts, gives 5 sts. The 2 extra sts sit on the rounded corners, so the ends curve instead of cupping. The inner corners get no extra stitches, which keeps them crisp. The edging adds about 0.125 in (0.3 cm) on each side. This takes the panel from 3 in x 3.5 in (7.6 cm x 8.9 cm) to 3.25 in x 3.75 in (8.3 cm x 9.5 cm).
Fasten off and hide the tail inside the stuffing.
Assembly
Roses and leaves: Place one raspberry rose at the upper left corner, overlapping the edge of the left upper leg, with 2 leaves fanning up and out behind it. At the lower right, put a raspberry rose on the right leg just below the crossbar and the light pink rose directly under it, with 3 leaves tucked behind the pair. Use the yarn tails to stitch the leaves on first, then the roses on top. Sew through the top layer only.
Hardware: Open a jump ring and slip it through the edging stitches at the center top of the left leg. Close it onto the last link of the key ring chain. Use the second jump ring to attach the heart charm through its top to the split ring, so it hangs beside the chain.
Final Blocking
- Lightly mist the finished letter with water. Do not soak it.
- Press the letter between your palms to spread the stuffing evenly.
- Shape the four rounded leg ends with your fingertips.
- Lay it flat on a towel and check that it measures 3.25 in x 3.75 in (8.3 cm x 9.5 cm).
- Fluff the rose petals and point the leaf tips outward.
- Let it dry completely, about 6 hours, before attaching keys.
Final Quality-Control Checklist
- Both panels have 15 sts across Row 13 and 21 rows in total
- Each leg end is rounded, with 3 sts in Rows 1 and 21
- The edging round has 104 sts
- No fiberfill shows through the stitches
- The finished size is 3.25 in x 3.75 in (8.3 cm x 9.5 cm)
- Roses and leaves stay in place when tugged
- Jump rings are fully closed with no gap
Troubleshooting
Legs lean or twist: you may have joined Leg 1 with the wrong side facing. Both legs must show the same side in Row 9.
Crossbar gap is too narrow: the 5 ch were pulled too tight. Chain more loosely, or use a hook one size larger for those 5 ch only.
Leg ends look square: check the shaping in Rows 2 and 20, and the 2 extra sts on each leg end in the edging.
Edging ripples: you added extra sts. Recount each section against the totals above.
Letter looks lumpy: use smaller tufts of fiberfill, and use less of it.
Roses unroll: stitch through every layer of the coil base at least three times.
Care
Spot clean with mild soap and cool water, then press gently and dry flat. Do not machine wash it, because the hardware and stuffing can shift.
Final Notes
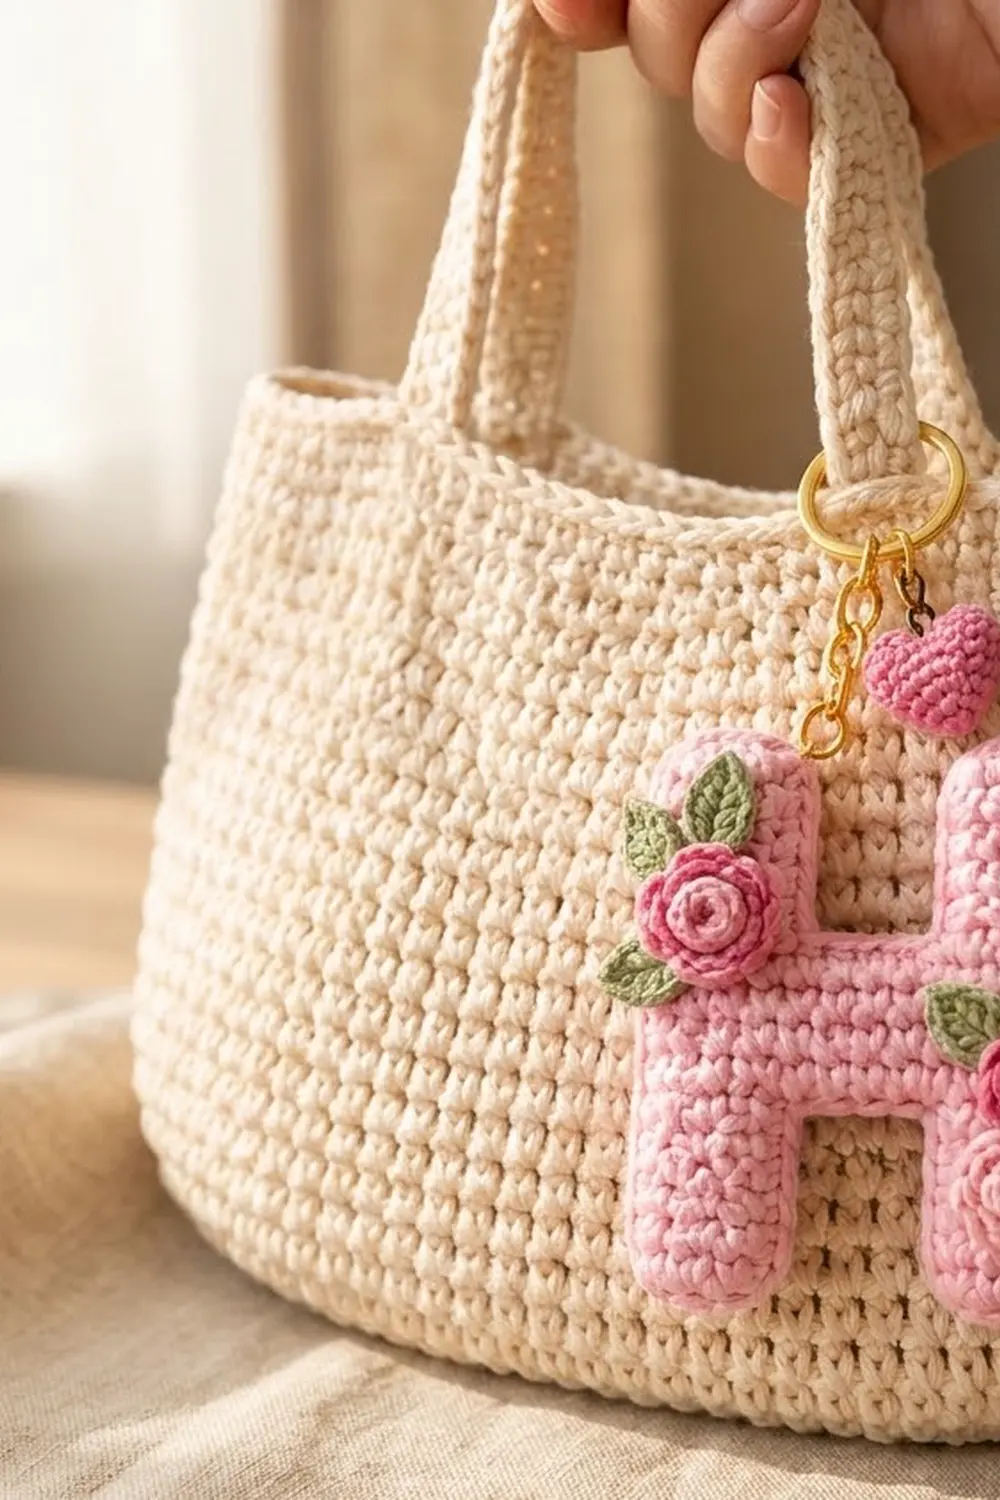
The measurements are easy to check at each step. A gauge of 5 sc and 6 rows per 1 in (2.5 cm) gives a 15-st by 21-row panel that measures 3 in x 3.5 in (7.6 cm x 8.9 cm). The 104-st edging round joins both panels and adds about 0.125 in (0.3 cm) on each side. That gives a finished letter of 3.25 in x 3.75 in (8.3 cm x 9.5 cm). Add three rolled roses, five leaves, a heart charm and the gold hardware, and your keychain is ready to hang.
Happy crocheting!