

The Rose Lattice Table Runner is a light, lacy runner built from small flower motifs set on point. Each motif is a diamond with a solid center ring, eight open petals, and a fine arched edge. The motifs touch only at their tips, so the runner forms an open lattice with diamond-shaped windows that let the table show through.
The sample is worked in a single dusty rose cotton. The soft pink looks warm next to gold ornaments, candlelight and pine, but it also works on a spring or everyday table. Three plump tassels hang from each short end.
This pattern uses US crochet terms throughout. The finished runner measures 15 in (38.1 cm) wide by 60 in (152.4 cm) long, not counting tassels. With tassels it measures 68 in (172.7 cm).
You’ll make 36 identical motifs, 3 across and 12 long. You join them as you go on the last round, linking corner tip loops together. There is no added border because the last round of each motif is the finished edge. Six tassels finish the ends.
Finished Size and Construction
- Finished size: 15 in x 60 in (38.1 cm x 152.4 cm), plus 4 in (10.2 cm) tassels at each end
- Skill level: Easy+ / confident beginner
- Terminology: US crochet terms
- Yarn weight: DK / light worsted cotton (weight 3)
- Hook: 3.5 mm (E-4)
- Number of pieces: 36 motifs plus 6 tassels
- Layout: 3 motifs wide x 12 motifs long, set on point, joined tip to tip
- Piece size: each motif is 3.25 in (8.3 cm) along one side and 5 in (12.7 cm) from tip to tip
- Size before border: 15 in x 60 in (38.1 cm x 152.4 cm)
- Border depth: 0 in (0 cm). Round 5 of each motif is the finished edging.
Materials
Yarn: Use a smooth mercerized or combed cotton in DK weight, roughly 113 m (124 yd) per 50 g. Cotton keeps the arches crisp and blocks sharply. Avoid fuzzy or very stretchy yarns, because they blur the lace and let the tips sag.
- Dusty Rose: 250 g, approx. 565 m (618 yd), which is 5 balls of 50 g
- Motifs: about 5 g each, so 180 g for 36
- Tassels: about 3.5 g each, so 21 g for 6
- The rest is a safety margin
Tools:
– 3.5 mm (E-4) crochet hook
– Tapestry needle
– Sharp scissors
– A stiff card or book 4.5 in (11.4 cm) tall, for tassels
– Blocking mats and rustproof pins
– Spray bottle
– Measuring tape
The quantities above include about a 20% margin for gauge differences, swatching and tassel trimming.
Abbreviations (US Terms)
- ch – chain
- sl st – slip stitch
- sc – single crochet
- hdc – half double crochet
- dc – double crochet
- tr – treble crochet
- sk – skip
- sp(s) – space(s)
- st(s) – stitch(es)
- rep – repeat
- beg – beginning
Special technique – Joining tip (JT): Ch 2. Insert your hook from front to back into the ch-5 tip loop of the finished neighboring motif and sl st. Ch 2. This replaces the ch 5 at that corner, so the tip loop stays the same size.
Gauge and Checkpoints
Gauge matters most for how the tips line up. Make one full motif and block it before you start the others.
Checkpoints for one motif:
– After Round 1: the ring is 1.25 in (3.2 cm) across.
– After Round 2: 2 in (5.1 cm) across.
– After Round 3: 3.5 in (8.9 cm) across, from arch tip to opposite arch tip.
– After Round 4: each straight side is 3 in (7.6 cm), measured between the tr stitches.
– After Round 5, blocked: each side is 3.25 in (8.3 cm), and tip to tip is 5 in (12.7 cm).
If your motif is too big: go down 0.25 mm in hook size, or crochet the ch-7 arches in Round 3 a little more tightly.
If your motif is too small: go up to a 3.75 mm or 4 mm hook. Being off by 0.25 in (0.6 cm) per motif adds up to 3 in (7.6 cm) over the 12-motif length, so fix the size now.
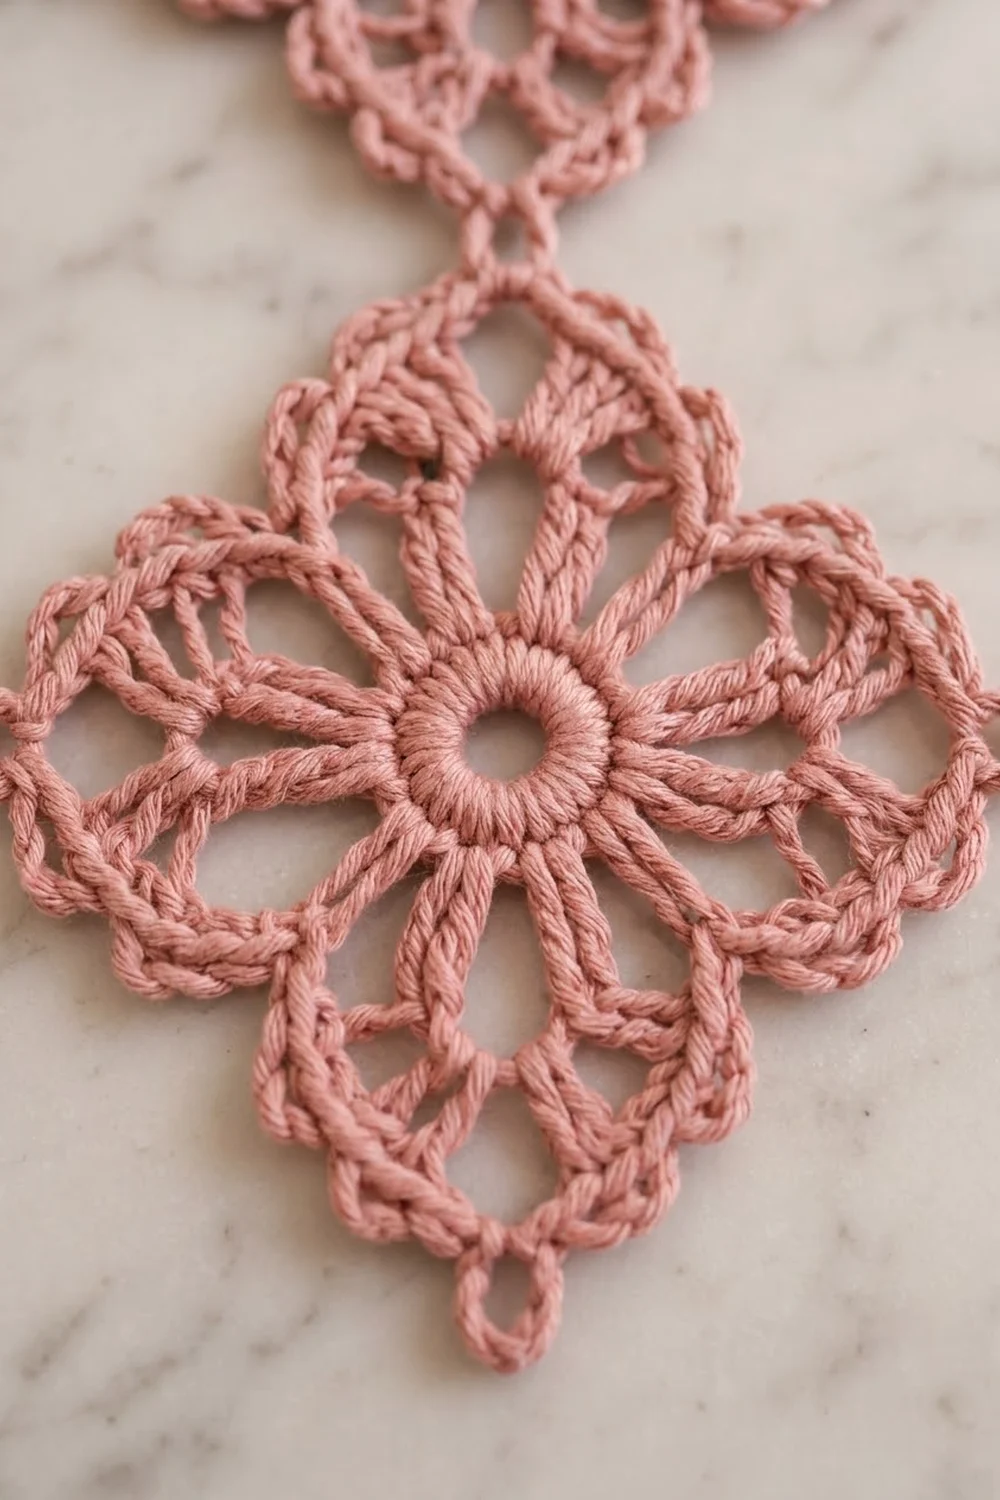
Motif (Make 36)
The first motif is worked in full. Motifs 2 to 36 follow the same Rounds 1–4. On Round 5 they replace some corner ch 5 loops with joining tips (see Joining below).
Round 1 (center ring): Make a magic ring. Ch 3 (counts as dc), work 23 dc into the ring. Pull the ring snug, leaving a small center hole. Sl st to the top of beg ch-3.
Count: 24 dc.
Round 2 (petal bases): Ch 3 (counts as dc), dc in next 2 sts, ch 3. Dc in next 3 sts, ch 3; rep from * 6 more times. Sl st to top of beg ch-3.
Count: 8 groups of 3 dc (24 dc) and 8 ch-3 sps.*
Round 3 (petal arches): Sl st in next dc, which is the center dc of the first group. Ch 1, sc in the same st. Ch 7, sc in the center dc of the next 3-dc group; rep from * 6 more times. Ch 7, sl st to the first sc.
Count: 8 sc and 8 ch-7 arches.*
Each arch passes over one ch-3 sp, which forms the eight open petals around the ring. The sc stitches are the low “valleys” between petals.
Round 4 (squaring round): The arches alternate between side arches and corner arches. You begin in a side arch.
- Sl st in the next ch-7 arch. Ch 2 (counts as hdc). In the same arch work hdc, 3 sc, 2 hdc. This is the side arch: 7 sts.
- *Dc in the next sc (valley).
- In the next ch-7 arch, work the corner arch: 2 dc, tr, ch 5, tr, 2 dc. That’s 6 sts plus a ch-5 sp.
- Dc in the next sc (valley).
- In the next ch-7 arch, work 2 hdc, 3 sc, 2 hdc (side arch, 7 sts).
- Rep from * 2 more times.
- Dc in the next sc, work a corner arch in the next ch-7 arch, then dc in the last sc. Sl st to the top of beg ch-2.
Count: 60 sts and 4 ch-5 corner sps.
This is a conversion round, so it adds up as (4 side arches x 7) + (4 corner arches x 6) + (8 valley dc x 1) = 28 + 24 + 8 = 60.
Here is one side, from corner to corner:
– tr, 2 dc (second half of a corner arch)
– valley dc
– 2 hdc, 3 sc, 2 hdc (side arch)
– valley dc
– 2 dc, tr (first half of the next corner arch)
That gives 15 sts per side. The ch-5 corner sps sit between sides and are not counted in those 15. The taller dc and tr at the corners and the shorter hdc and sc at mid-side are what pull the round into a straight-sided square.
Number the side stitches 1 to 15, starting from the tr after a corner. The round began on stitch 5, which is the first hdc of a side arch.
Round 5 (arched edging and tip loops):
- Ch 1, sc in the same st as the join (stitch 5).
- (Ch 3, sk 1, sc in next st) 5 times. You end with a sc in the tr (stitch 15).
- In the corner ch-5 sp, work (sc, ch 5, sc). The ch-5 is the tip loop.
- *Sc in the next tr (stitch 1). (Ch 3, sk 1, sc in next st) 7 times, ending in the tr at stitch 15.
- In the corner ch-5 sp, work (sc, ch 5, sc).
- Rep from * 2 more times.
- Sc in the next tr (stitch 1). Ch 3, sk 1, sc in next st (stitch 3). Ch 3, sk 1, sl st to the first sc.
Fasten off and weave in the ends.
Count per side: 8 sc (on stitches 1, 3, 5, 7, 9, 11, 13 and 15) and 7 ch-3 arches.
Count per corner: 2 sc and 1 ch-5 tip loop.
Round total: 32 side sc + 8 corner sc = 40 sc, plus 28 ch-3 arches and 4 ch-5 tip loops.
The first side works out too. Before the corner it gets 5 arches, and after the restart it gets 2 more, for 7 arches total.
Make All Pieces
- Dusty Rose: 36 motifs. You make the first one in full, and motifs 2–36 are joined as you go.
- Dusty Rose: 6 tassels.
Layout grid (rows run along the length of the runner; ◇ = one motif set on point):
Tassels:   T     T     T
Row 1:     ◇ — ◇ — ◇
           |     |     |
Row 2:     ◇ — ◇ — ◇
           |     |     |
 ...      (rows 3–11 identical)
           |     |     |
Row 12:    ◇ — ◇ — ◇
Tassels:   T     T     T
A dash (—) is a side-tip join and a bar (|) is a top/bottom-tip join. Each motif meets one neighbor at each touching tip. That leaves a diamond-shaped open window between every group of four motifs.
Joining
Method: join-as-you-go on Round 5 with the joining tip (JT). This keeps the joins as small and neat as the tip loops themselves.
Placing a motif: Lay each motif as a diamond. Its tips point up (toward the previous row), down, left and right.
Join order:
1. Row 1, motif A: Work Round 5 in full.
2. Row 1, motif B: At the corner that will be the left tip, work (sc, JT, sc) instead of (sc, ch 5, sc). The JT goes into motif A’s right tip loop. Work the other three corners normally.
3. Row 1, motif C: Join its left tip to motif B’s right tip.
4. Row 2 and later, first motif: Join the top tip to the bottom tip of the motif directly above.
5. Row 2 and later, second and third motifs: Join the left tip to the previous motif in the row and the top tip to the motif above. Work those two corners as (sc, JT, sc).
Stitch-to-stitch logic: A join only ever links one tip to one tip. No side stitches are sewn or slip-stitched together. Each JT uses ch 2 + sl st + ch 2 in place of ch 5, so the joined tip is as long as a free tip and the diamond windows stay true.
In total you make 24 side joins (2 per row x 12 rows) and 33 top/bottom joins (3 columns x 11 gaps). That’s 57 joins.
Tension advice: Keep the ch 2 on each side of the joining sl st relaxed. If you pull them tight, the tips pucker and the runner shortens. If they’re loose, the lattice droops between motifs.
Size checkpoint: After 3 rows, lay the work flat without stretching it. It should be 15 in (38.1 cm) wide, tip to tip, and 15 in (38.1 cm) long. If it’s off by more than 0.5 in (1.3 cm), adjust your hook before going on.
Border
No added border. Round 5 of each motif is the finished edge, which matches the open zigzag sides of the runner. Treat Round 5 as a built-in border with this gauge: 8 sc and 7 ch-3 arches across 3.25 in (8.3 cm). That’s about 2.5 sc per inch (1 sc per cm).
Edge counts:
– Each long edge is a zigzag of 12 motifs. Each motif shows 2 outer sides, so 24 sides x 8 sc = 192 sc and 168 ch-3 arches. That edge also carries 11 joined inner tips and 12 free outer tips.
– Each short end is 3 motifs, each showing 2 outer sides. That makes 6 sides x 8 sc = 48 sc and 42 ch-3 arches, plus 3 free bottom tip loops for the tassels.
Why the math works: Each side is exactly 3.25 in (8.3 cm), and each motif is 5 in (12.7 cm) from tip to tip on the diagonal. The joins add no stitches and no length, so the width is 3 x 5 in = 15 in (38.1 cm). The length is 12 x 5 in = 60 in (152.4 cm). Nothing is added at the seams, so the edge counts above are simply number of sides x 8.
Tassels (make 6):
1. Wrap yarn 30 times around a card 4.5 in (11.4 cm) tall.
2. Slide a 9 in (22.9 cm) strand under the wraps at the top and tie it tightly.
3. Cut the loops at the bottom.
4. With a 24 in (61.0 cm) strand, wrap tightly 0.75 in (1.9 cm) below the top tie about 8 times. Knot it and bury the ends inside the tassel.
5. Trim the tassel evenly to 4 in (10.2 cm).
6. Use the top tie ends to tie one tassel through the free bottom tip loop of each end-row motif.
7. Knot the tie securely and hide the ends inside the tassel head.
Final Blocking
- Weave in any loose ends, but don’t trim them yet.
- Wet the runner thoroughly in cool water and gently press out the water. Don’t wring it.
- Roll it in a towel to take out more moisture.
- Lay it on the mats as a 15 in x 60 in (38.1 cm x 152.4 cm) rectangle of diamonds.
- Pin every tip: free tips first, then the joined tips, keeping each motif at 5 in (12.7 cm) tip to tip.
- Pin the center of each ch-7 petal arch outward if it’s curling, and open the center ring.
- Check the diamond windows. Every one should be the same size, about 3.25 in (8.3 cm) per side.
- Let it dry completely, then unpin and trim the woven-in ends.
- Dampen the tassels, comb them straight with your fingers, let them hang dry, and trim once more.
Final Quality-Control Checklist
- All 36 motifs have 40 sc, 28 ch-3 arches and 4 tip loops on Round 5.
- Every motif is 5 in (12.7 cm) from tip to tip.
- 57 joins are present, and each one links only two tips.
- The runner is 15 in (38.1 cm) wide and 60 in (152.4 cm) long.
- The diamond windows are even, with no twisted or flipped motifs.
- Six tassels are each 4 in (10.2 cm) long and tied securely.
- All ends are woven in along the stitch posts, not across the open spaces.
Troubleshooting
The motif cups or ruffles. Round 3 arches are too long. Try ch 6 instead of ch 7, or use a smaller hook.
The square looks round. Make sure the corner arches use tr and dc and the side arches use hdc and sc. Mixing these up softens the corners.
A Round 5 side has the wrong number of sc. Recount Round 4. Each side needs 15 sts, so 60 in all.
The joins pull the tips inward. Your JT chains are too tight. Loosen the ch 2s or go up a hook size just for the joins.
A motif is joined upside down or twisted. Before joining, check that the right side faces up and the tip you’re joining points toward its neighbor.
The runner is shorter than 60 in (152.4 cm). Block it firmly to size. If you’re still more than 1 in (2.5 cm) short, add a 13th row.
The tassels are uneven. Trim them after wet blocking. Cotton relaxes when it gets wet.
Care
Hand wash in cool water with a mild soap and lay flat to dry, pinning the tips into shape again if needed. Store the runner rolled or folded loosely so the tips don’t get crushed.
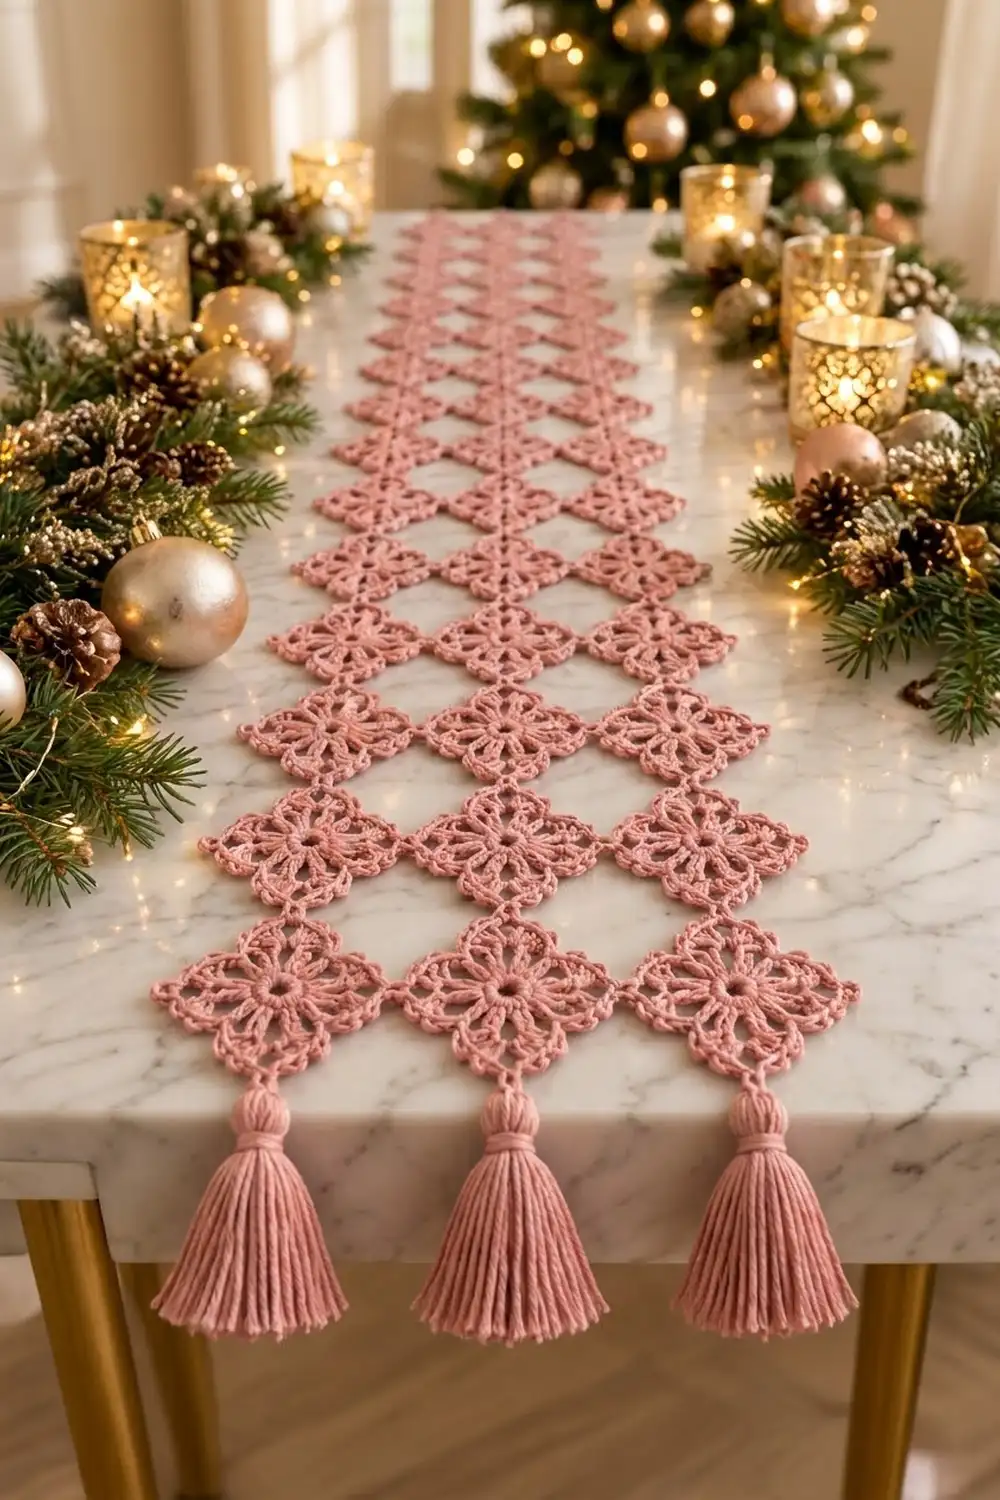
Final Notes
Each step’s size feeds the next. Round 1 is 1.25 in (3.2 cm), Round 2 is 2 in (5.1 cm), and Round 3 is 3.5 in (8.9 cm) across. Round 4 is 3 in (7.6 cm) per side, and Round 5 is 3.25 in (8.3 cm) per side and 5 in (12.7 cm) from tip to tip. Three of those across make 15 in (38.1 cm), and twelve along make 60 in (152.4 cm). With 4 in (10.2 cm) tassels at each end, the runner measures 68 in (172.7 cm) in total. If you check one motif well, the other 35 and the whole runner will come out to size.
Happy crocheting!