
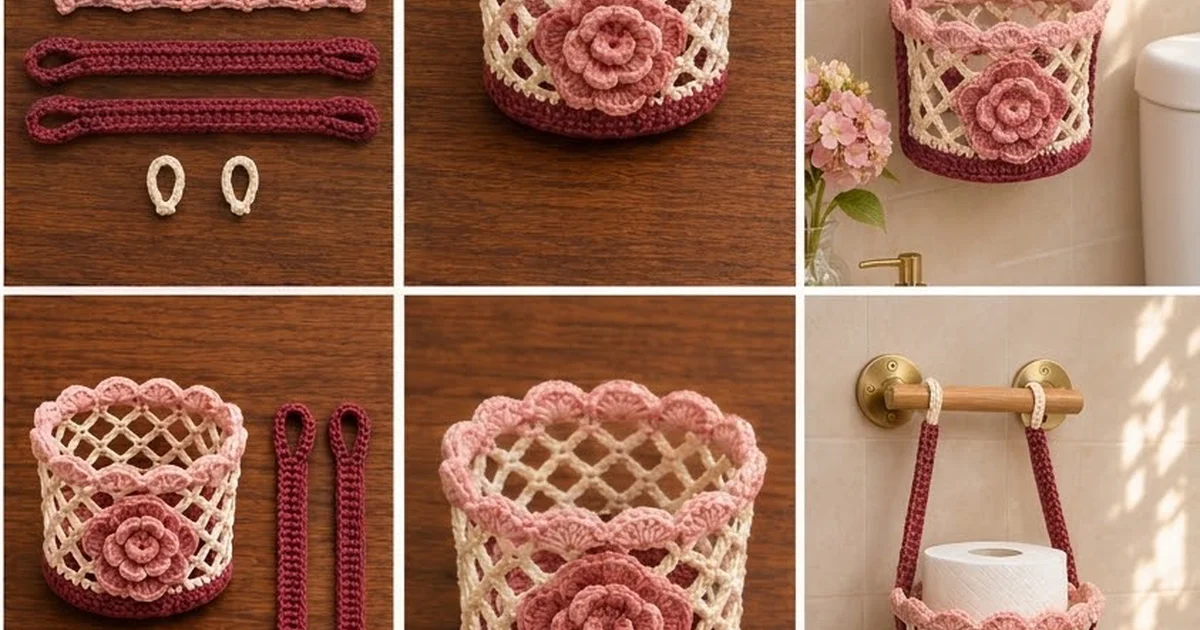
This hanging holder stores two spare toilet rolls in two small round baskets, one above the other. Each basket has a solid burgundy base and bottom band, an open cream lattice, a soft pink shell rim, and a three-layer pink rose on the front. Two burgundy straps join the tiers and hang from a towel rod on cream rings.
The look is vintage cottage: warm burgundy, blush pink, and creamy white in cotton yarn. Because the lattice is open, the baskets stay light and you can see when a roll is running low.
The pattern uses US crochet terms. Each basket is 5.5 in (14.0 cm) across and 4.25 in (10.8 cm) tall. From the rod to the bottom of the lower basket, the holder is about 22 in (55.9 cm) long.
You make each basket in four steps. First crochet a flat base. Next work the wall in the round from a chain and crochet it to the base. Then sew on a shell strip and a rose. Once both baskets are done, make two straps and two rings and assemble the holder.
Finished Size and Construction
- Basket size: 5.5 in (14.0 cm) diameter × 4.25 in (10.8 cm) tall
- Overall drop: about 22 in (55.9 cm) from rod to bottom
- Skill level: Easy to intermediate
- Terminology: US
- Yarn weight: Worsted (#4) cotton
- Hook: 5.0 mm (H-8)
- Number of pieces: 12 (2 bases, 2 walls, 2 shell strips, 2 roses, 2 straps, 2 rings)
- Layout: 2 baskets stacked vertically, 3.5 in (8.9 cm) apart
- Wall height before edging: 3.75 in (9.5 cm)
- Shell edging height above rim: 0.5 in (1.3 cm)
- Strap: 20 in (50.8 cm) long × 0.75 in (1.9 cm) wide, plus end loops
Materials
Use a smooth, firm 100% cotton or cotton blend. Cotton holds the basket shape, copes with bathroom humidity, and washes well. Avoid splitty or very soft yarns, because the lattice loops will sag.
These amounts assume about 80 m per 50 g:
- Burgundy (Color A): 110 g, about 176 m (bases, bottom bands, straps)
- Cream (Color B): 60 g, about 96 m (lattice, rings)
- Pink (Color C): 70 g, about 112 m (rims, shell strips, roses)
The quantities include a margin of about 15% for swatching and seaming.
Tools and hardware:
- 5.0 mm (H-8) crochet hook
- Tapestry needle
- 4 stitch markers
- Scissors and tape measure
- Rust-proof pins
- Wooden towel rod with two wall brackets, screws, and anchors
Abbreviations (US Terms)
- ch: chain
- sl st: slip stitch
- sc: single crochet
- hdc: half double crochet
- dc: double crochet
- inc: 2 sc in the same stitch
- sk: skip
- sp: space
- st(s): stitch(es)
- MR: magic ring
- RS / WS: right side / wrong side
Special stitch: back post sc (BPsc). Insert the hook from back to front to back around the post of the stitch indicated, yarn over, and draw up a loop. Yarn over again and pull through both loops. This stitch anchors each new layer of rose petals behind the one before it.
Lattice round ending: “ch 2, dc in first sc.” The ch 2 plus the dc equals one ch-5 loop. It also leaves your hook in the middle of a loop, ready to start the next round.
Gauge and Checkpoints
Gauge: 14 sc and 16 rounds = 4 in (10.2 cm) in sc. In the lattice, 3 rounds = 1.5 in (3.8 cm).
Make one base and one wall first. They have to match stitch for stitch.
Checkpoints:
- Base after Round 5 (30 sts): 2.75 in (7.0 cm) across.
- Base after Round 10 (60 sts): 5.5 in (14.0 cm) across.
- Wall after Round 4, flattened: 8.5 in (21.6 cm) wide.
- Wall after Round 10: 3.75 in (9.5 cm) tall.
Too big? Go down to a 4.5 mm (US 7) hook.
Too small? Go up to a 5.5 mm (I-9) hook.
Don’t change the stitch counts. Every join is built on 60 stitches.
Base (make 2)
Work with Color A in continuous rounds, and mark the first stitch of each round.
Round 1: MR, 6 sc in ring. (6 sts)
Round 2: Inc in each st around. (12 sts)
Round 3: (Sc in next st, inc) 6 times. (18 sts)
Round 4: (Sc in next 2 sts, inc) 6 times. (24 sts)
Round 5: (Sc in next 3 sts, inc) 6 times. (30 sts)
Round 6: (Sc in next 4 sts, inc) 6 times. (36 sts)
Round 7: (Sc in next 5 sts, inc) 6 times. (42 sts)
Round 8: (Sc in next 6 sts, inc) 6 times. (48 sts)
Round 9: (Sc in next 7 sts, inc) 6 times. (54 sts)
Round 10: (Sc in next 8 sts, inc) 6 times. (60 sts)
Sl st in the next st and fasten off. The base should lie flat at 5.5 in (14.0 cm). If it ruffles, go down a hook size. If it cups, go up a hook size.
Wall (make 2)
Bottom Band
With Color A, ch 60. Sl st in the first ch to form a ring, taking care not to twist the chain.
Round 1: Ch 1, sc in each ch around, sl st in first sc. (60 sts)
Rounds 2–4: Ch 1, sc in each st around, sl st in first sc. (60 sts)
Fasten off. The band is 1 in (2.5 cm) tall.
Cream Lattice
Join Color B in any st.
Round 5: Ch 1, sc in same st. (Ch 5, sk 3 sts, sc in next st) 14 times. Ch 2, dc in first sc. (15 loops)
60 sts ÷ 4 sts per repeat = 15 loops.
Rounds 6–8: Ch 1, sc in the loop formed by the dc. (Ch 5, sc in next ch-5 sp) 14 times. Ch 2, dc in first sc. (15 loops)
Round 9: Ch 1, sc in the loop formed by the dc. (Ch 5, sc in next ch-5 sp) 14 times. Ch 5, sl st in first sc. (15 loops)
Fasten off. Each sc lands in the middle of a loop from the round below, so the loops form diamonds. The five lattice rounds measure about 2.5 in (6.4 cm).
Pink Rim
Round 10 (conversion round): Join Color C in any ch-5 sp. Ch 1, 4 sc in each ch-5 sp around, sl st in first sc. (15 loops × 4 sc = 60 sts)
Fasten off. The wall measures 3.75 in (9.5 cm) tall and is back to 60 sts.
Shell Strip (make 2)
Work in rows with Color C.
Foundation: Ch 62.
Row 1: Sc in 2nd ch from hook and each ch across. Turn. (61 sts)
Row 2: Ch 1, sc in first st. (Sk 2 sts, 5 dc in next st, sk 2 sts, sc in next st) 10 times. (10 shells; 50 dc + 11 sc = 61 sts)
Fasten off, leaving a 20 in (50.8 cm) tail. The strip is about 17.1 in (43.4 cm) long and 0.75 in (1.9 cm) tall.
Layered Rose (make 2)
Work with Color C.
Round 1: MR, ch 1, 10 sc in ring, sl st in first sc. (10 sts)
Round 2: (Ch 3, sk 1 st, sc in next st) 5 times; on the last repeat, work a sl st into the base of the first ch instead of the sc. (5 ch-3 sps)
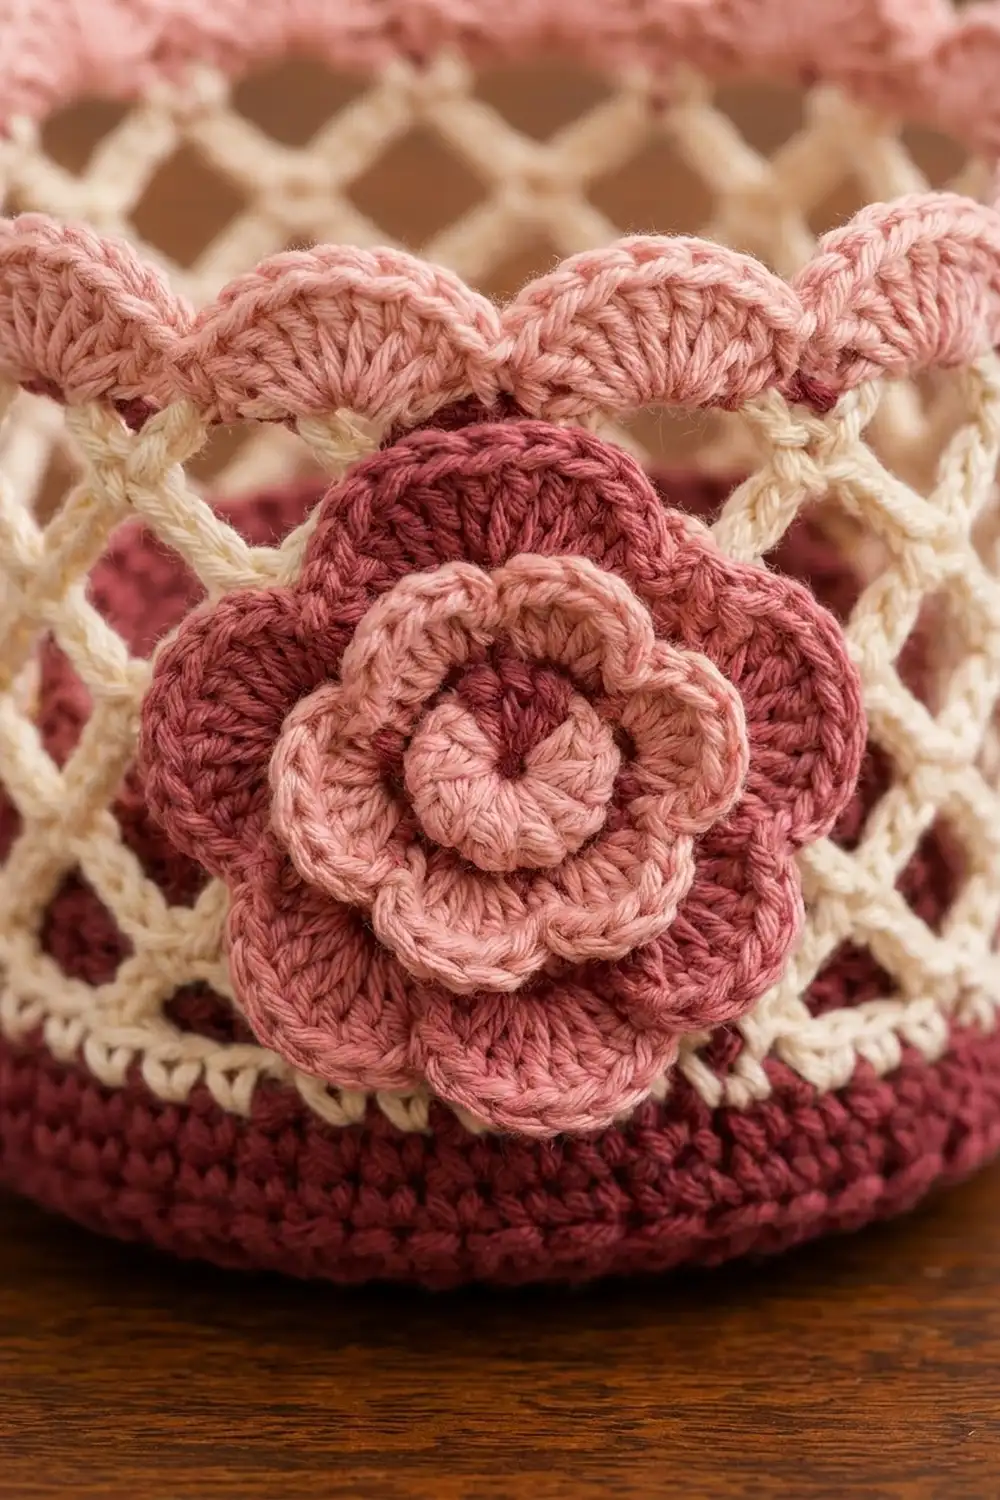
Round 3: In each ch-3 sp work (sc, hdc, 3 dc, hdc, sc). (5 small petals)
Round 4: Working behind the petals, (ch 5, BPsc around next Round 2 sc) 5 times. (5 ch-5 sps)
Round 5: In each ch-5 sp work (sc, hdc, 5 dc, hdc, sc). (5 medium petals)
Round 6: Working behind the petals, (ch 7, BPsc around next Round 4 BPsc) 5 times. (5 ch-7 sps)
Round 7: In each ch-7 sp work (sc, hdc, 7 dc, hdc, sc). (5 large petals)
Fasten off, leaving a 12 in (30.5 cm) tail. The rose is about 3 in (7.6 cm) across, with three stacked layers of five petals each. Pinch each layer forward slightly so the layers stand apart.
Strap (make 2)
Work with Color A.
Foundation: Ch 71.
Row 1: Sc in 2nd ch from hook and each ch across. Turn. (70 sts)
Rows 2–3: Ch 1, sc in each st across. Turn. (70 sts)
Don’t fasten off.
End loop: Rotate the strap to work along the short end. Ch 1, sc in the first row-end, ch 10, sk the middle row-end, and sc in the last row-end. Turn. Work 14 sc in the ch-10 sp, then sl st in the first sc. Fasten off. Join Color A at the opposite short end and repeat.
The strap body is 20 in (50.8 cm) long (70 sts ÷ 3.5 sts per inch) and 0.75 in (1.9 cm) wide. Each loop adds about 1.25 in (3.2 cm).
Hanging Ring (make 2)
With Color B, ch 20. Pass the chain through one strap’s top loop, then sl st in the first ch to close it into a ring linked to the strap.
Round 1: Ch 1, sc in each ch around, sl st in first sc. (20 sts)
Fasten off. The ring is about 2.5 in (6.4 cm) long when flattened.
Make All Pieces
- Color A: 2 bases, 2 bottom bands (wall Rounds 1–4), 2 straps
- Color B: 2 lattice sections (wall Rounds 5–9), 2 rings
- Color C: 2 rims (wall Round 10), 2 shell strips, 2 roses
Layout (front view):
[======== ROD ========]
  ring             ring
  strap  8 in      strap
  | [ TOP BASKET + rose ] |
  |    3.5 in gap         |
  | [ LOWER BASKET + rose]|
  loop             loop
Joining
Base to wall: Hold one base and the foundation edge of one wall with their WS together, base facing you. Join Color A through both layers. Ch 1, work 1 sc through each base st and its matching wall st, then sl st in the first sc. (60 sts)
Both edges have 60 sts, so they join one to one with no easing. Keep your tension even: if you work too tightly the base domes, and if you work too loosely it gaps. The finished basket should be 5.5 in (14.0 cm) across and sit level.
Shell strip to rim: Wrap the strip around the outside of the pink rim, with Row 1 lined up on Round 10 and the shells standing above. Overlap the strip’s first and last sc by one stitch so that 61 strip sts cover the 60 rim sts. Whipstitch through both layers, then sew the short ends together.
Rose: Mark wall sts 1 and 31 as the strap lines. Center the rose on st 16, with its lower petals overlapping the burgundy band. Sew through the Round 6 chains so the petals stay free.
Straps: Measure 8 in (20.3 cm) down from the base of each top loop. Starting at that mark, whipstitch the strap over a marker on the top basket for 4.25 in (10.8 cm), from the shell tops to the base join. Leave a 3.5 in (8.9 cm) gap, then sew the next 4.25 in (10.8 cm) to the lower basket. Tack the bottom loop flat under the lower base. Slide the rings onto the rod before you mount it.
Border
The shell strip is this design’s border.
Border gauge: 10 shells over 17.1 in (43.4 cm), so each shell is about 1.7 in (4.3 cm) wide and stands 0.5 in (1.3 cm) above the rim.
- Row 1: 61 sc. After the one-stitch overlap at the seam, 60 sts sit on the 60-st rim.
- Row 2: 10 shells. Each repeat uses 6 sts (sk 2, shell, sk 2, sc), and 10 × 6 = 60. The extra end sc is the overlap stitch.
Why the math works: The base, the bottom band, the rim, and the border all have 60 sts. The lattice splits those 60 sts into 15 loops of 4, and the rim turns them back into 60 sts.
Final Blocking
- Weave in all ends along same-color stitches.
- Soak each basket in cool water for 10 minutes, then press it in a towel.
- Slide a 5.5 in (14.0 cm) jar, or a roll wrapped in plastic, into each basket.
- Pull the lattice diamonds into even, upright shapes.
- Pin the shells so they curve outward evenly.
- Pin the straps straight at 20 in (50.8 cm).
- Let everything dry completely before you hang it.
Final Quality-Control Checklist
- Both bases measure 5.5 in (14.0 cm) and lie flat.
- Both walls are 3.75 in (9.5 cm) tall, with 15 even loops per lattice round.
- Each shell edging has 10 shells and a hidden seam.
- The roses are centered on the front, between the straps.
- The straps hang straight, with a 3.5 in (8.9 cm) gap between the baskets.
- The rings are secure and the same length, so the holder hangs level.
- A roll drops in and lifts out easily.
Troubleshooting
- Lattice slants: Work each sc into the center of a ch-5 sp, not into a chain stitch.
- Rim ruffles: Some spaces have extra sc. Recount Round 10 to 60.
- Base cups: Your increases are tight. Go up a hook size for the base.
- Holder hangs crooked: Re-measure the 8 in (20.3 cm) mark on each strap.
- Petals flop: Tack the middle petal layer from behind.
Care
Hand wash in cool water with mild soap, and dry flat with a jar inside each basket to hold its shape. Don’t tumble dry, because heat shrinks cotton and stretches the lattice.

Final Notes
Each measurement in this pattern sets up the next one:
- A gauge of 14 sc = 4 in (10.2 cm) gives a 60-st base 5.5 in (14.0 cm) across.
- That base matches a 60-st wall, which opens into 15 lattice loops and closes back into a 60-st rim.
- The rim carries 10 shells of 6 sts each.
- Two 20 in (50.8 cm) straps set the 3.5 in (8.9 cm) gap and the 22 in (55.9 cm) drop.
Check each checkpoint as you go and the pieces will fit together cleanly.
Happy crocheting!