

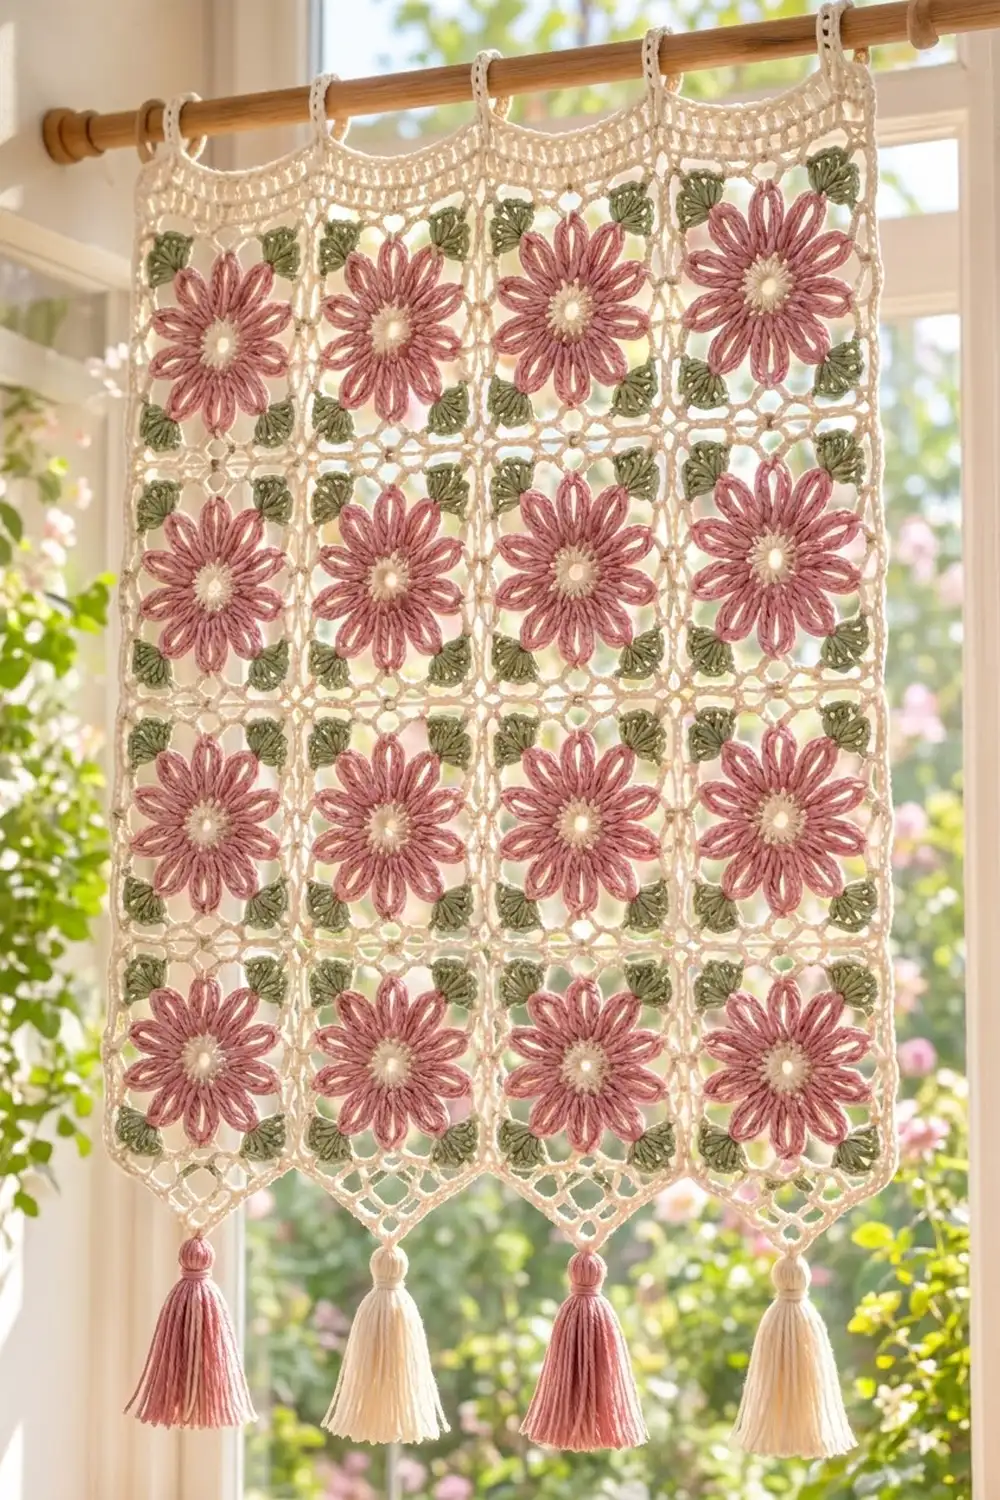
The Rose Meadow Daisy Window Curtain is a light, lacy panel made from sixteen flower squares. Each square has a cream center, twelve dusty-rose loop petals and four small sage-green leaf clusters, all held in an open cream mesh frame.
The finished curtain hangs from a wooden dowel by five cream loops. The top edge is softly scalloped. The bottom edge drops into four shallow points, and each point carries a tassel, alternating rose and cream. It suits a small kitchen window, a door light or a nursery nook.
This pattern uses US crochet terms. The finished body measures 20.8 in (52.8 cm) wide by 23.8 in (60.5 cm) long, from the top of the scallops to the point tips. The hanging loops add 1.5 in (3.8 cm), and the tassels add 4 in (10.2 cm).
Construction is simple. You make 16 identical squares and join them in a 4 x 4 grid with slip stitches. You then work a two-round border and add the top scallop row with hanging loops. Last, you work four triangular points along the bottom and attach the tassels.
Finished Size and Construction
- Finished body: 20.8 in x 23.8 in (52.8 cm x 60.5 cm)
- Skill level: Confident beginner to intermediate
- Terminology: US
- Yarn weight: DK (light worsted, #3) cotton or cotton blend
- Hook: 3.5 mm (E-4)
- Number of pieces: 16 squares
- Layout: 4 squares wide x 4 squares tall
- Piece size: 5 in (12.7 cm) square
- Size before border: 20 in x 20 in (50.8 cm x 50.8 cm)
- Border depth: 0.4 in (1.0 cm) per side, 2 rounds
Materials
Yarn: Choose a smooth mercerized cotton or a cotton-acrylic blend in DK weight, about 230 m per 100 g. Cotton shows the petal outlines clearly and hangs straight in a window.
- Cream (A): 150 g / 345 m (centers, frames, joining, border, top edge, points, 2 tassels)
- Dusty rose (B): 90 g / 207 m (petals, 2 tassels)
- Sage green (C): 25 g / 58 m (corner leaves)
These quantities include a margin of about 15% for gauge differences and tassels.
Tools:
- 3.5 mm (E-4) crochet hook
- Tapestry needle
- Scissors
- Stitch markers
- A 4.5 in (11.4 cm) piece of stiff card for the tassels
- Blocking mats and rust-proof pins
- Wooden dowel, 24 in (61.0 cm) long and 0.75 in (1.9 cm) in diameter
Abbreviations (US Terms)
- ch – chain
- sl st – slip stitch
- sc – single crochet
- hdc – half double crochet
- dc – double crochet
- st(s) – stitch(es)
- sp – space
- sk – skip
- BLO – back loop only
- RS / WS – right side / wrong side
- hdc3tog – (yarn over, insert hook in next st, yarn over, pull up a loop) 3 times, yarn over, pull through all 7 loops on hook
Special stitch – Cluster (dc3tog in one st): (Yarn over, insert hook in the indicated st, yarn over, pull up a loop, yarn over, pull through 2 loops) 3 times in the same st, then yarn over and pull through all 4 loops on hook.
Beginning cluster: Ch 2, then work the cluster with only 2 dc legs (dc2tog in the same st).
Gauge and Checkpoints
Make one complete square before you commit to the full curtain. Gauge is measured by size at each stage:
- After Round 2: cream center measures 1.25 in (3.2 cm) across.
- After Round 4: flower measures 3.75 in (9.5 cm) from petal tip to petal tip.
- After Round 8: square measures 5 in (12.7 cm) per side, laid flat without stretching.
Too big? Go down to a 3.25 mm hook, or tighten your chains in Rounds 5 and 7.
Too small? Go up to a 3.75 mm hook.
Changing a square by only 0.25 in (0.6 cm) changes the curtain width by 1 in (2.5 cm), so this check matters.
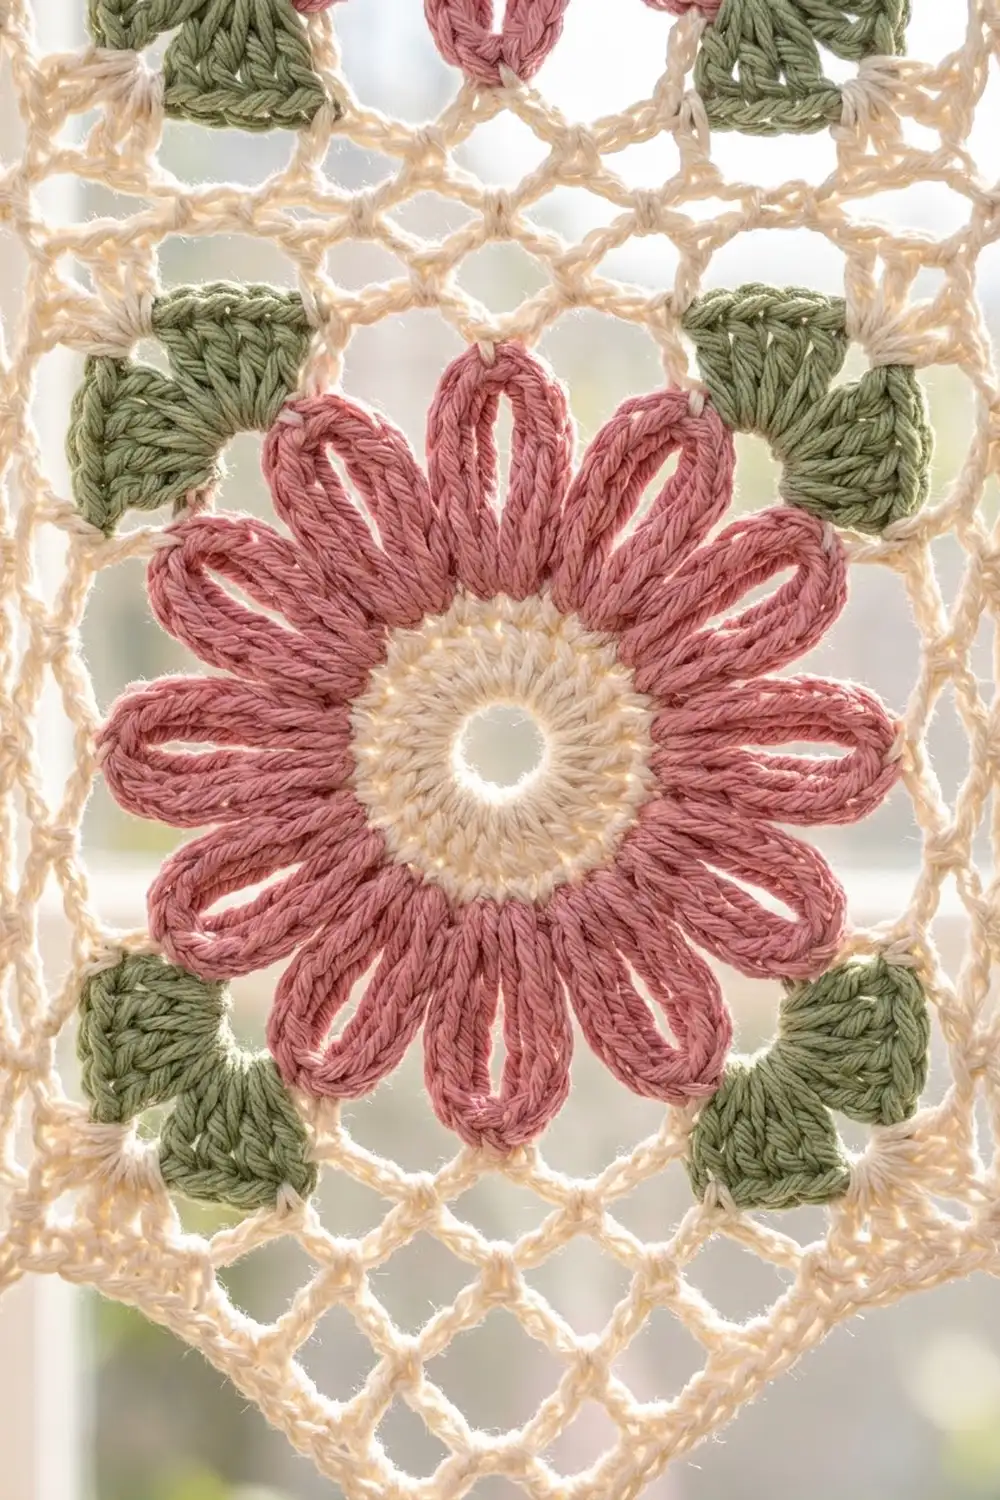
Flower Square (make 16)
Round 1 (A)
Make a magic ring. Ch 3 (counts as dc), work 11 dc in the ring, then sl st to the top of the ch-3. Pull the ring closed, leaving a small center hole. (12 dc)
Round 2 (A)
Ch 1, work 2 sc in each st around, then sl st to the first sc. Fasten off. (24 sc)
Round 3 (B) – Petal loops
Join B with a sl st in any sc. Ch 12, sl st in the same sc (petal loop made), then sl st in the next sc. Repeat from * around, ending with the last sl st in the joining st. (12 ch-12 loops)
Each loop sits on every other sc, so the petals are evenly spaced around the 24 sts.
Round 4 (B) – Outlined petals
Sl st into the first loop. In each loop, work (3 sc, 3 hdc, 2 dc, ch 2, 2 dc, 3 hdc, 3 sc). Then sl st in the sl st between loops. Join with a sl st at the base of the first petal and fasten off. (12 petals, each 16 sts plus a ch-2 tip; 192 sts in total)
Because the stitches wrap around a narrow chain loop, the loop stays open as a slit down each petal. This creates the outlined look.
Round 5 (A) – Tip chains
Join A in any ch-2 petal tip. Ch 1, sc in the same tip, ch 7. Sc in the next tip, ch 7. Repeat from * around, then sl st to the first sc. Do not fasten off; drop the loop and place a marker in it. (12 sc, 12 ch-7 sps)
Mark the joining sc and every third sc after it (sc 1, 4, 7 and 10). These four are the corner sc.
Round 6 (C) – Corner leaves
Work one leaf on each marked corner sc, using a separate short length of C for each leaf.
Join C with a sl st in a corner sc. Work a beginning cluster in the same sc, ch 2, cluster in the same sc, ch 2, cluster in the same sc. Fasten off. (4 leaves, each with 3 clusters and 2 ch-2 sps)
The three clusters fan outward into a small three-lobed leaf at each corner.
Round 7 (A) – Mesh frame
Pick up the dropped loop of A and sl st over to the top of the center cluster of the nearest leaf.
Corner: (dc, ch 3, dc) in the top of the center cluster.
Side: Ch 3, sc in the next leaf ch-2 sp, ch 3, sc in the next ch-7 sp, ch 3, sc in the next sc, ch 3, sc in the next ch-7 sp, ch 3, sc in the next sc, ch 3, sc in the next ch-7 sp, ch 3, sc in the first ch-2 sp of the next leaf, ch 3.
Repeat the corner and side 3 more times. Sl st to the first dc. (Per side: 6 sc and 7 ch-3 sps; plus 8 dc and 4 corner ch-3 sps around)
Round 8 (A) – Square edge (conversion round)
Sl st into the corner ch-3 sp, then ch 1.
In the corner sp, work (sc, ch 2, sc). Sc in the next dc, 3 sc in each of the next 7 ch-3 sps, and sc in each sc between them. Sc in the dc before the next corner. Repeat from * around and sl st to the first sc. Fasten off.
Count per side: (8 sts worked 1-per-existing-st: 6 sc + 2 dc) + (23 sts worked into spaces: 21 sc in ch-3 sps + 2 corner sc) = 31 sc per side. This count includes both corner sc. The square has 124 sc plus 4 corner ch-2 sps.
Checkpoint: the square measures 5 in (12.7 cm) per side.
Make All Pieces
Make 16 squares.
Per square, color use is roughly: A for Rounds 1–2 and 5–8, B for Rounds 3–4, and C for the four leaves in Round 6.
Weave in all ends before joining. Steam or wet-block each square to 5 in (12.7 cm).
Layout grid (all squares identical; the V marks show where the bottom points will go):
[S][S][S][S]
[S][S][S][S]
[S][S][S][S]
[S][S][S][S]
 V  V  V  V
Joining
Method: slip-stitch join through the BLO with A.
- Place two squares RS together with their edges aligned.
- Sl st through both ch-2 corner sps.
- Sl st through the BLO of each matching pair of sc: corner sc to corner sc, then st to st across. That is 31 sl sts.
- Finish with a sl st through the next pair of corner ch-2 sps.
Join the squares into 4 horizontal strips of 4, then join the strips along their long edges. Each long seam matches 4 x 31 = 124 sc pairs. At each four-way junction, work one sl st through all the corner ch-2 sps that meet there.
Tension: Keep the sl sts as loose as the sc beneath them. If a seam is shorter than the square edge next to it, rip it back and go up one hook size for joining.
Checkpoint: the joined panel measures 20 in x 20 in (50.8 cm x 50.8 cm).
Border
Border gauge: 124 sc = 20 in (50.8 cm), which is 6.2 sc per inch, matching the squares exactly.
Border Round 1 (A)
Join A in any outer corner ch-2 sp. Ch 1. Work 1 sc in each sc around the panel and ch 2 at each outer corner. At the seams, skip the joined corner ch-2 sps and add no stitch there. Sl st to the first sc.
Per side: 4 squares x 31 sc = 124 sc. Total: 496 sc plus 4 corner ch-2 sps.
Border Round 2 (A)
Ch 1. Work 1 sc in each sc around and ch 2 in each corner ch-2 sp. Sl st to the first sc and fasten off.
Per side: 124 sc (496 total).
Why the math works: The corner ch-2 sps give the border room to turn without adding stitches, so every column keeps exactly 31 sts. This lets the top loops and bottom points line up with the seams. Two rounds add about 0.4 in (1.0 cm) per side, so the panel measures 20.8 in x 20.8 in (52.8 cm x 52.8 cm).
Top Edge: Scallops and Hanging Loops (A)
With the RS facing, join A in the top-right corner sc, which is st 1 of the top edge. Number the top sts 1–124.
- Ch 16, then sl st in st 1 (loop).
- Scallop over the next 29 sts: sc in the next 4, hdc in the next 4, dc in the next 13, hdc in the next 4, sc in the next 4.
- Sl st in the next st, ch 16, sl st in the next st (seam loop, centered over a seam).
- Repeat steps 2–3 twice more.
- Work one more scallop, then ch 16 and sl st in st 124.
Fasten off.
Count: 1 + 29 + 2 + 29 + 2 + 29 + 2 + 29 + 1 = 124 sts. That gives 5 loops and 4 scallops of 29 sts each.
Each loop stands about 1.5 in (3.8 cm) tall. The dc centers raise each scallop by about 0.5 in (1.3 cm).
Bottom Points (A, make 4)
Each point is worked across one column of 31 sts on the bottom edge. Turn at the end of every row; ch 1 does not count as a stitch.
- Row 1 (RS): Join A in the first st of the column. Ch 1, then hdc in each st. (31)
- Row 2: Ch 1, hdc3tog, hdc to the last 3 sts, hdc3tog. (27)
- Rows 3–8: Repeat Row 2. (23, 19, 15, 11, 7, 3)
- Row 9: Ch 1, hdc3tog. (1)
Fasten off, leaving a 6 in (15.2 cm) tail.
Each point is about 2.5 in (6.4 cm) deep. Neighboring points meet at the seam stitches, which forms the V valleys.
Tassels (make 4: 2 in B, 2 in A)
- Wrap yarn 30 times around the 4.5 in (11.4 cm) card.
- Thread a 10 in (25.4 cm) strand under the wraps at one edge and tie it tightly.
- Cut the wraps at the opposite edge.
- Wrap a second strand tightly around the bundle 0.5 in (1.3 cm) below the top, then knot it and bury the ends inside the tassel.
- Trim the tassel to 4 in (10.2 cm).
Tie the tassels to the point tips from left to right in the order B, A, B, A, using the point tails.
Final Blocking
- Wet the curtain in cool water and press the water out in a towel. Do not wring it.
- Lay it flat RS up on the blocking mats.
- Pin the body to 20.8 in (52.8 cm) wide by 20.8 in (52.8 cm) to the border corners.
- Pin each petal outward from the center so the slits open evenly.
- Pin each point down to its tip, 2.5 in (6.4 cm) below the border.
- Pin each scallop into an even arch, and pin the loops straight.
- Let it dry completely. Steam the tassels separately, then comb them straight.
Final Quality-Control Checklist
- All 16 squares measure 5 in (12.7 cm).
- Every square edge has 31 sc, including the corners.
- All leaves sit at the corners, not mid-side.
- Seams lie flat and match stitch to stitch.
- Both border rounds have 124 sc per side.
- There are 5 loops, centered at the corners and the seams.
- All 4 points end in a single stitch, with no lean.
- Tassels alternate rose and cream and are trimmed evenly to 4 in (10.2 cm).
- All ends are woven in securely.
Troubleshooting
- Petals cup or ruffle: The loops are too short. Use ch 13 in Round 3.
- Petal slits close up: You are working too tightly in Round 4. Loosen your tension, or work into the loop space rather than into the chains.
- Square bows outward at the sides: Your ch-3 sps are too loose. Use ch 2 on the sides only in Round 7, but keep 3 sc per sp in Round 8.
- Square edge does not reach 31 sts: Check that each ch-7 sp and each tip sc got its own stitch in Round 7.
- Seams pucker: Join with a larger hook.
- Points lean sideways: Make sure each row begins and ends with an hdc3tog.
- Loops miss the seams: Recount the top edge in groups of 31.
Care
Hand wash cool with mild detergent, then reshape and dry flat. If needed, steam lightly from the WS. Avoid hot ironing, which can flatten the petals.
Final Notes
The measurement chain is simple:
- One square is 5 in (12.7 cm) with 31 sc per side.
- Four squares make 20 in (50.8 cm) and 124 sc per side.
- Two border rounds bring the panel to 20.8 in (52.8 cm) with no added stitches.
- The top scallops, 2.5 in (6.4 cm) points and 4 in (10.2 cm) tassels all build on those same 124 stitches.
Check every stage before moving on, and the curtain will hang straight and even. Happy crocheting!