

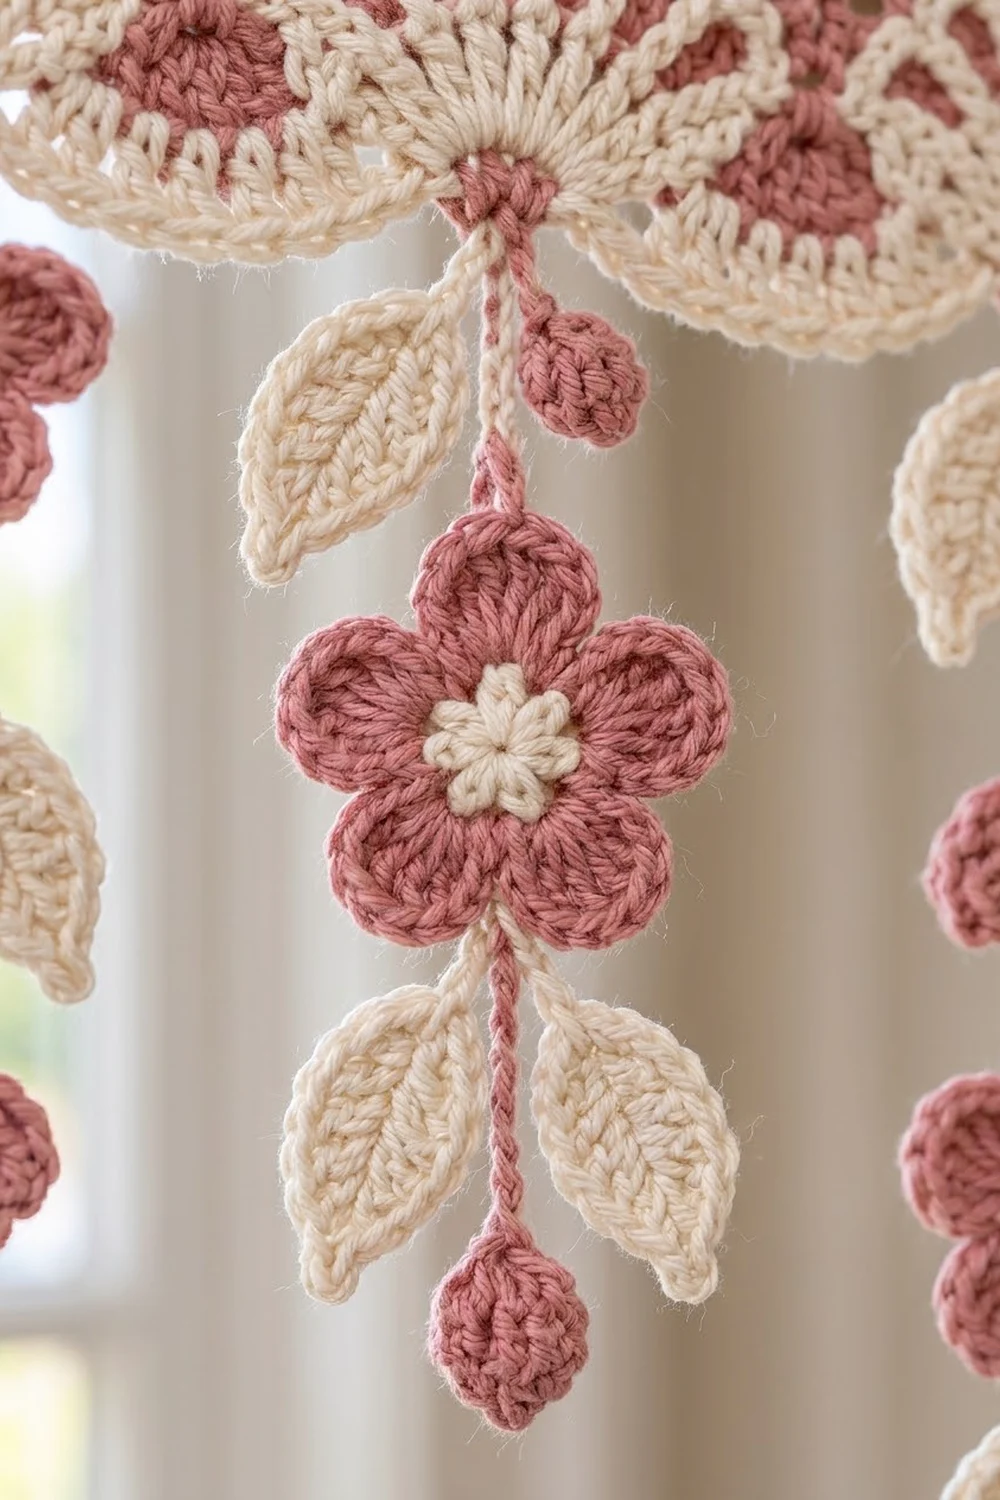
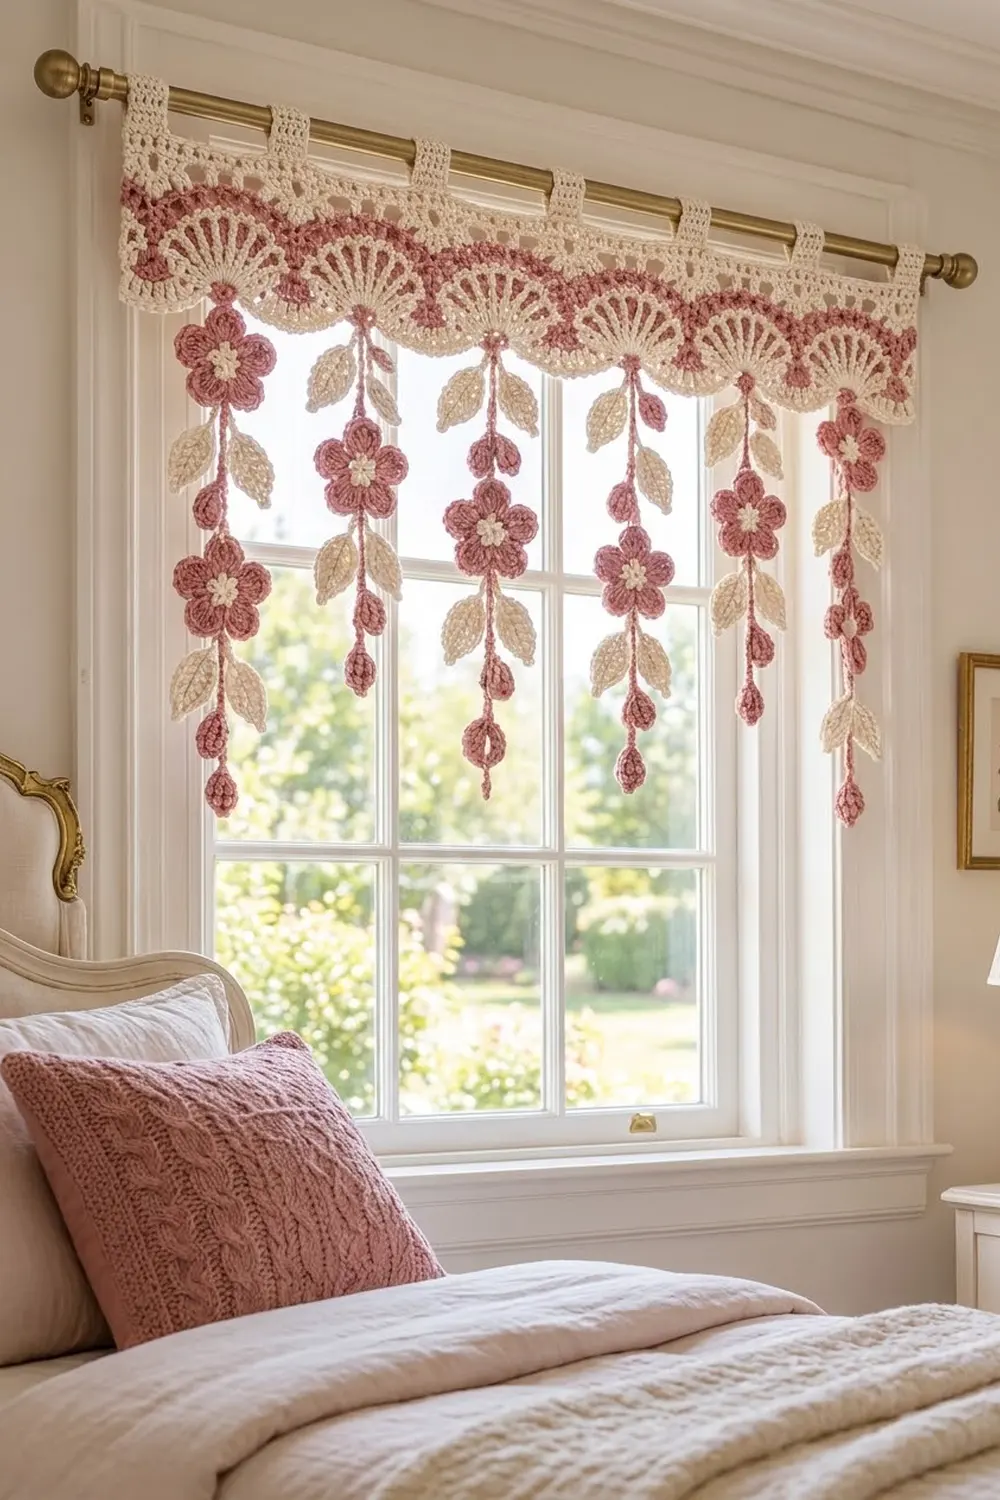
The Rose Trellis Fan Valance is a lacy curtain topper with a vintage cottage look. A band of offset cream and dusty rose fans sits above a row of open cream fans, and their rounded tops form a soft scalloped edge. Thirteen chain drops hang from the dips between the scallops. Each drop has pointed cream leaves and ends in a small rose berry.
The palette is just two colors: warm cream and dusty rose. Seven drops carry two five-petal rose flowers with cream centers. They alternate with six shorter leaf drops, so the hem looks full without feeling heavy.
The pattern uses US crochet terms. The finished valance measures 36¾ in (93.3 cm) wide and 15 in (38.1 cm) long from the top edge to the tip of the longest drop. The lace band alone is 5 in (12.7 cm) deep.
You work the band flat in rows using a 12-stitch fan repeat. Next you add a top border with rod loops and a simple side edging. The drops are worked straight off the scallop edge. The 14 flowers are made separately and sewn onto the stems.
Finished Size and Construction
- Finished size: 36¾ in (93.3 cm) wide × 15 in (38.1 cm) long, including drops
- Band depth with border: 5 in (12.7 cm)
- Skill level: Intermediate
- Terminology: US crochet terms
- Yarn weight: Worsted (#4) cotton
- Hook: 5 mm (H-8)
- Number of pieces: 1 valance band with 13 drops worked in place, plus 14 small flower appliqués
- Layout: 12 fan repeats across; 7 flower drops alternating with 6 leaf drops
- Fan repeat width: 12 sts = 3 in (7.6 cm)
- Size before border: 36¼ in × 4½ in (92.1 cm × 11.4 cm)
- Border depth: ½ in (1.3 cm) at the top and ¼ in (0.6 cm) at each side, plus 13 rod loops
Materials
Use a smooth mercerized or combed cotton in worsted weight. Cotton holds the fan shapes, hangs straight, and stands up to sunlight and washing. Avoid fuzzy yarn, because the open fans and the leaves need clear stitch definition.
- Cream (main color): 100 g, about 190 m (208 yd)
- Dusty rose (contrast color): 100 g, about 190 m (208 yd)
Both amounts include a margin of about 30% for swatching, joins, and tails.
Tools:
- 5 mm (H-8) crochet hook
- Tapestry needle
- 4 locking stitch markers
- Scissors
- Measuring tape
- Blocking mat and rust-proof pins
- Spray bottle
Abbreviations (US Terms)
- ch – chain
- sl st – slip stitch
- sc – single crochet
- hdc – half double crochet
- dc – double crochet
- tr – treble crochet
- BLO – back loop only
- st(s) – stitch(es)
- sp – space
- RS – right side
- rep – repeat
Special stitches:
- Fan: 11 dc in the same stitch.
- Open Fan: (tr, ch 1) 6 times in the same stitch, then 1 more tr in that stitch. This makes 7 tr and 6 ch-1 sps, for 13 sts.
- Berry: Ch 3. (Yo, insert hook in 3rd ch from hook, yo and pull up a loop, yo and pull through 2 loops) 5 times. Yo and pull through all 6 loops on the hook, then ch 1 to close.
- Leaf: Ch 8.
- Side 1: Sc in 2nd ch from hook, hdc in next ch, dc in next 3 ch, hdc in next ch, sc in last ch (7 sts). Ch 1.
- Side 2: Working in the free loops on the other side of the same chain, sc in first ch, hdc in next ch, dc in next 3 ch, hdc in next ch, sc in next ch (7 sts).
- Finish: Sl st in the first sc of Side 1 at the tip. Sl st in the BLO of each of the next 6 sts of Side 1 to return to the base.
- The finished leaf is about 1¾ in (4.4 cm) long.
Gauge and Checkpoints
- Sc gauge: 16 sts and 16 rows = 4 in (10.2 cm)
- Dc gauge: 16 sts and 8 rows = 4 in (10.2 cm)
- Chain gauge: 4 ch = 1 in (2.5 cm)
Make a test piece first. Ch 26 and work Rows 1–6 below over 25 sts, which is 2 fan repeats. The swatch should measure 6¼ in (15.9 cm) wide and 2½ in (6.4 cm) tall. Then make one flower. It should measure 2¼ in (5.7 cm) across.
Checkpoints on the band:
- After Row 1: 36¼ in (92.1 cm) wide
- After Row 4: 1½ in (3.8 cm) deep
- After Row 7: 2¾ in (7.0 cm) deep
- After Row 9: 3½ in (8.9 cm) deep
- After Row 11: 4½ in (11.4 cm) deep at the fan tops
If the swatch is too big, use a hook 0.5 mm smaller. If it is too small, use a hook 0.5 mm larger. Width matters most: an error of ¼ in (0.6 cm) on the swatch grows to about 1½ in (3.8 cm) across the full valance.
Main Pattern: Valance Band
Work flat in rows and turn at the end of each row. When the color changes, fasten off at the end of the row. Join the new color with a sl st in the first stitch of the next row. The turning ch does not count as a stitch unless stated.
Row 1 (rose): Ch 146. Sc in 2nd ch from hook and in each ch across. Turn. (145 sc)
Row 2 (rose): Ch 3 (counts as dc), dc in each st across. Fasten off. (145 dc)
Row 3 (cream, mesh): Join cream. Ch 4 (counts as dc + ch 1), skip next st, dc in next st. Ch 1, skip next st, dc in next st; rep from * across, ending with a dc in the top of the turning ch. Fasten off. (73 dc + 72 ch-1 sps = 145 sts)
Row 4 (rose): Join rose. Ch 1, sc in each dc and each ch-1 sp across. Fasten off. (145 sc)
Row 5 (cream, fans): Join cream. Ch 1, sc in first sc. Skip 5 sc, Fan in next sc, skip 5 sc, sc in next sc; rep from * 11 more times. Fasten off. (12 Fans × 11 dc + 13 sc = 145 sts)
Row 6 (rose, offset fans): Join rose in first sc. Ch 3 (counts as dc), 5 dc in same sc for a half fan. Skip 5 dc, sc in next dc (the center of the Fan), skip 5 dc, Fan in next sc; rep from * 10 more times. Skip 5 dc, sc in next dc, skip 5 dc, 6 dc in last sc for a half fan. Fasten off. (6 + 11 × 12 + 1 + 6 = 145 sts)
The rose fans now fill the gaps between the cream fans, so the band stays level.
Row 7 (cream): Join cream. Ch 1, sc in each st across, working the last sc in the top of the turning ch. Turn. (145 sc)
Row 8 (cream, mesh): Ch 4 (counts as dc + ch 1), skip next st, dc in next st. Ch 1, skip next st, dc in next st; rep from * across. Fasten off. (73 dc + 72 ch-1 sps = 145 sts)
Row 9 (rose): Join rose. Ch 1, sc in each dc and each ch-1 sp across. Fasten off. (145 sc)
Row 10 (cream, open fans – growth row): Join cream. Ch 1, sc in first sc. Skip 5 sc, Open Fan in next sc, skip 5 sc, sc in next sc; rep from * 11 more times. Turn. (12 Open Fans × 13 sts + 13 sc = 169 sts)
Row 11 (cream, scallop edge – conversion row): Ch 1, sc in each sc, each tr, and each ch-1 sp across. Fasten off. (169 sts worked 1 per existing st + 0 added = 169 sc)
The 13 sc that sit above the Row 10 sc are the valley sc: sts 1, 15, 29, 43, 57, 71, 85, 99, 113, 127, 141, 155, and 169 of Row 11. The drops hang from these stitches.
Main Pattern: Flowers (make 14)
Rnd 1 (cream): Make a magic ring. Ch 1, 10 sc in ring, sl st to first sc. Pull the ring closed and fasten off. (10 sc)
Rnd 2 (rose): Join rose in any sc. Ch 1. (Sc, hdc, 3 dc) in next sc, (3 dc, hdc, sc) in next sc; rep from * 4 more times. Sl st to first sc. Fasten off, leaving a 10 in (25.4 cm) tail for sewing. (5 petals × 10 sts = 50 sts)
Each flower is 2¼ in (5.7 cm) across. Where the petals meet sc to sc, they leave a small notch between them.
Main Pattern: Drops
With the RS facing, number the valleys 1 to 13 from right to left. Odd valleys get Flower Drops (7), and even valleys get Leaf Drops (6). This puts a flower drop at each end.
Flower Drop (valleys 1, 3, 5, 7, 9, 11, 13):
- With the RS facing, join cream with a sl st in the valley sc. Ch 8.
- Work a Leaf.
- Ch 12. Mark the last ch as the Flower 1 position.
- Work a Leaf.
- Ch 12. Mark the last ch as the Flower 2 position.
- Work a Leaf.
- Ch 6, changing to rose on the last yo. Work a Berry.
- Fasten off, leaving a 6 in (15.2 cm) tail. Thread the tail through the top of the Berry, pull it snug to round it, and weave it in.
The stem is 38 ch, or 9½ in (24.1 cm). With the berry, the drop is 10 in (25.4 cm) long.
Leaf Drop (valleys 2, 4, 6, 8, 10, 12):
- Join cream with a sl st in the valley sc. Ch 6.
- Work a Leaf. Ch 8.
- Work a Leaf. Ch 8.
- Work a Leaf. Ch 6.
- Work a Leaf. Ch 4, changing to rose on the last yo. Work a Berry.
- Fasten off and finish the berry as for the Flower Drop.
The stem is 32 ch, or 8 in (20.3 cm). With the berry, the drop is 8½ in (21.6 cm) long.
Attach the flowers: Center a flower over each marked chain on the Flower Drops. Flower 1 sits 5 in (12.7 cm) below the band, and Flower 2 sits 8 in (20.3 cm) below it. Using the rose tail, sew through the cream center and around the stem chain 3 times. Then tack the base of the 2 petals nearest the stem so the flower stays upright.
Border
Border gauge: Same as the sc gauge, 16 sts = 4 in (10.2 cm). Along the top, the border is worked 1 sc per stitch, so the width stays the same.
Border Row 1 (rose, top edge): With the RS facing, join rose in the first free loop of the foundation chain. Ch 1, sc in each free loop across. Fasten off. (145 sc)
Border Row 2 (cream, rod loops): Join cream. Ch 1, (sc, ch 14, sc) in first sc. Sc in next 11 sc, (sc, ch 14, sc) in next sc; rep from * 11 more times. Fasten off. (158 sc + 13 ch-14 loops)
Why the math works: This row uses 1 + 12 × 12 = 145 sts, so it ends exactly on the last stitch. The loops fall on sts 1, 13, 25, and so on through 145. These are the same columns as the valley sc, so each loop sits directly above a drop. Each loop is about 3½ in (8.9 cm) around, which fits a rod up to 1 in (2.5 cm) thick.
Side Edging (cream, each side): With the RS facing, join cream at the top corner. Sc down the side, working:
- 1 sc in each sc row end
- 2 sc in each dc, mesh, or fan row end
- 3 sc in the Row 10 row end
Fasten off. (20 sc per side)
Per side, that is 1 + 1 sc for Border Rows 2 and 1, plus 1 + 2 + 2 + 1 + 2 + 2 + 1 + 2 + 1 + 3 + 1 sc for Rows 1–11, for a total of 20. At 16 sts per 4 in (10.2 cm), 20 sc equals the 5 in (12.7 cm) band depth, so the sides lie flat. The edged band is 36¾ in (93.3 cm) wide.
Final Blocking
- Weave in all ends through stitches of the same color.
- Soak the valance in cool water for 10 minutes, then press the water out gently without wringing.
- Roll it in a towel to remove extra moisture.
- Lay it RS up and pin the top edge straight to 36¾ in (93.3 cm).
- Pin the band to 5 in (12.7 cm) deep, with 1 pin at the top of each Open Fan to round the scallops.
- Pin each drop straight down. Spread the leaf tips and flatten the petals.
- Let it dry completely, which takes 12–24 hours.
Final Quality-Control Checklist
- Band measures 36¾ in (93.3 cm) × 5 in (12.7 cm)
- 12 cream Fans; 11 full rose fans plus 2 half fans
- 12 Open Fans and 13 valley sc
- 13 rod loops, each above a drop
- 7 Flower Drops at 10 in (25.4 cm) and 6 Leaf Drops at 8½ in (21.6 cm)
- 14 flowers sewn on securely, facing forward
- 45 leaves: 21 on Flower Drops and 24 on Leaf Drops
- 13 round, closed berries
- No ends showing on the RS
Troubleshooting
Band is wider than 36¼ in (92.1 cm) after Row 1: Your foundation chain is too loose. Redo it with a hook 0.5 mm smaller.
Fans cup or ruffle: Check that you skipped exactly 5 sts on each side of each Fan. If you did, go down one hook size.
Row 6 fans don’t line up: Recount Row 5. It must have exactly 145 sts, with 13 sc and 12 Fans.
Scallop edge flares: Work Row 11 with a hook 0.5 mm smaller.
Drops twist: Make sure the chains aren’t twisted, then let the drops hang while they dry.
Leaves curl: Work the BLO sl sts loosely and pin the leaves flat when blocking.
Care
Hand wash in cool water with mild detergent and dry flat, reshaping the drops while damp. To slow fading of the dusty rose, keep the valance out of harsh direct sun.
Final Notes
Here is the full measurement chain. A 25-st swatch at 6¼ in (15.9 cm) gives 145 sts at 36¼ in (92.1 cm). Rows 1–11 make the band 4½ in (11.4 cm) deep. The border adds ½ in (1.3 cm) at the top and ¼ in (0.6 cm) at each side, so the band finishes at 36¾ in × 5 in (93.3 cm × 12.7 cm). The 10 in (25.4 cm) drops bring the total length to 15 in (38.1 cm).
Check each stage as you go and your valance will hang straight. Happy crocheting!