

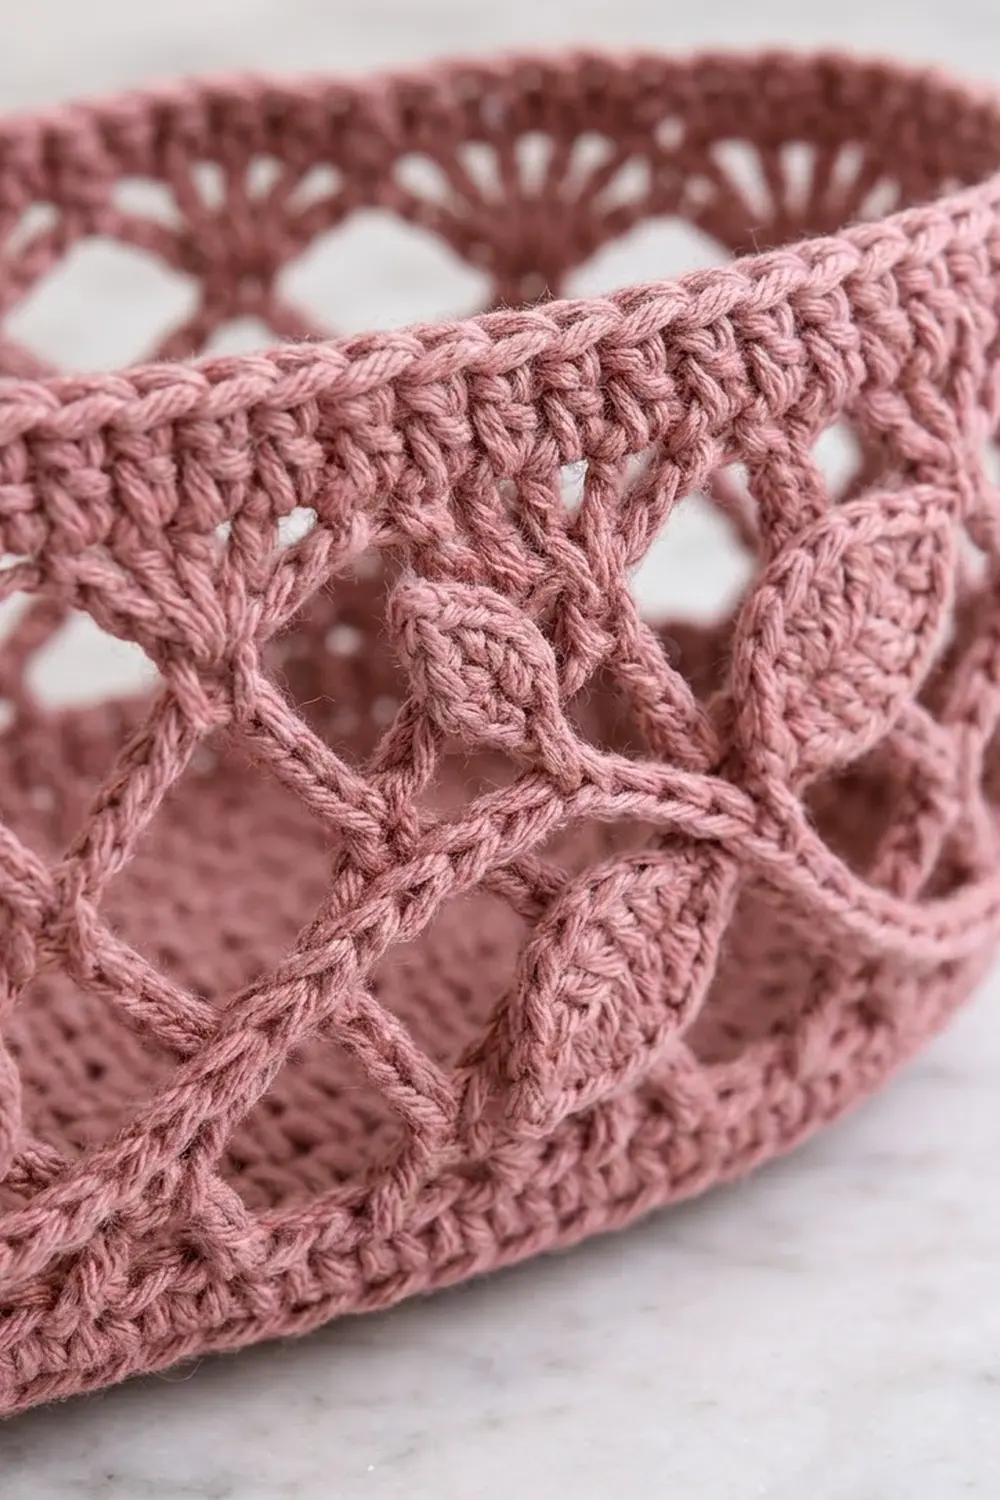
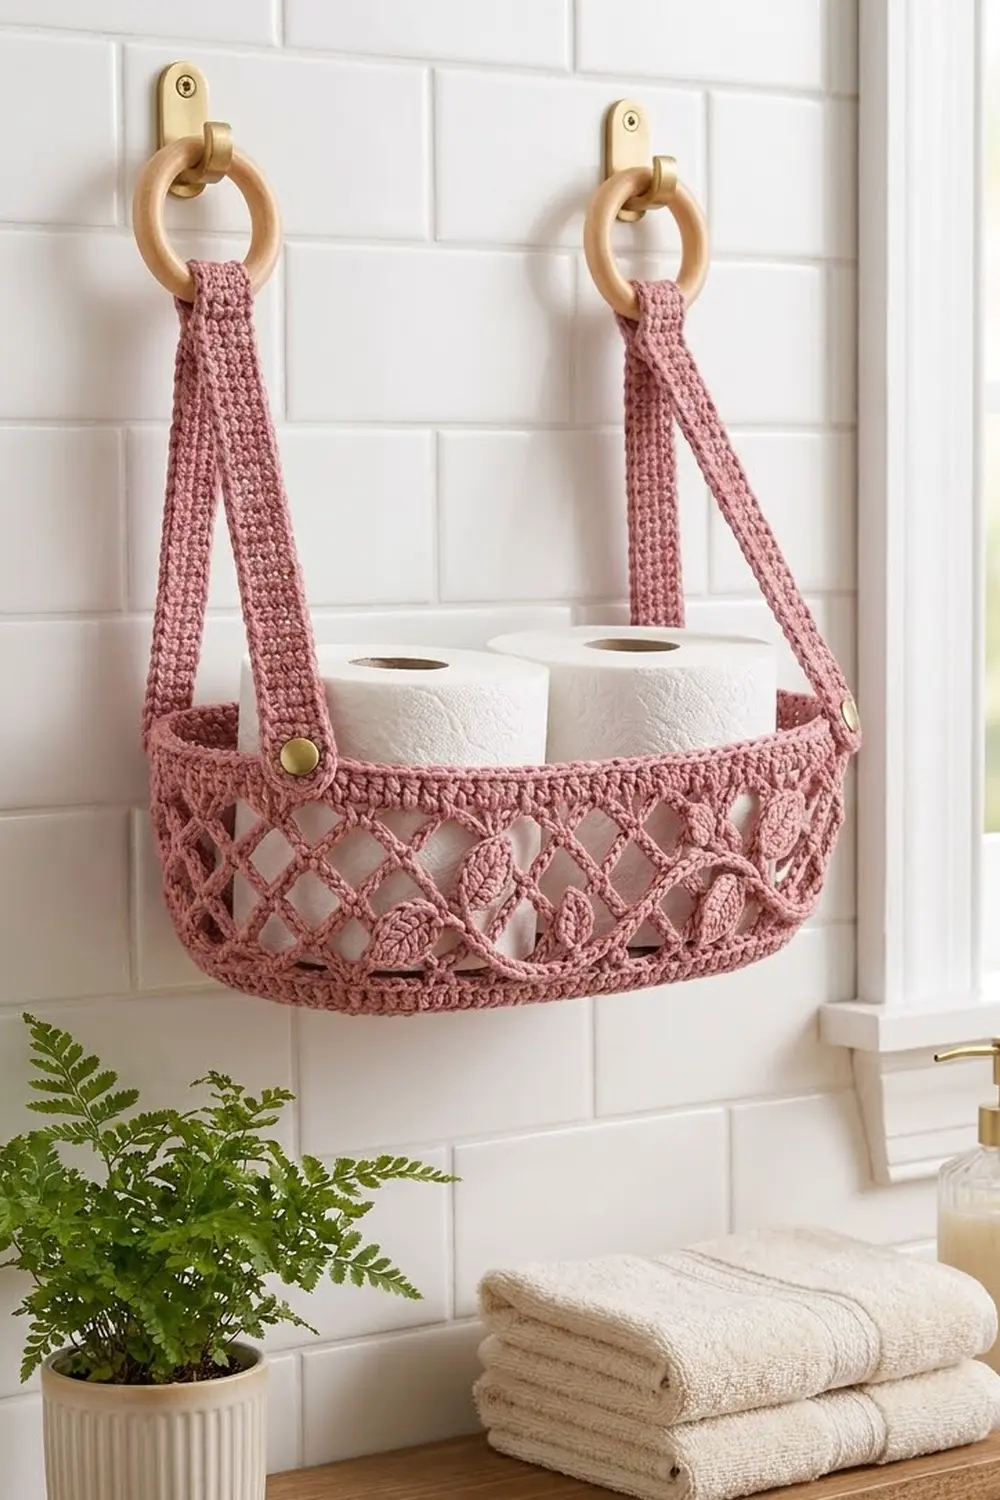
The Rose Trellis Hanging Basket is a long, narrow oval basket that hangs from two wooden rings. The walls are an open diamond lattice topped with a row of small fans and a firm rolled rim. A slip-stitch vine with pointed leaves winds across the lower walls on both long sides.
Everything is worked in one dusty rose cotton, so the texture does the decorating. Small brass buttons and natural wooden rings give it a soft, cottage-style bathroom look. Two standard toilet paper rolls fit side by side, and it also works for washcloths, soaps, or small plants.
This pattern uses US crochet terms. The finished basket measures 12.25 in (31.1 cm) long and 4.75 in (12.1 cm) wide at the base, and stands 5.5 in (14.0 cm) tall. Each strap is 12 in (30.5 cm) long and 1.25 in (3.2 cm) wide.
You’ll crochet the oval base in single crochet rounds, then keep going up into the walls without breaking the yarn. After that, make two straps, two vines, and fourteen leaves. Sew on the appliqués, button the straps to the basket, and loop them through the rings.
Finished Size and Construction
- Finished basket: 12.25 in (31.1 cm) long × 4.75 in (12.1 cm) wide × 5.5 in (14.0 cm) tall
- Skill level: Intermediate
- Terminology: US
- Yarn weight: Worsted (#4) cotton
- Hook: 4.0 mm (US G-6)
- Number of pieces: 1 basket body, 2 straps, 2 vines, 14 leaves
- Layout: One basket with a strap at each short end. One vine runs along each long side.
- Base size: 12.25 in × 4.75 in (31.1 cm × 12.1 cm)
- Wall height before the rim: 5 in (12.7 cm)
- Rim (border) depth: 0.5 in (1.3 cm)
- Strap size: 12 in × 1.25 in (30.5 cm × 3.2 cm)
Materials
Choose a smooth, firm worsted-weight cotton or cotton blend. Cotton holds the basket’s shape, shows off the lattice, and copes well with bathroom humidity. Avoid soft acrylic, because the walls will sag.
- Dusty rose worsted cotton: 100 g / 170 m total
- Basket body: 70 g / 119 m
- Straps: 20 g / 34 m
- Vines and leaves: 10 g / 17 m
These quantities include a margin of about 25%, so you shouldn’t run short.
Tools and notions:
- 4.0 mm (US G-6) crochet hook
- 4 locking stitch markers
- Tapestry needle and rust-proof pins
- 2 wooden rings, 2.5 in (6.4 cm) outer diameter
- 2 brass shank buttons, 5/8 in (1.6 cm)
- 2 wall hooks with screws and wall anchors
- Sewing thread in a matching color (optional, for the buttons)
- Spray bottle and blocking mats
Abbreviations (US Terms)
- ch: chain
- sl st: slip stitch
- sc: single crochet
- hdc: half double crochet
- dc: double crochet
- BLO: back loop only
- sk: skip
- sp: space
- st(s): stitch(es)
- rnd: round
- rev sc: reverse single crochet (crab stitch)
Special stitch: Fan. Work 5 dc in the same stitch.
Reverse sc: Work from left to right (right to left if you crochet left-handed). Insert the hook into the next stitch to the right, yarn over, pull up a loop, then yarn over and pull through both loops.
Gauge and Checkpoints
Gauge: 16 sc and 18 rnds = 4 in (10.2 cm) in sc worked in the round.
Make the base first and use it as your gauge swatch. Every other measurement in the pattern depends on it.
Checkpoints:
- After Rnd 1: about 8 in (20.3 cm) long
- After Rnd 5: about 10 in × 2.5 in (25.4 cm × 6.4 cm)
- After Rnd 10: 12.25 in × 4.75 in (31.1 cm × 12.1 cm)
- After Rnd 14: walls 1 in (2.5 cm) tall
- After Rnd 21: walls 4 in (10.2 cm) tall
- After Rnd 24: walls 5 in (12.7 cm) tall
- After Rnd 26: walls 5.5 in (14.0 cm) tall
If the base is too big, go down half a hook size. If it’s too small, go up half a size. If the base cups or ruffles, check your increases before you change hooks.
Basket Body
Base
Ch 32.
Rnd 1: Sc in 2nd ch from hook and in next 29 ch (30 sc), 3 sc in last ch. Turn the work to crochet along the underside of the chain. Sc in next 30 ch, then 3 sc in the skipped first ch. Join with sl st to first sc. (66 sts: 30 per long side, 3 per end)
Place a marker in the first st of each 3-st end group. Move the markers up each round. On every round, the long sides stay at 30 sc each, and all increases happen in the two end groups.
Every round from here on begins with ch 1 and sc in the same st, and ends by joining with sl st to the first sc.
Rnd 2: Sc 30, [2 sc in next st] 3 times, sc 30, [2 sc in next st] 3 times. (72 sts)
Rnd 3: Sc 30, [sc 1, 2 sc in next] 3 times, sc 30, [sc 1, 2 sc in next] 3 times. (78 sts)
Rnd 4: Sc 30, [sc 2, 2 sc in next] 3 times, sc 30, [sc 2, 2 sc in next] 3 times. (84 sts)
Rnds 5–10: Continue the same way. Each round, add 1 more plain sc before the increase inside each bracket. (Rnd 5: 90 sts; Rnd 6: 96; Rnd 7: 102; Rnd 8: 108; Rnd 9: 114; Rnd 10: 120)
On Rnd 10 the bracket is [sc 8, 2 sc in next], and each end group has 30 sts. That gives 120 sts: 30 on each long side and 30 around each end.
Check your size now: 12.25 in × 4.75 in (31.1 cm × 12.1 cm).
Walls
Rnd 11: Working in BLO, sc in each st around. (120 sts) The unused front loops make a crisp fold line where the base meets the walls.
Rnds 12–14: Sc in each st around. (120 sts)
Lattice
Rnd 15: Ch 1, sc in first st, ch 5, sk 3, sc in next st. Repeat from * around, ending ch 5, sk 3, and join with sl st to first sc. (30 ch-5 loops)
Rnd 16: Sl st in each of the first 3 ch so you are at the center of the first loop. Ch 1, sc in the same loop, ch 5, sc in next ch-5 loop. Repeat around, ending ch 5, join with sl st to first sc. (30 loops)
Rnds 17–21: Repeat Rnd 16. (30 loops each round)
The loops stack offset from each other and form the diamond trellis.
Upper Band and Fans
Rnd 22 (conversion): Ch 1, work 4 sc in each ch-5 loop around. Join. (30 loops × 4 sc = 120 sts)
Rnd 23: Sc in each st around. (120 sts)
Rnd 24: Ch 1, sc in first st, sk 2, Fan in next st, sk 2, sc in next st. Repeat around, ending the last repeat with sk 2 and join to first sc. (20 fans; 20 sc + 100 dc = 120 sts)
Each repeat uses 6 stitches and makes 6 stitches, so the total stays at 120.
Straps (Make 2)
Ch 6.
Row 1: Sc in 2nd ch from hook and in each ch across. Turn. (5 sc)
Row 2: Ch 1, sc in each st across. Turn. (5 sc)
Row 3 (eyelet): Ch 1, sc 2, ch 1, sk 1, sc 2. Turn. (4 sc + 1 ch-1 sp)
Row 4: Ch 1, sc 2, sc in ch-1 sp, sc 2. Turn. (5 sc)
Rows 5–51: Ch 1, sc in each st across. Turn. (5 sc)
Row 52: Repeat Row 3.
Row 53: Repeat Row 4.
Row 54: Repeat Row 2. Don’t fasten off.
Edging: Ch 1, then sl st loosely around the whole strap: 1 sl st in each row end and 1 sl st in each st. Join. (54 + 5 + 54 + 5 = 118 sl sts)
Each strap should measure 12 in × 1.25 in (30.5 cm × 3.2 cm).
Vines (Make 2)
Ch 53. Sl st in the back bump of the 2nd ch from hook and in each ch across. (52 sl sts)
Fasten off and leave a 12 in (30.5 cm) tail. Each vine is about 13 in (33.0 cm) long.
Leaves (Make 14)
Ch 8.
Side 1: Sl st in 2nd ch from hook, sc in next ch, hdc in next ch, dc in next 2 ch, hdc in next ch, 3 sc in last ch.
Side 2: Working along the underside of the chain, hdc in next ch, dc in next 2 ch, hdc in next ch, sc in next ch, sl st in next ch.
Tip: Ch 2, sl st into the skipped first ch. (15 sts + tip)
Fasten off and leave a 10 in (25.4 cm) tail. Thread the tail onto the needle and make one surface sl st or backstitch line from the base to the tip to form the center vein.
Each leaf is about 1.75 in × 0.75 in (4.4 cm × 1.9 cm).
Make All Pieces
Before assembly, check that you have:
- Basket body: 1 (rims and finishing below)
- Straps: 2
- Vines: 2
- Leaves: 14 (7 per vine)
- Wooden rings: 2
- Brass buttons: 2
Layout:
  (ring)                                      (ring)
    |                                            |
 [strap]                                      [strap]
    |                                            |
 (button)  ---------- BASKET RIM ----------  (button)
 END 1   | FRONT: vine + 7 leaves         |   END 2
         | BACK:  vine + 7 leaves         |
         |------- oval base (Rnd 10) -----|
Joining
Vines: Lay the basket on its back. Pin one vine across the front long side over Rnds 15–19. Start just inside one end curve and finish just inside the other, letting it wave gently up and down 3 times. With the tail, tack the vine to a lattice sc or loop every 0.5 in (1.3 cm). Sew through only the outer layer and keep the stitches flat so the wall doesn’t pucker.
Leaves: Place 7 leaves along the vine about 1.5 in (3.8 cm) apart, alternating above and below it. Sew the base of each leaf directly onto the vine. Then tack the tip and the two widest points to the lattice behind it.
Repeat the vine and leaves on the back long side.
Buttons: Sew one button to the outside of each short end, centered on Rnd 23. Stitch through both the sc band and a strand of yarn on the inside so the button can’t pull out.
Straps: Push the top end of each strap through a ring. Fold back 1.5 in (3.8 cm) and whipstitch the fold to the strap through both layers. The top eyelet stays hidden inside the fold. Button the lower eyelet onto the basket.
Tension tip: Sew with even, relaxed stitches. If the lattice pulls tight around an appliqué, loosen the tacks.
Size checkpoint: After assembly, the basket should still measure 12.25 in × 4.75 in (31.1 cm × 12.1 cm) at the base. The drop from ring to rim should be about 10 in (25.4 cm).
Border
The two rim rounds act as the border and firm up the top edge. Work them directly into Rnd 24 with the same yarn.
Border gauge: 16 sts = 4 in (10.2 cm), the same as the base.
Rnd 25: Ch 1, sc in each sc and each dc around. (120 sts: 30 per long side, 30 around each end)
Rnd 26: Ch 1, rev sc in each st around. (120 sts: 30 per long side, 30 around each end) Join and fasten off.
The border is 0.5 in (1.3 cm) deep.
Why the math works: Rnd 24 has 120 sts, so Rnds 25 and 26 keep 120 sts with nothing added or removed. At 16 sts per 4 in, 120 sts measure 30 in (76.2 cm). That matches the perimeter of the Rnd 10 base: 2 × 7.5 in straight sides plus about 14.9 in of curved ends. Because the rim is the same length as the base, the walls rise straight up without flaring or pulling in.
The buttons and straps from the Joining section can be attached before or after the rim. Rnd 23 isn’t affected by the rim rounds.
Final Blocking
- Weave in all ends except the ones you used for sewing.
- Mist the whole basket with water until it’s damp but not dripping.
- Stuff it firmly with a towel shaped to 12.25 in × 4.75 in (31.1 cm × 12.1 cm).
- Pull the lattice diamonds into even shapes and open each fan with your fingers.
- Press the leaves flat against the walls.
- Pin the straps flat on a mat at 12 in × 1.25 in (30.5 cm × 3.2 cm).
- Let everything dry completely before hanging.
Final Quality-Control Checklist
- Base measures 12.25 in × 4.75 in (31.1 cm × 12.1 cm) and lies flat.
- Rnds 10, 11–14, 22, 23, 24, 25, and 26 each have 120 sts.
- The lattice has 30 loops in every round.
- There are exactly 20 fans, evenly spaced.
- The walls are 5.5 in (14.0 cm) tall and stand straight.
- 7 leaves sit on each vine, alternating sides.
- Both buttons are sewn on securely.
- Both straps are the same length.
- No loose ends are showing.
Troubleshooting
- Base cups upward: You’re missing increases. Recount the end groups.
- Base ripples: Your tension is too loose or you’ve added too many increases. Recount, or go down one hook size.
- Lattice twists to one side: Make sure each round starts from the center of the first loop.
- Fans crowd together: Check that you skip exactly 2 sts on each side of every fan.
- Rim flares: Rnd 25 has more than 120 sts. Rework it.
- Basket tips forward: The buttons are off-center. Move them to the exact middle of each short end.
- Straps stretch: Use a cotton blend with less give, or work the straps with a hook one size smaller.
Care
Hand wash in cool water with mild soap, press out the water in a towel, and reshape it over a towel to dry. Remove the wooden rings and buttons before washing if you can.
Final Notes
Everything in this basket follows one measurement chain. A 66-st base grows to 120 sts and 12.25 in × 4.75 in (31.1 cm × 12.1 cm). Those 120 sts carry up through the walls, the 30-loop lattice, the 20-fan round, and the rim, which keeps the walls straight at 5.5 in (14.0 cm) tall. The two 12 in (30.5 cm) straps then hang the basket about 10 in (25.4 cm) below the rings. Check your base gauge and recount at each checkpoint, and the rest will fall into place.
Happy crocheting!