

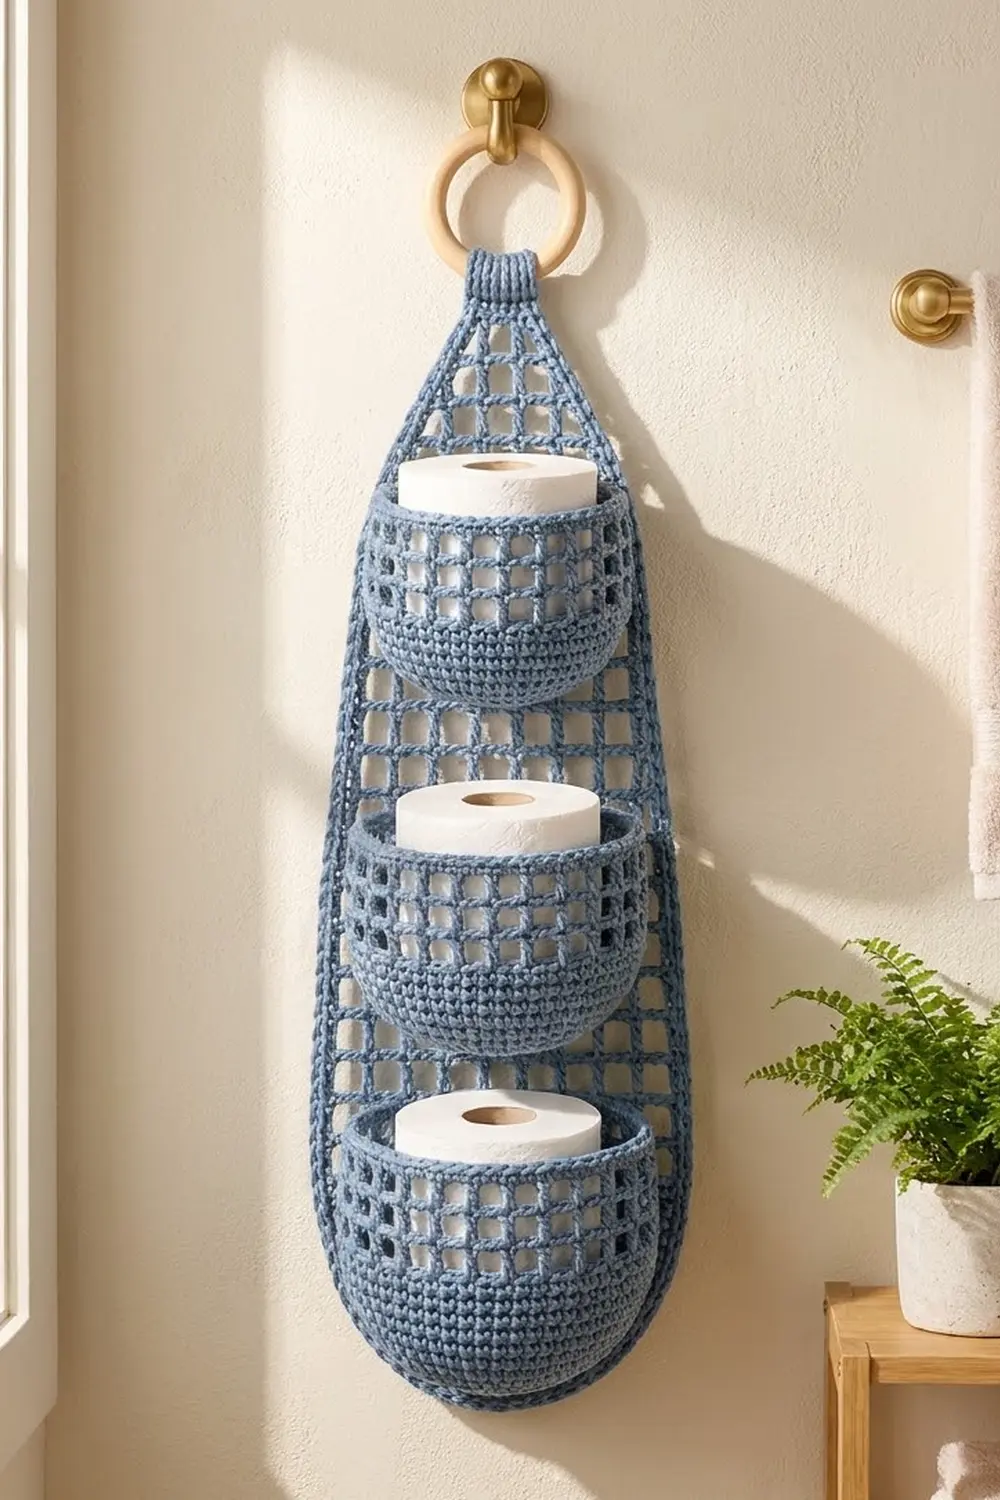
The Bluebell Drop is a hanging bathroom organizer. It has a teardrop-shaped filet mesh panel with three round baskets stacked on the front, and each basket holds one standard roll of toilet paper. The open grid keeps it light and airy, and the solid bottoms and rims keep the baskets firm.
The sample uses one color, a soft dusty blue, with a natural wooden ring at the top. The style is calm and modern. It looks good with white, cream, brass, and marble.
This pattern uses US crochet terms. The finished panel measures about 7.5 in (19.1 cm) wide by 22.5 in (57.2 cm) long. The hanging tab adds about 2 in (5.1 cm) above that. Each basket is about 5.7 in (14.5 cm) across and 4.8 in (12.2 cm) tall.
Construction is simple. You crochet three baskets in the round, from a flat spiral base up to the rim. You work the panel in rows from the top point down, adding mesh squares as it widens, and finish with a solid rounded bottom. Then you tack the baskets onto the panel, add a two-round border and a hanging tab, and block.
Finished Size and Construction
- Finished size: 7.5 in × 22.5 in (19.1 cm × 57.2 cm) panel, plus a 2 in (5.1 cm) tab
- Skill level: Intermediate (rounds, filet mesh, shaping)
- Terminology: US
- Yarn weight: Bulky (#5) cotton
- Hook: 6.0 mm (US J-10)
- Number of pieces: 4 (1 panel, 3 baskets)
- Layout: 3 baskets stacked vertically down the center of the panel
- Basket size: 5.7 in (14.5 cm) diameter × 4.8 in (12.2 cm) tall
- Panel size before border: 6.3 in × 21.3 in (16.0 cm × 54.1 cm)
- Border depth: 0.6 in (1.5 cm) on each edge
Materials
Choose a firm, smooth bulky cotton or cotton-blend cord. Cotton holds its shape when filled and tolerates bathroom humidity. Avoid fuzzy or very stretchy yarn, because the mesh squares will sag.
- Dusty Blue: 300 g, approx. 330 m (361 yd)
- Each basket: about 60 g (66 m)
- Panel, border, and tab: about 70 g (77 m)
These quantities include a margin of roughly 20% for gauge swatches and tension differences.
Tools:
– 6.0 mm (US J-10) crochet hook
– Wooden ring, 3 in (7.6 cm) outer diameter
– Tapestry needle
– 4–6 locking stitch markers
– Measuring tape
– Blocking mat, rust-proof pins, and spray bottle
– A jar or canister about 5.5 in (14.0 cm) across for blocking baskets
Abbreviations (US Terms)
- ch – chain
- sl st – slip stitch
- sc – single crochet
- dc – double crochet
- sp – space
- sk – skip
- st(s) – stitch(es)
- RS – right side
- dc2tog – double crochet 2 together
- dc3tog – double crochet 3 together
Special stitch – mesh square: a mesh square is (dc, ch 1) worked over 2 stitches, with the ch 1 skipping one stitch or space. A row of M mesh squares contains M + 1 dc posts and M ch-1 spaces, which is 2M + 1 stitches in total.
Beginning dc3tog: ch 2 (counts as the first leg), then dc2tog over the next 2 sts.
Gauge and Checkpoints
- Sc: 12 sts and 13 rows = 4 in (10.2 cm)
- Dc: 12 sts and 6 rows = 4 in (10.2 cm)
- One mesh square: 0.67 in (1.7 cm) wide and tall
Make one basket base first and use it as your test piece. After Rnd 9 it should measure 5.7 in (14.5 cm) across.
- Too big: if it measures more than 0.25 in (0.6 cm) over, drop to a 5.5 mm hook.
- Too small: if it measures more than 0.25 in (0.6 cm) under, go up to a 6.5 mm hook.
Gauge matters because each basket has to hold a 4.5 in (11.4 cm) roll, and because the panel’s border math depends on row height.
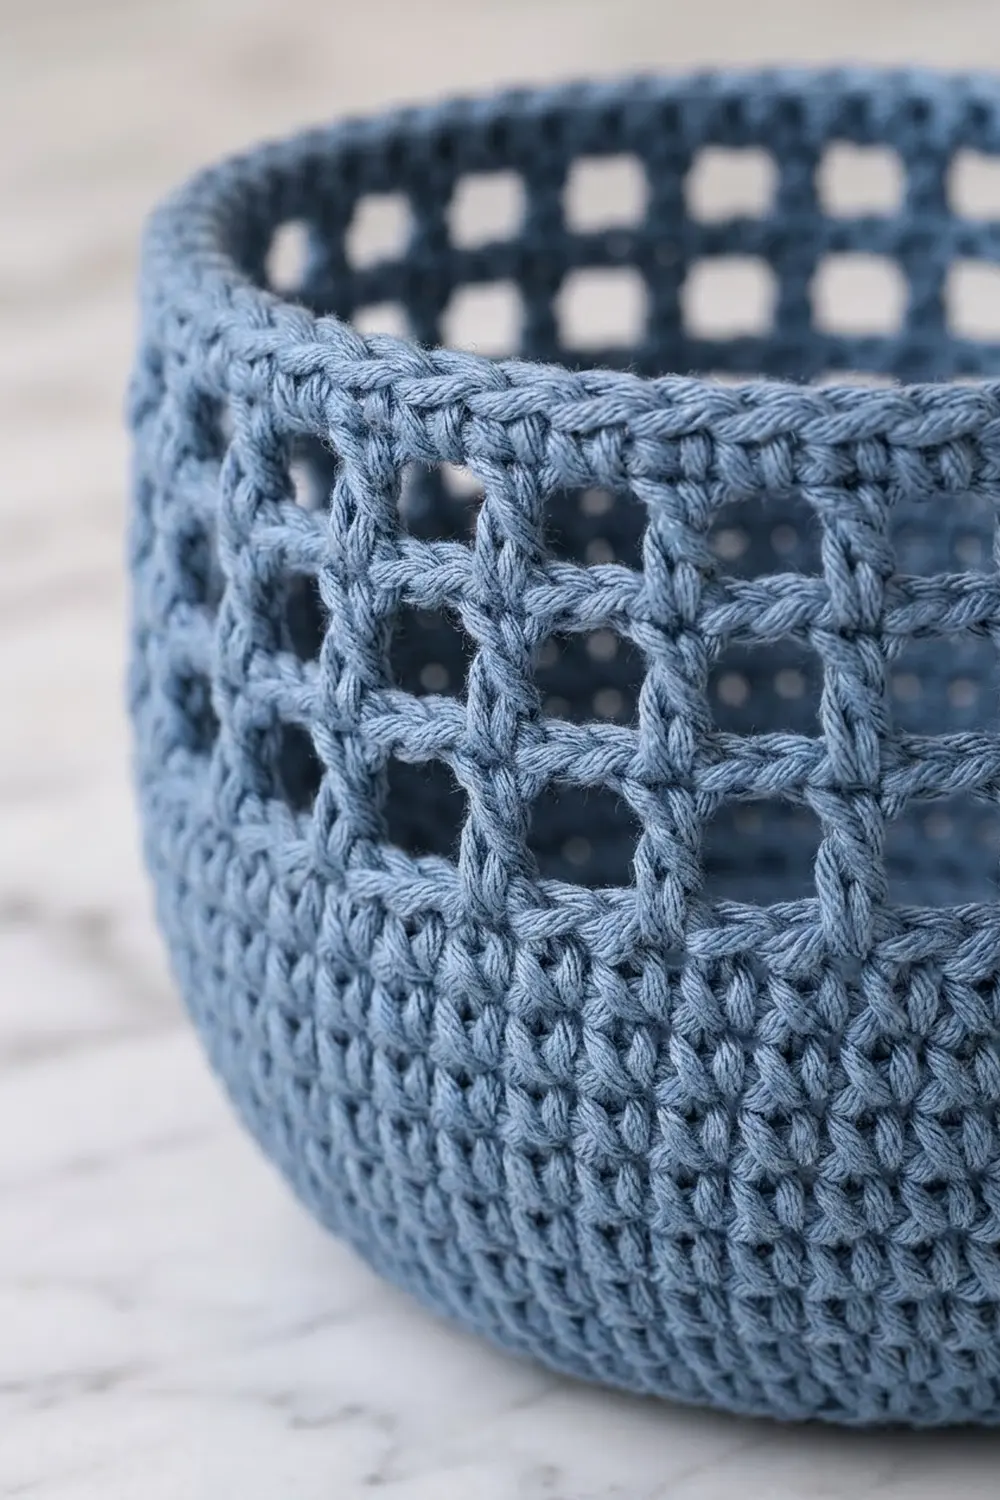
Basket (Make 3)
Base
Work in a continuous spiral. Mark the first st of each round.
Rnd 1: Magic ring, 6 sc in ring. (6)
Rnd 2: 2 sc in each st. (12)
Rnd 3: Sc 1, 2 sc in next 6 times. (18)
Rnd 4: Sc 2, 2 sc in next 6 times. (24)
Rnd 5: Sc 3, 2 sc in next 6 times. (30)
Rnd 6: Sc 4, 2 sc in next 6 times. (36)
Rnd 7: Sc 5, 2 sc in next 6 times. (42)
Rnd 8: Sc 6, 2 sc in next 6 times. (48)
Rnd 9: Sc 7, 2 sc in next 6 times. (54)
Checkpoint: a flat circle 5.7 in (14.5 cm) across, with a circumference of 18 in (45.7 cm).
Solid Lower Wall
Rnds 10–14: Sc in each st around. (54)
With no increases, the wall curves up gently and gives the basket its rounded, bowl-like bottom. At the end of Rnd 14, sl st in the next st to close the spiral.
Checkpoint: the wall is 1.5 in (3.8 cm) tall from the edge of the base.
Mesh Band
Rnd 15: Ch 4 (counts as dc + ch 1), sk next st. Dc in next st, ch 1, sk next st 26 times. Sl st in the 3rd ch of the beginning ch-4. (27 dc + 27 ch-1 sps = 54 sts; 27 mesh squares)
Rnds 16–18: Ch 4 (counts as dc + ch 1), sk ch-1 sp. Dc in next dc, ch 1, sk ch-1 sp 26 times. Sl st in the 3rd ch of the beginning ch-4. (54 sts; 27 mesh squares)
Each new post sits directly above the post below, which makes clean square holes.
Checkpoint: wall height 4.2 in (10.7 cm).
Rim
Rnd 19 (conversion): Ch 1, sc in each dc and each ch-1 sp around. Join with a sl st to the first sc. (27 sc in posts + 27 sc in spaces = 54)
Rnd 20: Ch 1, sc in each st around. Join. (54)
Fasten off and leave a 24 in (61.0 cm) tail for sewing.
Checkpoint: basket 4.8 in (12.2 cm) tall and 5.7 in (14.5 cm) across.
Back Panel
Work in rows from the top point down. The turning ch-4 counts as dc + ch 1 throughout.
Plain mesh row: Ch 4, turn, sk ch-1 sp. Dc in next dc, ch 1, sk ch-1 sp across. End with a dc in the 3rd ch of the turning ch. (Mesh count stays the same.)
Increase row: Ch 4, turn, dc in the same st at the base of the ch (1 mesh added). Ch 1, sk ch-1 sp, dc in next dc across, ending with the dc in the 3rd ch of the turning ch. Then ch 1 and dc again in the same st (1 mesh added). (+2 meshes, +4 sts)
Tapered Top
Row 1: Ch 6. Dc in the 6th ch from the hook. (1 mesh, 3 sts)
Rows 2–3: Plain mesh row. (1 mesh, 3 sts)
Row 4: Increase row. (3 meshes, 7 sts) – width 2.3 in (5.8 cm)
Rows 5–6: Plain mesh row. (3 meshes, 7 sts)
Row 7: Increase row. (5 meshes, 11 sts) – width 3.7 in (9.4 cm)
Rows 8–9: Plain mesh row. (5 meshes, 11 sts)
Row 10: Increase row. (7 meshes, 15 sts) – width 5.0 in (12.7 cm)
Rows 11–12: Plain mesh row. (7 meshes, 15 sts)
Row 13: Increase row. (9 meshes, 19 sts)
Checkpoint: 6.3 in (16.0 cm) wide and 8.7 in (22.1 cm) long.
Straight Mesh Section
Rows 14–27: Plain mesh row. (9 meshes, 19 sts)
Checkpoint: 18.0 in (45.7 cm) long.
Solid Rounded Bottom
Row 28 (conversion): Ch 3 (counts as dc), turn. Dc in each ch-1 sp and each dc across, ending with a dc in the 3rd ch of the turning ch. (10 dc in posts + 9 dc in spaces = 19)
Row 29: Ch 3, turn, dc in each st across. (19)
Row 30: Ch 2, turn, dc in next st (beginning dc2tog), dc in next 15, dc2tog. (17)
Row 31: Ch 2, turn, beginning dc3tog over the first 3 sts, dc in next 11, dc3tog. (13)
Row 32: Ch 2, turn, beginning dc3tog over the first 3 sts, dc in next 7, dc3tog. (9)
Fasten off.
Checkpoint: 32 rows × 0.67 in = 21.3 in (54.1 cm) long and 6.3 in (16.0 cm) at the widest point.
Make All Pieces
All pieces use Dusty Blue:
- Basket: 3 (about 60 g / 66 m each)
- Back panel: 1 (about 70 g / 77 m with border and tab)
Layout (front view):
          ( ring )
           [tab]
          /  1  \        Rows 1–8   mesh tip
         | BASKET A |    rim on Row 9
         | BASKET B |    rim on Row 17
         | BASKET C |    rim on Row 25
          \ solid /      Rows 28–32
Joining
Tack the baskets on before working the border. Each basket is sewn only along the 9 center stitches of the panel, so the edges stay free for the border.
Method: whipstitch with the basket’s own tail, through both loops.
Stitch-to-stitch logic:
- Lay the panel RS up. Find the 9 center sts of the rim row: on Row 9, use all sts except the first and last; on Rows 17 and 25, use sts 6–14.
- Choose 9 consecutive sts on the basket’s Rnd 20 to be the back. Nine sts is 1/6 of 54, an arc of 3 in (7.6 cm).
- Whipstitch those 9 rim sts to the 9 panel sts, 1 to 1.
- Count 6 rows below the rim row (Rows 15, 23, and 31). Sew the matching 9 sts of the basket’s Rnd 12 to the center 9 sts of that row, again 1 to 1.
The basket wall between Rnds 12 and 20 is 4.2 in (10.7 cm) tall and spans 6 panel rows, or 4.0 in (10.2 cm). The extra 0.2 in (0.5 cm) lets the basket bow forward slightly so it looks rounded.
Tension: keep stitches snug but not tight. If the panel puckers behind a basket, the seam is too tight.
Size checkpoint: the panel is still 21.3 in (54.1 cm) long, and all three rims sit level and centered.
Border
Border gauge: 2 sc per dc row-end = 0.67 in (1.7 cm), which matches one dc row exactly at 3 sc per inch.
Rnd 1 (RS): Join yarn at the top of Row 1. Then:
- Top: work 3 sc evenly across the foundation edge.
- Right edge: work 2 sc in each row-end of Rows 1–32. (64)
- Bottom: 3 sc in the first st of Row 32, sc in the next 7, 3 sc in the last st. (13)
- Left edge: work 2 sc in each row-end of Rows 32–1. (64)
Join with a sl st. (3 + 64 + 13 + 64 = 144)
Rnd 2: Ch 1. Sc in each st around, working 2 sc in the center sc of each bottom 3-sc group. Join. (top 3 + sides 64 each + bottom 13 + 2 = 15; total 146)
Why the math works: each side has 64 sc at 3 per inch, which is 21.3 in (54.1 cm). That matches the 32 rows of the panel exactly, so the edges won’t ruffle or cup. The extra stitches at the bottom corners let the rounded tip curve smoothly.
Hanging Tab
Row 1: With RS facing, join yarn in the last sc of the right edge before the top 3 sc. Sc in that st and the next 4 (the 3 top sc plus 1 sc from the left edge). (5)
Rows 2–14: Ch 1, turn, sc in each st. (5)
The tab measures 1.7 in (4.3 cm) wide and 4.3 in (10.9 cm) long. Thread it through the wooden ring, fold it to the back, and whipstitch Row 14 to the back of Row 1. The folded loop stands about 2 in (5.1 cm) above the panel.
Final Blocking
- Lightly mist the whole piece until it is damp, not soaked.
- Lay it face up on the blocking mat.
- Pin the panel to 7.5 in × 22.5 in (19.1 cm × 57.2 cm), with the side edges straight and the mesh squares square.
- Stuff each basket with a towel or a roll wrapped in plastic so it holds a round 5.7 in (14.5 cm) shape.
- Let it dry completely, at least 24 hours.
- Unpin it, hang it, and check that the baskets sit level.
Final Quality-Control Checklist
- Each basket has 54 sts at every round from Rnd 9 to Rnd 20.
- Each basket has 27 mesh squares per round, with the posts stacked vertically.
- The panel has 9 meshes (19 sts) from Row 13 to Row 27.
- The panel bottom shapes down 19 → 17 → 13 → 9.
- Border Rnd 1 has 144 sts and Rnd 2 has 146 sts.
- Each basket is sewn at the rim and at Rnd 12, 9 sts each.
- The tab is sewn securely and all ends are woven in.
- A standard roll drops into each basket easily.
Troubleshooting
- Basket base cups: your tension is too tight. Go up 0.5 mm.
- Basket base ruffles: your tension is too loose, or you missed an increase. Count each round.
- Mesh holes lean sideways: you are working into the ch-sp instead of into the dc post. Recheck Rnds 16–18.
- Panel edges wave: you worked more than 2 sc per row-end. Rip back and count 64 per side.
- Baskets droop forward: add a third tack line at Rnd 16, joined to the panel row 3 rows below the rim row.
- Rolls don’t fit: your basket is under 5.5 in (14.0 cm) across. Remake it with a larger hook.
Care
Hand wash in cool water, press out excess water in a towel, and dry flat in shape. Do not tumble dry, because cotton can shrink and the mesh can distort.
Final Notes
Each step’s measurement builds on the one before. One mesh square is 0.67 in (1.7 cm). Nine meshes make a 6.3 in (16.0 cm) panel, and 32 rows make it 21.3 in (54.1 cm) long. The 0.6 in (1.5 cm) border brings it to 7.5 in × 22.5 in (19.1 cm × 57.2 cm). Each 54-stitch basket comes out 5.7 in (14.5 cm) across, wide enough for a standard roll. If you match the gauge on your first basket, everything else follows.
Happy crocheting!