

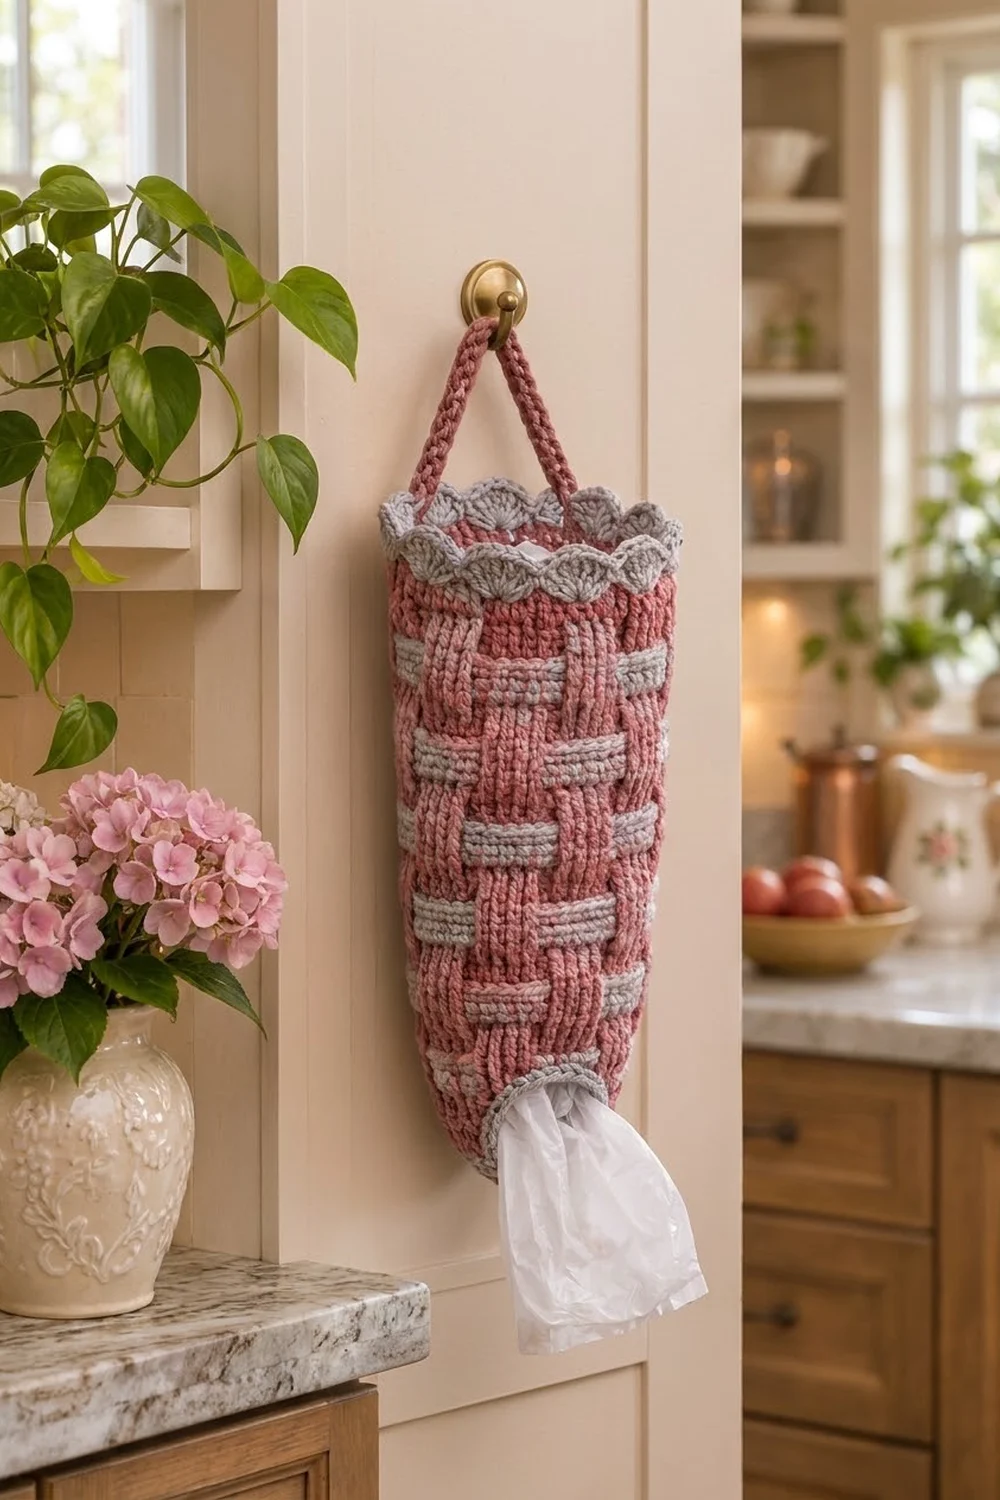
Every kitchen ends up with a drawer full of crumpled plastic bags. This hanging bag holder fixes that: stuff bags in through the open top and pull them out one at a time through the small opening at the bottom. It looks like a basket and works like a dispenser.
The Rosewood holder is worked in dusty rose with soft gray accents. The rose body has a knit-look texture of vertical V-columns. Short gray bars run across it in staggered rows, which gives a woven, basketweave-look surface. A gray scalloped shell edge finishes the top, a firm gray rim surrounds the bottom opening, and a rose loop at the top hangs it from a hook or cabinet knob. It also works well in sage green and cream.
This pattern uses US crochet terms. The finished holder is about 17.5 in (44.5 cm) tall including the scallops. Laid flat, it measures 4 in (10.2 cm) wide at the bottom and 7 in (17.8 cm) wide at the top. The hanging loop adds about 10 in (25.4 cm) of strap.
The body is one seamless tube worked bottom-up in joined rounds of waistcoat stitch, with simple two-color tapestry blocks. Three evenly spaced increase rounds create the taper. You finish with two gray rim rounds and a shell round, then sew on a separate handle strip.
Finished Size and Construction
- Finished height: 17.5 in (44.5 cm) including the scalloped edge
- Flat width: 4 in (10.2 cm) at the bottom, 7 in (17.8 cm) at the top
- Circumference: 8 in (20.3 cm) at the bottom opening, 14 in (35.6 cm) at the top
- Skill level: Intermediate (colorwork in the round)
- Terminology: US
- Yarn weight: Worsted (#4)
- Hook: 5 mm (H-8)
- Number of pieces: 1 tubular body + 1 handle strip, sewn together
- Layout: Single item; there are no motifs to arrange
- Piece size: 56 stitches around the top, 86 rounds tall
- Size before edging: 17 in (43.2 cm) tall
- Shell edging depth: 0.5 in (1.3 cm)
Materials
Use a smooth worsted-weight yarn so the V-columns and gray bars stay crisp. Acrylic or an acrylic-cotton blend is ideal because it’s sturdy, washable and doesn’t stretch much under the weight of the bags. Avoid fuzzy or very slippery yarns.
- Color A, Dusty Rose: about 85 g / 160 yd (146.3 m)
- Color B, Soft Gray: about 40 g / 70 yd (64.0 m)
These quantities include a margin of about 25 percent for gauge differences and a gauge swatch.
Tools:
- 5 mm (H-8) crochet hook
- Tapestry needle
- 4 locking stitch markers
- Scissors
- Measuring tape
- Spray bottle and blocking pins
Abbreviations (US Terms)
- ch: chain
- sc: single crochet
- sc2tog: single crochet 2 together
- fsc: foundation single crochet
- dc: double crochet
- sl st: slip stitch
- st(s): stitch(es)
- rnd(s): round(s)
- wst: waistcoat stitch
- A / B: Color A (rose) / Color B (gray)
Special stitch – Waistcoat stitch (wst): Insert the hook between the two vertical legs of the next stitch, through the center of the “V” and below the top loops. Yarn over, pull up a loop, yarn over, pull through both loops on the hook. It’s worked like a single crochet, but it makes stacked V-columns that look like knitting.
Waistcoat increase (wst inc): Work 2 wst in the same stitch.
Color change: Work the last yarn over of the stitch before the change in the new color. Strand the unused color loosely along the inside of the tube. Floats are never longer than 4 sts, or 1 in (2.5 cm).
Joined rounds: At the end of every round, sl st to the first st, then ch 1. The ch 1 does not count as a stitch. Start each round in the same st as the join.
Gauge and Checkpoints
Gauge: 16 sts and 20 rnds = 4 in (10.2 cm) in waistcoat stitch in the round.
That gives 4 sts per inch and 5 rnds per inch. One 10-round colorwork motif is 2 in (5.1 cm) tall.
Test first: Work Rounds 1–13 as written and measure before you go on. This is your gauge swatch, and it becomes the bottom of the holder.
Checkpoints (laid flat, measured from the foundation edge):
- After Rnd 3: 0.6 in (1.5 cm) tall, 4 in (10.2 cm) flat width
- After Rnd 13: 2.6 in (6.6 cm) tall, 5 in (12.7 cm) flat width
- After Rnd 33: 6.6 in (16.8 cm) tall, 6 in (15.2 cm) flat width
- After Rnd 53: 10.6 in (26.9 cm) tall, 7 in (17.8 cm) flat width
- After Rnd 83: 16.6 in (42.2 cm) tall
- After Rnd 85: 17 in (43.2 cm) tall
Too big? Go down 0.5 mm in hook size. Too small? Go up 0.5 mm. Waistcoat stitch is naturally tight, so many crocheters need a 5.5 mm hook to reach gauge. Get the width right first. If your rounds are too short, add one rose round per motif only after checking that you have enough yarn.
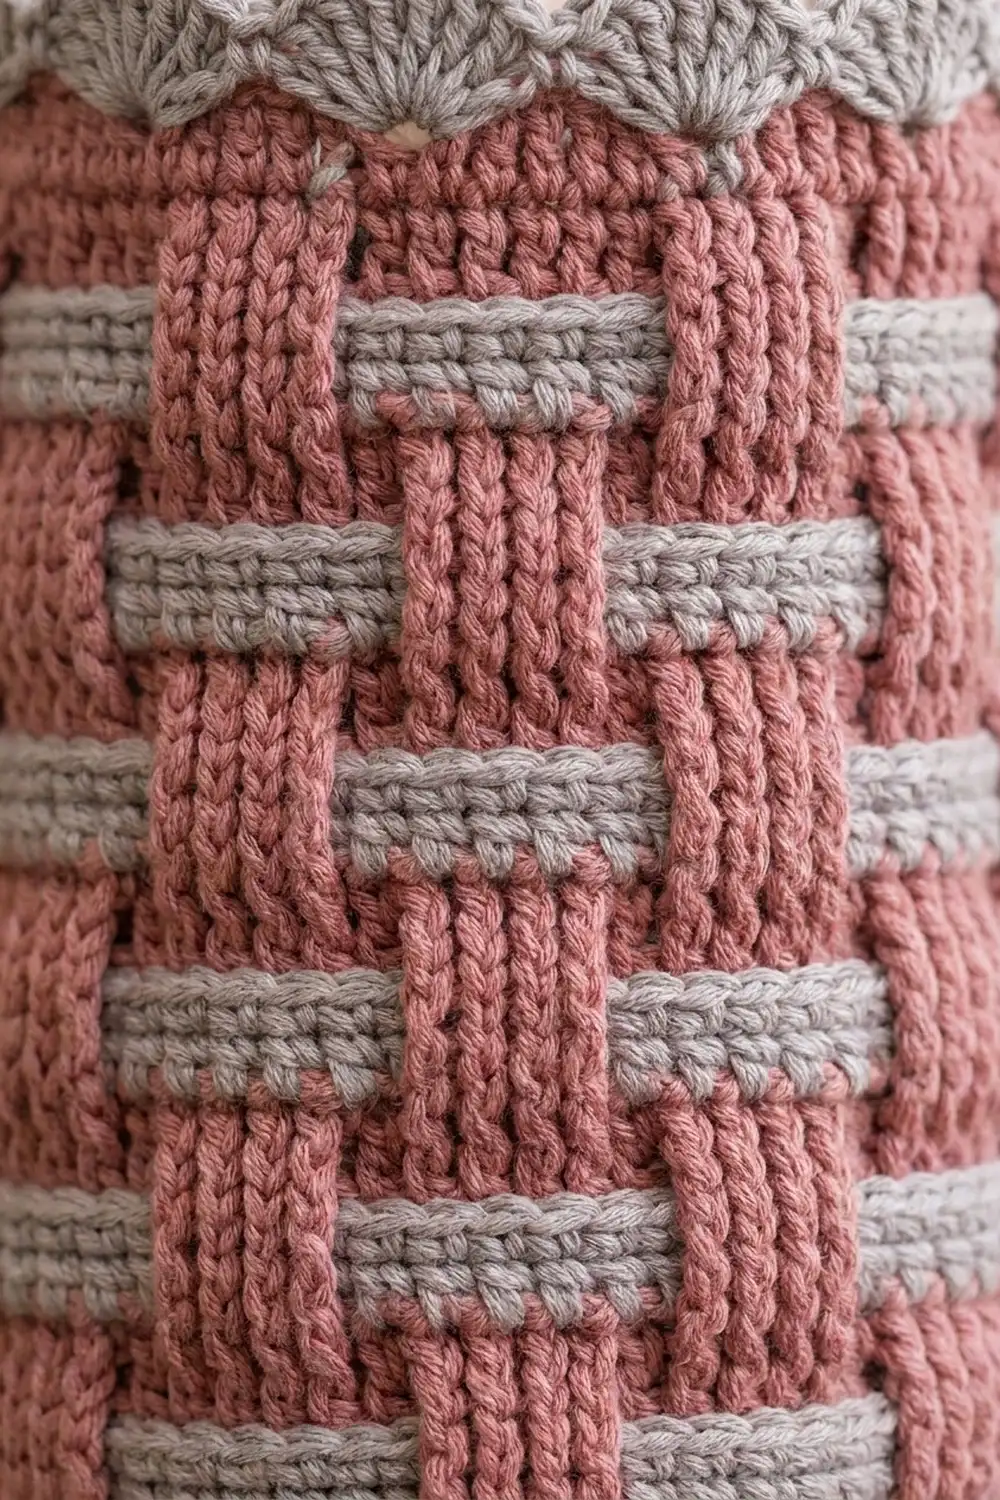
The Colorwork Motif
The body is made of 8 identical motifs, each 10 rounds tall. Every stitch count around is a multiple of 8, so the 8-stitch block repeat always divides evenly.
- Motif Rnds 1–2: With A, wst in each st around.
- Motif Rnds 3–4 (Band 1): *Wst 4 with B, wst 4 with A; repeat from * around.
- Motif Rnds 5–7: With A, wst in each st around.
- Motif Rnds 8–9 (Band 2): *Wst 4 with A, wst 4 with B; repeat from * around.
- Motif Rnd 10: With A, wst in each st around.
Band 2 is shifted by 4 stitches from Band 1. That offset produces the staggered, brick-like gray bars. Each gray bar is 4 sts wide and 2 rnds tall, about 1 in × 0.4 in (2.5 cm × 1.0 cm).
During the rose rounds, leave B hanging inside and carry it up loosely at the join.
Pattern: Body
Bottom Rim (Color B)
Rnd 1: With B, fsc 32. Join with sl st to the first fsc, taking care not to twist, then ch 1. (32 sts)
Rnd 2: Sc in each st around, join, ch 1. (32 sts)
Rnd 3: Sc in each st around, join, ch 1. (32 sts)
These three standard sc rounds make a firm gray band that holds the bottom opening in shape.
Checkpoint: 8 in (20.3 cm) around, 4 in (10.2 cm) flat.
Motif 1 (Rnds 4–13)
Join A in the last stitch of Rnd 3.
Rnds 4–5: Motif Rnds 1–2. (32 sts)
Rnds 6–7: Motif Rnds 3–4. (32 sts; 4 gray bars)
Rnd 8: Motif Rnd 5. (32 sts)
Rnd 9 (Increase): With A, *wst in next 3 sts, wst inc in next st; repeat from * 8 times. (40 sts)
Rnd 10: Motif Rnd 7. (40 sts)
Rnds 11–12: Motif Rnds 8–9. (40 sts; 5 gray bars)
Rnd 13: Motif Rnd 10. (40 sts)
Checkpoint: 2.6 in (6.6 cm) tall, 10 in (25.4 cm) around.
Motif 2 (Rnds 14–23)
Work Motif Rnds 1–10 with no increases. (40 sts; 5 gray bars in each band)
Motif 3 (Rnds 24–33)
Rnds 24–28: Motif Rnds 1–5. (40 sts; 5 gray bars in Band 1)
Rnd 29 (Increase): With A, *wst in next 4 sts, wst inc in next st; repeat from * 8 times. (48 sts)
Rnds 30–33: Motif Rnds 7–10. (48 sts; 6 gray bars in Band 2)
Checkpoint: 6.6 in (16.8 cm) tall, 12 in (30.5 cm) around.
Motif 4 (Rnds 34–43)
Work Motif Rnds 1–10. (48 sts; 6 gray bars in each band)
Motif 5 (Rnds 44–53)
Rnds 44–48: Motif Rnds 1–5. (48 sts; 6 gray bars in Band 1)
Rnd 49 (Increase): With A, *wst in next 5 sts, wst inc in next st; repeat from * 8 times. (56 sts)
Rnds 50–53: Motif Rnds 7–10. (56 sts; 7 gray bars in Band 2)
Checkpoint: 10.6 in (26.9 cm) tall, 14 in (35.6 cm) around.
Motifs 6–8 (Rnds 54–83)
Work Motif Rnds 1–10 three times. (56 sts; 7 gray bars in each band)
Fasten off A. Each increase round is the middle rose round of a motif, so the gray bars are never interrupted.
Stitch count summary: Rnds 1–8: 32. Rnds 9–28: 40. Rnds 29–48: 48. Rnds 49–83: 56.
Pattern: Handle
With A, ch 49.
Row 1: Sc in the 2nd ch from the hook and in each ch across, turn. (48 sts)
Rows 2–3: Ch 1, sc in each st across, turn. (48 sts)
Fasten off, leaving a 12 in (30.5 cm) tail. The strip measures 12 in (30.5 cm) long and about 0.6 in (1.5 cm) wide. For a rounder cord like the one in the photo, fold the strip in half lengthwise and whipstitch the long edges together.
Border: Top Rim and Shell Edge
Border gauge: One shell repeat uses 4 stitches, so each scallop is 1 in (2.5 cm) wide.
Rnd 84: Join B in the first st of Rnd 83 (at the round’s join), ch 1. Sc (standard, under both loops) in each st around, join. (56 sts)
Rnd 85: Ch 1, sc in each st around, join. (56 sts)
Flatten the holder so the join sits at one side fold. That gives 28 sts per side, front and back. A tube has no corners, so no stitch is counted twice.
Rnd 86 (Shell round): Ch 1, *sc in next st, skip 1 st, 5 dc in next st, skip 1 st; repeat from * 14 times. Join with sl st to the first sc. (14 shells; 14 sc + 70 dc = 84 sts made)
Per side: 28 sts ÷ 4 = 7 shells on the front and 7 on the back.
Why the math works: Each repeat uses exactly 4 base stitches (sc, skip, shell, skip). 56 ÷ 4 = 14 with nothing left over, so the last shell meets the first sc and the scallops close evenly around the rim. If your top count isn’t 56, fix it on Rnd 85 by working sc2tog or 2 sc in one st until you’re back to 56. Don’t fudge it in the shell round.
Fasten off and weave in the end.
Attaching the Handle
Mark the two side folds at the top: the join stitch and the stitch directly opposite, 28 sts away. Place 1 in (2.5 cm) of each handle end on the inside of the holder at a marker, covering Rnds 82–85. Using the tail and a tapestry needle, sew each end down securely with small stitches around all four edges. The visible loop measures 10 in (25.4 cm). Make sure the strip isn’t twisted before you sew the second end.
Final Blocking
- Weave in all ends on the inside, running each one through stitches of its own color.
- Turn the holder right side out and lay it flat with the side folds at the markers.
- Mist it evenly with water until damp. Don’t soak it.
- Gently ease it to shape: 4 in (10.2 cm) flat at the bottom, 7 in (17.8 cm) flat at the top and 17.5 in (44.5 cm) tall.
- Pin each of the 14 scallops into a round arc, 1 in (2.5 cm) apart.
- Straighten the gray bars so each band runs level all the way around.
- Let it dry completely, at least 12 hours. Then turn it over and let the back air out for an hour.
For acrylic yarn, you can steam-block lightly instead. Hold the iron above the fabric and never press it flat.
Final Quality-Control Checklist
- Bottom rim is 8 in (20.3 cm) around and the opening is round, not wavy
- Each band has the correct number of gray bars: 4, 5, 6 or 7 depending on the section
- Band 2 bars sit exactly centered between the Band 1 bars
- No inside floats are tight enough to pucker the fabric
- Top edge has 56 sts with 14 evenly spaced shells
- Handle ends are sewn directly opposite each other at the side folds
- Finished height is 17.5 in (44.5 cm) and top flat width is 7 in (17.8 cm)
- All ends are woven in securely on the inside
Troubleshooting
Fabric is stiff and cupping inward: Waistcoat stitch is tight. Go up a hook size and keep the pulled-up loop tall before you finish each stitch.
Gray bars are slanting: This is the normal jog of joined rounds. Keep the join on the same side every round, and block the bars level.
Gray shows through the rose: You’re stranding too tightly or crossing the colors on the outside. Keep floats on the inside and relaxed.
Bars don’t line up in the staggered pattern: Count your stitches after every increase round. If a round has the wrong count, the 8-stitch repeat won’t divide evenly.
Scallops are ruffling: Your dc stitches are too loose for the rim. Work 4 dc per shell instead of 5, or use a hook 0.5 mm smaller for Rnd 86.
Bottom opening is too loose: Bags will slip out. With B, work one extra round of sc into the foundation edge, working sc2tog 4 times evenly spaced. (28 sts)
Handle stretches: Use the folded cord version, or sew a strip of ribbon along the inside of the handle.
Care
Machine wash cold on a gentle cycle in a laundry bag, then reshape and lay flat to dry. Don’t tumble dry if your yarn contains any cotton.
Final Notes
The whole design depends on one chain of measurements. At a gauge of 16 sts and 20 rnds per 4 in (10.2 cm), the 32-st foundation makes an 8 in (20.3 cm) opening. Three increase rounds take it to 40, then 48, then 56 sts, or 14 in (35.6 cm) around. Eight 2 in (5.1 cm) motifs build 16 in (40.6 cm) of body. The 0.6 in (1.5 cm) bottom rim, 0.4 in (1.0 cm) top rim and 0.5 in (1.3 cm) shell edge bring the total to 17.5 in (44.5 cm). The 56 top stitches divide into exactly 14 scallops. Check each measurement as you go and the holder will come out even and level, ready to tame that bag drawer.
Happy crocheting!