

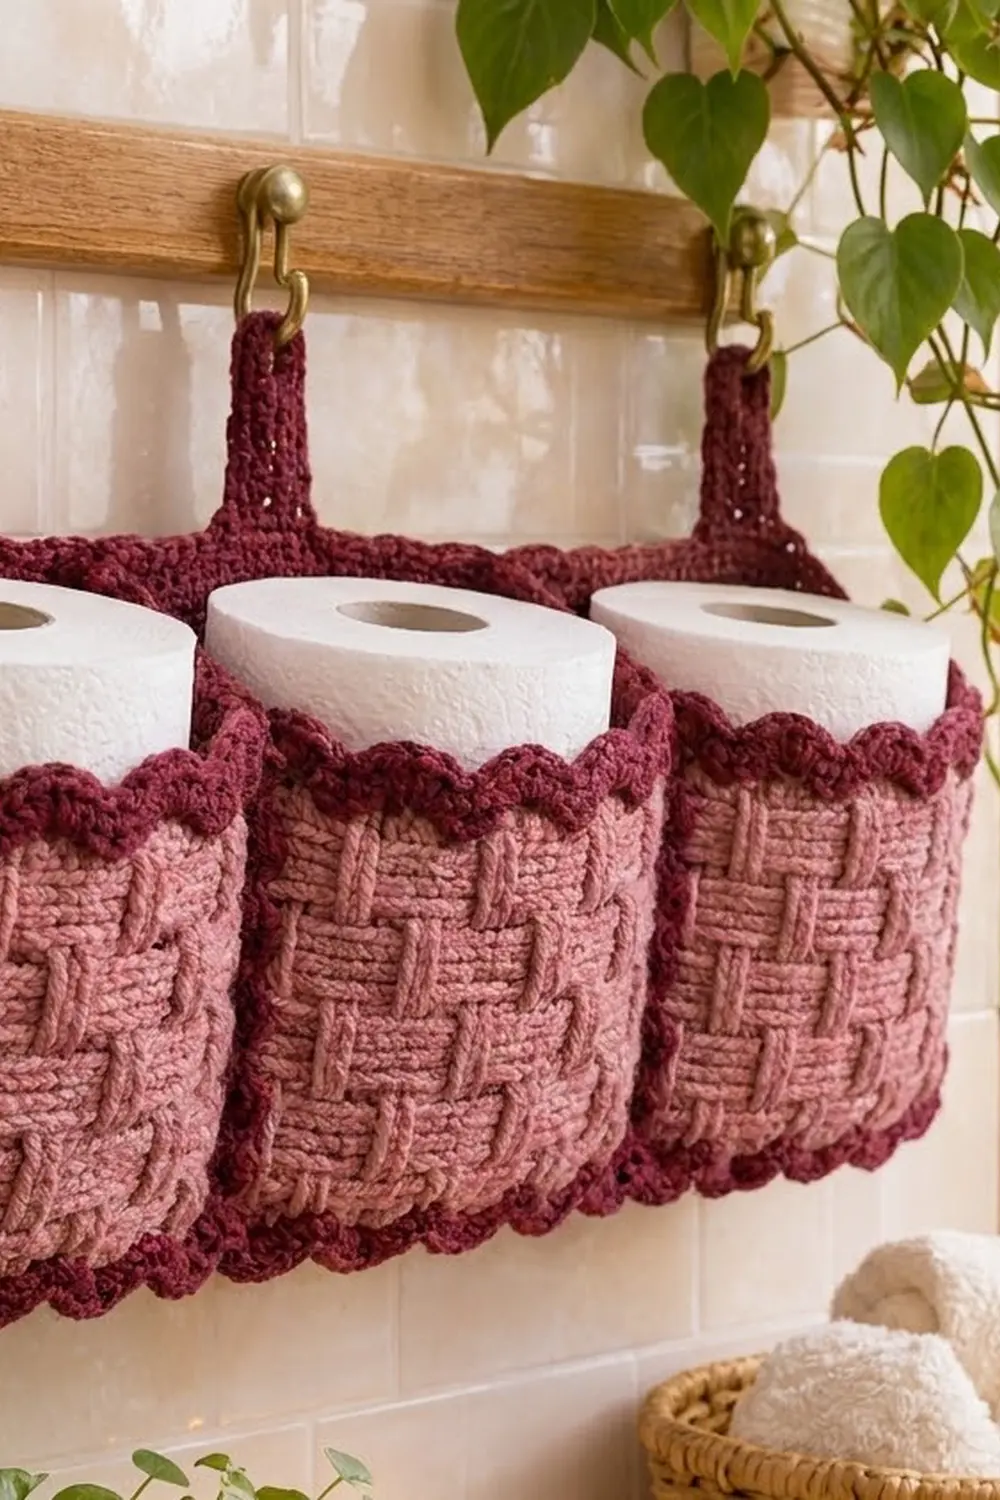
This hanging holder stores three spare toilet rolls in a neat row on the wall. Each pocket is a sturdy dusty rose basket with a deep, woven-looking texture. Burgundy shell scallops frame the top and bottom of every pocket, and a burgundy back panel with a corded edge ties the whole piece together.
The style is warm and a little rustic. It suits a bathroom with natural wood, brass hardware and plants. The two-tone palette makes the basketweave stand out, and the scallops soften the boxy shapes.
This pattern uses US crochet terms. The finished holder measures 16.4 in (41.7 cm) wide and 7.4 in (18.8 cm) tall across the bordered back panel. With the loops, the total height is 9.4 in (23.9 cm). Each pocket is 5 in (12.7 cm) wide, 4 in (10.2 cm) deep and about 5 in (12.7 cm) tall including the top scallops.
The construction is simple. You crochet three pockets from the base up in joined rounds, then add the scallop trims. Next you work a flat back panel in single crochet and give it a three-round border. Finally, you sew the pockets onto the panel stitch to stitch and add three folded hanging loops.
Finished Size and Construction
- Finished size: 16.4 x 7.4 in (41.7 x 18.8 cm) panel; 9.4 in (23.9 cm) tall with loops
- Skill level: Intermediate (post stitches, working in rounds, seaming)
- Terminology: US
- Yarn weight: Worsted (#4)
- Hook: 5.0 mm (H-8)
- Number of pieces: 7 (1 back panel, 3 pockets, 3 hanging loops)
- Layout: 3 pockets in a single row
- Pocket size: 5 in (12.7 cm) wide x 4 in (10.2 cm) deep x 5 in (12.7 cm) tall
- Panel size before border: 15 x 6 in (38.1 x 15.2 cm)
- Border depth: 0.7 in (1.8 cm) on each side
Materials
Use a firm worsted-weight cotton or cotton blend. Cotton holds the box shape well and stands up to bathroom humidity. Soft acrylic also works, but the pockets will be a little floppier. The amounts below assume a yarn with about 170 m per 100 g.
- Burgundy (Color A): 100 g / about 170 m (bases, trims, panel, border, loops)
- Dusty rose (Color B): 75 g / about 130 m (basketweave pocket walls)
- 5.0 mm (H-8) crochet hook
- Tapestry needle
- 8 locking stitch markers
- Scissors
- Measuring tape
- Pins and a blocking surface
Both quantities include a margin of about 25% for your swatch and for differences in tension.
Abbreviations (US Terms)
- ch – chain
- sl st – slip stitch
- sc – single crochet
- dc – double crochet
- BLO / FLO – back loop only / front loop only
- FPdc – front post double crochet
- BPdc – back post double crochet
- rev sc – reverse single crochet (crab stitch)
- sk – skip
- st(s) – stitch(es)
- RS – right side
Special stitch – Shell scallop: (sc in next st, sk 2 sts, 5 dc in next st, sk 2 sts). One scallop uses 6 sts.
Basketweave block: 4 post stitches of the same type (FPdc or BPdc) worked over 2 rounds. Switching the post type every 2 rounds makes the woven look.
Gauge and Checkpoints
Single crochet gauge: 16 sts and 18 rows = 4 in (10.2 cm) in sc worked in rows.
Basketweave gauge: 16 sts = 4 in (10.2 cm), and 8 rounds = 4 in (10.2 cm).
Make one complete pocket first and use it as your gauge test. A pocket gives you more reliable information than a flat swatch, because post-stitch fabric pulls in when it is worked in the round.
Check these measurements as you go:
- Base after Row 18: 5 x 4 in (12.7 x 10.2 cm)
- After Pocket Rnd 2: perimeter 18 in (45.7 cm)
- After Rnd 8: wall height 3.5 in (8.9 cm)
- After Rnd 10: wall height 4.5 in (11.4 cm)
- Panel after Row 9: height 2 in (5.1 cm)
- Panel after Row 27: 15 x 6 in (38.1 x 15.2 cm)
If your piece is too big by more than 0.25 in (0.6 cm), go down half a hook size. If it is too small, go up half a hook size. Don’t add or remove stitches. Every count in this pattern is linked to the others.
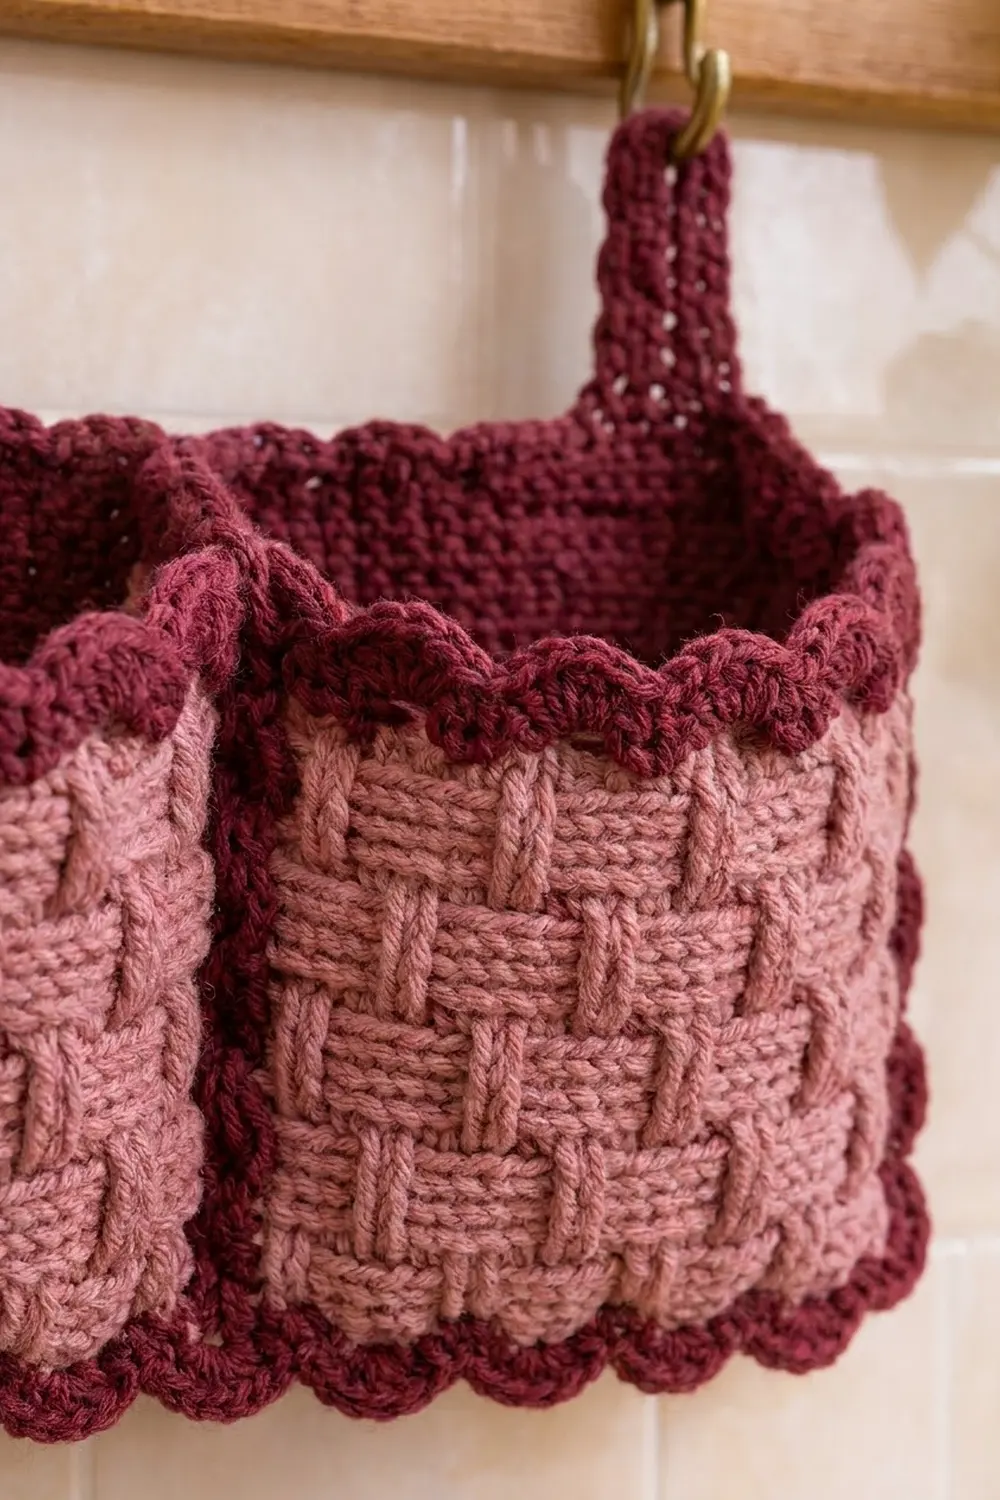
Pocket (Make 3)
Base
With Color A, ch 21.
Row 1: Sc in 2nd ch from hook and in each ch across. Turn. (20 sts)
Rows 2–18: Ch 1, sc in each st across. Turn. (20 sts)
The base should measure 5 x 4 in (12.7 x 10.2 cm).
Rnd 1 (edging): Ch 1, do not turn. Work 20 sc across the last row. Then work 16 sc evenly along the row ends, skipping the 6th and 13th row ends. Work 20 sc across the foundation chain, then 16 sc evenly along the other row-end edge in the same way. Join with sl st to first sc. (72 sts: 20 + 16 + 20 + 16)
Place a marker on the first st of each 20-st long side. One long side will be the pocket front and the other will be the back.
Walls
Change to Color B.
Rnd 2 (setup): Ch 2 (does not count as a st), dc in BLO of each st around. Join with sl st to first dc. (72 sts)
Working into the back loops makes the wall stand straight up. It also leaves the front loops of Rnd 1 free for the bottom scallop.
From here on, the ch 2 at the start of each round does not count as a stitch. Join every round with a sl st to the first st. Do not turn; keep the RS facing you.
Rnds 3–4: Ch 2, FPdc in next 4 sts, BPdc in next 4 sts; repeat from * 8 more times. (72 sts, 9 repeats)*
Rnds 5–6: Ch 2, BPdc in next 4 sts, FPdc in next 4 sts; repeat from * 8 more times. (72 sts)*
Rnds 7–8: Repeat Rnds 3–4. (72 sts)
Checkpoint: the wall is 3.5 in (8.9 cm) tall.
Rnds 9–10: Repeat Rnds 5–6. (72 sts)
Checkpoint: the wall is 4.5 in (11.4 cm) tall, with four bands of blocks.
Fasten off Color B.
Top Trim
Join Color A in any st at the center of the back wall, so the round join stays hidden against the panel.
Rnd 11: Ch 1, sc in each st around. Join. (72 sts)
Rnd 12: Ch 1, sc in next st, sk 2, 5 dc in next st, sk 2; repeat from * 11 more times. Join to first sc. (12 scallops: 12 sc + 60 dc = 72 sts)*
Fasten off.
Bottom Trim
Turn the pocket upside down. Join Color A in a free front loop of Rnd 1, near the center of the back long side.
Bottom Rnd: Ch 1, working in the free front loops of Rnd 1 only, sc in next st, sk 2, 5 dc in next st, sk 2; repeat from * 11 more times. Join. (12 scallops over 72 loops)*
Fasten off. These scallops sit along the bottom fold of the pocket, which gives the shell edge at the bottom.
Because 72 divides evenly by 6, both trims close with no partial scallop.
Back Panel
With Color A, ch 61.
Row 1: Sc in 2nd ch from hook and in each ch across. Turn. (60 sts)
Rows 2–27: Ch 1, sc in each st across. Turn. (60 sts)
Checkpoint after Row 9: 2 in (5.1 cm) tall. After Row 27, the panel measures 15 x 6 in (38.1 x 15.2 cm). Do not fasten off; continue straight into the border.
The 60 stitches are exactly three pocket widths (3 pockets x 20 sts). This is what lets the pockets line up stitch for stitch later.
Hanging Loops (Make 3)
With Color A, ch 7.
Row 1: Sc in 2nd ch from hook and in each ch across. Turn. (6 sts)
Rows 2–27: Ch 1, sc in each st across. Turn. (6 sts)
Each strap measures 1.5 x 6 in (3.8 x 15.2 cm). Fasten off and leave a 12 in (30.5 cm) tail for sewing.
Make All Pieces
Before assembly, check that you have:
- Pockets: 3 (each made with Color A base and trims and a Color B basketweave wall)
- Back panel: 1 (Color A)
- Hanging loops: 3 (Color A)
Layout, front view:
   [loop]        [loop]        [loop]
+--------------------------------------+
|  [Pocket 1]  [Pocket 2]  [Pocket 3]  |
|   sts 1–20    sts 21–40   sts 41–60  |
+--------------------------------------+
Border (Back Panel)
Border gauge: the border uses the same sc gauge, 18 rounds = 4 in (10.2 cm). Three rounds add about 0.7 in (1.8 cm) on every side.
Rnd 1: With RS facing, ch 1 and work around the panel as follows:
- Top edge: 3 sc in the first st (corner), sc in the next 58 sts, 3 sc in the last st (corner).
- Side edge: 1 sc in each row end of Rows 26 down to 2. (25 sc)
- Bottom edge: 3 sc in the first foundation st (corner), sc in the next 58 sts, 3 sc in the last foundation st (corner).
- Other side: 1 sc in each row end of Rows 2 up to 26. (25 sc)
Join. (178 sts)
Counting each side from one corner center stitch to the next, with corners included:
- Each long side has 62 sts: 60 panel sts plus 1 extra from each corner increase.
- Each short side has 29 sts: 25 row-end sts plus 2 from each corner.
Check: 62 + 62 + 29 + 29 − 4 shared corner sts = 178.
Rnd 2: Ch 1, sc in each st around, working 3 sc in each corner center st. Join. (186 sts: long sides 64 each, short sides 31 each, corners included)
Check: 64 + 64 + 31 + 31 − 4 = 186.
Rnd 3: Ch 1, rev sc in each st around. Join. (186 sts)
Fasten off. The panel now measures 16.4 x 7.4 in (41.7 x 18.8 cm).
Why the math works: Rnd 1 picks up every stitch and every row end exactly once, so the edge doesn’t ruffle or pull in. The 3-sc corners add the 2 stitches per corner that a flat square corner needs in each round. Rnd 3 has no increases, because reverse single crochet sits on the edge instead of building outward.
Joining
Method: whipstitch with Color A and a tapestry needle.
- Lay the bordered panel RS up with the bottom edge toward you. Using stitch markers, mark panel Row 1 stitches 20/21 and 40/41.
- Place Pocket 1 on the panel with its back long side against panel stitches 1–20. The pocket’s base edge should sit just above the border, along Row 1.
- Bottom seam: whipstitch the 20 back-side stitches of base Rnd 1 to panel Row 1 stitches 1–20. Go through the post of each Rnd 1 stitch and one panel stitch, matching one to one. The bottom scallops along the back wall lie flat against the panel and stay hidden.
- Corner seams: sew each back corner of the pocket straight up the panel, from Rnd 2 to Rnd 11. That is 10 rounds against about 21 panel rows, so take one pocket round to every 2 panel rows. Stop at Rnd 11 and leave the top scallops free.
- Repeat for Pocket 2 on stitches 21–40 and Pocket 3 on stitches 41–60. The neighboring side walls will touch, as in the photo.
Tension: pull each stitch snug enough to close the seam but not so tight that it puckers. The panel should stay flat when you hold it up.
Size checkpoint: across the front, the three pockets measure 15 in (38.1 cm), centered on the 16.4 in (41.7 cm) panel. That leaves 0.7 in (1.8 cm) of border showing on each side.
Loops: fold each strap in half widthwise to make a 3 in (7.6 cm) loop. Sew both ends to the back of the panel so that 2 in (5.1 cm) of loop shows above the border. Sew the end of each strap through the panel along all 6 strap stitches. Place the loops behind panel stitches 5–10, 28–33 and 51–56. All three are symmetrical, and the center loop sits exactly in the middle.
Final Blocking
- Fill each pocket firmly with a toilet roll, or with a rolled towel cut to 5 x 4 in (12.7 x 10.2 cm).
- Pin the panel flat on a blocking mat at 16.4 x 7.4 in (41.7 x 18.8 cm).
- Steam the panel and pockets lightly, holding the iron about 1 in (2.5 cm) above the fabric. Don’t press down on the basketweave.
- Use your fingers to shape the pocket corners square and fan out each scallop.
- Let the holder dry completely, at least 6 hours, before you remove the pins and fillers.
Final Quality-Control Checklist
- Each pocket has 72 sts in every wall round and 12 scallops on each trim.
- The basketweave blocks change direction every 2 rounds, with 4 bands in total.
- The panel has 60 sts across, 178 sts in border Rnd 1 and 186 in Rnds 2–3.
- The pockets line up with panel sts 1–20, 21–40 and 41–60.
- The three loops are evenly spaced and stand 2 in (5.1 cm) above the top edge.
- All yarn ends are woven in on the wrong side.
Troubleshooting
- Pocket walls lean outward: your post stitches are loose. Go down half a hook size, or make sure Rnd 2 is worked in the BLO.
- Basketweave blocks look slanted: you missed a stitch at a round join. Count 72 sts at the end of every round.
- Scallops ruffle: you worked 5 dc into a stitch you should have skipped. Recount the 6-st repeat.
- Border waves: you added extra stitches along the row ends. Work exactly 25 sc per short side in Rnd 1.
- Panel sags under the rolls: use cotton yarn, and check that the loops are sewn through at least 1 in (2.5 cm) of panel.
Care
Hand wash in cool water with mild soap, gently press out the water, and dry flat with the pockets reshaped. Don’t tumble dry, because the basketweave can shrink and lose its crisp definition.
Final Notes
All the measurements build on each other. The 16-st sc gauge gives a 20-stitch pocket width, which equals 5 in (12.7 cm). The 72-stitch pocket round gives 9 basketweave repeats and 12 even scallops. Three pockets of 20 sts make the 60-stitch panel, which measures 15 in (38.1 cm). The three-round border adds 0.7 in (1.8 cm) per side, for a finished panel of 16.4 x 7.4 in (41.7 x 18.8 cm). If you check your gauge at each stage, every piece will fit the next one.
Happy crocheting!