

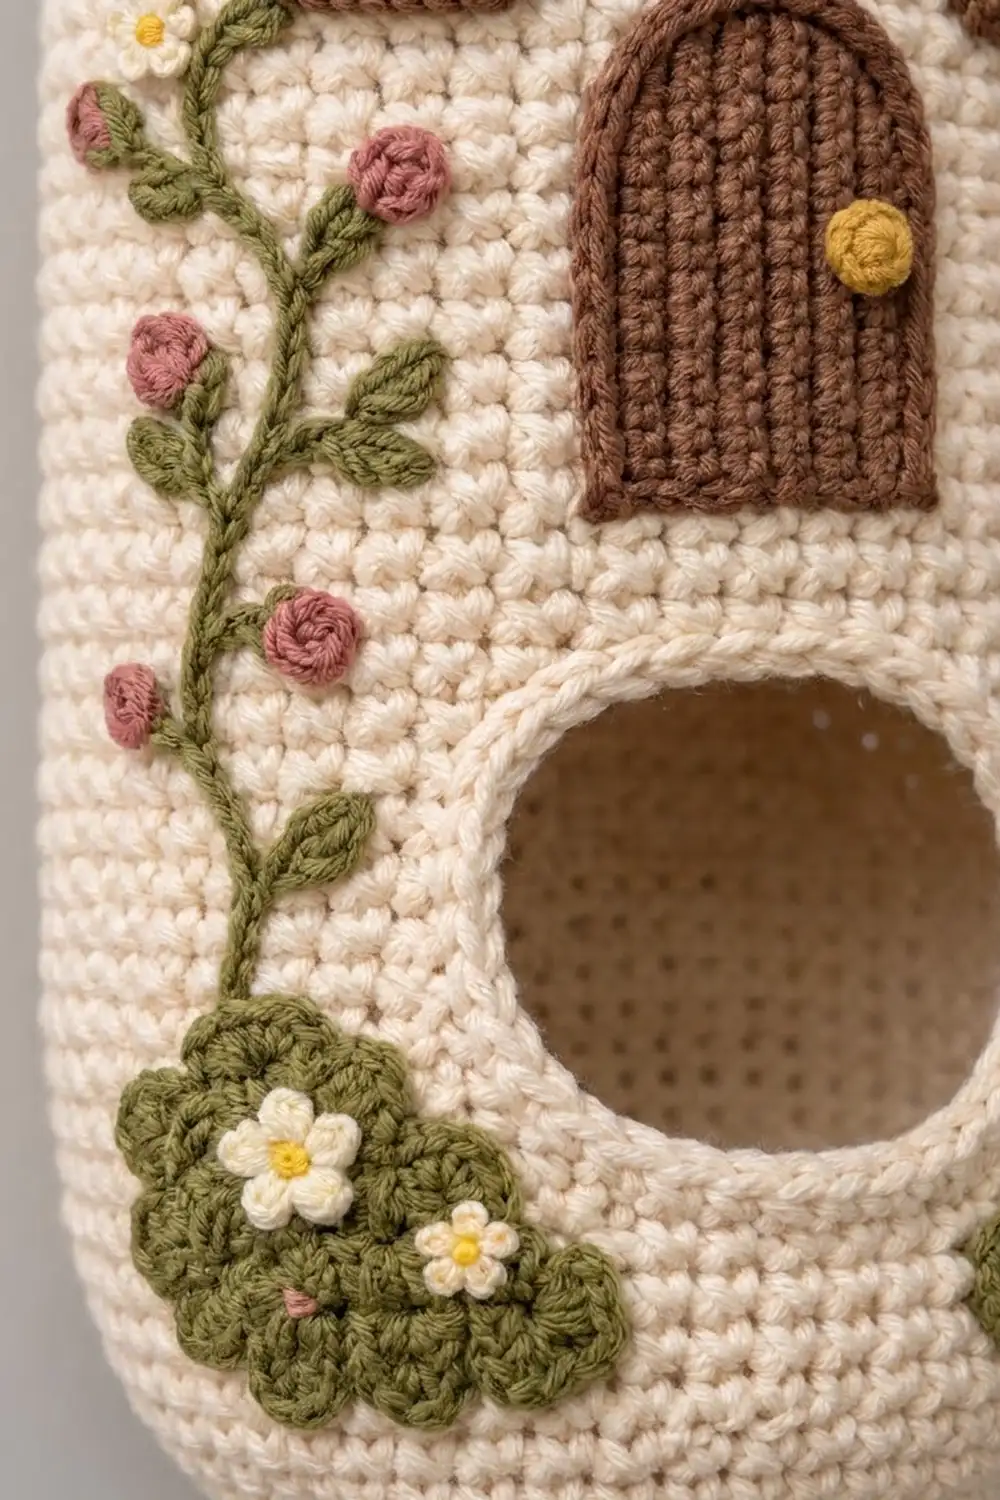
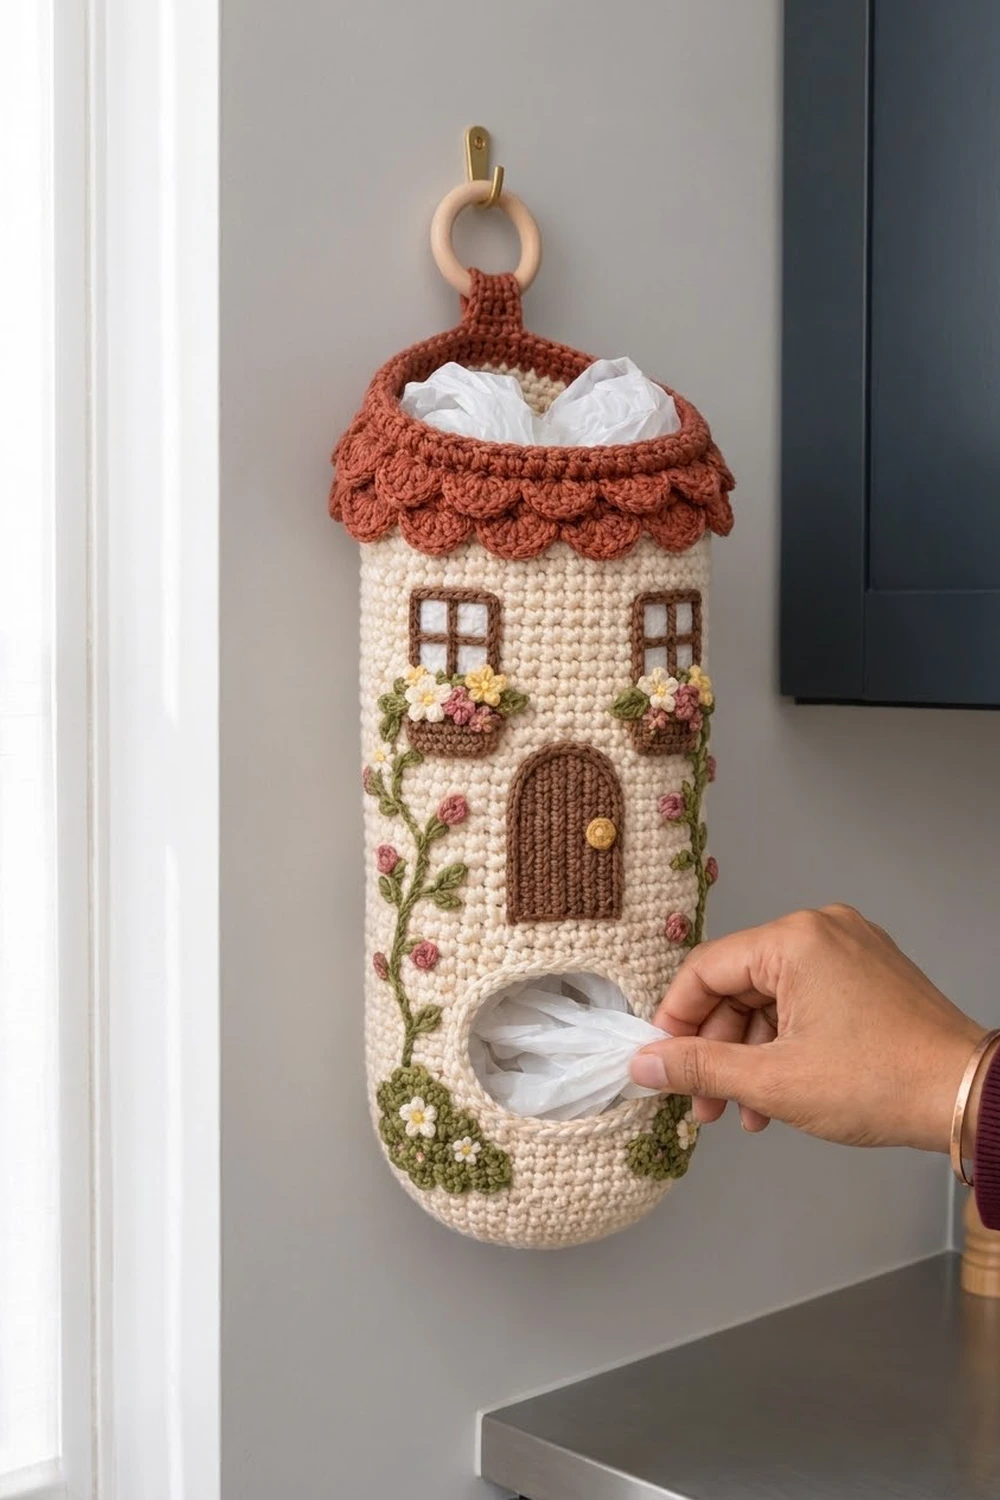
This cottage-shaped bag holder turns a pile of grocery bags into something nice to look at. It’s a cream cylinder with a rust-red scalloped roof, brown windows and an arched door, flower-filled window boxes, and green vines climbing up to a round dispensing hole.
The colors are warm and earthy: cream walls, a rust roof, a chocolate-brown door and windows, and olive, dusty pink, mustard and white for the garden details. The style is cozy and storybook-like, but the base is a plain, sturdy tube.
This pattern uses US crochet terms. The finished holder is 15 in (38.1 cm) tall and 5.75 in (14.6 cm) across, with an 18 in (45.7 cm) circumference. The hanging strap adds about 3.5 in (8.9 cm) above the rim.
You work the body in continuous rounds of single crochet from a rounded base upward. The dispensing hole is made by working back and forth for a few rows, then closing over the gap with a chain. Rust rounds and two tiers of scallops form the roof, and a strap is worked from the back of the rim. Last, you make the small appliqués and sew them on.
Finished Size and Construction
- Finished size: 15 in (38.1 cm) tall × 5.75 in (14.6 cm) diameter; 9 in (22.9 cm) wide when pressed flat
- Skill level: Intermediate
- Terminology: US
- Yarn weight: Worsted (#4)
- Hook: 4.5 mm (US 7)
- Number of pieces: 1 main body, plus small sewn-on appliqués
- Layout: Single vertical tube with the hole centered on the front
- Body circumference: 72 sts = 18 in (45.7 cm)
- Height before roof: about 13.75 in (34.9 cm)
- Roof band depth: 6 rounds, about 1.25 in (3.2 cm), with scallops hanging about 0.75 in (1.9 cm)
Materials
Use a smooth cotton or cotton-blend worsted yarn. Cotton holds the cylinder’s shape and stands up to bags being pulled through. Avoid fuzzy yarns, because they make the appliqué edges look blurry.
- Cream (main): 160 g / 290 m
- Rust: 50 g / 90 m
- Chocolate brown: 20 g / 36 m
- Olive green: 20 g / 36 m
- Dusty pink: 8 g / 14 m
- White: 5 g / 9 m
- Mustard yellow: 5 g / 9 m
These quantities include about a 15% margin.
Tools:
– 4.5 mm (US 7) hook
– 3.75 mm (US F/5) hook (optional, for the flowers)
– Wooden ring, 2.5 in (6.4 cm)
– Locking stitch markers
– Tapestry needle
– Sewing pins
– Measuring tape
– Scissors
Abbreviations (US Terms)
- MR – magic ring
- ch – chain
- sl st – slip stitch
- sc – single crochet
- sc2tog – single crochet 2 together
- hdc – half double crochet
- dc – double crochet
- BLO / FLO – back loop only / front loop only
- st(s) – stitch(es)
- rnd – round
- inc – 2 sc in the same st
Special stitch – surface slip stitch: Hold the yarn behind the fabric. Insert the hook from the front between stitches, pull up a loop, and draw it through the loop on the hook. Repeat along the line you want. It makes a raised line that looks like a chain.
Gauge and Checkpoints
Gauge: 16 sc × 18 rnds = 4 in (10.2 cm) in sc worked in the round.
Before you start the body, crochet a small flat circle up to Rnd 8 as a test piece. It should measure about 3.5 in (8.9 cm) across.
- After Rnd 16: Pressed flat, the base cup is 9 in (22.9 cm) wide.
- After Rnd 22: The cup stands about 3 in (7.6 cm) tall.
- Hole: 3 in (7.6 cm) wide × 3.1 in (7.9 cm) tall before edging.
- After Rnd 70: About 13.75 in (34.9 cm) tall.
If your piece is too big, go down 0.5 mm in hook size. If it is too small, go up 0.5 mm. Don’t change the stitch counts, because the hole, scallops and strap all depend on the 72-stitch circumference.
Body
Work in continuous rounds without joining. Move a marker up to the first stitch of each round.
Rounded base (cream)
- Rnd 1: 6 sc in MR. (6)
- Rnd 2: inc in each st. (12)
- Rnd 3: [sc 1, inc] 6 times. (18)
- Rnd 4: [sc 2, inc] 6 times. (24)
- Rnd 5: [sc 3, inc] 6 times. (30)
- Rnd 6: [sc 4, inc] 6 times. (36)
- Rnd 7: [sc 5, inc] 6 times. (42)
- Rnd 8: [sc 6, inc] 6 times. (48)
- Rnd 9: sc in each st. (48)
- Rnd 10: [sc 7, inc] 6 times. (54)
- Rnd 11: sc in each st. (54)
- Rnd 12: [sc 8, inc] 6 times. (60)
- Rnd 13: sc in each st. (60)
- Rnd 14: [sc 9, inc] 6 times. (66)
- Rnd 15: sc in each st. (66)
- Rnd 16: [sc 10, inc] 6 times. (72)
Alternating increase rounds with plain rounds makes the base curve up gently into a dome instead of lying flat.
Lower walls
- Rnds 17–22: sc in each st. (72)
Checkpoint: the cup is about 3 in (7.6 cm) tall.
Dispensing hole
The last 12 stitches of Rnd 22 become the bottom edge of the hole. This spot is now the center front.
- Row 1: ch 1, turn. Sc in the next 60 sts, leaving the 12 front sts unworked. (60)
- Rows 2–14: ch 1, turn, sc 60. (60)
After Row 14 you are back at the side where Row 1 began.
- Close the gap: ch 12. Sl st into the first st of Row 14 on the far side of the opening.
- Rnd 37: sc in each of the 60 sts, then sc in each of the 12 ch. (72)
Checkpoint: the opening is 12 sts = 3 in (7.6 cm) wide and 14 rows ≈ 3.1 in (7.9 cm) tall.
Upper walls
- Rnds 38–70: sc in each st. (72)
Checkpoint: the body is about 13.75 in (34.9 cm) tall. Fasten off the cream.
Roof Band
Join rust in the first st.
- Rnd 71: sc BLO in each st. (72) This leaves 72 cream front loops from Rnd 70 free for the lower scallop tier.
- Rnd 72: sc in each st. (72)
- Rnd 73: sc BLO in each st. (72) This leaves 72 rust front loops from Rnd 72 free for the upper scallop tier.
- Rnds 74–76: sc in each st. (72)
- Rnd 77: sl st in each st. (72) This firms up the rim so it doesn’t stretch when bags are pushed in.
Do not fasten off yet; the strap is worked from this edge.
Hanging Strap
Find the back center, directly opposite the hole. Skip to the 6 sts centered there and keep working in rust:
- Rows 1–22: ch 1, turn, sc 6. (6)
Fasten off and leave a 12 in (30.5 cm) tail. Pass the strap through the wooden ring. Fold the last 6 rows (about 1.25 in / 3.2 cm) to the back and whipstitch Row 22 to Row 16. The strap now rises about 3.5 in (8.9 cm) above the rim.
Hole Edge and Roof Scallops
These are the “border” stages of this piece. Use the same gauge as the body: 4 sc per 1 in (2.5 cm).
Hole edging (cream)
Join cream at the bottom right corner of the opening.
- Rnd 1: Work around the opening as follows. (52)
- sc 12 along the bottom (unworked sts of Rnd 22);
- sc 14 up the side, 1 per row end;
- sc 12 across the underside of the ch;
- sc 14 down the other side.
- Rnd 2: Work around again with a decrease at each corner. (48)
- [sc2tog over the corner pair, sc 10 along the edge, sc2tog over the next corner pair, sc 12 along the side] twice.
- Count: (24 sts worked one-for-one along the edges) + (4 sc2tog) = 28 + 20 = 48.
- Rnd 3: sl st in each st. (48)
Why the math works:
– One sc per stitch or row end matches the body gauge, so the edge lies flat.
– The four sc2tog stitches pull in the square corners just enough to round the opening without puckering.
Lower scallop tier (rust)
Hold the top of the holder toward you. Join rust in any free cream front loop of Rnd 70.
- Sk 2 loops, 7 dc in the next loop, sk 2 loops, sl st in the next loop. Repeat around. You get 12 scallops, each using 6 loops: 12 × 6 = 72.
Upper scallop tier (rust)
Join in a free rust front loop of Rnd 72, 3 loops to the right of where the lower tier started. Repeat the same pattern for 12 more scallops. Starting 3 loops over staggers the tiers, so each upper scallop sits between two lower ones.
Each scallop is about 0.75 in (1.9 cm) deep. The upper tier overlaps the tops of the lower tier, and the rolled rim shows above both.
Appliqués
Use the 4.5 mm hook unless a different hook is noted.
Windows (make 2)
1. With white, ch 9. Starting in the 2nd ch from the hook, sc 8 for 9 rows.
2. Change to brown for the frame. Work 3 sc in each corner st, sc 6 across the top and bottom, and sc 8 down each side. Total: 6 + 6 + 8 + 8 + (4 × 3) = 40. Sl st to join.
3. Use brown surface slip stitch to work one vertical line and one horizontal line through the center, dividing the glass into 4 panes.
Each window is about 2.5 × 2.5 in (6.4 × 6.4 cm).
Window boxes (make 2)
– In brown, ch 11. Work 3 rows of sc 10. (10)
– Size: 2.5 × 0.75 in (6.4 × 1.9 cm).
Door (make 1, brown)
1. Ch 11.
2. Rows 1–10: sc 10. (10)
3. Row 11: sc2tog, sc 6, sc2tog. (8)
4. Row 12: sc2tog, sc 4, sc2tog. (6)
5. Row 13: sc2tog, sc 2, sc2tog. (4)
6. Edging: Work 3 sc in each bottom corner, sc 8 along the bottom, sc 13 up each side, and sc 4 across the top. Total: 8 + 6 + 13 + 13 + 4 = 44.
7. Work 3 vertical lines of surface slip stitch to make the plank ridges.
8. Knob: In mustard, make 5 sc in MR, pull it tight, and sew it on the right side of the door.
The door is about 3 × 3.25 in (7.6 × 8.3 cm).
Small flowers
Use the 3.75 mm hook. Make 9 flowers: 3 yellow, 2 pink and 4 cream.
– MR, then [ch 2, dc, ch 2, sl st] 5 times into the ring. Pull the ring closed.
– Add a French knot center in a contrasting color: pink on yellow flowers, yellow on cream and pink flowers.
Leaves
Make 22 in green.
– Ch 5. In the 2nd ch from the hook work sc, then hdc, dc, then sl st in the last ch.
Rosettes
Make 12 in pink.
– 5 sc in MR, pull tight.
Vines (make 2)
– In green, ch 40. This is about 9 in (22.9 cm) long.
Bushes (make 2)
– Make 4 green circles per bush: 6 sc in MR, then inc in each st (12). Each circle is about 1.25 in (3.2 cm) across.
– Overlap the 4 circles in a mound and sew them together.
Assembly
Pin everything in place before sewing anything.
- Door: Center it above the hole with its bottom edge 0.75 in (1.9 cm) above the hole edging.
- Windows: Place one on each side of the door, with their tops 1 in (2.5 cm) below the lower scallops.
- Window boxes: Sew one directly under each window. On each box, sew 1 yellow flower, 1 pink flower and 1 cream flower, plus 3 leaves.
- Bushes: Sew one on each side of the hole, low on the base curve. Add 1 cream flower and 1 leaf to each bush. Also sew the third yellow flower onto one bush.
- Vines: Run one vine in a gentle wave from each bush up to its window box. Sew on 6 rosettes and 7 leaves along each vine.
Use whipstitch through the outer loops of each appliqué. Keep your stitches loose enough that the cylinder doesn’t get pulled out of shape.
Final Blocking
- Fill the holder firmly with crumpled bags or a rolled towel.
- Lightly mist it with water until it is damp, not soaked.
- Shape it into an even 5.75 in (14.6 cm) cylinder, 15 in (38.1 cm) tall.
- Fan the scallops so they hang straight down and evenly staggered.
- Pin the flower petals and leaf tips flat.
- Let it dry completely before removing the filling.
Final Quality-Control Checklist
- Every body round has 72 sts.
- The hole edging has 48 sts and the opening looks round.
- There are 12 scallops in each tier, and the tiers are offset.
- The strap is centered at the back, directly opposite the hole.
- The windows sit level and match each other.
- All yarn ends are woven in on the inside.
- The holder hangs straight from the ring.
Troubleshooting
- The base cups too sharply: Your tension is tight on the plain rounds. Loosen up or go up a hook size.
- The hole is lopsided: Check that you worked exactly 14 rows and closed with 12 ch.
- The scallops ruffle: Work 6 dc instead of 7 per scallop.
- The scallops gap: Work 8 dc instead of 7 per scallop.
- The holder leans to one side: Re-center the strap opposite the hole.
- The appliqués pucker: Re-sew them with looser whipstitches.
Care
Hand wash in cool water, press out the excess water in a towel, and reshape it over a rolled towel to dry. Don’t tumble dry.
Final Notes
Each stage of this design checks against the one before:
– The gauge circle measures 3.5 in (8.9 cm) at Rnd 8.
– The 72-st base is 18 in (45.7 cm) around.
– The 12-st × 14-row hole is 3 × 3.1 in (7.6 × 7.9 cm).
– The walls reach 13.75 in (34.9 cm) by Rnd 70.
– The rust roof brings the holder to 15 in (38.1 cm).
– 72 front loops ÷ 6 gives exactly 12 scallops per tier.
If each checkpoint matches, the finished cottage will hang straight and dispense bags neatly.
Happy crocheting!