

This ornament cover is made from eight slim lace panels in burgundy and dusty rose. Each panel is a pointed oval with a column of fan shells running up the middle. Joined together around a cream ball, the panels make a striped, vintage-style bauble that looks hand-tatted but is quick to crochet.
The two colors alternate around the ball: four burgundy panels and four pink panels. The pink seams stand up as fine ridges between the panels, and the open windows between the fans let the ball glow through, especially near tree lights.
The pattern uses US crochet terms. The finished cover fits a 3 in (7.6 cm) ball snugly, and the ornament is about 4.5 in (11.4 cm) tall including the hanging loop.
Here is how it comes together. You work each panel flat in rows from the bottom tip to the top tip, then add a single-crochet outline. You join the panels partway up, close the bottom, insert the ball, finish the seams, and close the top with a hanging loop.
Finished Size and Construction
- Finished size: fits a 3 in (7.6 cm) ball; circumference about 9.4 in (23.9 cm)
- Height with loop: about 4.5 in (11.4 cm)
- Skill level: Intermediate
- Terminology: US
- Yarn weight: Super Fine (#1), fingering-weight mercerized cotton
- Hook: 2.5 mm (US B-1 or C-2, depending on brand)
- Number of pieces: 8 panels (4 burgundy, 4 pink)
- Layout: panels arranged in a ring, colors alternating, all tips meeting at the top and bottom
- Panel size (outlined): 4.75 in (12.1 cm) long × 1.2 in (3.0 cm) at the widest point
- Panel size before outline: 4.5 in (11.4 cm) × 1 in (2.5 cm)
- Border depth: the closure rounds add about 0.1 in (0.3 cm) at each pole
Materials
Use a smooth, mercerized cotton in fingering weight. It holds the fan shapes crisply and doesn’t fuzz. The quantities below assume about 3.4 m of yarn per gram (roughly 170 m per 50 g ball).
- Burgundy: 12 g, about 41 m (45 yd), for 4 panels
- Dusty rose pink: 18 g, about 61 m (67 yd), for 4 panels, all seams, the closure rounds, and the hanging loop
Tools:
- 2.5 mm crochet hook
- One 3 in (7.6 cm) ball in cream (satin, foam, or plastic)
- Tapestry needle
- Scissors
- Rust-proof pins and a small foam board for blocking
- Locking stitch markers (at least 8)
All quantities include a margin of about 20% for gauge swatching and weaving in ends.
Abbreviations (US Terms)
- ch – chain
- sl st – slip stitch
- sc – single crochet
- dc – double crochet
- sk – skip
- sp – space
- st(s) – stitch(es)
- tch – turning chain
- RS / WS – right side / wrong side
Special stitch – dc3tog (double crochet 3 together): [Yarn over, insert hook in next st, yarn over and pull up a loop, yarn over and draw through 2 loops] 3 times. You now have 4 loops on the hook. Yarn over and draw through all 4 loops. This counts as 1 stitch.
Fan: 7 dc worked into the same stitch, or 5 dc for the first fan only.
Gauge and Checkpoints
Gauge matters here because the panels have to wrap one specific ball. Make one complete panel before anything else and measure it.
- After Row 5: the panel measures 1.75 in (4.4 cm) from the bottom of the ring to the top of Fan 3, and Row 5 is 1 in (2.5 cm) wide.
- After Row 12: the panel body measures 4.5 in (11.4 cm) × 1 in (2.5 cm).
- After the outline: the panel measures 4.75 in (12.1 cm) × 1.2 in (3.0 cm), lightly stretched.
- Outline gauge: 23 sc = 4 in (10.2 cm) along the outline edge.
If your panel is too big, go down to a 2.25 mm hook. If it’s too small, go up to a 2.75 mm hook. If only the length is off, check your dc height: tall, loose dc lengthen the panel fast. If you’d rather keep your tension, match the ball to your panel instead. Eight panels should measure about 9.6 in (24.4 cm) laid side by side, which is a little more than the ball’s circumference.
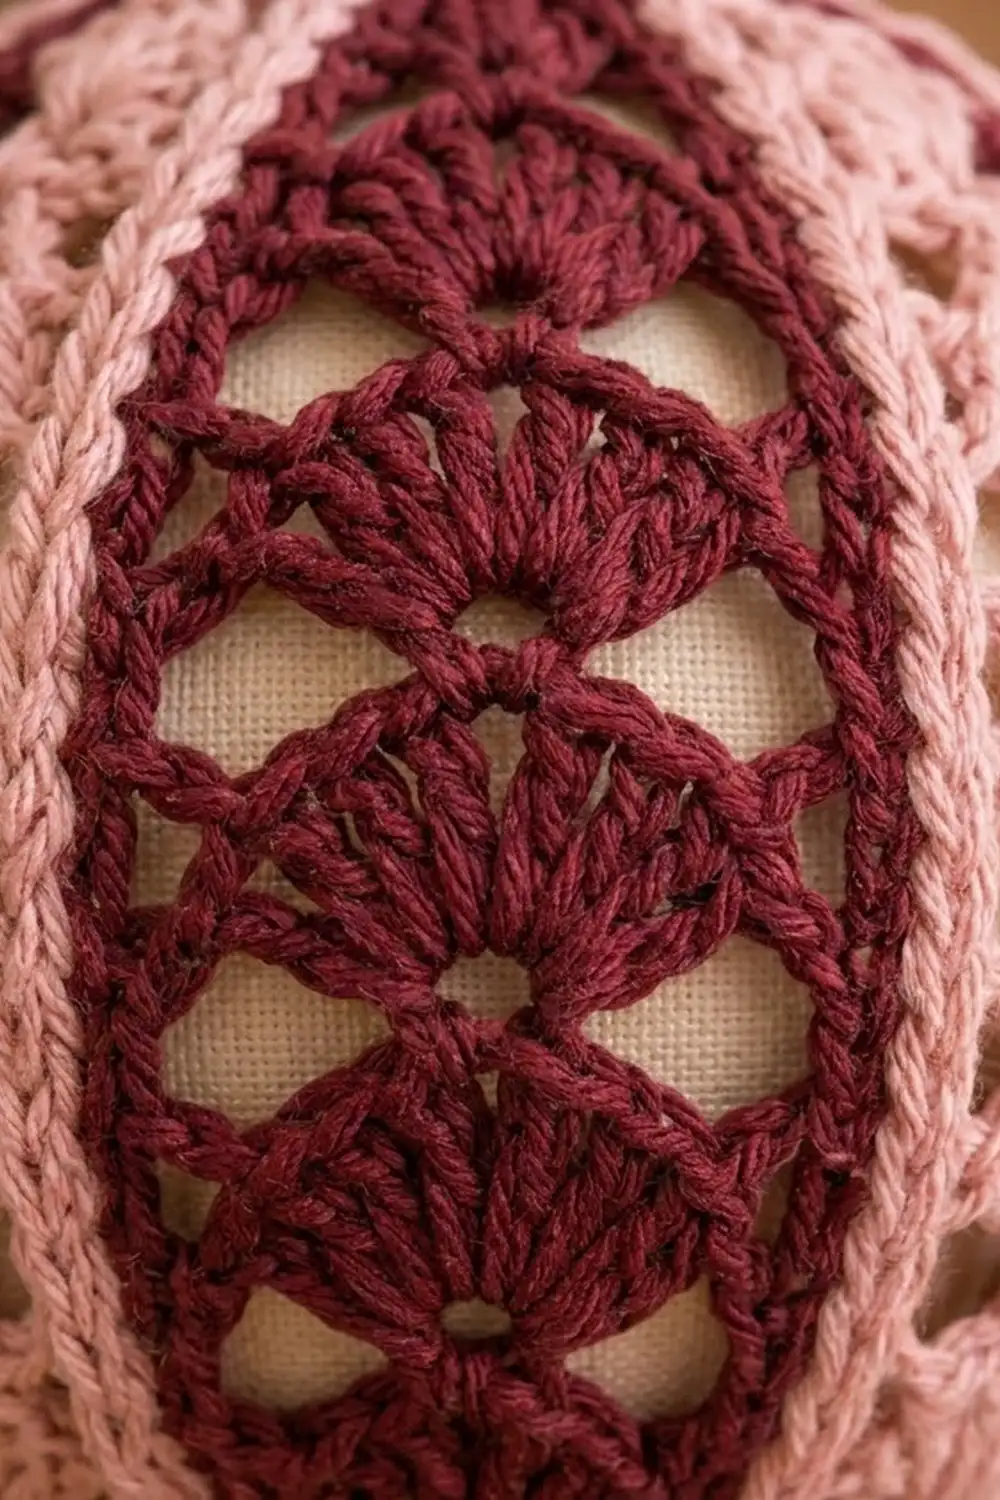
Panel (Make 8)
Work in rows. The ring is the bottom tip, and Row 12 forms the top tip.
Row 1 (RS): Ch 4, sl st in first ch to form a ring. Ch 3 (counts as dc), 4 dc in ring. (5 dc – Fan 1)
Row 2: Ch 4 (counts as dc + ch 1), turn, dc in first dc, ch 2, sk next dc, sc in center (3rd) dc, ch 2, sk next dc, (dc, ch 1, dc) in top of tch. (4 dc, 1 sc, 2 ch-1 sps, 2 ch-2 sps)
This row widens the panel with a V-stitch at each edge and sets the center sc where the next fan will sit.
Row 3: Ch 3 (counts as dc), turn, dc in ch-1 sp, dc in next dc, ch 1, sk ch-2 sp, 7 dc in sc, ch 1, sk ch-2 sp, dc in next dc, dc in ch-1 sp, dc in 3rd ch of tch. (13 dc: 3 edge dc + 7 fan dc + 3 edge dc; 2 ch-1 sps – Fan 2)
Row 4: Ch 3 (counts as dc), turn, dc in next 2 dc, ch 3, sk ch-1 sp and next 3 dc, sc in center (4th) dc of fan, ch 3, sk next 3 dc and ch-1 sp, dc in next 2 dc, dc in top of tch. (6 dc, 1 sc, 2 ch-3 sps)
The two ch-3 arches make the open windows.
Row 5: Ch 3 (counts as dc), turn, dc in next 2 dc, ch 1, sk ch-3 sp, 7 dc in sc, ch 1, sk ch-3 sp, dc in next 2 dc, dc in top of tch. (13 dc, 2 ch-1 sps – Fan 3)
Rows 6–9: Repeat Rows 4–5 twice. (Row 9: 13 dc, 2 ch-1 sps – Fans 4 and 5 are complete.)
Row 10 (taper): Ch 2 (does not count), turn, dc3tog over first 3 dc, ch 3, sk ch-1 sp and next 3 dc, sc in center dc of fan, ch 3, sk next 3 dc and ch-1 sp, dc3tog over last 2 dc and top of tch. (2 dc3tog, 1 sc, 2 ch-3 sps)
Row 11: Ch 1, turn, sc in dc3tog, ch 1, sk ch-3 sp, 7 dc in sc, ch 1, sk ch-3 sp, sc in last dc3tog. (7 dc, 2 sc, 2 ch-1 sps – Fan 6)
Row 12 (top tip): Ch 1, turn, sl st in first sc, ch 3, sk ch-1 sp and next 3 dc, sc in center dc, ch 3, sk next 3 dc and ch-1 sp, sl st in last sc. (1 sc, 2 sl sts, 2 ch-3 sps)
Do not fasten off. Checkpoint: the panel body should measure 4.5 in (11.4 cm) × 1 in (2.5 cm).
Outline Round
In this round, every sc is counted, and each tip is (sc, ch 2, sc).
Rnd 13: Ch 1, turn, 3 sc in first ch-3 sp, (sc, ch 2, sc) in center sc of Row 12 for the top tip, 3 sc in next ch-3 sp. Working down the side edge, 2 sc around the end of each of Rows 11 through 2 (20 sc), then 2 sc around the end of Row 1. For the bottom tip, (sc, ch 2, sc) into the bottom of the ring. Working up the other edge, 2 sc around the end of Row 1, then 2 sc around the end of each of Rows 2 through 11 (20 sc). Sl st to the first sc.
Count per long side: 1 tip sc + 3 + 20 + 2 + 1 tip sc = 27 sc. Total: 54 sc + 2 ch-2 tip sps.
Each long side runs from one tip sc to the other, so each side’s 27 sc already includes both of its tip stitches. Fasten off with a 6 in (15.2 cm) tail.
Checkpoint: 4.75 in (12.1 cm) × 1.2 in (3.0 cm). Lightly steam or pin each panel flat so the fans open evenly before joining.
Make All Pieces
- Burgundy: 4 panels
- Pink: 4 panels
The layout around the ball, read left to right, wraps back to the start:
[B1] [P1] [B2] [P2] [B3] [P3] [B4] [P4] → back to [B1]
On each long side, place markers on sc 1 (the bottom tip sc), sc 16, and sc 27 (the top tip sc), counting upward from the bottom tip.
Joining
Method: single crochet seam in pink, worked on the RS so it forms a raised ridge.
Stitch logic: every long side has exactly 27 sc, so you join stitch to stitch with no extra stitches. Sc 1 matches sc 1, sc 16 matches sc 16, and so on.
- Hold B1 and P1 with their WS together and the bottom tips lined up.
- With pink, join through both bottom tip sc. Ch 1, then sc through both loops of both layers in that same stitch (sc 1).
- Sc through both layers in each of the next 15 sts, ending at sc 16. (16 sc)
- Fasten off. Leave sts 17–27 open (11 sts on each side).
- Repeat for the seams P1–B2, B2–P2, P2–B3, B3–P3, P3–B4, B4–P4, and P4–B1. (8 seams × 16 sc)
Tension: keep the seam sc the same height as the outline sc. A tight seam bunches the panels, and a loose one lets the ball show through at the seams.
Checkpoint: you should have an open cup whose seams reach about 2.8 in (7.1 cm) up from the bottom. The top has eight open petal tips, and the opening is about 1.9 in (4.8 cm) deep along each panel. It should stretch over the 3 in (7.6 cm) ball.
Border: Bottom Closure, Top Closure, and Hanging Loop
Border gauge: the same as the outline, 23 sc = 4 in (10.2 cm). Each closure round takes 1 sc from each of the 8 panel tips, so each pole is treated as one 8-stitch “side.”
Bottom Closure (work before inserting the ball)
Rnd 1: With pink, join in any bottom tip ch-2 sp. Ch 1, sc in the same sp, [ch 1, sc in next bottom tip ch-2 sp] 7 times, ch 1, sl st to the first sc. (8 sc + 8 ch-1 sps = 16 sts)
Pull the starting tail to close the ring firmly, then weave it in.
Insert the Ball and Finish the Seams
Ease the ball into the cup through the top opening. For each of the 8 seams, rejoin pink at sc 17 and sc through both layers from sc 17 to sc 27. (11 sc per seam)
Each seam now has 16 + 11 = 27 sc, matching both panel sides exactly.
Top Closure
Rnd 1: With pink, join in any top tip ch-2 sp. Ch 1, sc in the same sp, [ch 1, sc in next top tip ch-2 sp] 7 times, ch 1, sl st to the first sc. (8 sc + 8 ch-1 sps = 16 sts)
Hanging Loop
Ch 36, about 3.25 in (8.3 cm). Sl st in the 5th sc of the closure round, directly opposite the start. Sl st in each ch back along the loop (36 sl sts) to firm it, then sl st in the first sc. Fasten off. The finished loop stands about 1.5 in (3.8 cm) tall.
Why the math works: 8 panels × 1 tip = 8 sc at each pole, which is small enough to close flat over the curve of the ball. Every seam joins 27 to 27, so no panel is eased or stretched against its neighbor, and the stripes stay straight from pole to pole.
Final Blocking
- Lightly mist the whole ornament with cool water until it is just damp.
- Using your fingertips, center each panel so its fan column runs straight from tip to tip.
- Open each fan so the 7 dc spread evenly, and pull the ch-3 windows into rounded arches.
- Nudge the seam ridges so they sit upright between the colors.
- Pinch the tips at each pole so the closure rings are centered.
- Hang the ornament by its loop and let it dry completely, at least 6 hours.
- If you want a crisper finish, mist with diluted fabric stiffener before drying.
Final Quality-Control Checklist
- 8 panels, colors alternating, no two burgundy panels side by side
- Each panel has 6 fans: 1 small fan of 5 dc and 5 fans of 7 dc
- Every long side has 27 sc, and every seam has 27 sc
- The tip ch-2 sps are sharp and evenly caught in the closure rounds
- Each closure round has 16 sts (8 sc + 8 ch-1 sps)
- The cover is snug on a 3 in (7.6 cm) ball with no gaps at the seams
- The loop is firm, centered, and about 1.5 in (3.8 cm) tall
- All ends are woven into same-color stitches
Troubleshooting
- Fans look lopsided: you missed the center dc. On arch rows, count 3 dc before and after the sc.
- Panel too wide at the top: check that you worked the dc3tog clusters in Row 10.
- Outline ruffles: you have more than 2 sc per row end. Recount to 27.
- Outline pulls tight: use a slightly larger hook for Rnd 13 only.
- Seam ends with spare stitches: one side’s outline count is off. Fix that panel’s outline before you go on.
- Ball won’t fit through the opening: take out one stitch from each seam’s 16, leaving 12 open, then add it back after the ball is in.
- Closure ring gapes: pull the tail tighter, or work sc2tog pairs in place of the ch-1 sps.
Care
Spot clean with cool water and mild soap, then reshape and hang to dry. Store flat in tissue so the tips stay crisp.

Final Notes
The measurement chain is simple. Row 5 reaches 1.75 in (4.4 cm), and the panel body measures 4.5 in × 1 in (11.4 × 2.5 cm). The outlined panel measures 4.75 in × 1.2 in (12.1 × 3.0 cm), with 27 sc per side. Eight panels give about 9.6 in (24.4 cm) of flat width, which fits snugly around a 9.4 in (23.9 cm) ball circumference. If you check each step, the finished ornament will fit and hang straight.
Happy crocheting!