

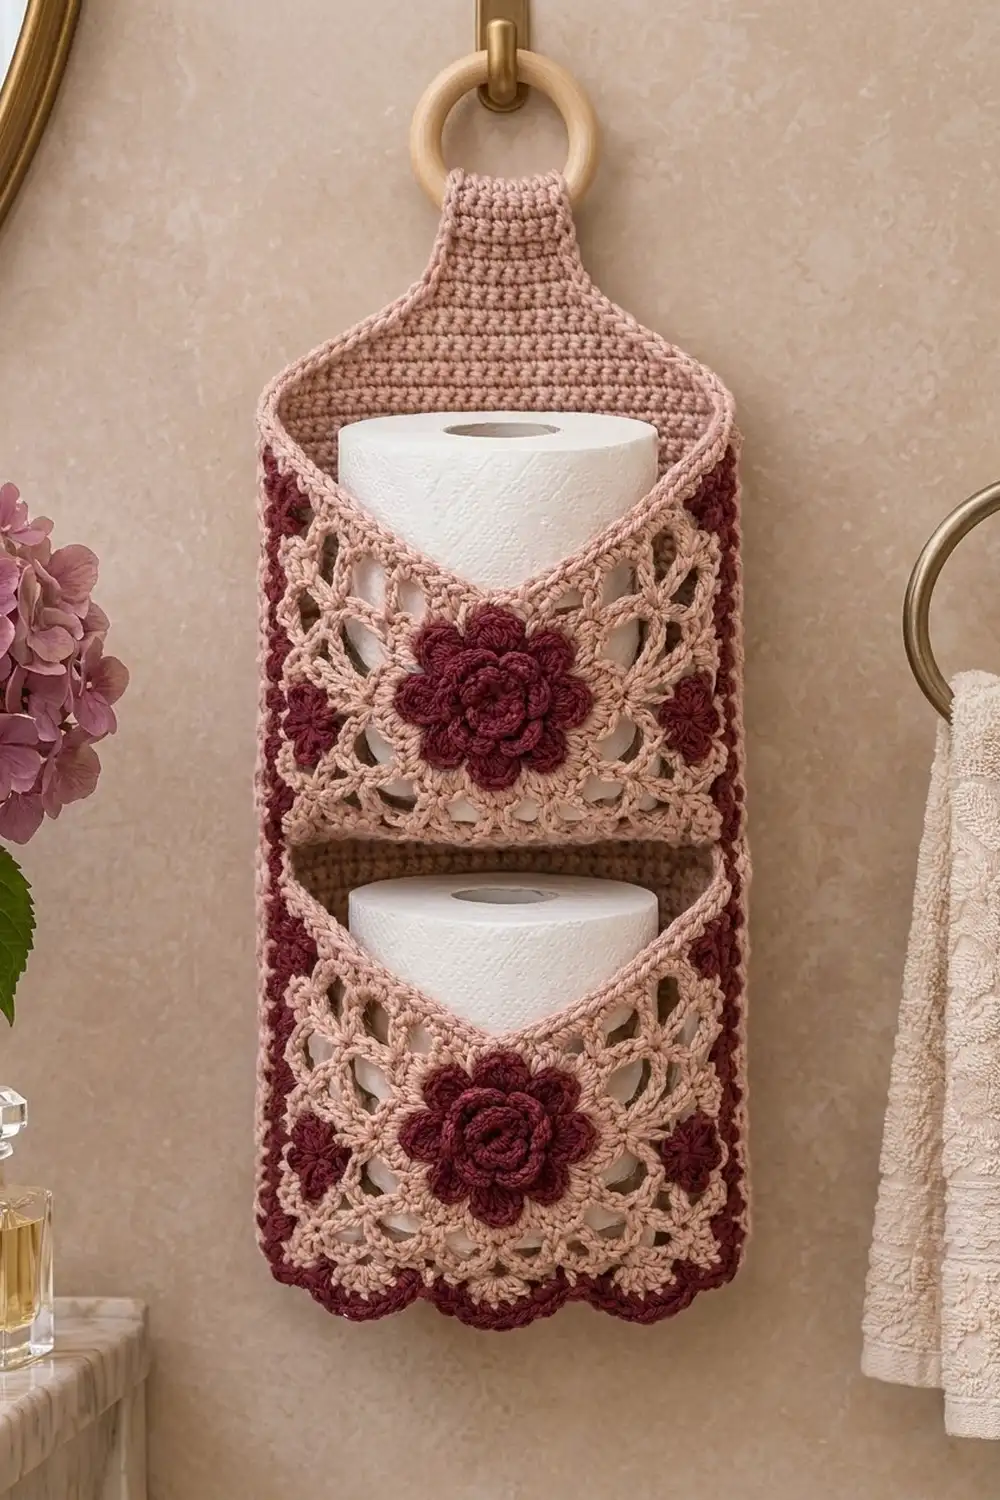
This hanging toilet paper holder brings a little vintage charm to the bathroom. A solid dusty rose back panel hangs from a wooden ring, and two lace pockets each hold one spare roll. Each pocket front is an airy granny-style lace square with a layered burgundy rose at its center and small burgundy flowers near its sides.
The palette is soft and romantic: dusty rose for the panel and lace, and deep burgundy for the roses, pocket gussets and scalloped bottom edge. The top edge of each pocket dips into a gentle V, so a roll is easy to see and to grab.
This pattern uses US crochet terms. The finished holder is about 6¾ in (17.1 cm) wide and 20½ in (52.1 cm) long from the scallop tips to the bottom of the ring. Each pocket is 3½ in (8.9 cm) deep.
You will work one back panel in rows, two lace squares, two gusset strips and the appliqués. Next you sew the pockets onto the panel and add a two-round border. Last, you mount the ring.
Finished Size and Construction
- Finished size: 6¾ in × 20½ in (17.1 cm × 52.1 cm)
- Skill level: Intermediate
- Terminology: US
- Yarn weight: Worsted (#4)
- Hook: 5.0 mm (H-8)
- Number of pieces: 11 (1 back panel, 2 lace squares, 2 gussets, 2 roses, 4 small flowers), assembled into one holder
- Layout: two pockets stacked vertically on one panel
- Piece size: each lace square is 5¾ in (14.6 cm); the back panel is 5¾ in × 16 in (14.6 cm × 40.6 cm) below the taper
- Size before border: 5¾ in (14.6 cm) wide
- Border depth: ½ in (1.3 cm) at the sides, ¾ in (1.9 cm) at the bottom including the scallops
Materials
Choose a smooth worsted-weight cotton or cotton blend so the stitches stay crisp and the panel stays firm. These amounts assume about 200 m per 100 g.
- Dusty rose: 120 g / 240 m (back panel, lace squares, V-trim, Border Round 1)
- Burgundy: 110 g / 220 m (gussets, roses, small flowers, Border Round 2)
- 5.0 mm (H-8) crochet hook
- One wooden ring, 2½ in (6.4 cm) outer diameter
- Tapestry needle
- 6 stitch markers
- Rust-proof pins
- Measuring tape
All quantities include a safety margin of roughly 15%.
Abbreviations (US Terms)
- ch: chain
- sl st: slip stitch
- sc: single crochet
- hdc: half double crochet
- dc: double crochet
- tr: treble crochet
- sc2tog: single crochet 2 together
- sk: skip
- sp: space
- st(s): stitch(es)
- MR: magic ring
- BPsc (back post single crochet): insert the hook from back to front to back around the post of the stitch, then complete a sc.
Gauge and Checkpoints
Gauge: 16 sc × 18 rows = 4 in (10.2 cm) in sc rows.
Make one lace square before anything else. It tests your tension in both lace and solid stitches.
Lace square checkpoints:
- After Rnd 2: 2½ in (6.4 cm)
- After Rnd 4: 4 in (10.2 cm)
- After Rnd 6: 5¾ in (14.6 cm)
Back panel checkpoints:
- Width: 5¾ in (14.6 cm)
- After Row 26: 5¾ in (14.6 cm) tall
- After Row 72: 16 in (40.6 cm) tall
If your work is too big, go down 0.5 mm in hook size. If it is too small, go up 0.5 mm. The panel and the squares must match in width, because the pockets are sewn stitch to stitch.

Back Panel (Dusty Rose)
Ch 24.
Row 1: Sc in 2nd ch from hook and in each ch across, turn. (23 sc)
Rows 2–72: Ch 1, sc in each st across, turn. (23 sc)
Checkpoint: the panel measures 5¾ in × 16 in (14.6 cm × 40.6 cm).
Taper
Row 73: Ch 1, sc2tog, sc in each st to last 2 sts, sc2tog, turn. (21 sts)
Rows 74–80: Repeat Row 73. Your counts are 19, 17, 15, 13, 11, 9 and 7 sts.
The taper is about 1¾ in (4.4 cm) tall.
Tab
Rows 81–98: Ch 1, sc in each st across, turn. (7 sc)
The tab is 1¾ in (4.4 cm) wide and 4 in (10.2 cm) long. Do not fasten off. Set the panel aside, or finish off and rejoin later.
Lace Squares (Make 2, Dusty Rose)
Rnd 1: MR, ch 3 (counts as dc), 2 dc in ring, ch 3, [3 dc, ch 3] 3 times, sl st to top of ch-3. (12 dc, 4 ch-3 corner sps)
Rnd 2: Sl st to the first corner sp. Ch 3, (2 dc, ch 3, 3 dc) in the same sp, ch 2. *(3 dc, ch 3, 3 dc) in the next corner sp, ch 2; repeat from * 2 more times. Sl st to join. (24 dc, 4 corners, 4 ch-2 side sps)
Rnd 3: Sl st to the corner sp. Ch 3, (2 dc, ch 3, 3 dc) in the same sp. *Ch 3, sc in the next ch-2 sp, ch 3, (3 dc, ch 3, 3 dc) in the next corner; repeat from * around, omitting the last corner. Sl st to join. (24 dc, 4 corners, 8 ch-3 loops, 4 sc)
Rnd 4: Sl st to the corner sp. Ch 3, (2 dc, ch 3, 3 dc) in the same sp. *[Ch 3, sc in the next ch-3 loop] twice, ch 3, (3 dc, ch 3, 3 dc) in the next corner; repeat from * around, omitting the last corner. Sl st to join. (24 dc, 4 corners, 12 ch-3 loops, 8 sc)
Rnd 5: Sl st to the corner sp. Ch 3, (2 dc, ch 3, 3 dc) in the same sp. *Ch 1, [3 dc in the next ch-3 loop, ch 1] 3 times, (3 dc, ch 3, 3 dc) in the next corner; repeat from * around, omitting the last corner. Sl st to join. (60 dc, 16 ch-1 sps, 4 corners; 15 dc per side)
Rnd 6 (conversion round): Ch 1. Sc in each dc and each ch-1 sp, and work 3 sc in each corner sp. Sl st to join.
The round count is 76 sc worked one into each existing dc and ch-1 sp, plus 12 corner sc, for 88 sc total. Each side has 23 sts, counting the center sc of each corner group as a corner st.
Row 7 (V-trim, top edge only): Join dusty rose in the top-right corner center st. Ch 4 (counts as tr). Tr in the next 2 sts, dc in the next 4, hdc in the next 4, sc in the next st (the center), hdc in the next 4, dc in the next 4, and tr in the last 3 sts, ending in the top-left corner center. (23 sts) Fasten off.
The trim rises at the corners and drops to a single sc at the center. That is what creates the V-shaped pocket opening.
Gussets (Make 2, Burgundy)
Ch 15.
Row 1: Sc in 2nd ch from hook and in each ch across, turn. (14 sc)
Rows 2–78: Ch 1, sc in each st across, turn. (14 sc)
Place a marker at the end of Row 26 and another at the end of Row 52. These markers split the strip into three sections of 26 rows: one side, the bottom and the other side.
Checkpoint: each gusset is 3½ in × 17¼ in (8.9 cm × 43.8 cm).
Roses (Make 2, Burgundy)
Rnd 1: MR, ch 1, 10 sc in ring, sl st to join. (10 sc)
Rnd 2: Ch 1, sc in the first st, ch 3, sk 1, [sc in the next st, ch 3, sk 1] 4 times, sl st to join. (5 sc, 5 ch-3 sps)
Rnd 3: In each ch-3 sp work (sc, hdc, 3 dc, hdc, sc). Sl st to join. (5 petals, 35 sts)
Rnd 4: Working behind the petals, ch 1. BPsc around the first sc of Rnd 2, ch 4, then [BPsc around the next Rnd 2 sc, ch 4] 4 times. Sl st to join. (5 ch-4 loops)
Rnd 5: In each ch-4 loop work (sc, hdc, 5 dc, hdc, sc). Sl st to join. (5 petals, 45 sts)
Fasten off and leave a long tail. The rose measures about 2¾ in (7.0 cm), and its inner petals stand in front of the outer ring.
Small Flowers (Make 4, Burgundy)
MR, then [ch 2, 2 dc, ch 2, sl st] 5 times into the ring. Pull the ring closed. (5 petals) Leave a tail for sewing. Each flower is about 1¼ in (3.2 cm) across.
Make All Pieces
- Dusty rose: 1 back panel, 2 lace squares
- Burgundy: 2 gussets, 2 roses, 4 small flowers
Before sewing, sew one rose to the center of each lace square, covering Rnds 1–2. Then sew a small flower to the left and right sides of each square on Rnd 4, halfway up.
Layout, top to bottom:
[ ring ]
[ tab  ]
[ taper ]
[ plain panel, rows 57-72 ]
[ UPPER POCKET, rows 31-56 ]
[ gap, rows 27-30 ]
[ LOWER POCKET, rows 1-26 ]
[ scallop border ]
Joining
Use whipstitch with matching yarn: dusty rose where the gusset meets the lace square, and burgundy where it meets the panel. Work through the outer loops only.
Step 1: Gusset to lace square. Line up the gusset’s markers with the two bottom corners of the square. Its 3 sections of 26 row-ends meet the square’s left, bottom and right sides, which have 23 sts each.
On each side, join 20 sts with 1 row-end each and 3 sts with 2 row-ends each (20 + 6 = 26). Spread the doubled stitches out evenly. Leave the V-trim free.
Step 2: Pocket to panel. For the lower pocket, sew the gusset’s free bottom section along Row 1 of the panel, on the front surface. Use the same 20 + 3×2 = 26 split across the 23 sts.
Next, sew each side section 1-to-1 into the outermost stitch column of rows 1–26, so 26 row-ends match 26 rows. Sewing into the face of the panel keeps the panel’s edge free for the border.
For the upper pocket, repeat the same steps with the bottom section along Row 31 and the sides along rows 31–56.
Tension: Pull each stitch snug, but not so tight that the seam puckers. The lace should lie flat, and the gusset should stand at a right angle to the panel.
Checkpoint: Both pockets sit square, and each pocket opening is 5¾ in (14.6 cm) wide.
Border
The border is worked around the back panel only, using sc at 4 sts per inch.
Rnd 1 (dusty rose): Join at the bottom-right corner. Work 3 sc in each corner st, and use these counts for each edge:
- Bottom (Row 1): 21 sc between the corners
- Each long side (72 rows): [sc in 8 row-ends, sk 1] 8 times, for 64 sc
- Each taper edge: 1 sc in each of the 8 row-ends, for 8 sc
- Each tab side (18 rows): [sc in 8 row-ends, sk 1] twice, for 16 sc
- Tab top: 5 sc between the corners
Sl st to join.
The total is 214 sts: bottom 21 + 6 = 27, tab top 5 + 6 = 11, and each side 64 + 8 + 16 = 88, twice is 176. 27 + 11 + 176 = 214.
Rnd 2 (burgundy): Join in the bottom-left corner center st.
- Bottom: Sc in the corner center. Then [sk 2, 5 dc in the next st, sk 2, sc in the next st] 4 times, ending in the bottom-right corner center. This uses 25 sts and makes 4 scallops (5 sc + 20 dc = 25).
- Rest of the round: Sc in each of the remaining 189 sts, working 3 sc in each tab-top corner center.
Sl st to join. (218 sts)
Why the math works: The bottom edge has 25 sts from corner center to corner center, inclusive. Each scallop repeat uses 6 sts, plus 1 st to finish: 4 × 6 + 1 = 25. That is why the panel is 23 sts wide. The 8-of-9 row-end ratio matches 18 rows to 16 sts per 4 in, so the sides stay flat without ruffling or pulling in.
Ring: Pass the top 2¼ in (5.7 cm) of the tab through the ring. Fold it to the back and sew its edge across the tab.
Final Blocking
- Mist the holder with water until it is damp, not soaked.
- Lay it flat and pin the panel to 6¾ in (17.1 cm) wide.
- Pin each lace square open to 5¾ in (14.6 cm), and open up the chain loops.
- Pin each scallop tip so the curves are even.
- Shape the rose petals with your fingers so they cup forward.
- Stuff each pocket with a rolled towel so the gussets dry square.
- Let it dry completely, at least 24 hours.
Final Quality-Control Checklist
- Panel is 23 sts wide, and the tab is 7 sts wide
- Each lace square has 88 sts in Rnd 6 and a V-trim of 23 sts
- Each gusset has 78 rows, with sections of 26
- Border Rnd 1 has 214 sts, and Rnd 2 has 218 sts with 4 scallops
- Both pockets are level and centered
- All ends are woven in and the ring is secure
Troubleshooting
- Square is smaller than the panel: Go up a hook size for the lace only.
- Side border ruffles: Skip 1 row-end out of every 7 instead of every 9.
- Pocket gapes at the sides: Re-sew the side seams, checking that the 3 doubled stitches per side are spread out.
- Panel sags under the rolls: Use a tighter hook for the panel, or choose 100% cotton.
- Scallops are uneven: Recount Rnd 1’s bottom edge; it needs exactly 25 sts from corner center to corner center.
Care
Hand wash cold with mild detergent. Reshape the holder and dry it flat, then hang it once it is fully dry.
Final Notes
The measurements chain together. A gauge of 16 sc per 4 in (10.2 cm) gives a panel and lace squares that are both 5¾ in (14.6 cm) wide. Gussets of 26-row sections let each pocket match the panel stitch for stitch. A 25-st bottom edge fits exactly 4 scallops, which brings the finished holder to 6¾ in × 20½ in (17.1 cm × 52.1 cm). Check each stage and the rest falls into place.
Happy crocheting!