

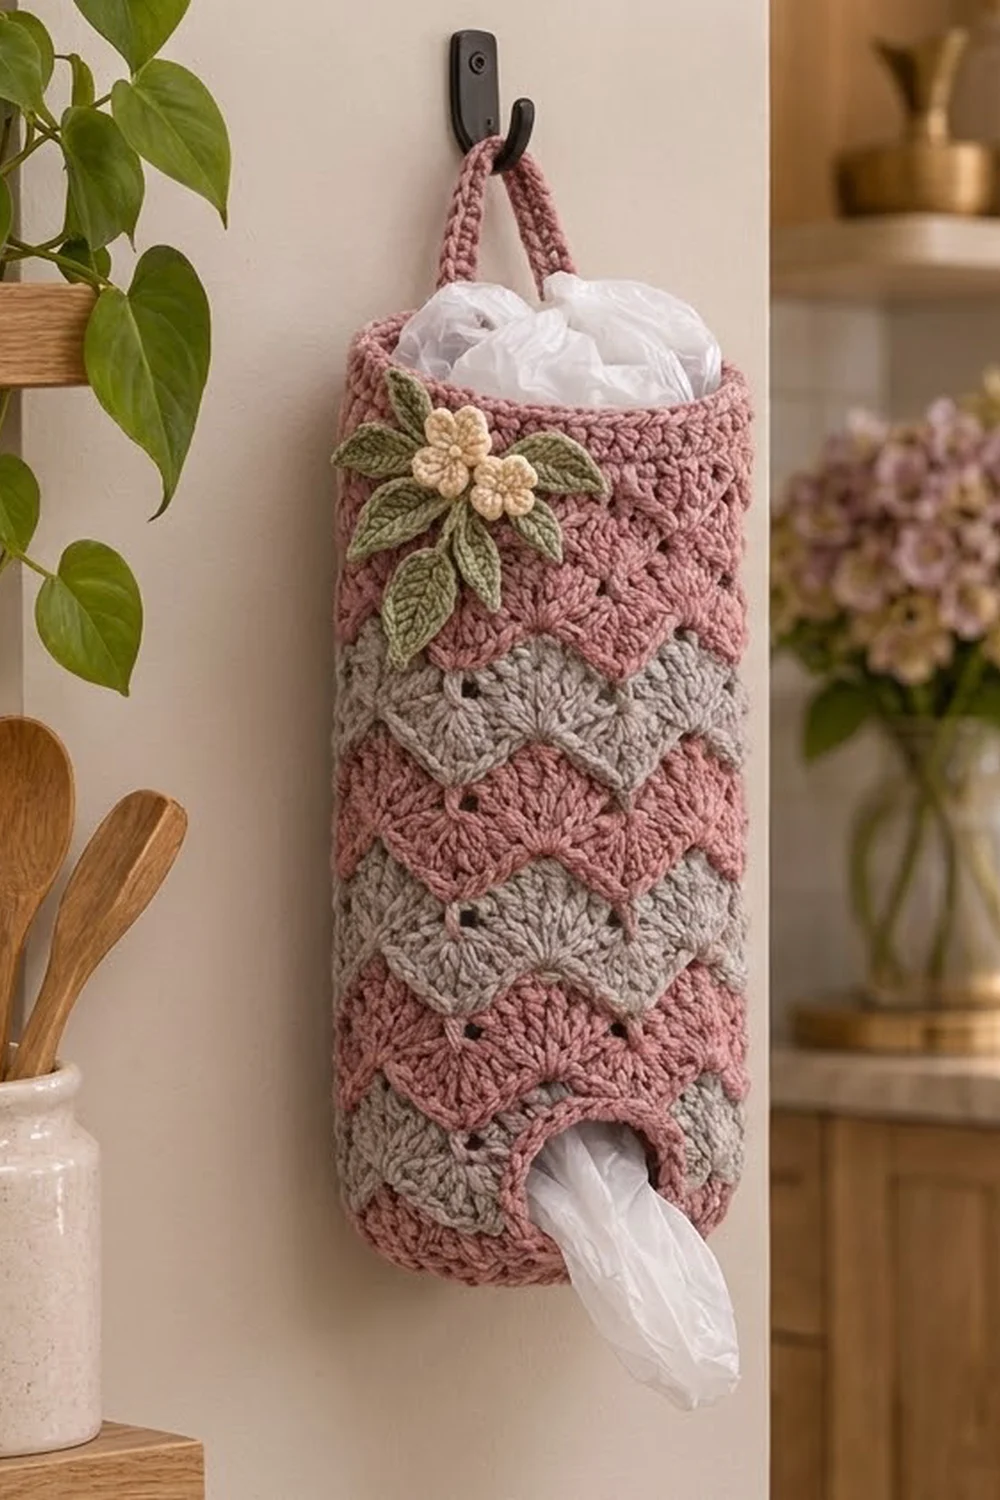
Every kitchen collects plastic bags somewhere. This holder turns that pile into something nice to look at. It is one soft tube with dusty rose and heather gray ripple stripes, and you stuff bags in at the top and pull them out through a round opening at the bottom.
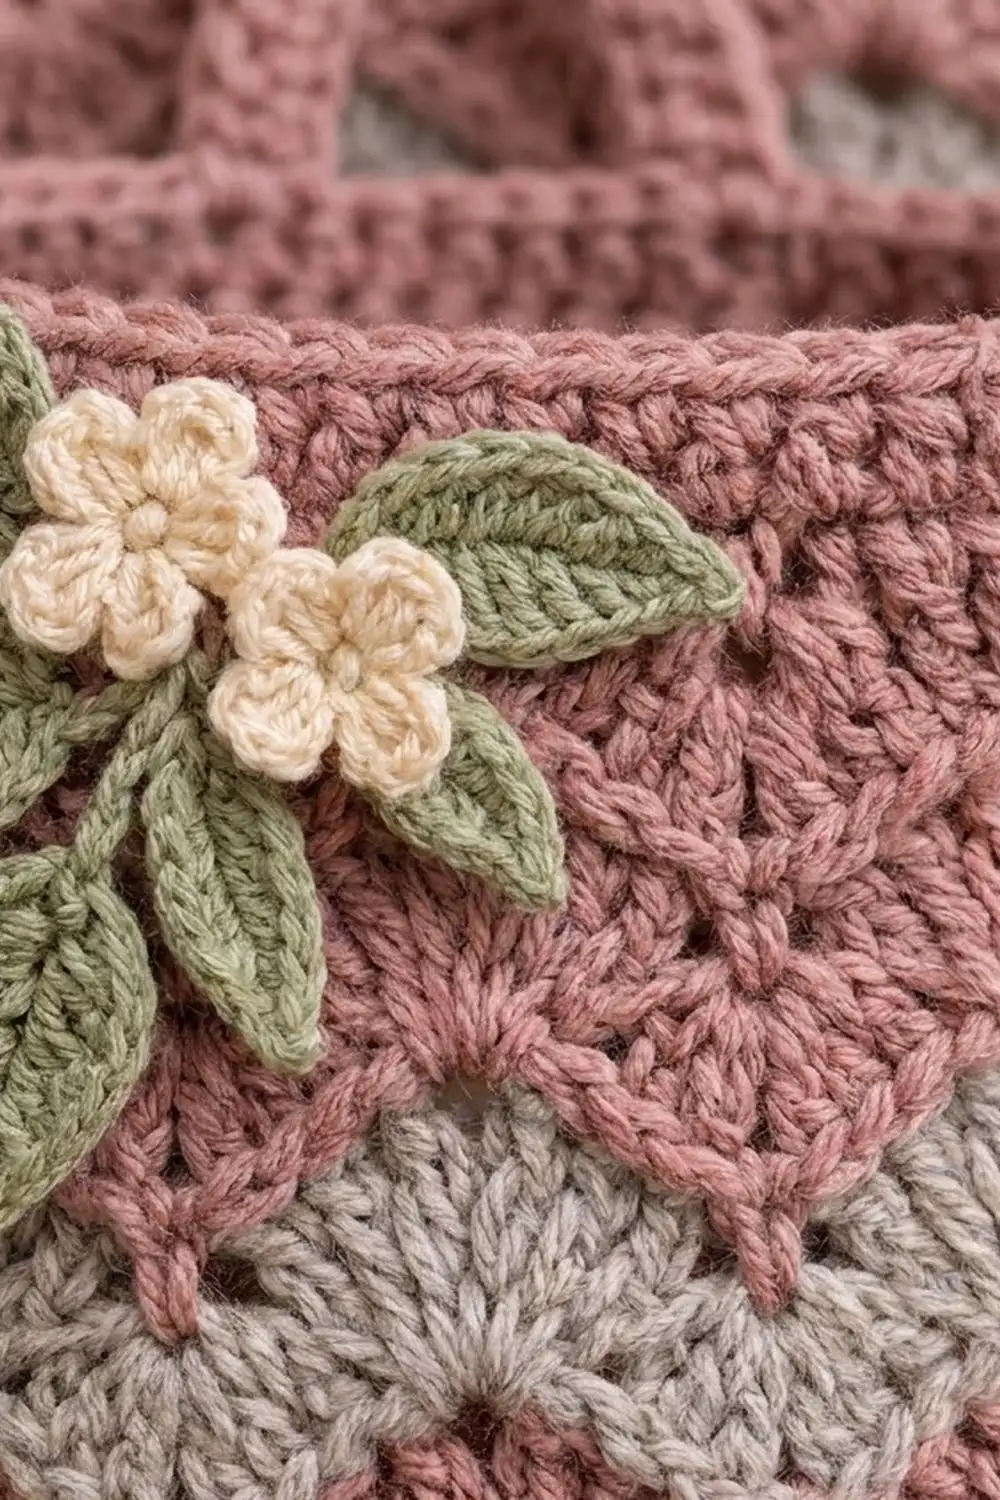
Each wave is a fan of double crochet with a small eyelet at its peak, so the fabric has texture but no complicated stitches. A plain dusty-rose single-crochet band closes off the top, and a slim strap arches over the opening to hang on a hook. The front gets two cream flowers on a spray of sage-green leaves.
The pattern uses US crochet terms. The holder is 6.4 in (16.3 cm) wide when flat and about 17 in (43.2 cm) long, plus an 8 in (20.3 cm) strap.
The body is worked from the bottom up in joined rounds. You start with a chain ring that becomes the dispensing opening, increase to make a small base, then work 28 ripple rounds without changing the stitch count. A leveling round flattens the waves so you can add the top band. The strap is worked in rows and sewn down, and the appliqués are made separately and stitched on.
Finished Size and Construction
- Finished size: 6.4 in (16.3 cm) wide flat × about 17 in (43.2 cm) long
- Circumference: 12.8 in (32.5 cm)
- Skill level: Easy-intermediate
- Terminology: US crochet terms
- Yarn weight: Worsted (#4)
- Hook: 5.0 mm (H-8) for the body; 4.0 mm (G-6) for the appliqués
- Number of pieces: 1 body (with the strap worked onto it), plus 2 flowers and 4 leaves for the appliqué
- Layout: One vertical tube with a strap across the top and the appliqué at the upper left front
- Piece size: 48 stitches around, 24 per flattened side
- Size before border: 6.4 in (16.3 cm) wide × 14.75 in (37.5 cm) tall, including the base curve
- Border depth: Top band 2.25 in (5.7 cm), which is 1 leveling round plus 7 sc rounds
Materials
Use a smooth worsted-weight cotton or cotton blend. Cotton holds its shape when the holder is full and shows the shell eyelets clearly. Pick a light, matte gray so the ripple stripes stay easy to see.
- Color A, dusty rose: 60 g / 100 m
- Color B, heather gray: 30 g / 50 m
- Color C, cream: 5 g / 9 m
- Color D, sage green: 5 g / 9 m
These quantities include about a 20% margin for your gauge swatch and weaving in ends.
Tools:
– 5.0 mm (H-8) hook
– 4.0 mm (G-6) hook
– Tapestry needle
– 4 locking stitch markers
– Scissors
– Measuring tape
– Spray bottle and a rolled towel for blocking
Abbreviations (US Terms)
- ch – chain
- sl st – slip stitch
- sc – single crochet
- hdc – half double crochet
- dc – double crochet
- tr – treble crochet
- sp – space
- st(s) – stitch(es)
- rev sc – reverse single crochet (crab stitch)
Special stitches:
- Shell: (2 dc, ch 1, 2 dc) in the same stitch or space. It counts as 5 stitches: 4 dc plus the ch-1.
- dc5tog: [Yarn over, insert hook in next st, pull up a loop, yarn over, pull through 2 loops] 5 times, then yarn over and pull through all 6 loops on the hook. It counts as 1 stitch.
In ripple rounds, the ch-1 at the center of each shell counts as a stitch. Each 12-stitch repeat is shell (5) + 3 dc + dc5tog (1) + 3 dc = 12.
Gauge and Checkpoints
Gauge with the 5.0 mm hook:
– Ripple pattern: 15 sts and 8 rounds = 4 in (10.2 cm)
– Single crochet: 15 sc and 16 rounds = 4 in (10.2 cm)
Since you only make one body, the first few rounds serve as your test piece. Work Rounds 1–4 and measure before you start the ripple.
Checkpoints:
– After Round 4: The base lies as a flat ring about 4 in (10.2 cm) across, with an opening about 2 in (5.1 cm) wide.
– After Round 12: The ripple section measures 4 in (10.2 cm) tall when measured straight up a peak column. When flattened, the tube is 6.4 in (16.3 cm) wide.
– After Round 32: The ripple section is 14 in (35.6 cm) tall.
– After Round 40: The body is about 17 in (43.2 cm) long, measured from the base edge.
If the tube is wider than 6.4 in (16.3 cm), go down half a hook size. If it is narrower, go up half a size. Don’t add or remove stitches, because the ripple only works with a multiple of 12.
Base
With the 5.0 mm hook and Color A, ch 24 and join with a sl st to the first ch to form a ring. Be careful not to twist the chain. This ring is the dispensing opening.
Round 1: Ch 1, sc in each ch around, then join with a sl st to the first sc. (24 sc)
Round 2: Ch 1, [sc in next st, 2 sc in next st] 12 times, then join. (36 sc)
Round 3: Ch 1, [sc in next 2 sts, 2 sc in next st] 12 times, then join. (48 sc)
Round 4: Ch 1, sc in each st around through the back loop only, then join. (48 sc)
Working Round 4 in back loops makes a fold line, so the wall turns upward and the base curves under.
Ripple Body
Work two rounds of each color, starting with Color A. Rounds 5–6 are A, 7–8 are B, 9–10 are A, and so on, ending with Rounds 31–32 in B. Change color with the last yarn-over of the joining sl st. Carry the unused color up the inside of the tube.
Round 5 (A): Ch 3 (counts as dc), then (dc, ch 1, 2 dc) in the same st as the join to make the first shell. Dc in next 3 sts, dc5tog over next 5 sts, dc in next 3 sts, shell in next st; repeat from * 2 more times. Dc in next 3 sts, dc5tog, dc in next 3 sts, then join to the top of the beginning ch-3. (48 sts: 4 repeats of 12)*
The shells use stitches 1, 13, 25, and 37. The decreases are centered on stitches 7, 19, 31, and 43. This is how the four peaks and four valleys form.
Round 6 (A): Sl st in next dc, sl st in next ch-1 sp, ch 3, then (dc, ch 1, 2 dc) in the same sp. Dc in next 3 sts, dc5tog over next 5 sts, dc in next 3 sts, shell in next ch-1 sp; repeat from * 2 more times. Dc in next 3 sts, dc5tog, dc in next 3 sts, then join. (48 sts)*
The last 3 dc go into the last dc of the previous round, the beginning ch-3, and the next dc. Two of those already have slip stitches in their tops. Work into them anyway.
Every dc5tog is centered on the dc5tog below it, and every shell sits in the ch-1 eyelet below it. This lines up the zigzag and the eyelets.
Rounds 7–32: Repeat Round 6, keeping to the color sequence. Every round is 48 sts.
That gives 28 ripple rounds: 7 stripes of A and 7 of B. Check that the ripple section measures 14 in (35.6 cm).
Border: Leveling Round, Top Band, and Strap
Border gauge: 15 sc and 16 rounds = 4 in (10.2 cm).
The ripple top is wavy, so the leveling round uses short stitches over the peaks and tall stitches in the valleys. This brings the edge to an even height.
Round 33 (A), conversion round: Join A in the ch-1 sp of any shell. Ch 1, sc in the same sp. *Sc in next dc, hdc in next dc, dc in next 2 dc, tr in next dc, tr in dc5tog, tr in next dc, dc in next 2 dc, hdc in next dc, sc in next dc, sc in next ch-1 sp; repeat from * around, leaving out the last sc on the final repeat. Join.
Working into the 4 shells this way gives 1 sc in each ch-1 sp, and the rest of the stitches are worked 1 per stitch. The count is 48 worked 1-per-existing-stitch + 0 added = 48 sts, or 24 per flattened side.
Rounds 34–40 (A): Ch 1, sc in each st around, then join. (48 sc each round, 24 per flattened side)
When you finish Round 40, fasten off.
Why the math works: At the band gauge, 48 sc measures 12.8 in (32.5 cm), the same as 48 ripple stitches. The band doesn’t pull in or flare, and it lies flat at 6.4 in (16.3 cm) wide. The leveling round adds about 0.5 in (1.3 cm) and the 7 sc rounds add 1.75 in (4.4 cm), so the border is 2.25 in (5.7 cm) deep.
Placing the strap: Flatten the tube with the round joins lined up along the left fold. Mark sts 47, 48, 1, and 2, which straddle the left fold. Then mark sts 23–26 on the right fold. Each set of 4 is centered exactly 24 stitches from the other.
Strap:
– Row 1: Join A in st 47 of Round 40. Ch 1, sc in sts 47, 48, 1, and 2. (4 sc)
– Rows 2–32: Ch 1, turn, sc in each st across. (4 sc)
Fasten off and leave a 12 in (30.5 cm) tail. Whipstitch the last row to sts 23–26 on the inside of the band, going through both loops.
The strap is 8 in (20.3 cm) long and about 1.1 in (2.8 cm) wide. It forms an arch about 3 in (7.6 cm) high above the rim.
Bottom opening edging: Join A in any free loop of the foundation chain. Ch 1, then rev sc in each free loop around and join. (24 rev sc) This makes a corded rim that keeps the opening from stretching.
Flower and Leaf Appliqué
Make these with the 4.0 mm hook.
Flower (make 2, Color C):
– Round 1: Make a magic ring. Ch 1, then 5 sc in the ring. Pull the ring closed and join. (5 sc)
– Round 2: [(Sl st, ch 2, 2 dc, ch 2, sl st) in next sc] 5 times. (5 petals)
Fasten off. Each flower is about 1.25 in (3.2 cm) across.
Leaf (make 4, Color D): Ch 8. Sc in 2nd ch from hook, then hdc, dc, dc, hdc, sc in the next 5 chs, and sl st in the last ch. Ch 1, then work down the other side of the chain in the same stitches in reverse: sc, hdc, dc, dc, hdc, sc, and sl st in the first ch. Fasten off.
Each leaf is about 1.75 in (4.4 cm) long. If you want a vein, slip stitch up the center of each leaf along the surface.
Assembly: Put the appliqué on the front, in the upper left. Arrange the four leaves in a fan, with their tips pointing up, left, and down, overlapping the band and the first ripple stripe. Sew the leaves down at their bases. Place one flower over the leaf bases and the second one just below and to the right, overlapping it a little. Tack each petal tip and the center of each flower.
Final Blocking
- Weave in all ends on the inside, following the stitches of the same color.
- Roll a towel until it is about 4 in (10.2 cm) thick and slide it into the tube.
- Spray the holder evenly until it is damp, but not soaked.
- Smooth the zigzags so the peaks and valleys line up vertically.
- Pat the tube to 6.4 in (16.3 cm) wide flat and 17 in (43.2 cm) long.
- Shape the base curve and press the flower petals open with your fingers.
- Let it dry completely, then remove the towel.
Final Quality-Control Checklist
- Every ripple round has 48 stitches with 4 peaks and 4 valleys.
- The eyelets and decreases line up in straight vertical columns.
- The color stripes alternate in 2-round bands with no jogs on the front.
- The band is 48 sc around and lies flat.
- The strap is centered over the opening, sewn to opposite folds.
- The bottom opening is about 2 in (5.1 cm) wide and has a firm rev-sc rim.
- The flowers and leaves are tacked securely and every end is woven in.
Troubleshooting
- The zigzag is drifting: A shell or decrease is out of place. Check that each shell goes into the ch-1 eyelet below.
- The tube is flaring at the top: Your band stitches are too loose. Redo Rounds 34–40 with a 4.5 mm (7) hook.
- The leveling round is bumpy: Make sure the tr stitches line up with the valleys and the sc stitches line up with the peaks.
- The opening is too tight for bags: Rework the rev sc more loosely or replace it with a sl st round.
- The appliqué is curling: Pin it flat, steam it lightly, and let it dry before sewing it on.
Care
Hand wash in cool water and lay flat to dry, reshaping it over a rolled towel. Don’t wring the holder or hang it while wet.
Final Notes
The measurement chain goes like this:
– The 24-ch ring gives a 2 in (5.1 cm) opening.
– Increasing to 48 sts gives a 12.8 in (32.5 cm) tube.
– 28 ripple rounds add 14 in (35.6 cm).
– The leveling round and 7-round band add 2.25 in (5.7 cm).
– The finished holder is about 17 in (43.2 cm) long and 6.4 in (16.3 cm) wide flat, with an 8 in (20.3 cm) strap.
If you check your measurements at each checkpoint, the finished holder will come out at this size. Hang it near your bag drawer and keep it filled.
Happy crocheting!