

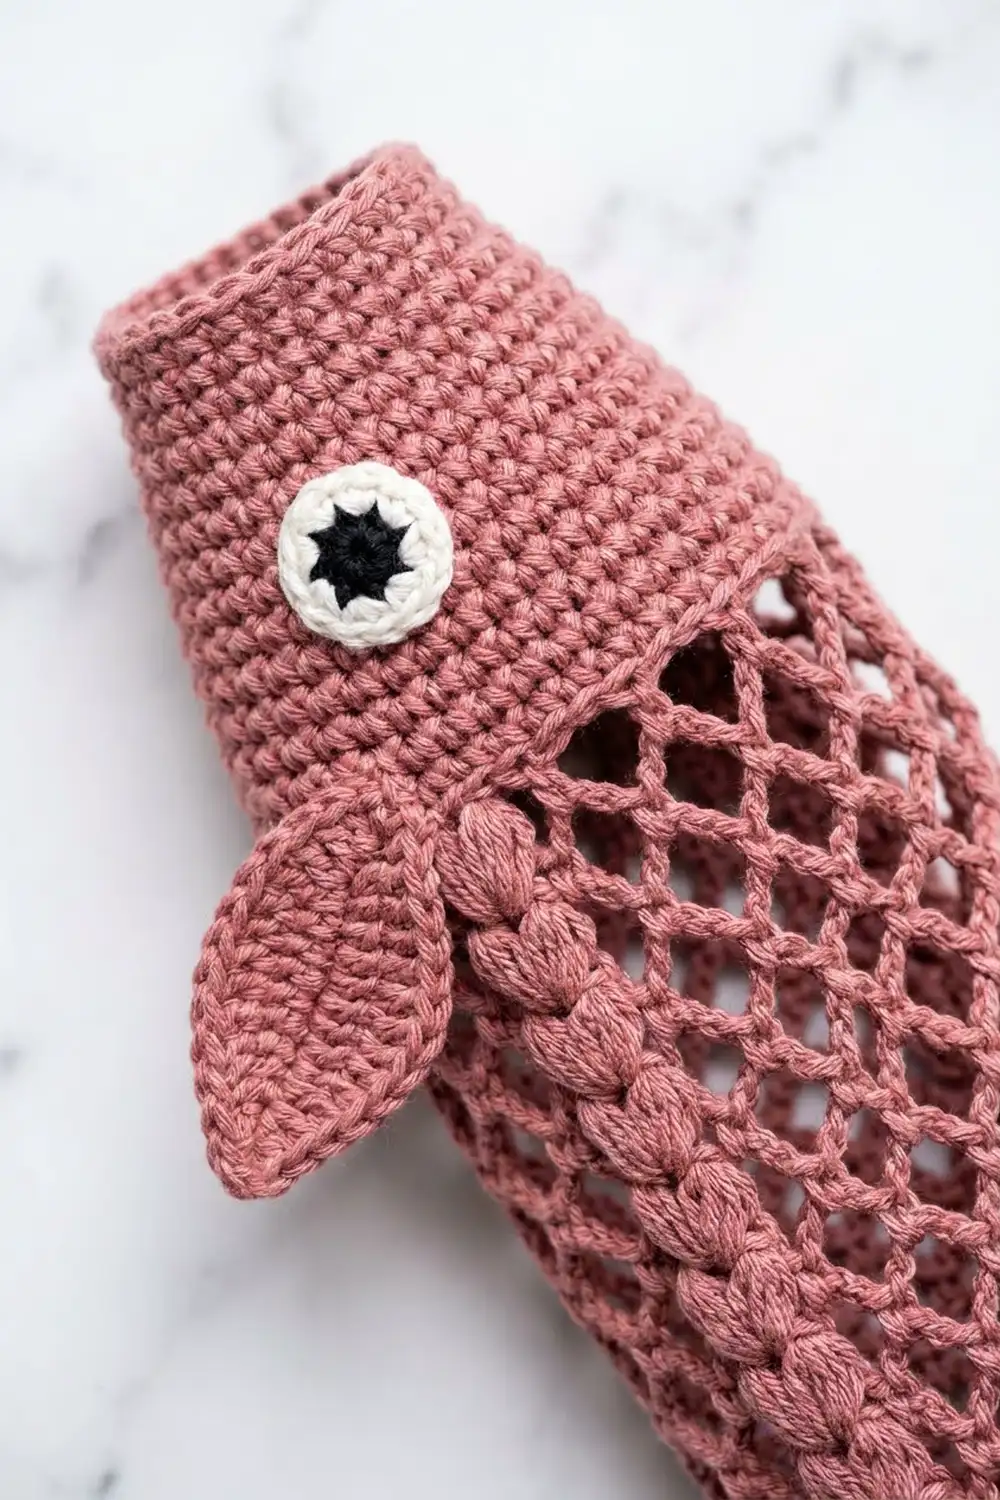
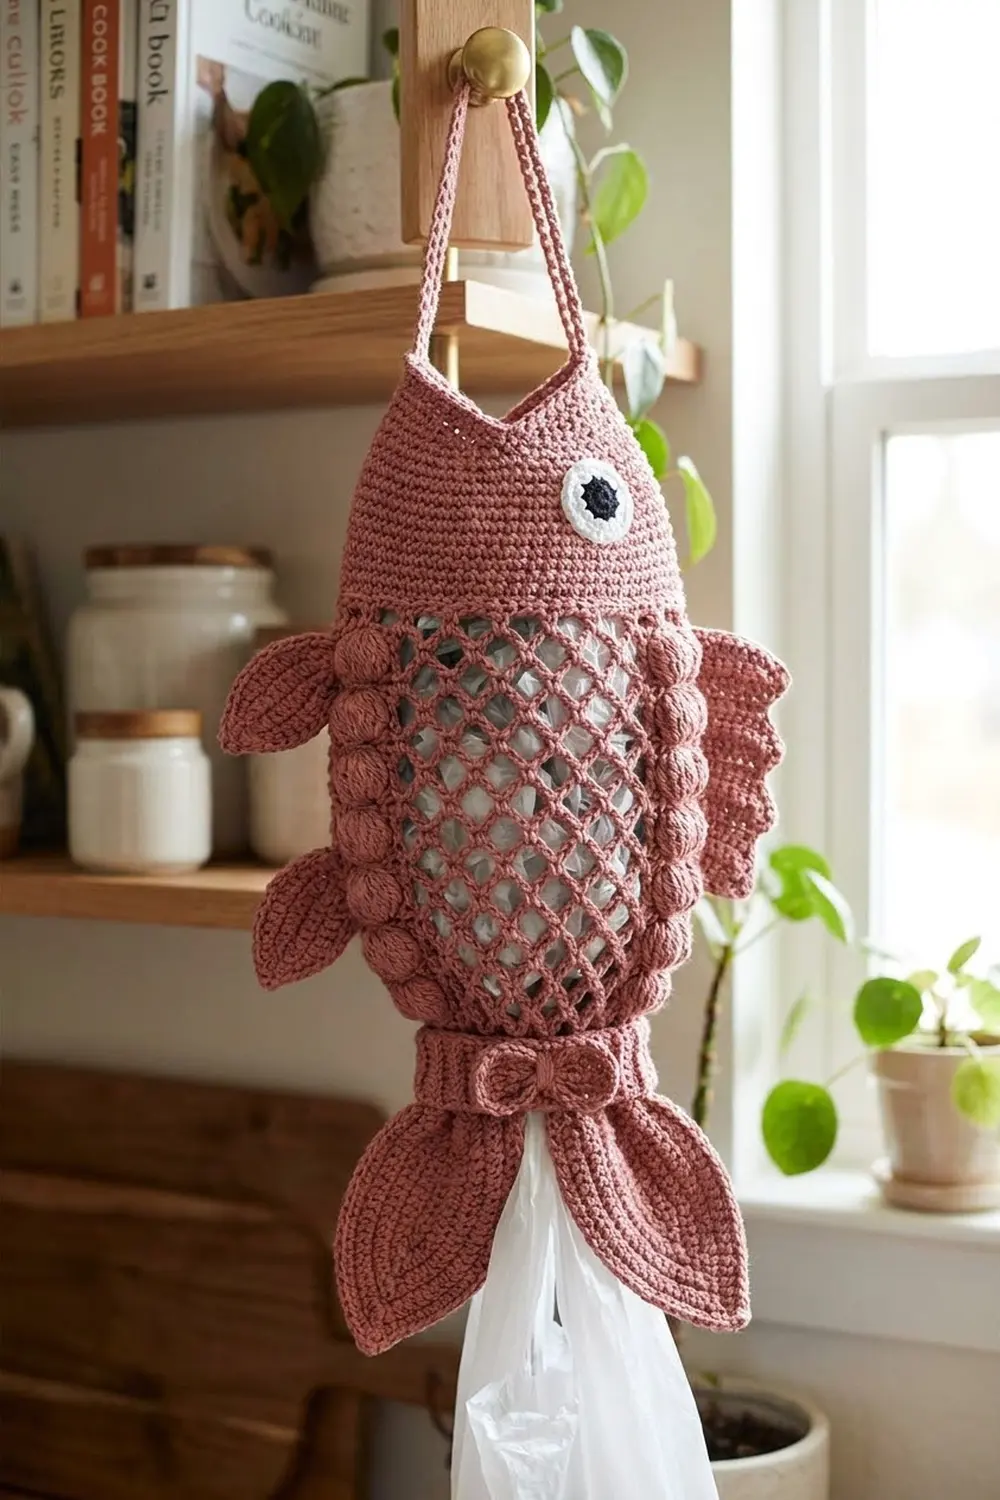
Meet Rosie, a fish-shaped plastic bag holder that makes a pile of grocery bags look intentional. The body is an open diamond net with a column of plump puff stitches along each side. It has a solid tapered head, ridged leaf fins, and a tail with a bow on top.
The sample is worked in dusty rose cotton with a white-and-black eye. A deep burgundy version uses the same pattern and quantities.
This pattern uses US crochet terms. The finished holder measures about 19 in (48.3 cm) long including the tail, 6.5 in (16.5 cm) wide across the body, and 10 in (25.4 cm) across the fins.
The body is one seamless tube worked bottom-up: ribbed cuff, then net, then head. Bags go in at the top and pull out through the cuff. The fins, tail lobes, bow, eye, and hanging loops are made separately and sewn on.
Finished Size and Construction
- Finished size: 19 in (48.3 cm) long x 6.5 in (16.5 cm) wide (body); 10 in (25.4 cm) across the fins
- Skill level: Intermediate
- Terminology: US
- Yarn weight: Worsted (#4) cotton
- Hook: 4.5 mm (US 7)
- Number of pieces: 10 (1 body, 2 fins, 2 tail lobes, 1 bow, 1 bow band, 1 eye, 2 hanging loops)
- Layout: One tube with pieces sewn on
- Body size: 14.75 in (37.5 cm) long; 6.5 in (16.5 cm) wide flat
- Fin size before edging: 4.25 in (10.8 cm) x 1.25 in (3.2 cm)
- Border depth: each sc edging round adds 0.25 in (0.6 cm) at edges and tips
Materials
Choose a smooth, firm cotton. It shows the puffs well and won’t stretch under the weight of the bags.
- Main color (dusty rose or burgundy): 120 g / 204 m
- White (eye): 3 g / 5 m
- Black (pupil): 2 g / 3 m
Quantities include a margin of about 15 percent for swatching and sewing tails.
Tools:
- 4.5 mm (US 7) crochet hook
- Tapestry needle
- 4 locking stitch markers
- Rust-proof pins
- Scissors
- Blocking mat and spray bottle
Abbreviations (US Terms)
- ch – chain
- sl st – slip stitch
- sc – single crochet
- hdc – half double crochet
- dc – double crochet
- fpdc / bpdc – front / back post double crochet
- sc2tog – single crochet 2 together
- BLO – back loop only
- sk – skip
- sp(s) – space(s)
- st(s) – stitch(es)
- MR – magic ring
Puff stitch (puff): (Yarn over, insert hook in the indicated st or sp, yarn over, pull up a loop to 0.5 in (1.3 cm)) 4 times. Yarn over, pull through all 9 loops on the hook, then ch 1 to close. The closing ch does not count as a stitch.
Gauge and Checkpoints
Gauge: 16 sc x 18 rounds = 4 in (10.2 cm) in sc worked in the round.
Use the cuff as your test piece and measure it first. A mistake there carries through every later stage.
- After Rnd 3 (cuff): 6 in (15.2 cm) around, 3 in (7.6 cm) wide flat, 1.5 in (3.8 cm) tall
- After Rnd 4: 30 sc, 3.75 in (9.5 cm) wide flat
- After Rnd 12: widest point, about 6.5 in (16.5 cm) wide flat
- After Rnd 16: net about 9 in (22.9 cm) tall, lightly stretched
- After Rnd 17: 40 sc, 10 in (25.4 cm) around, 5 in (12.7 cm) wide flat
- After Rnd 34: body 14.75 in (37.5 cm) long; top opening 2.5 in (6.4 cm) wide flat
Too big? Go down 0.5 mm. Too small? Go up 0.5 mm. The net is forgiving, but the head must measure 5 in (12.7 cm) flat so the fins sit correctly.
Body
Work in joined rounds with the right side facing. Do not turn.
Ribbed Cuff
Foundation: Ch 24 and join with a sl st to form a ring, without twisting.
Rnd 1: Ch 2 (does not count), dc in each ch around, join with sl st to first dc. (24 dc)
Rnds 2–3: Ch 2 (does not count), (fpdc around next st, bpdc around next st) 12 times, join. (24 sts: 12 fpdc, 12 bpdc)
The fpdc columns form the vertical ribs at the bag exit.
Rnd 4 (conversion): Ch 1, (sc in next 3 sts, 2 sc in next st) 6 times, join. (24 sc worked 1-per-stitch + 6 increases = 30 sc)
Fish Net with Puff Columns
Each net round has 10 ch-loops, each held by a sc worked into a loop of the round below. On odd rounds, puffs replace two opposite anchors. This builds one puff column on each side edge.
The start of the round moves half a loop each round, so use markers to place puffs instead of counting from the start. Work each new puff in the ch-sp directly above the marked puff from two rounds earlier, then move the marker up to the new puff.
Rnd 5 (puff round): Ch 1, puff in first st, ch 5, sk 2, (sc in next st, ch 5, sk 2) 4 times, puff in next st, ch 5, sk 2, (sc in next st, ch 5, sk 2) 4 times, join with sl st to top of first puff. (10 ch-5 sps: 8 sc + 2 puffs) Mark both puffs.
Check: 10 anchors x 3 sts used (1 anchor + 2 skipped) = 30, which matches Rnd 4.
Rnd 6 (plain round): Sl st in each of next 3 ch to reach the center of the first ch-5 sp, ch 1, sc around same sp, (ch 5, sc in next ch-5 sp) 9 times, ch 5, join to first sc. (10 ch-5 sps, 10 sc)
Rnd 7 (puff round): Sl st to center of first sp, ch 1. Work (anchor, ch 6) in each of the 10 sps. Every anchor is a sc, except in the 2 sps above the marked puffs, where you work a puff. Join to first anchor. (10 ch-6 sps: 8 sc + 2 puffs)
Rnd 8 (plain round): Work as Rnd 6, but ch 6 between anchors. (10 ch-6 sps, 10 sc)
Rnds 9–12: Repeat Rnds 7 and 8 twice, with ch 7 between anchors. (10 ch-7 sps each round; puffs on Rnds 9 and 11)
Rnds 13–14: Repeat Rnds 7 and 8 once, with ch 6 between anchors. (10 ch-6 sps each round)
Rnds 15–16: Repeat Rnds 7 and 8 once, with ch 5 between anchors. (10 ch-5 sps each round; Rnd 16 has 10 sc anchors)
Each side column now holds 6 puffs (Rnds 5, 7, 9, 11, 13, 15).
Head
Rnd 17 (conversion): Ch 1, sc in same st as join, 3 sc in next ch-5 sp, (sc in next sc, 3 sc in next ch-5 sp) 9 times, join. (10 sc worked 1-per-anchor + 30 sc added in sps = 40 sc)
Rnds 18–22: Ch 1, sc in each st around, join. (40 sc)
Rnd 23: Ch 1, (sc in next 8 sts, sc2tog) 4 times, join. (36 sc)
Rnd 24: Sc around. (36 sc)
Rnd 25: Ch 1, (sc in next 7 sts, sc2tog) 4 times, join. (32 sc)
Rnd 26: Sc around. (32 sc)
Rnd 27: Ch 1, (sc in next 6 sts, sc2tog) 4 times, join. (28 sc)
Rnd 28: Sc around. (28 sc)
Rnd 29: Ch 1, (sc in next 5 sts, sc2tog) 4 times, join. (24 sc)
Rnd 30: Sc around. (24 sc)
Rnd 31: Ch 1, (sc in next 4 sts, sc2tog) 4 times, join. (20 sc)
Rnds 32–33: Sc around. (20 sc)
Keep the yarn attached for the rim (see Border).
Fins (Make 2)
Each fin is worked around both sides of a foundation chain, so the center chain and the stitch rows form lengthwise ridges.
Foundation: Ch 17.
Rnd 1: Sc in 2nd ch from hook, hdc in next 2 ch, dc in next 10 ch, hdc in next 2 ch, 3 sc in last ch. Working along the opposite side of the chain: hdc in next 2 ch, dc in next 10 ch, hdc in next 2 ch, 2 sc in last ch (same ch as first sc), join to first sc. (34 sts: 14 per side + 3 per tip)
The fin measures 4.25 in (10.8 cm) x 1.25 in (3.2 cm). Add the edging in the Border section.
Tail Lobes (Make 2)
Foundation: Ch 21.
Rnd 1: Sc in 2nd ch from hook, hdc in next 2 ch, dc in next 14 ch, hdc in next 2 ch, 3 sc in last ch. Working along the opposite side: hdc in next 2 ch, dc in next 14 ch, hdc in next 2 ch, 2 sc in last ch, join. (42 sts: 18 per side + 3 per tip)
The lobe measures 5.25 in (13.3 cm) x 1.25 in (3.2 cm). Add the edging in the Border section.
Bow and Band
Bow: Ch 15.
Row 1: Sc in 2nd ch from hook and in each ch across, turn. (14 sc)
Rows 2–5: Ch 1, sc in BLO of each st across, turn. (14 sc)
The bow measures 3.5 in (8.9 cm) x 1.1 in (2.8 cm). Fasten off.
Band: Ch 7, sc in 2nd ch from hook and in each ch across. (6 sc) Fasten off with a long tail. The band measures 1.5 in (3.8 cm).
Pinch the bow at its center, wrap the band around it, and sew the band ends together at the back.
Eye (Make 1)
Rnd 1: With black, MR, 6 sc in ring, join with white. (6 sc)
Rnd 2: With white, ch 1, 2 sc in each st around, join. (12 sc)
Rnd 3: Sl st loosely in each st around. (12 sl st)
The eye measures about 1 in (2.5 cm).
Hanging Loops (Make 2)
Ch 40, join with sl st to first ch. Sl st in the back bump of each ch around. (40 sl st) Fasten off with a long tail.
Each loop is 10 in (25.4 cm) around and hangs 5 in (12.7 cm) long.
Make All Pieces
- Main color: body, 2 fins, 2 tail lobes, bow, band, 2 hanging loops
- White and black: 1 eye
Placement map (front view):
       [loop]   [loop]
       | rim + eye   |
 [fin] | net body    | [fin]
       | ribbed cuff |
           [bow]
      [lobe]   [lobe]
Joining (Assembly)
Edge and block all pieces first. Lay the body flat with the puff columns on the side folds, then pin everything in place before you sew.
Fins: Place one fin tip at each fold on Rnd 17, angled down and outward. Whipstitch the 5 tip sts to 5 sts of Rnd 17, one fin st to one body st. Tack the fin’s inner edge to the puff of Rnd 11 to hold the angle.
Tail lobes: Overlap the upper tips in a V at the front center of the cuff, covering 1.5 in (3.8 cm) of each lobe. Sew through the front layer of the cuff only, so the opening stays clear. Each lobe extends 4.25 in (10.8 cm) below the cuff.
Bow: Sew it over the place where the lobes overlap, stitching through the band.
Eye: Center it on Rnd 21, 1.25 in (3.2 cm) in from the right fold.
Hanging loops: Flatten each loop and sew one end to 3 rim sts at a side fold, above a puff column.
Sew firmly but keep the work flat. If it puckers, you are pulling too tight.
Size checkpoint: 19 in (48.3 cm) long, 6.5 in (16.5 cm) wide at the body, 10 in (25.4 cm) across the fins.
Border
These edging rounds form the border on the head, fins, and tail lobes. Border gauge matches the main gauge: 16 sc = 4 in (10.2 cm). Each sc edging round adds 0.25 in (0.6 cm) at every edge and tip.
Head Rim, Rnd 34: With the yarn still attached, ch 1, sl st loosely in BLO of each st around, join. (20 sl st) Fasten off. The rim stays 2.5 in (6.4 cm) wide flat.
Fin Edging, Rnd 2: Ch 1, working in BLO, sc in each st, with 3 sc in the center st of each tip, join. (34 sts worked 1-per-stitch + 4 added at tips = 38 sc: 14 per side + 5 per tip)
The fin now measures 4.5 in (11.4 cm) x 1.75 in (4.4 cm).
Tail Edging, Rnd 2: Work as Fin Rnd 2. (42 + 4 = 46 sc: 18 per side + 5 per tip)
Tail Edging, Rnd 3: Repeat Rnd 2. (46 + 4 = 50 sc: 18 per side + 7 per tip)
The lobe now measures 5.75 in (14.6 cm) x 2.25 in (5.7 cm).
Why the math works: The side counts never change (14 on the fins, 18 on the lobes), so the long edges stay straight. All the increases go into the tips, 2 sts per tip per round. This keeps the tips pointed instead of cupped.
Final Blocking
- Spray the fins, lobes, and bow until damp.
- Pin them flat to their finished sizes, with sharp tips.
- Slide a rolled towel inside the body.
- Mist the net and ease it to 6.5 in (16.5 cm) wide at the widest point.
- Don’t press the puffs; leave them round.
- Let everything dry completely.
Final Quality-Control Checklist
- Cuff: 24 sts with clear ribs
- 6 puffs per column, in straight lines
- 10 loops in every net round
- Head: 40 sc at Rnd 17, 20 sc at the rim
- Fins: 38 sts; tail lobes: 50 sts
- Tail sewn through the front cuff layer only
- Hanging loops secure and equal in length
- All ends woven in
Troubleshooting
Puff columns spiral. You counted from the start of the round. Place each puff directly above the marked one.
Net looks lopsided. Recount: every round needs exactly 10 anchors.
Head flares. Rework it with a hook 0.5 mm smaller and keep all the counts the same.
Bags won’t pull out. The tail is sewn through both cuff layers. Resew it through the front layer only.
Care
Hand wash in cool water, roll in a towel, and dry flat. Reshape the fins and puffs while damp.
Final Notes
Here is the measurement chain: a 24-st cuff at 6 in (15.2 cm) around, a 30-st conversion round, 10 net loops widening to 6.5 in (16.5 cm), and a 40-st head at 10 in (25.4 cm) around that tapers to a 20-st rim. Then come the edged fins and lobes. If every checkpoint matches, Rosie finishes at 19 in (48.3 cm) long.
Happy crocheting!