

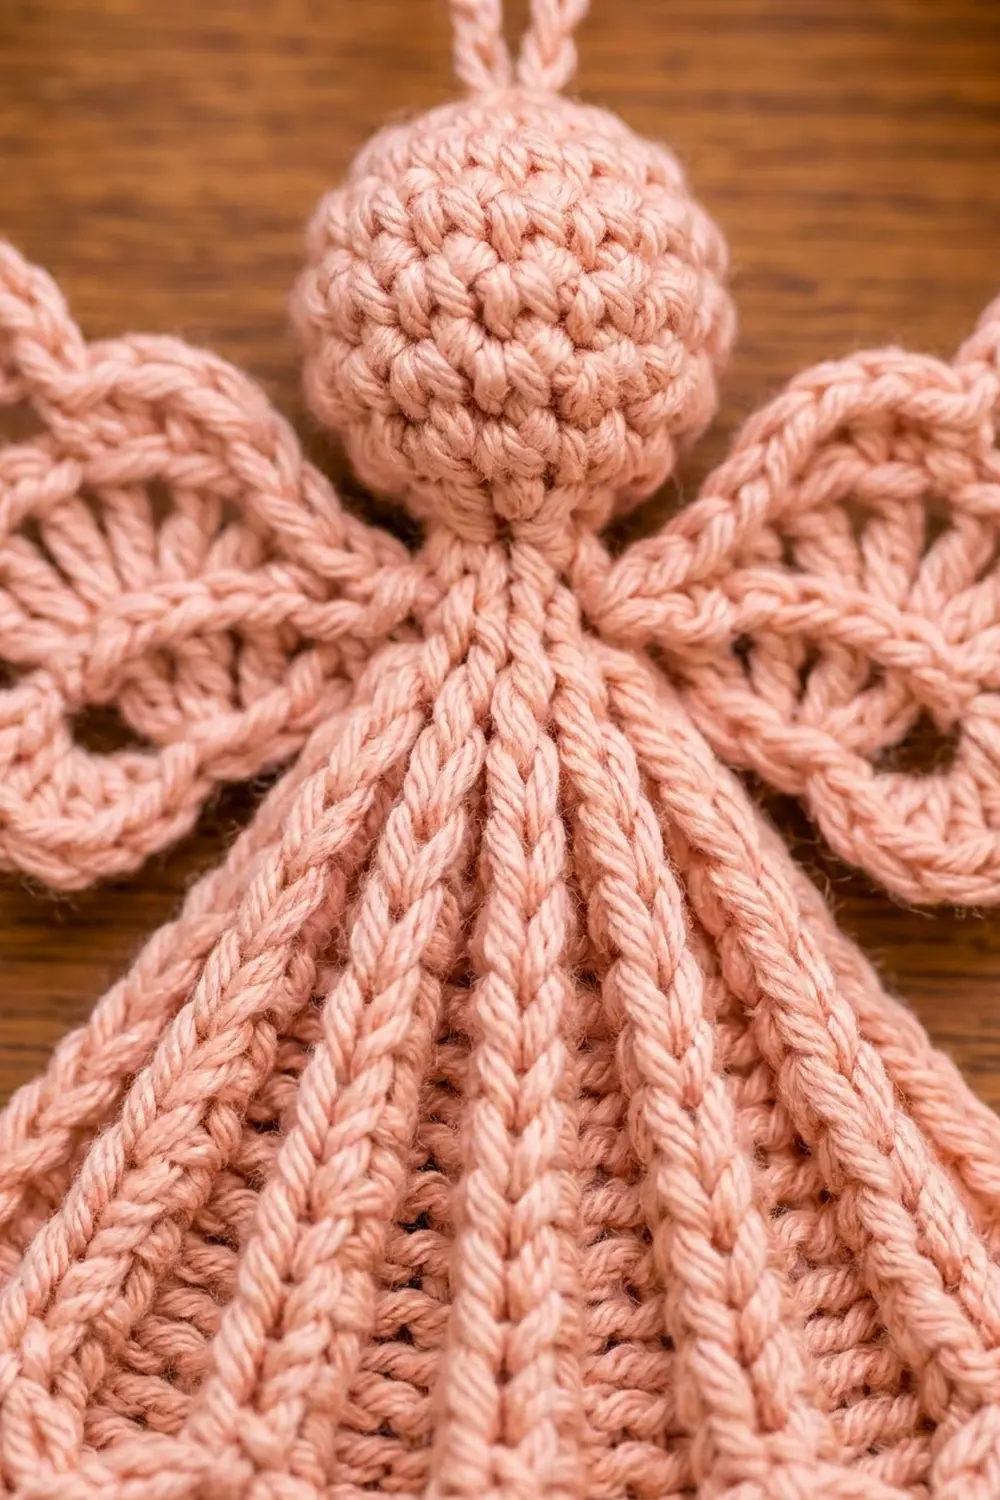
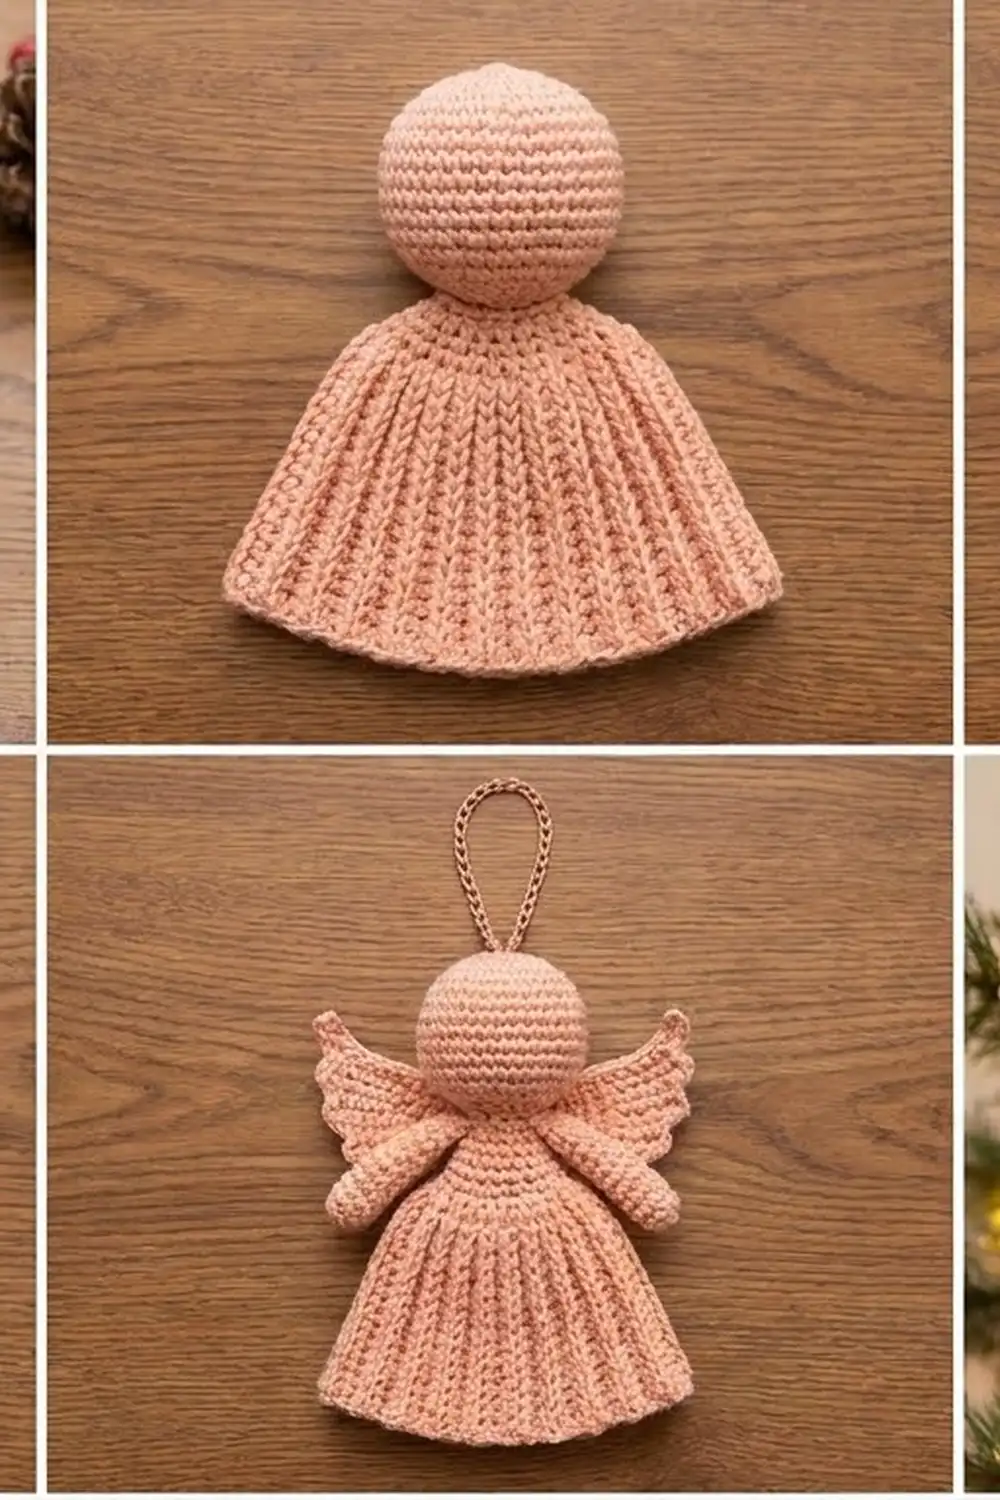
The Rosy Grace Angel is a small hanging ornament in one soft blush-peach shade. She has a round, stuffed head and an A-line skirt with raised vertical ribs that fan out from the neck. A row of shell scallops finishes the hem. Two lacy wings sit behind her shoulders, each with a larger upper lobe and a smaller lower lobe.
The style is classic and quiet: one color, crisp texture, and a delicate chain-loop edge on the wings.
This pattern uses US crochet terms. The finished angel measures about 5 in (12.7 cm) from the top of the head to the hem, 5.5 in (14.0 cm) across the hem, and 6 in (15.2 cm) across the wings. With the hanging loop she is about 7.25 in (18.4 cm) tall.
You make one ornament from three crocheted parts. The head is worked in a spiral and stuffed. The skirt is worked flat in rows from the neck down, with post-stitch ribs, and finished with a scalloped hem border. The wings are one butterfly-shaped motif worked in rounds. Everything is sewn together, then a chain hanging loop is added.
Finished Size and Construction
- Finished size: 5 in (12.7 cm) tall, 6 in (15.2 cm) wide across the wings, not counting the loop
- Skill level: Intermediate (front and back post stitches)
- Terminology: US crochet terms
- Yarn weight: DK / light worsted (#3), cotton or cotton blend
- Hook: 3.5 mm (E-4)
- Number of pieces: 1 finished ornament, built from 3 parts (head, skirt, wing motif)
- Layout: one standalone ornament, not joined to other motifs
- Head size: 1.5 in (3.8 cm) diameter, stuffed
- Skirt size before border: 5.4 in (13.7 cm) wide at the hem, 3.1 in (7.9 cm) tall
- Border depth: 0.6 in (1.5 cm), for a finished skirt 5.5 in (14.0 cm) wide and 3.7 in (9.4 cm) tall
Materials
Choose a smooth, tightly plied DK cotton. Cotton shows the ribs and scallops clearly and blocks crisply. Avoid fuzzy or brushed yarns, because they hide the stitch definition.
- Blush pink / peach: 25 g, about 55 m (60 yd)
- 3.5 mm (E-4) crochet hook
- Polyester fiberfill, about 2 g
- Tapestry needle
- 2 stitch markers
- Scissors
- Pins and a small blocking mat
- Spray bottle with clean water
These quantities include a margin of about 20 percent. One angel uses about 20 g in total.
Abbreviations (US Terms)
- ch: chain
- sl st: slip stitch
- sc: single crochet
- hdc: half double crochet
- dc: double crochet
- inc: 2 sc in the same stitch
- dec: sc2tog (single crochet 2 together)
- MR: magic ring
- st(s): stitch(es)
- tch: turning chain
- RS / WS: right side / wrong side
- fpdc: front post double crochet. Yarn over, insert the hook from front to back to front around the post of the stitch, and complete as a dc.
- bpdc: back post double crochet. Yarn over, insert the hook from back to front to back around the post of the stitch, and complete as a dc.
Special technique (ribs on WS rows): A bpdc on a WS row pushes the post toward the RS. If you alternate fpdc on RS rows and bpdc on WS rows over the same stitch, every rib stays raised on the front.
Gauge and Checkpoints
Make the head first. It is the quickest test of your tension.
- Single crochet gauge: 22 sc and 24 rounds = 4 in (10.2 cm)
- Rib pattern gauge (skirt): 20 sts and 9 rows = 4 in (10.2 cm)
Checkpoints:
- Head after Round 4, laid flat: 1.25 in (3.2 cm) across
- Finished stuffed head: 1.5 in (3.8 cm) diameter
- Skirt after Row 1: 1.8 in (4.6 cm) wide
- Skirt after Row 2: 3 in (7.6 cm) wide
- Skirt after Row 4: 4.2 in (10.7 cm) wide
- Skirt after Row 7: 5.4 in (13.7 cm) wide and 3.1 in (7.9 cm) tall
- Wings after Round 2: about 3.5 in (8.9 cm) across
- Wings after Round 4: about 6 in (15.2 cm) across
If your pieces are too big, go down 0.25 mm in hook size. If they are too small, go up 0.25 mm. Keep the head firm so no stuffing shows between the stitches.
Head
Work in a continuous spiral without joining rounds. Mark the first stitch of each round. The magic ring is the top of the head.
Round 1: MR, 6 sc in ring. (6 sts)
Round 2: Inc in each st around. (12 sts)
Round 3: [Sc in next st, inc] 6 times. (18 sts)
Round 4: [Sc in next 2 sts, inc] 6 times. (24 sts)
Checkpoint: the flat disk measures 1.25 in (3.2 cm) across.
Rounds 5–9: Sc in each st around. (24 sts each round, 5 rounds)
Round 10: [Sc in next 2 sts, dec] 6 times. (18 sts)
Round 11: [Sc in next st, dec] 6 times. (12 sts)
Stuff the head firmly and shape it into a smooth ball.
Round 12: Dec 6 times. (6 sts)
Fasten off and leave a 12 in (30.5 cm) tail. Weave the tail through the front loops of the last 6 sts and pull to close. Keep this tail for sewing.
Skirt
The skirt is worked flat from the neck down. It has 2 edge stitches and 7 rib stitches. Background dc are added between the ribs on RS rows only, so the sides widen into a gentle A-line.
Leave an 8 in (20.3 cm) tail before the foundation chain for gathering.
Row 1 (WS): Ch 11, dc in 4th ch from hook and in each ch across. Turn. (9 sts; the skipped ch-3 counts as the first dc)
The stitch order is edge, 7 ribs, edge. Checkpoint: 1.8 in (4.6 cm) wide.
Row 2 (RS): Ch 3 (counts as dc here and throughout), [fpdc around next st, dc in top of the same st] 6 times, fpdc around next st, dc in top of tch. Turn. (15 sts)
Checkpoint: 3 in (7.6 cm) wide.
Row 3 (WS): Ch 3, [bpdc around next fpdc, dc in next dc] 6 times, bpdc around next fpdc, dc in top of tch. Turn. (15 sts)
Row 4 (RS): Ch 3, [fpdc around next bpdc, 2 dc in next dc] 6 times, fpdc around next bpdc, dc in top of tch. Turn. (21 sts)
Checkpoint: 4.2 in (10.7 cm) wide.
Row 5 (WS): Ch 3, [bpdc around next fpdc, dc in each of next 2 dc] 6 times, bpdc around next fpdc, dc in top of tch. Turn. (21 sts)
Row 6 (RS): Ch 3, [fpdc around next bpdc, dc in next dc, 2 dc in next dc] 6 times, fpdc around next bpdc, dc in top of tch. Turn. (27 sts)
Row 7 (WS): Ch 3, [bpdc around next fpdc, dc in each of next 3 dc] 6 times, bpdc around next fpdc, dc in top of tch. Turn. (27 sts)
To check Row 7: 1 edge + (6 × 4) + 1 rib + 1 edge = 27. It should measure 5.4 in (13.7 cm) wide and 3.1 in (7.9 cm) tall, with 9 raised vertical lines on the RS. Do not fasten off, because the border starts here.
Wings
The wings are one butterfly-shaped motif with 4 lobes: 2 large upper lobes and 2 smaller lower lobes. The center sits hidden behind the neck.
Round 1: MR, ch 1, 8 sc in ring, sl st to first sc. (8 sc)
Round 2: Ch 1, sc in first sc. Ch 9, skip next sc, sc in next sc (upper right lobe). Ch 7, skip next sc, sc in next sc (lower right lobe). Ch 7, skip next sc, sc in next sc (lower left lobe). Ch 9, skip last sc, sl st to first sc (upper left lobe). (4 sc, 2 ch-9 loops, 2 ch-7 loops)
Checkpoint: about 3.5 in (8.9 cm) across with the loops spread.
Round 3: In each ch-9 loop, work (sc, hdc, 11 dc, hdc, sc). In each ch-7 loop, work (sc, hdc, 9 dc, hdc, sc). Sl st in each Round 2 sc between the loops, then sl st to the first sc. (15 sts in each upper lobe, 13 sts in each lower lobe, 56 sts total, not counting sl sts)
Round 4 (scalloped edge):
- Each upper lobe: Sl st in first sc, sc in hdc, [ch 3, skip 1 dc, sc in next dc] 5 times, ch 3, skip last dc, sc in hdc, sl st in last sc. (7 sc, 6 ch-3 loops)
- Each lower lobe: Sl st in first sc, sc in hdc, [ch 3, skip 1 dc, sc in next dc] 4 times, ch 3, skip last dc, sc in hdc, sl st in last sc. (6 sc, 5 ch-3 loops)
Work the lobes in this order: upper right, lower right, lower left, upper left. Sl st in each Round 2 sc between the lobes. Sl st to the start and fasten off, leaving a 12 in (30.5 cm) tail.
The sc land on even-numbered dc, so every lobe is symmetrical. Checkpoint: about 6 in (15.2 cm) across.
Assembly and Hanging Loop
- Thread the skirt’s foundation tail through the bottom loops of the foundation chain. Gather the top edge to 0.75 in (1.9 cm) and knot it.
- Use the head tail to sew the gathered skirt top to the bottom of the head, centered over Round 12. Stitch around twice for a firm neck.
- Place the wings behind the angel with the RS facing out and the center ring behind the neck. The upper lobes point up and out.
- Use the wing tail to sew the center ring to the back of the neck and the top 1 in (2.5 cm) of the skirt. Keep the stitches on the back.
- Hanging loop: Join yarn with a sl st at the center of Round 1 on the head. Ch 24 and sl st in the same spot, then sl st in each of the 24 ch. Fasten off. The loop stands about 2.25 in (5.7 cm) tall.
Border
The border is the scalloped hem. It is worked across the bottom edge of the skirt only. The side edges stay plain, and their dc edge columns already look neat.
Border gauge: 22 sc = 4 in (10.2 cm), so 29 sc measure about 5.3 in (13.5 cm) before the scallops spread.
Border Row 1 (RS): Ch 1, 2 sc in first st, sc in each of next 25 sts, 2 sc in last st. Turn. (27 + 2 = 29 sc)
That is 27 sc worked one per stitch, plus 2 extra sc at the corners to stop the hem from pulling in.
Border Row 2 (WS): Ch 1, sc in first sc, [skip 1 sc, 5 dc in next sc, skip 1 sc, sc in next sc] 7 times. Fasten off. (7 shells, 8 sc, 43 sts)
Why the math works: Each scallop repeat uses 4 sc: skip, shell, skip, sc. Seven repeats use 28 sc, and the first sc uses 1 more, so 28 + 1 = 29. The hem starts and ends with an sc, which anchors both corners.
Checkpoint: the hem measures 5.5 in (14.0 cm) across, and the border adds 0.6 in (1.5 cm) of depth.
Final Blocking
- Weave in all remaining tails on the back.
- Lightly mist the skirt and wings. Keep the head dry.
- Lay the angel face up on a blocking mat.
- Pin the hem to 5.5 in (14.0 cm), with one pin in each shell.
- Straighten the ribs so they fan evenly from the neck.
- Pin the wings to 6 in (15.2 cm) across, with a pin at each lobe tip.
- Let the angel dry completely, about 6–8 hours.
Final Quality-Control Checklist
- The head is round, firm, and 1.5 in (3.8 cm) across.
- The skirt shows 7 raised ribs plus 2 edge columns.
- The skirt measures 5.4 in (13.7 cm) at Row 7 and 5.5 in (14.0 cm) after the border.
- The hem has 7 even shells.
- Each upper lobe has 6 ch-3 loops, and each lower lobe has 5.
- No sewing shows on the front.
- The angel is about 5 in (12.7 cm) tall without the loop.
Troubleshooting
Ribs sink instead of standing out: Check that you worked bpdc, not fpdc, on the WS rows.
Skirt cups or ruffles: The background dc are too loose. Use a smaller hook for the skirt.
Skirt is narrower than 5.4 in (13.7 cm): The post stitches are too tight. Pull up slightly taller loops.
Hem shells curl: Recount Border Row 1 (it should have 29 sc), then block with a pin in every shell.
Wing lobes look lopsided: Recount Round 3. The upper lobes need 11 dc and the lower lobes need 9 dc.
Angel tilts when hanging: Move the loop to the exact center of the head.
Care
Hand wash in cool water with mild soap. Press out the water in a towel and dry flat, reshaping the scallops and wings.
Final Notes
Each measurement builds on the one before it. The 1.5 in (3.8 cm) head sits on a skirt that grows from 1.8 in (4.6 cm) to 5.4 in (13.7 cm) over 7 rows. The border brings the hem to 5.5 in (14.0 cm) and makes the skirt 3.7 in (9.4 cm) tall. The wings block to 6 in (15.2 cm), and the angel stands 5 in (12.7 cm) tall.
Happy crocheting!