
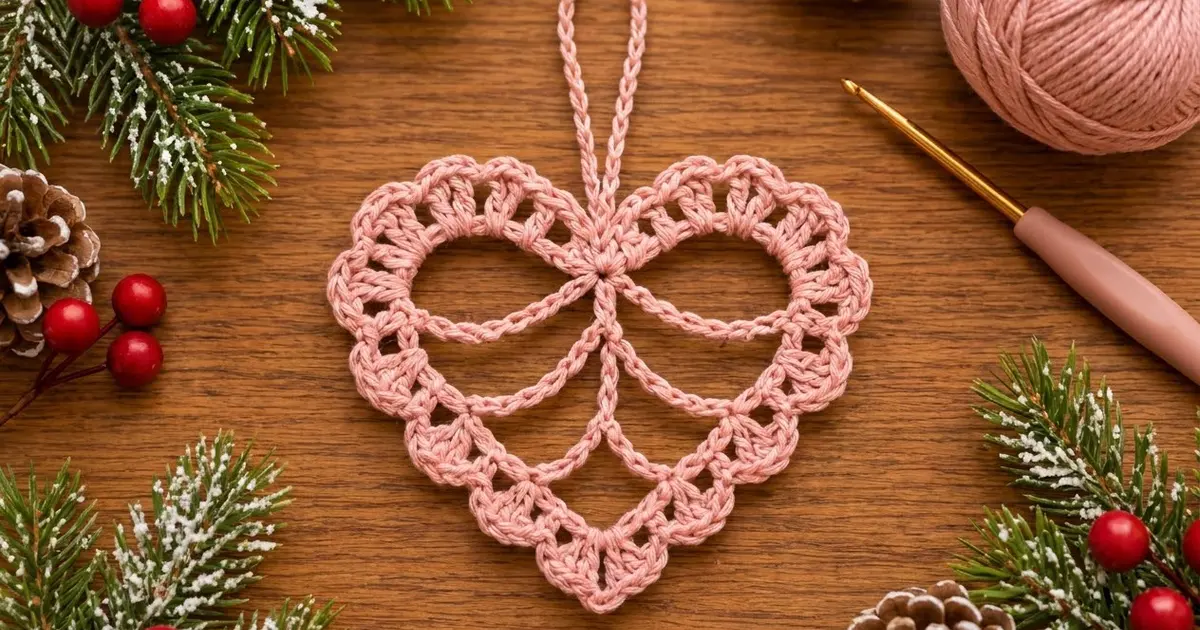
The Rosy Lattice Heart is a light, airy ornament. The open chain framework looks like the veins of a leaf. Two rounded lobes sit above a straight center spine, and pairs of soft chain swags drop toward the spine in neat V shapes. A border of tiny double crochet windows and rounded scallops frames the lace and ends in a crisp point at the bottom.
The sample is dusty rose pink. The same heart also looks lovely in cream, lilac and mint, so you can make a small mixed set for a tree, a gift tag or a window. This pattern uses US crochet terms throughout.
The finished heart measures 4.75 in wide × 4.25 in tall (12.1 × 10.8 cm), not counting the hanging loop. With the 2 in (5.1 cm) loop, the total height is 6.25 in (15.9 cm).
Construction is simple, but it relies on careful counting. First you chain a ring for the outline, add a straight spine, then slip stitch along the frame to anchor three pairs of chain swags. After that, a three-round border goes around the outline. Last comes a reinforced hanging loop.
Finished Size and Construction
- Finished size: 4.75 × 4.25 in (12.1 × 10.8 cm), plus a 2 in (5.1 cm) loop
- Skill level: Intermediate (needs careful chain counting)
- Terminology: US
- Yarn weight: Sport (#2) cotton
- Hook: 2.75 mm (US C-2)
- Number of pieces: 1
- Layout: Single heart motif, worked flat
- Piece size: 4.75 × 4.25 in (12.1 × 10.8 cm)
- Size before border (chain frame, blocked): 3.5 × 3.0 in (8.9 × 7.6 cm)
- Border depth: 5/8 in (1.6 cm) on every edge
Materials
Yarn: Use a smooth, mercerized or combed sport-weight cotton, about 100 m per 50 g. Cotton holds the chain lines crisp and blocks flat. Avoid fuzzy or very stretchy yarn, because the open frame will sag.
- Dusty rose pink (main sample): 8 g / 16 m per heart
- Optional colorways (one heart each): cream, lilac or mint, 8 g / 16 m each
The quantities include a margin of about 50% for the gauge swatch, tails and the hanging loop.
Tools:
– 2.75 mm (US C-2) crochet hook
– 8 removable stitch markers
– Tapestry needle
– Small scissors
– Rustproof pins and a blocking mat or foam board
– Spray bottle with water
– Optional: light spray starch
Abbreviations (US Terms)
- ch – chain
- sl st – slip stitch
- sc – single crochet
- hdc – half double crochet
- dc – double crochet
- sk – skip
- sp(s) – space(s)
- st(s) – stitch(es)
- beg – beginning
Special stitch – sc3tog (single crochet 3 together): [Insert hook in next st, yarn over, pull up a loop] 3 times (4 loops on hook), yarn over, pull through all 4 loops. This is 1 stitch.
Frame landmarks:
– C is the top center junction (ch 1 of the ring).
– B is the bottom tip (ch 35 of the ring).
– Spine chains are counted from the top (C) down.
Gauge and Checkpoints
Gauge matters more for the frame than for the border, because every chain count sets a shape. Make one test heart first and measure it before starting a set.
- Chain gauge: 12 ch = 2 in (5.1 cm), measured relaxed and not stretched.
- Border gauge: 6 sc = 1 in (2.5 cm) along the outline. In Rnd 2, 3 windows (dc + ch 1) = 1 in (2.5 cm), and one dc is 3/8 in (1.0 cm) tall.
Checkpoints:
1. After the ring: each half of the ring (33 ch) is about 5.5 in (14.0 cm) long.
2. After the spine: the spine is a little over 2.25 in (5.7 cm) long.
3. Frame finished: pinned in shape, it measures 3.5 × 3.0 in (8.9 × 7.6 cm).
4. After border Rnd 1: 3.75 × 3.25 in (9.5 × 8.3 cm).
5. After border Rnd 2: 4.5 × 4.0 in (11.4 × 10.2 cm).
6. After border Rnd 3: 4.75 × 4.25 in (12.1 × 10.8 cm).
If your heart is too big by more than 1/4 in (0.6 cm), go down half a hook size or chain more firmly. If it is too small, go up half a hook size. Don’t change the chain counts, because the swag positions depend on them.

Part 1: Outline Ring
Leave a 6 in (15.2 cm) tail.
- Ch 1. This is ch 1, point C. Place a marker in it.
- Ch 33 more (ch 2–34). This is the first half of the outline.
- Ch 1 more (ch 35). This is point B, the bottom tip. Mark it.
- Ch 33 more (ch 36–68). This is the second half.
- Without twisting the chain, sl st in ch 1 (C) to close the ring. (68 ch)
Lay the ring flat with C at the top and B at the bottom. Let the first half fall to your left.
Mark the swag points:
– First half: ch 18, ch 23 and ch 28
– Second half: ch 42, ch 47 and ch 52
These pairs mirror each other. Each first-half number plus its second-half partner equals 70.
Part 2: Center Spine
You are at C after the joining sl st.
- Ch 14, then sl st in ch 35 (B). (14 spine ch)
The spine now runs straight from the top dip to the tip. It splits the heart into two equal halves of 33 outline chains each.
Part 3: Chain Swags
Work every sl st into a single chain of the frame, under the top loop and the back bump. Keep the new chains relaxed so the swags droop slightly.
- Travel up the first half: from B, sl st in ch 34, 33, 32, 31, 30, 29 and 28. (7 sl st)
- Lowest swag, first half: ch 6, sl st in the 9th spine ch.
- Lowest swag, second half: ch 6, sl st in ch 42. The two swags meet the spine in the lowest V.
- Travel up the second half: sl st in ch 43, 44, 45, 46 and 47. (5 sl st)
- Middle swag, second half: ch 10, sl st in the 4th spine ch.
- Middle swag, first half: ch 10, sl st in ch 23. This makes the middle V.
- Travel up the first half: sl st in ch 22, 21, 20, 19 and 18. (5 sl st)
- Lobe swag, first half: ch 13, sl st in C.
- Lobe swag, second half: ch 13, sl st in ch 52.
Fasten off.
Frame count:
– Outline: 68 ch
– Spine: 14 ch
– Swags: 6 + 6 + 10 + 10 + 13 + 13 = 58 ch
– Travel: 17 sl st
The lobe swags close off the two rounded lobes. Below them, the middle and lowest swags give the stacked V veins. Pin the frame flat at 3.5 × 3.0 in (8.9 × 7.6 cm) and check it before adding the border.
Part 4: Border
The border goes all the way around the outline. It is three rounds deep and adds 5/8 in (1.6 cm) to every edge:
- Rnd 1: 1/8 in (0.3 cm)
- Rnd 2: 3/8 in (1.0 cm)
- Rnd 3: 1/8 in (0.3 cm)
Border gauge reminder: 6 sc = 1 in (2.5 cm). One dc is 3/8 in (1.0 cm) tall.
Rnd 1 – Single Crochet Edge (Conversion Round)
Join the yarn with a sl st in B (ch 35).
- Ch 1, 3 sc in B. This is the tip corner.
- Second half: sc in each ch from ch 36 to ch 67. (32 sc)
- Top dip: sc3tog over ch 68, C and ch 2. (1 st)
- First half: sc in each ch from ch 3 to ch 34. (32 sc)
- Join with a sl st to the first sc.
Count: 3 + 32 + 1 + 32 = 68 sts. That is 68 sts worked 1-per-chain, plus 2 extra at the tip (3 sc in B), minus 2 at the dip (sc3tog).
Per half: 32 sc between the tip group and the sc3tog.
Rnd 2 – Window Round
Sl st in the next sc, which is the center sc of the tip group.
- Tip: ch 4 (counts as dc + ch 1), dc in the same sc. This gives a V at the point.
- Start of second half: ch 1, sk the next sc, dc in the next sc.
- Second half: [ch 1, sk next sc, dc in next sc] 15 times. (16 dc on this half)
- Top dip: ch 1, sk the next sc, dc in the sc3tog. Ch 1, sk the next sc, dc in the next sc.
- First half: [ch 1, sk next sc, dc in next sc] 15 times. (16 dc on this half, counting the one from step 4)
- Close: ch 1, sk the last sc, sl st in the 3rd ch of the beg ch-4.
Count: 2 (tip) + 16 + 1 (dip) + 16 = 35 dc and 35 ch-1 sps.
Per half: 16 dc and 16 windows, plus 1 window on each side of the dip dc.
Rnd 3 – Scallop Round
Sl st into the tip ch-1 sp (the space between the two tip dc).
- Tip: ch 1, then work (sc, hdc, ch 2, hdc, sc) in the same sp.
- Second half: (sc, hdc, sc) in each of the next 16 ch-1 sps. (48 sts)
- Top dip: 2 sc in each of the next 2 ch-1 sps. (4 sts)
- First half: (sc, hdc, sc) in each of the next 16 ch-1 sps. (48 sts)
- Join with a sl st to the first sc. Fasten off.
Count: 4 + 48 + 4 + 48 = 104 sts and 1 ch-2 tip sp.
Per half: 16 scallops (48 sts), plus 2 sc at the dip.
Why the Math Works
Rnd 1 keeps a 1:1 ratio with the 68 ring chains, so the edge neither ruffles nor pulls in. The tip is convex and needs 2 extra stitches. The dip is concave and gives 2 back. These cancel out, so the total stays at 68.
Rnd 2 needs an even number of sts on each half, because each window uses 2 sts of Rnd 1 (1 dc + 1 skipped). Each half has 32 sc, so each half gets exactly 16 windows. The tip and dip add 3 more dc, which brings the total to 35.
Rnd 3 puts 3 sts into each 2-stitch window. That small extra length lets the scallops curve around the lobes. The dip spaces get only 2 sc so the top center stays neat. The ch-2 at the tip keeps the point sharp.
Hanging Loop
- Join the yarn with a sl st in the top of the dc worked into the sc3tog. This is the top center of the dip.
- Ch 24 (4 in / 10.2 cm), then sl st in the same dc.
- Sl st in each of the 24 ch around the loop, which doubles its thickness.
- Sl st in the same dc again. Fasten off.
The loop hangs about 2 in (5.1 cm) above the heart.
Final Blocking
- Weave in all the tails along the outline or the border, never along a swag.
- Spray the heart until it is damp but not dripping.
- Pin the tip first, then the top center of the dip.
- Pin the widest point of each lobe so the heart is 4.75 in (12.1 cm) wide.
- Pin the top of each lobe so the heart is 4.25 in (10.8 cm) tall.
- Pin each scallop point around the edge.
- Ease each swag into a gentle, even curve, and pin the spine straight.
- If you want a stiffer ornament, mist lightly with starch.
- Let it dry completely, at least 6 hours, before you unpin it.
Final Quality-Control Checklist
- The heart measures 4.75 × 4.25 in (12.1 × 10.8 cm).
- The spine is straight and centered from the dip to the tip.
- Both halves have matching swags: 6, 10 and 13 ch.
- Each V meets the spine at the same point from both sides.
- Rnd 1: 68 sts. Rnd 2: 35 windows. Rnd 3: 104 sts.
- Each half has 16 scallops.
- The tip is sharp and the dip is tidy.
- The hanging loop is centered and firm.
- No tails show through the open frame.
Troubleshooting
The swags sag a lot or are pulled tight.
Check your chain gauge. If the counts are right, re-block and ease the swags into even curves.
The heart is lopsided.
A travel sl st probably landed in the wrong chain. Recount from B: 7, then 5, then 5.
The tip is blunt.
Make sure you worked 3 sc in B in Rnd 1, and kept the ch-2 at the tip in Rnd 3.
The edge ruffles on the lower sides.
Your scallops are loose. Work the hdc more firmly or go down half a hook size for Rnd 3 only.
The dip bunches.
Check that you used sc3tog in Rnd 1 and only 2 sc per dip space in Rnd 3.
Your window count is off.
Rnd 1 must be exactly 68 sts, with 32 on each half. Fix it before you work Rnd 2.
The ring twisted.
Twisting can’t be fixed after the join. Rip back and rejoin.
Care
Hand wash in cool water, press out the water in a towel, and re-block flat to dry. Store the heart flat or hanging, away from heavy ornaments.

Final Notes
The measurement chain runs like this:
- 12 ch = 2 in (5.1 cm) gives a 68-ch ring with 33 ch per half.
- Adding the spine and swags makes a 3.5 × 3.0 in (8.9 × 7.6 cm) frame.
- Rnd 1 (68 sts) brings it to 3.75 × 3.25 in (9.5 × 8.3 cm).
- Rnd 2 (35 windows) brings it to 4.5 × 4.0 in (11.4 × 10.2 cm).
- Rnd 3 (104 sts) finishes it at 4.75 × 4.25 in (12.1 × 10.8 cm).
If each checkpoint matches, your heart will come out the right size. Once your test heart matches, make more in cream, lilac and mint for a soft mixed set.
Happy crocheting!