

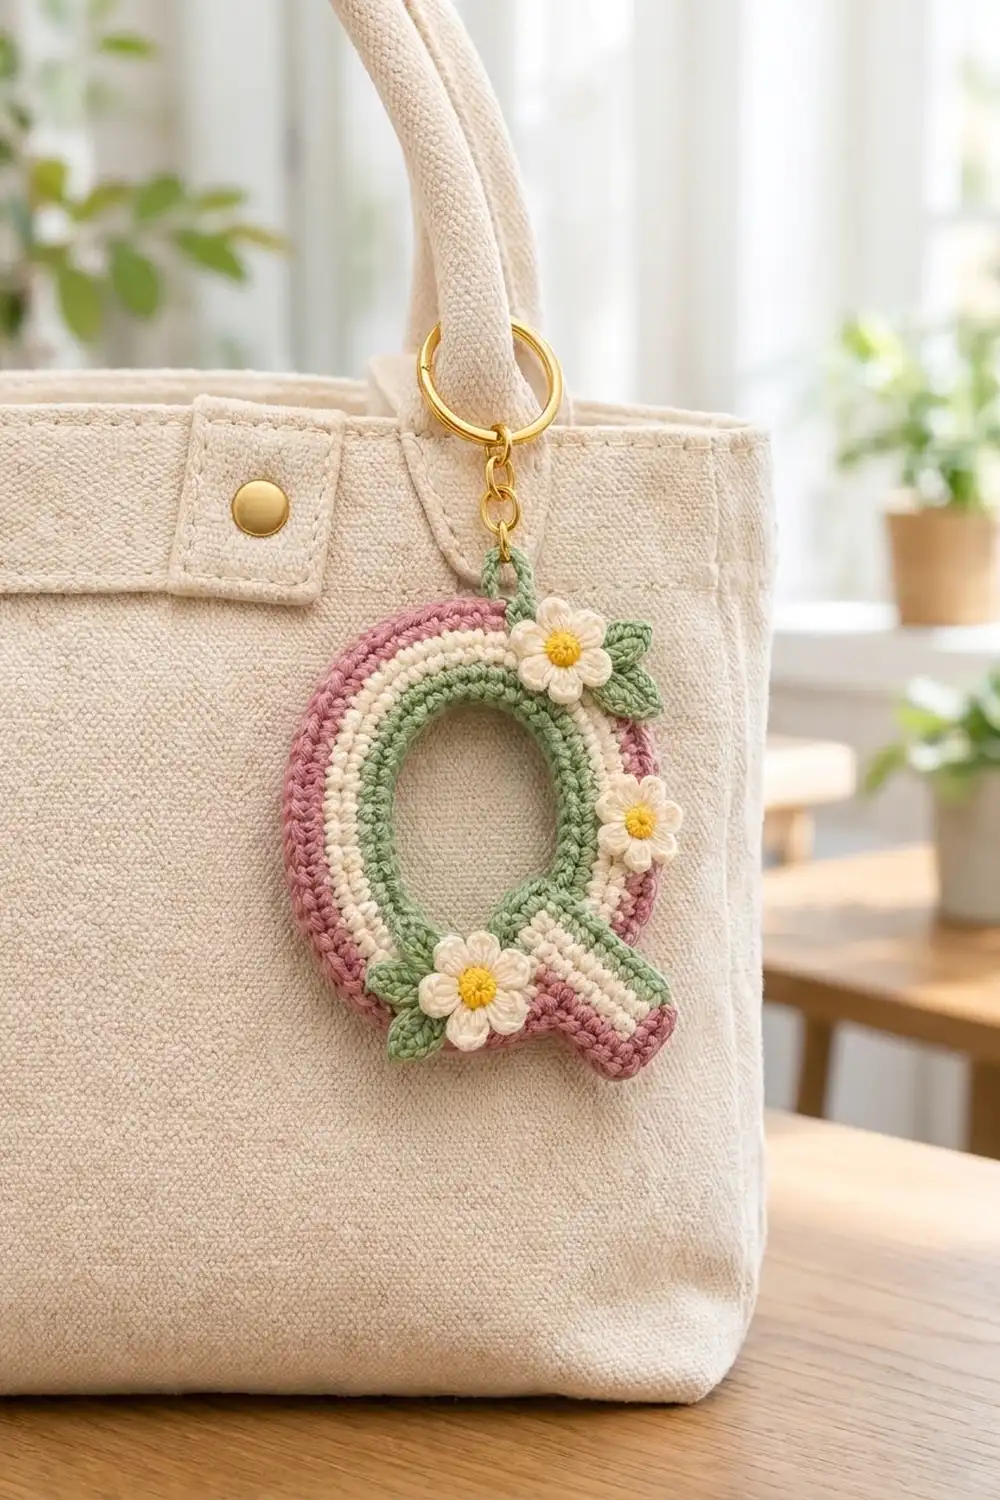
The Rosy Meadow Letter Q Keychain is a small, sturdy monogram charm for a bag, a key set, or a gift tag. The letter is worked in tight single crochet, so the fabric stays firm and flat. Soft rainbow-style stripes run from the inner edge outward.
The palette is sage green, cream, and dusty rose. Three small cream daisies with golden centers and a few sage leaves sit on top of the letter, and a gold keyring finishes it off. The look is gentle and a little cottage-style, and it works well for spring or for anyone whose name starts with Q.
This pattern uses US crochet terms. The finished letter, blocked, is about 4 in (10.2 cm) wide x 4.25 in (10.8 cm) tall, not counting the hardware.
Construction is simple. You work the ring in joined rounds outward from a chain ring. Next, you work the tail in short rows directly off the ring. A two-round rose border then goes around the whole outer outline. Finally, you add the hanging loop, the flowers, and the leaves.
Finished Size and Construction
- Finished size: about 4 in (10.2 cm) wide x 4.25 in (10.8 cm) tall
- Skill level: Easy
- Terminology: US crochet terms
- Yarn weight: DK (light worsted, #3), cotton or cotton blend
- Hook: 2.75 mm (US C/2)
- Number of pieces: 1 letter body, plus 3 flowers and 4 leaves (appliqués)
- Layout: single letter, no joining of letter pieces
- Ring size before border: 3 in (7.6 cm) across
- Tail: about 0.8 in (2.0 cm) wide x 1 in (2.5 cm) long before border
- Border depth: 2 rounds, about 1/3 in (0.8 cm) on each side
- Ring size after border: about 3.7 in (9.4 cm) across, blocked to 3.5 in (8.9 cm) wide x 3.9 in (9.9 cm) tall
Materials
Mercerized cotton or a cotton blend gives the clearest stitch definition and holds its shape best on a keychain. Choose a DK yarn of roughly 120 m per 50 g.
- Sage green: 6 g (14 m), for the inner rounds, tail stripes, hanging loop, and leaves
- Cream: 8 g (19 m), for the middle rounds, tail center, and flower petals
- Dusty rose: 6 g (14 m), for the border
- Golden yellow: 1 g (2 m), for the flower centers
All quantities include a small safety margin.
Tools:
– 2.75 mm (US C/2) crochet hook
– Tapestry needle
– 4 locking stitch markers
– Scissors
– Gold split keyring, 1 in (2.5 cm)
– Short gold chain, about 1 in (2.5 cm), with 2 jump rings
– Flat-nose pliers
– Rust-proof pins and a foam blocking mat
Abbreviations (US Terms)
- ch: chain
- sl st: slip stitch
- sc: single crochet
- hdc: half double crochet
- dc: double crochet
- st(s): stitch(es)
- inc: 2 sc in the same stitch
- sc2tog: single crochet 2 together (insert hook in the next st, yarn over, pull up a loop; insert hook in the next st, yarn over, pull up a loop; yarn over, pull through all 3 loops)
- sc3tog: single crochet 3 together (same as sc2tog, but pull up loops in 3 sts, then pull through all 4 loops)
- rep: repeat
- MR: magic ring
Special stitch: Petal. Work (ch 2, 3 dc, ch 2, sl st) all in the same stitch.
Gauge and Checkpoints
Gauge: 6 sc and 6 rows = 1 in (2.5 cm) in sc worked in rows.
Make a test swatch first. Ch 13, then sc in the 2nd ch from the hook and in each ch across (12 sc). Work 11 more rows of 12 sc. The swatch should measure 2 in (5.1 cm) square.
- Too big: go down to a 2.5 mm hook.
- Too small: go up to a 3.0 mm hook.
Keep the fabric firm. A keychain should not show gaps between stitches.
Measurement checkpoints:
– After Round 2: the ring measures about 2.25 in (5.7 cm) across, and the hole is about 1.6 in (4.1 cm) across.
– After Round 4: the ring measures 3 in (7.6 cm) across.
– After the tail: the tail sticks out about 1 in (2.5 cm) from the ring edge.
– After Border Round 2: the ring measures about 3.7 in (9.4 cm) across before blocking.
If the ring cups like a bowl, your increases are too tight; loosen up or go up a hook size. If it ruffles, your stitches are too loose; go down a hook size.

Letter Body: Ring
Begin with sage green. You will join each round with a sl st to the first sc and then ch 1; the ch 1 does not count as a stitch.
Plan to start every round at the lower right of the ring. The tail will be worked at that spot later and will hide the color-change jogs.
Foundation: Ch 30. Sl st in the first ch to form a ring, taking care not to twist the chain.
Round 1 (green): Ch 1. [Sc in each of the next 4 ch, 2 sc in the next ch] 6 times. Join. (36 sts)
Round 2 (green): Ch 1. [Sc in each of the next 5 sts, inc] 6 times. Join. (42 sts)
Change to cream as you finish the join: insert the hook, pull up the green loop, then complete the sl st with cream. Fasten off green.
Round 3 (cream): Ch 1. Sc in each of the next 3 sts, inc, [sc in each of the next 6 sts, inc] 5 times, sc in each of the last 3 sts. Join. (48 sts)
Round 4 (cream): Ch 1. [Sc in each of the next 7 sts, inc] 6 times. Join. (54 sts)
Fasten off cream and weave in the ends. Lay the ring flat and check that it measures 3 in (7.6 cm) across.
Each round adds 6 increases. That matches how fast the circle grows at this gauge, about 1 in (2.5 cm) more circumference per round, so the ring stays flat. Round 3 shifts its increases by half a repeat so the ring keeps a round shape instead of forming corners.
Letter Body: Tail
Find the round joins at the lower right of the ring, at about the 4–5 o’clock position. Mark 4 consecutive stitches of Round 4 there, starting at the join and moving away from it. Call these stitches A, B, C, and D.
The tail is worked in rows that run lengthwise, pointing diagonally down and to the right, away from the ring. Each row that ends back at the ring is anchored to it with a sl st.
Row 1 (green): Join green with a sl st in st A. Ch 7. Sc in the 2nd ch from the hook and in each of the next 5 ch, ending back at the ring (6 sc). Sl st in st B. Change to cream as you complete that sl st. Fasten off green. Do not turn yet. (6 sc)
Row 2 (cream): Turn. Skip the sl st. Sc in each of the 6 sc. (6 sc)
Row 3 (cream): Ch 1, turn. Sc in each of the 6 sc, ending at the ring. Sl st in st C. (6 sc)
Row 4 (cream): Turn. Skip the sl st. Sc in each of the 6 sc. (6 sc)
Row 5 (green): Change to green as you finish the last sc of Row 4. Fasten off cream. Ch 1, turn. Sc in each of the 6 sc. Sl st in st D. Fasten off. (6 sc)
The tail now has a green stripe on each long side and a 3-row cream center. It is 5 rows wide, about 0.8 in (2.0 cm), and 6 stitches long, 1 in (2.5 cm).
Stitches A through D of Round 4 are now used by the tail. That leaves 50 free ring stitches for the border.
Border
The border uses the same gauge as the body: 6 sts = 1 in (2.5 cm) and 6 rounds = 1 in (2.5 cm). Two rounds add about 1/3 in (0.8 cm) to every outer edge.
The border goes around the outer edge of the ring and all three free edges of the tail. The inner hole stays green and gets no border.
Base stitches available:
– Ring: 50 free sts
– Tail side 1: 6 sts, worked into the free loops of the Row 1 foundation chain
– Tail tip: 5 row-ends. The Row 1 and Row 5 ends are the tip corners, so only the 3 middle row-ends (Rows 2–4) count as tip stitches.
– Tail side 2: 6 sts, the tops of Row 5
Total base stitches: 50 + 6 + 3 + 6 = 65
Border Round 1 (rose): Join rose in the first free ring st next to the Row 5 side of the tail. Ch 1.
- Ring section: Sc in the next 48 ring sts, working an inc in every 8th st (6 increases). The 49th and 50th ring sts are left for the corners.
- Inner corner 1: Sc2tog over the last ring st and the first st of tail side 1.
- Tail side 1: Sc in the next 4 sts, then 3 sc in the tip corner st.
- Tip: Sc in each of the 3 middle row-ends.
- Tail side 2: 3 sc in the tip corner st, then sc in the next 4 sts.
- Inner corner 2: Sc2tog over the last st of tail side 2 and the first ring st, the one you joined into.
Join to the first sc.
Count: 61 sts worked one per base stitch (65 − 4 used in the two sc2tog), plus 2 sc2tog, plus 10 extra (6 ring increases + 2 extra at each tip corner). Total 73 sts: 54 in the ring section, 2 corner decreases, and 17 in the tail section.
Border Round 2 (rose): Ch 1.
- Ring section: Sc in each of the 54 ring sts, working an inc in every 9th st (6 increases), for 60 sts. Leave the last ring st free for the inner corner.
- Inner corner 1: Sc3tog, centered on the sc2tog from Round 1.
- Tail section: Sc around, working 3 sc in the center sc of each tip-corner group, for 19 sts.
- Inner corner 2: Sc3tog, centered on the second sc2tog from Round 1.
Join. Fasten off and weave in the ends.
Count: 73 + 10 added − 4 removed by the two sc3tog = 79 sts (58 ring singles + 2 corner decreases + 19 tail).
Why the math works: The ring section gains 6 sts per round, which keeps the curve flat, just as in Rounds 1–4. Each outer tail corner gains 2 sts per round so it turns a clean 90 degrees. Each inner corner, where the tail meets the ring, loses stitches so it stays crisp instead of bunching.
Hanging Loop
Find the top center of the ring, shifting slightly toward the right, at about the 12–1 o’clock position.
- Join green with a sl st in a Border Round 2 stitch at that spot.
- Ch 8, then sl st in the next st.
- Ch 1. Work 12 sc over the chain loop, then sl st in the starting st.
- Fasten off, leaving a tail. Stitch through the base twice for strength.
The loop stands about 0.6 in (1.5 cm) tall.
Flowers (make 3)
With yellow:
– Make a MR. Ch 1, then work 5 sc in the ring. Pull the ring closed and join to the first sc. (5 sts)
– Fasten off.
With cream:
– Join cream with a sl st in any sc.
– Work a Petal in the same st. Sl st in the next st, Petal in the same st; rep from * 3 more times. (5 petals)*
– Sl st in the first st. Fasten off, leaving a 6 in (15.2 cm) tail for sewing.
Each flower measures about 1 in (2.5 cm) across.
Leaves (make 4)
With green: Ch 6.
- Sc in the 2nd ch from the hook, then hdc in the next ch, dc in the next ch, and hdc in the next ch.
- Work 3 sc in the last ch.
- Working along the opposite side of the chain: hdc in the next ch, dc in the next ch, hdc in the next ch, sc in the last ch.
- Sl st in the first sc. (11 sts)
Fasten off, leaving a 6 in (15.2 cm) tail. Each leaf is about 0.8 in (2.0 cm) long.
Assembly of Appliqués
Sew the leaves on first, then add the flowers on top of their bases.
- Flower 1: upper right of the ring, overlapping the cream and rose stripes, just right of the hanging loop. Tuck 2 leaves underneath it, one pointing left and one pointing down-right.
- Flower 2: on the right side of the ring at about 3 o’clock, across the cream and rose stripes. No leaves.
- Flower 3: lower left of the spot where the tail meets the ring. Tuck 2 leaves underneath it, one pointing left and one pointing down.
Sew through the back loops of the letter only, so the stitching stays invisible from the back.
Open a jump ring with pliers and thread it through the hanging loop and one end of the chain. Close it fully. Use the second jump ring to attach the other end of the chain to the split keyring.
Final Blocking
- Lightly mist the letter with water, or steam it from about 1 in (2.5 cm) above. Do not press the flowers flat.
- Pin the ring into a gentle vertical oval, 3.5 in (8.9 cm) wide x 3.9 in (9.9 cm) tall.
- Pin the tail straight and diagonal, with its corners square.
- Check that the whole piece measures about 4 in (10.2 cm) x 4.25 in (10.8 cm).
- Let it dry completely, at least 4 hours, before unpinning.
- Fluff each petal with your fingertip once the piece is dry.
Final Quality-Control Checklist
- Ring counts: 36, 42, 48, and 54 sts for Rounds 1–4.
- Tail rows: 6 sc each, with green on both long sides.
- Border Round 1 has 73 sts and Round 2 has 79 sts.
- The inner hole edge is green and has no rose stitches.
- No color-change jogs show outside the tail area.
- The piece lies flat with no cupping or ruffling.
- All ends are woven in and trimmed.
- The jump rings are fully closed, and the loop base is reinforced.
- The flowers and leaves are secure and do not lift when tugged.
Troubleshooting
- The ring cups: your increases are too tight. Redo the round with a looser tension or a larger hook.
- The ring ruffles: your tension is too loose. Go down a hook size.
- The tail bunches at the ring: check that each odd row ends with exactly one sl st into the next marked stitch, A to D.
- The inner corners pucker: make sure you worked the sc2tog and sc3tog decreases at both inner corners.
- The tip corners are rounded: work 3 sc into the center stitch of each corner group.
- Color jogs show: start the rounds closer to the tail position next time, or hide the jog under Flower 3.
- The flower petals curl: steam them lightly and pin them flat to dry.
Care
Hand wash in cool water with mild soap and lay flat to dry. Keep the metal hardware dry where you can to protect the gold finish.
Final Notes
The measurement chain is straightforward:
- Gauge is 6 sts and 6 rows per 1 in (2.5 cm).
- Four rounds build a ring 3 in (7.6 cm) across.
- The tail adds 1 in (2.5 cm).
- The two-round border adds 1/3 in (0.8 cm) per side.
- Blocking gives a finished letter about 4 in (10.2 cm) x 4.25 in (10.8 cm).
Check each stage before moving on and the final shape will follow.
Happy crocheting!