

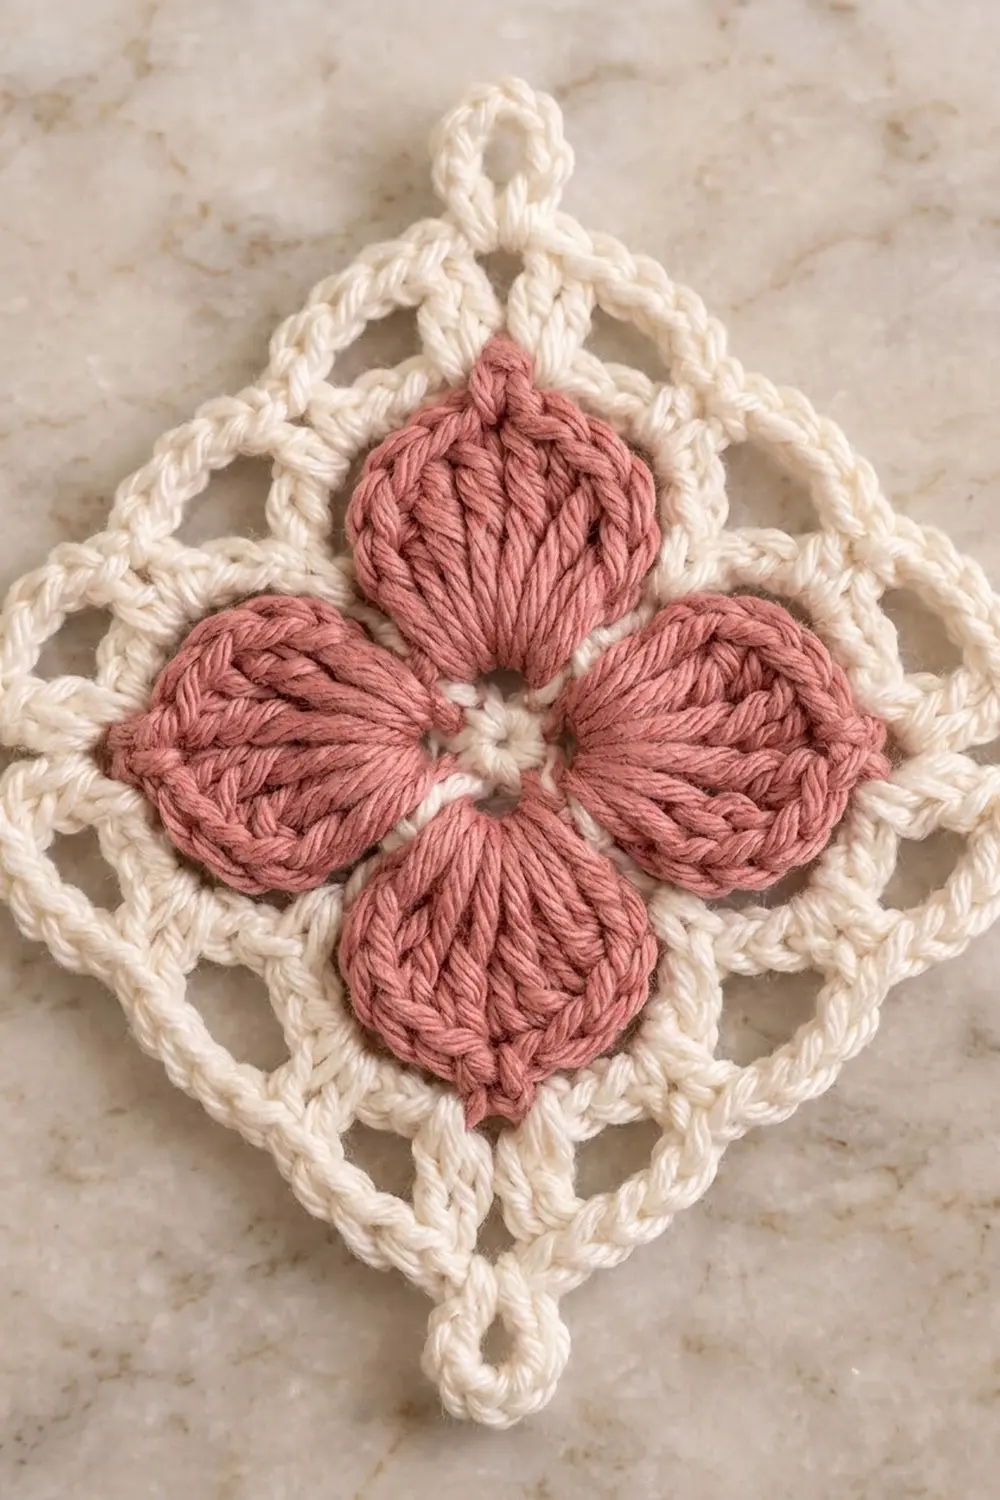
The Rosy Noel Blossom Diamond is a small, lacy square turned on point. A dusty rose flower with four plump, ribbed petals sits in the center, and an airy cream lattice with picot scallops and a chain loop at each corner frames it.
The colors are soft and festive without leaning on bright red and green. Rose and cream look warm next to pine, gold ornaments, and candlelight, and they still suit everyday decor after the holidays. The style is vintage lace: a solid flower inside an open frame.
This pattern uses US crochet terms. The finished motif measures about 4 in (10.2 cm) per side, or about 6 in (15.2 cm) from corner loop to corner loop.
You make it in one piece, working in the round. Rounds 1–3 make the rose flower. Rounds 4–6 make the cream frame, which builds the square around the petal tips. There is no sewing apart from weaving in ends.
Finished Size and Construction
- Finished size: 4 in (10.2 cm) per side; about 6 in (15.2 cm) on the diagonal, including corner loops
- Skill level: Easy / advanced beginner
- Terminology: US crochet terms
- Yarn weight: Worsted weight (#4), cotton or cotton blend
- Hook: 4.0 mm (US G-6)
- Number of pieces: 1
- Layout: Single square motif, displayed on point (as a diamond)
- Piece size: 4 in (10.2 cm) per side
- Size before border (flower only, after Round 3): 3 in (7.6 cm) from petal tip to petal tip
- Border depth: about 1.5 in (3.8 cm) from petal tip to the tip of the corner loop
Materials
Choose a smooth, mercerized or matte worsted cotton. Cotton shows the petal ribs and picots clearly and blocks crisply. Acrylic works, but the lattice will be softer and less defined.
- Color A – Dusty Rose: 8 g (about 14 m)
- Color B – Cream / Off-White: 10 g (about 17 m)
These quantities include a margin for your gauge swatch and for weaving in ends.
Tools:
– 4.0 mm (US G-6) crochet hook
– Tapestry needle
– Scissors
– Stitch markers (2–3)
– Ruler or measuring tape
– Blocking mat and rust-proof pins
– Spray bottle with water
Abbreviations (US Terms)
- ch – chain
- sl st – slip stitch
- sc – single crochet
- hdc – half double crochet
- dc – double crochet
- tr – treble crochet
- sp(s) – space(s)
- st(s) – stitch(es)
- rep – repeat
Special stitch – Petal: Work (sc, hdc, 2 dc, 3 tr, 2 dc, hdc, sc) all into the same ch-5 space. That is 11 stitches, and the 6th stitch (the middle tr) is the petal tip.
Gauge and Checkpoints
Make one complete motif before you buy more yarn or plan any display. A finished motif tells you more than a flat swatch because the size comes from the chain spaces.
Border gauge: 4 sc = 1 in (2.5 cm) along the Round 6 edge.
Checkpoints (measure lightly, without stretching):
– After Round 1: the ring is about 1 in (2.5 cm) across.
– After Round 3: the flower is 3 in (7.6 cm) from petal tip to opposite petal tip.
– After Round 4: each side is about 2.75 in (7.0 cm), measured from corner space to corner space.
– After Round 5: each side is about 3.5 in (8.9 cm).
– After Round 6: each side is 4 in (10.2 cm).
If the motif is too big: go down to a 3.75 mm hook, or tighten your chains. Loose chains are the most common cause of an oversized frame.
If the motif is too small: go up to a 4.5 mm hook. If only the frame is too tight, use the larger hook for Rounds 4–6 only.
Pattern
Flower Center (Color A – Dusty Rose)
Round 1: Make a magic ring. Ch 1, then work 8 sc into the ring. Pull the ring snug but leave a small open hole in the center. Sl st to the first sc to join. (8 sc)
Round 2: Ch 1. Sc in the same st as the join, ch 5, skip the next sc. Sc in the next sc, ch 5, skip the next sc. Rep from * to * 2 more times. Sl st to the first sc to join. (4 sc, 4 ch-5 sps)
The 4 sc are the anchor points between the petals. The 4 ch-5 spaces hold the petals.
Round 3: Sl st into the next ch-5 sp. Work 1 Petal in this ch-5 sp, then sl st in the next sc of Round 2. Rep from * to * 3 more times, ending with the last sl st in the sc at the base of your first Petal. (4 Petals; 44 sts, not counting sl sts)
Fasten off Color A and weave in the ends.
The 3 tr at the middle of each Petal give it a rounded point. Shorter stitches on either side taper the edges, which makes the pointed-oval shape. Each Petal tip will become one corner of the diamond.
Checkpoint: the flower measures 3 in (7.6 cm) tip to tip. Place a marker in the middle tr of each Petal.
Cream Frame / Border (Color B – Cream)
Rounds 4–6 make the border. They turn the round flower into a square on point.
Round 4: Join Color B with a sl st in the marked middle tr of any Petal. Ch 1.
- In the same st, work (sc, ch 5, sc). This is a corner.
- Ch 5. Push the two neighboring Petals aside and work 1 tr into the Round 2 sc between them, inserting under both loops.
- Ch 5, then work (sc, ch 5, sc) in the marked middle tr of the next Petal.
Rep steps 2–3 two more times. Then work step 2 once more, ch 5, and sl st to the first sc to join. (8 sc, 4 tr, 4 corner ch-5 sps, 8 side ch-5 sps)
Per side: 1 corner sp at each end, with 2 side ch-5 sps between them that are separated by the tr.
The tr drops into the gap between petals. That pulls the middle of each side inward and makes the first diagonal line of the lattice.
Round 5: Sl st into the next corner ch-5 sp. Ch 1.
- In the corner sp, work (sc, ch 5, sc).
- Ch 4, sc in the next side ch-5 sp, ch 4, sc in the next side ch-5 sp, ch 4.
Rep steps 1–2 three more times. Sl st to the first sc to join. (16 sc, 4 corner ch-5 sps, 12 ch-4 sps)
Per side: 3 ch-4 sps between the corner spaces. This round makes the second layer of open mesh.
Round 6 (picot edge): Sl st into the next corner ch-5 sp. Ch 1.
- In the corner sp, work (2 sc, ch 5, 2 sc). This makes the corner loop.
- In each of the next 3 ch-4 sps, work (2 sc, ch 3, 2 sc). These are the side picots.
Rep steps 1–2 three more times. Sl st to the first sc to join. (64 sc, 4 ch-5 corner loops, 12 ch-3 picots)
Fasten off and weave in the ends.
Border count per side: 2 sc from the first corner group, plus 12 sc from the three ch-4 sps (4 sc each), plus 2 sc from the next corner group, makes 16 sc per side. The count includes the corner stitches.
Check the total: 4 sides × 16 sc = 64 sc. Each corner group has 4 sc, split 2 and 2 between the two sides it touches, so no stitch is counted twice.
Why the math works: At the border gauge of 4 sc per 1 in (2.5 cm), 16 sc per side gives exactly 4 in (10.2 cm) per side. The chain counts also grow from round to round: one ch-5 span on each half-side in Round 4, three ch-4 spans in Round 5, and three picot groups in Round 6. Each round adds just enough length to keep the edges flat as the square grows. With fewer chains the edges would cup. With more chains the sides would ripple.
Final Blocking
- Lightly mist the motif with water until it is damp, not soaked. For heavier shaping you can soak it and roll it in a towel.
- Lay it face up on the blocking mat, turned on point.
- Pin the 4 corner loops first. Each side should be 4 in (10.2 cm), and the corners should be about 6 in (15.2 cm) apart on the diagonal.
- Pin the middle picot on each side so the edges are straight, not curved in.
- Pin out each remaining picot so it forms a small, rounded point.
- Gently shape each rose Petal with your fingertips so it lies flat and points straight at its corner.
- Leave it to dry completely, usually 6–12 hours, before you unpin it.
Final Quality-Control Checklist
- The center ring has a small, tidy hole and no gap at the join.
- There are 4 Petals of 11 stitches each, all the same size.
- Each Petal tip lines up with a corner loop.
- The Round 4 tr sits centered between each pair of petals.
- Round 6 has 16 sc on every side, 3 picots per side, and a ch-5 loop at each corner.
- Each side measures 4 in (10.2 cm).
- The motif lies flat, with no cupping or rippling.
- All ends are woven in securely and invisibly.
Troubleshooting
Petals are crowded or curl up: Your Round 2 chains are too tight. Make the ch-5 looser, or go up half a hook size for Round 2 only.
Petals look floppy or gappy: The ch-5 spaces are too loose. Tighten your chains, or check that every Petal has all 11 stitches.
The frame cups into a bowl: The chains in Rounds 4–5 are too short or too tight. Loosen your tension or try a 4.5 mm hook for the frame.
The edges ripple: Your chains are too loose. Use a 3.75 mm hook for Rounds 4–6.
The motif comes out lopsided: You probably started Round 4 somewhere other than a middle tr. Each corner must sit on a Petal tip.
The corner loops are uneven: Count the ch 5 at each corner, and pin every corner to the same measurement when blocking.
Care
Hand wash in cool water with a mild soap, press out the water in a towel, and dry flat. Re-pin to 4 in (10.2 cm) per side if the shape relaxes.

Final Notes
The measurement chain is simple. The 1 in (2.5 cm) ring grows into a 3 in (7.6 cm) flower, then the frame reaches about 2.75 in (7.0 cm) per side after Round 4 and about 3.5 in (8.9 cm) after Round 5. It finishes at 16 sc and 4 in (10.2 cm) per side, about 6 in (15.2 cm) on the diagonal. If you hit each checkpoint, the motif blocks into a crisp, even diamond. Make one, block it well, and use it as an ornament backing, a festive coaster, or a small gift-tag accent.
Happy crocheting!