

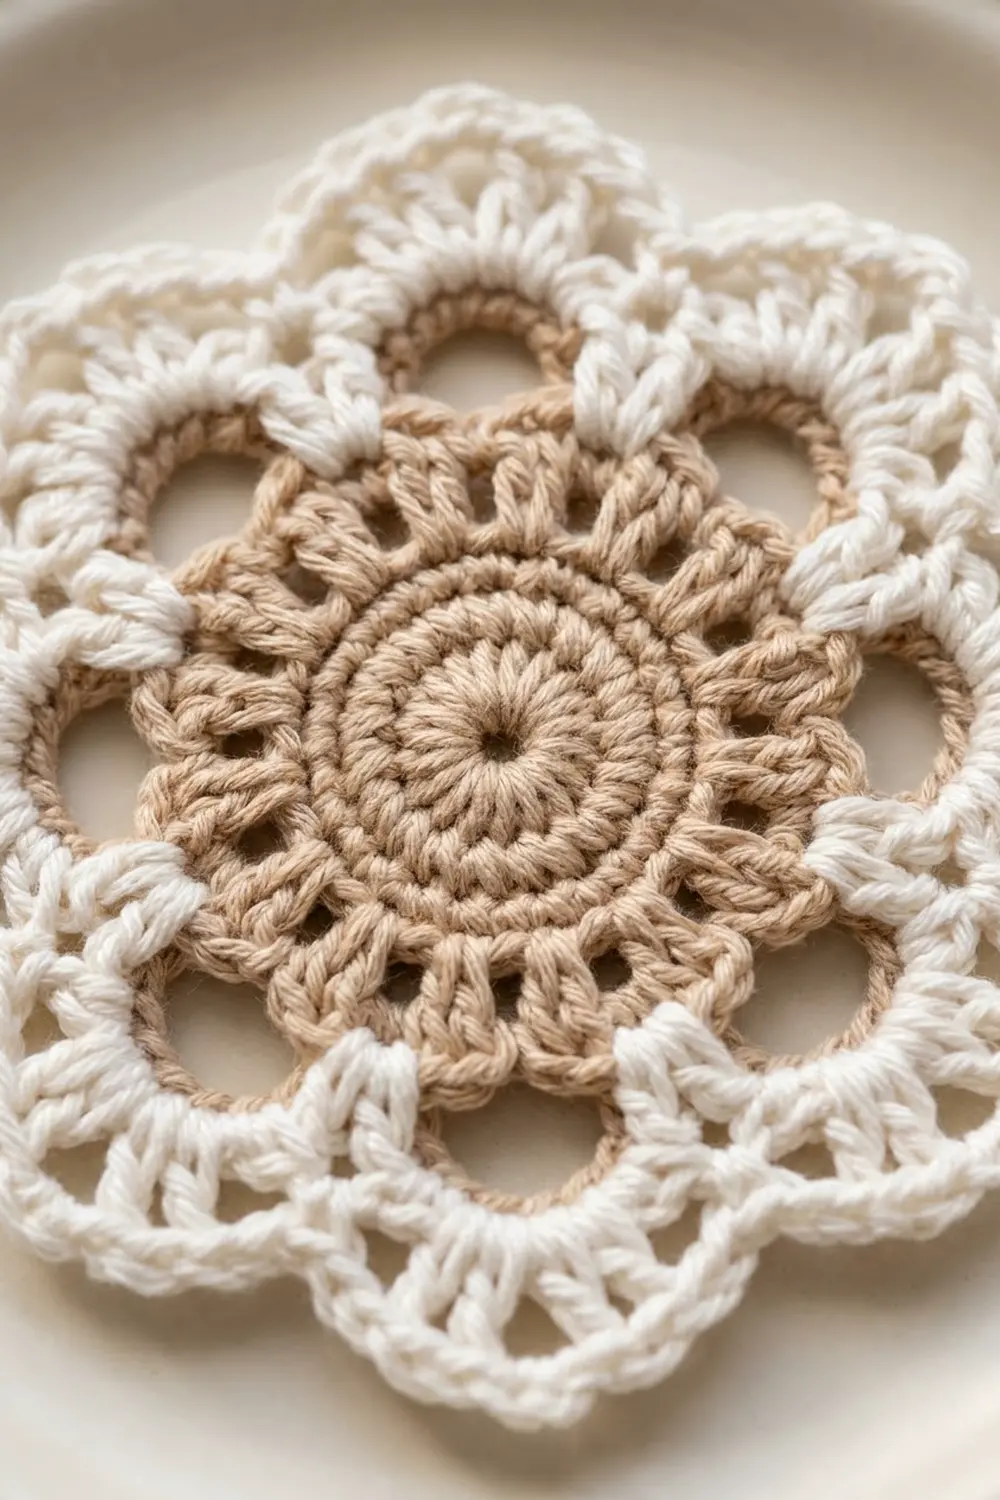
The Winter Latte Lace Flower is a round motif with eight petals. It has a solid latte-beige center, a ring of open windows and a crisp white lacy edge. It is light, airy and quick to make, and it suits a setting of pine branches, gold ornaments and candlelight.
Two colors do all the work. A warm beige makes the center, the cluster spokes and the chain arches. A soft white makes the rounded petals and the looped edge. The contrast is gentle, so the motif looks cozy and elegant rather than bold.
This pattern uses US crochet terms. After blocking, the finished motif measures 5.5 in (14.0 cm) across, from the tip of one petal to the tip of the opposite petal.
The construction is simple. Starting from a magic ring, you work six joined rounds. The first three are solid beige rounds. Round 4 is a beige round of clusters and chain arches, Round 5 is a white round of shell petals, and Round 6 is a white lace edge. There is only one piece, so there is no joining or sewing.
Finished Size and Construction
- Finished size: 5.5 in (14.0 cm) diameter, tip to tip
- Skill level: Easy to Intermediate
- Terminology: US crochet terms
- Yarn weight: DK / light (#3) cotton or cotton blend
- Hook: 3.5 mm (E-4)
- Number of pieces: 1
- Layout: single round motif, 8 petals
- Piece size: 5.5 in (14.0 cm) diameter
- Size before border (after Round 5): 4.75 in (12.1 cm)
- Border depth (Round 6): 0.375 in (1.0 cm) on each side
Materials
Choose a smooth mercerized or combed cotton in DK weight. Cotton shows each stitch clearly, keeps the petals flat and blocks crisply. Avoid fuzzy or loosely plied yarns, because the chain loops on the edge will lose their shape.
- Color A – Latte Beige: 8 g (about 18 m)
- Color B – Soft White: 7 g (about 16 m)
These amounts include a margin of about 20% for your test motif, yarn tails and small differences in tension. If you plan to make several motifs, multiply the amounts by the number of motifs.
You can swap the colors to suit your space. Pale gold works well with ivory, and sage green works well with cream. Keep the darker shade in the center so the windows and spokes stand out against the lighter petals.
Tools:
- 3.5 mm (E-4) crochet hook
- Tapestry needle
- Scissors
- Stitch marker
- Ruler or tape measure
- Blocking mat and rustproof pins
- Spray bottle with cool water
Abbreviations (US Terms)
- ch – chain
- sl st – slip stitch
- sc – single crochet
- dc – double crochet
- dc2tog – double crochet 2 together
- sp – space
- st(s) – stitch(es)
- CL – cluster
- Beg-CL – beginning cluster
Special Stitches
3-dc Cluster (CL): *Yarn over, insert hook in indicated st, yarn over and pull up a loop, yarn over and draw through 2 loops; repeat from * 2 more times in the same st (4 loops on hook), yarn over and draw through all 4 loops.
Beginning Cluster (Beg-CL): Ch 2, then work dc2tog with both legs in the same st. This counts as one CL.
Gauge and Checkpoints
Gauge isn’t critical for a decorative motif, but it sets the final size. Make one motif first, measure it, and adjust before you make more.
Gauge: Rounds 1–2 = 2 in (5.1 cm) diameter with a 3.5 mm hook.
Check these sizes as you go. Measure with the motif lying flat, and don’t stretch it.
- After Round 1: 1.25 in (3.2 cm)
- After Round 2: 2 in (5.1 cm)
- After Round 3: 2.5 in (6.4 cm)
- After Round 4: 3.75 in (9.5 cm)
- After Round 5: 4.75 in (12.1 cm)
- After Round 6 (blocked): 5.5 in (14.0 cm)
If your motif is too big by more than 0.25 in (0.6 cm) at the Round 2 check, switch to a 3.25 mm (D-3) or 3 mm hook. If it is too small by the same amount, switch to a 3.75 mm (F-5) or 4 mm hook. Fixing size at Round 2 is much faster than finding the problem at the edge.
If the center cups into a bowl shape, your tension is tight or your hook is too small. If it ruffles, your tension is loose or your hook is too large.
Pattern
Before you begin: Leave a 6 in (15.2 cm) tail at the start and at each fasten-off for weaving in. Work every round with the right side facing you, and join each round with a sl st. Don’t turn your work. Put a stitch marker in the first stitch of each round so the join is always easy to find. Keep your chains even and a little relaxed, because the open windows and edge loops depend on them.
Round 1 (Color A)
With Color A, make a magic ring. Ch 3 (counts as dc), then work 15 dc into the ring. Sl st to the top of the beginning ch-3. Pull the ring tightly closed.
Stitch count: 16 dc.
Checkpoint: 1.25 in (3.2 cm) across.
Round 2 (Color A) – Growth Round
Ch 3 (counts as dc), dc in the same st as the join. Work 2 dc in each remaining st around. Sl st to the top of the beginning ch-3.
Stitch count: 32 dc (16 sts × 2).
Checkpoint: 2 in (5.1 cm) across. This is your gauge check.
Round 3 (Color A) – Growth Round
Ch 1 (does not count as a st). Sc in the same st as the join, sc in the next 2 sts, 2 sc in the next st. Sc in the next 3 sts, 2 sc in the next st; repeat from * 6 more times. Sl st to the first sc.
Stitch count: 40 sc (8 repeats × 5 sts).
This round makes the slim ridge that frames the solid center. Checkpoint: 2.5 in (6.4 cm) across.
Round 4 (Color A) – Cluster Spokes and Windows
Work a Beg-CL in the same st as the join. Ch 5, skip the next 4 sts, CL in the next st; repeat from * 6 more times. Ch 5, skip the last 4 sts, then sl st to the top of the Beg-CL.
Stitch count: 8 CL and 8 ch-5 sps.
Math check: each repeat uses 1 st for the cluster and skips 4 sts, so 8 × 5 = 40 sts. This matches Round 3 exactly.
The skipped stitches under each ch-5 create the eight open windows around the center. The clusters form the eight beige spokes. Pull each cluster up to full height before closing it, so the spokes stand straight and the windows stay open and round.
Checkpoint: 3.75 in (9.5 cm) across. Fasten off Color A and weave in the tail.
Round 5 (Color B) – Shell Petals
Join Color B in the top of any CL with a standing sc, or with a sl st, ch 1 and sc. Work 7 dc in the next ch-5 sp, then sc in the top of the next CL; repeat from * 6 more times. Work 7 dc in the last ch-5 sp, then sl st to the first sc.
Stitch count: 64 sts = 8 sc (1 in each existing CL) + 56 dc (7 in each of the 8 ch-5 sps).
You now have 8 rounded white petals. Each petal sits directly over one window, and each sc anchors a dip between petals (the valley) over a beige spoke. Spread the 7 dc evenly across each ch-5 so the petal curve stays smooth.
A standing sc gives the neatest color change. If you join with a sl st instead, make sure the ch 1 doesn’t count as a stitch.
Checkpoint: 4.75 in (12.1 cm) across. This is the size before the border. Don’t fasten off.
Border: Round 6 (Color B) – Lace Loop Edge
This round turns each smooth petal into a lacy scallop of five chain loops, which gives the motif its delicate white edge.
Border gauge: Each ch-3 loop is about 0.375 in (1.0 cm) long and sits about 0.125 in (0.3 cm) above the petal. The round adds 0.375 in (1.0 cm) on each side, so the motif grows from 4.75 in (12.1 cm) to 5.5 in (14.0 cm).
To keep count, number the 7 dc of each petal 1 through 7 in the direction you’re working.
Ch 1 (does not count as a st). Sc in the same sc as the join.
Ch 3, skip dc 1, sc in dc 2.
Ch 3, skip dc 3, (sc, ch 3, sc) in dc 4.
Ch 3, skip dc 5, sc in dc 6.
Ch 3, skip dc 7, sc in the next sc (valley).
Repeat from * 7 more times. On the last repeat, replace the final “sc in the next sc” with a sl st to the first sc of the round.
Per petal: 5 sc and 5 ch-3 loops. The 5 sc are the valley sc, the sc in dc 2, the 2 sc in dc 4 and the sc in dc 6.
Stitch count: 40 sc and 40 ch-3 loops (8 petals × 5).
Why the math works: Each petal from Round 5 has 8 sts (1 sc + 7 dc). Round 6 works into the valley sc once, places stitches in dc 2, dc 4 and dc 6, and skips dc 1, 3, 5 and 7. That uses all 8 sts of each petal, and 8 × 8 = 64, which matches Round 5 exactly. The loop worked into dc 4 forms the petal tip, so every petal has a clear point while the valleys stay tight.
Fasten off. Weave in all tails, working them back through stitches of the same color so nothing shows through the windows.
Final Blocking
- Weave in all ends before blocking, and trim them after the motif dries.
- Lay the motif right side up on a blocking mat.
- Draw or mark a 5.5 in (14.0 cm) circle on the mat as a guide.
- Pin the center flat first, and check that the solid beige area measures 2.5 in (6.4 cm).
- Pin each of the 8 petal-tip loops evenly around the guide circle.
- Pin the valley between each pair of petals so all the scallops are the same depth.
- Open each window and each ch-3 loop with a pin tip so they look round, not squashed.
- Mist with cool water until damp but not soaking.
- Leave the motif pinned until it is completely dry, usually 6 to 12 hours.
- Unpin and measure. The motif should be 5.5 in (14.0 cm) tip to tip.
For a firmer, more decorative finish, mist lightly with spray starch before it dries.
Final Quality-Control Checklist
- The magic ring is fully closed, with no hole in the center.
- Round 2 has 32 dc and Round 3 has 40 sc.
- Round 4 has exactly 8 clusters and 8 open windows of equal size.
- Round 5 has 8 petals of 7 dc each, separated by 8 sc.
- Round 6 has 40 ch-3 loops, 5 per petal, with a tip loop at the center of each petal.
- The motif lies flat with no cupping or rippling.
- The petals are evenly spaced and all the same size.
- The finished diameter is 5.5 in (14.0 cm), give or take 0.25 in (0.6 cm).
- All tails are woven into matching colors and hidden on the wrong side.
Troubleshooting
The center cups or curls upward. Round 2 or Round 3 is too tight. Loosen your tension or go up 0.25 mm in hook size.
The motif ripples like a ruffle. Your tension is loose, often in Round 5. Go down one hook size for the white rounds only.
The number of clusters is wrong. Recount Round 3. If it has 40 sc, the pattern of 1 cluster stitch plus 4 skipped stitches will always give 8 clusters.
The windows look closed or tiny. Your ch-5 is too tight. Chain a little more loosely, or work ch 6 and keep everything else the same.
The petals look lopsided. The 7 dc are bunched to one side. Spread them evenly from one end of the ch-5 sp to the other.
The edge loops lie flat and disappear. Pin each tip loop when blocking, and use spray starch if needed.
Beige shows through the white at the color change. Weave tails only through stitches of the same color.
The join seam slants across the rounds. Join into the top of the first stitch, not the turning chain’s back loop, and use your stitch marker every round.
Care
Hand wash in cool water with a mild soap, press out the water in a towel and dry flat, reshaping the petals while damp. Don’t wring it, because wringing distorts the lace edge.

Final Notes
The measurements build step by step. Round 1 measures 1.25 in (3.2 cm). Round 2 grows to 2 in (5.1 cm) and confirms your gauge. Round 3 reaches 2.5 in (6.4 cm), and Round 4 opens to 3.75 in (9.5 cm) with 8 clusters and 8 windows. Round 5 brings the white petals to 4.75 in (12.1 cm). The lace edge then adds 0.375 in (1.0 cm) on each side, for a blocked size of 5.5 in (14.0 cm).
The stitch counts fit together just as neatly: 16 dc, then 32, then 40 sc, then 8 clusters across those 40 stitches, then 64 stitches in 8 petals, and finally 40 loops. If every checkpoint matches, your finished motif will match too.
Make one, measure it, and enjoy how quickly this little flower comes together. On its own it works well as a coaster, an ornament backing or a festive table accent.
Happy crocheting!