

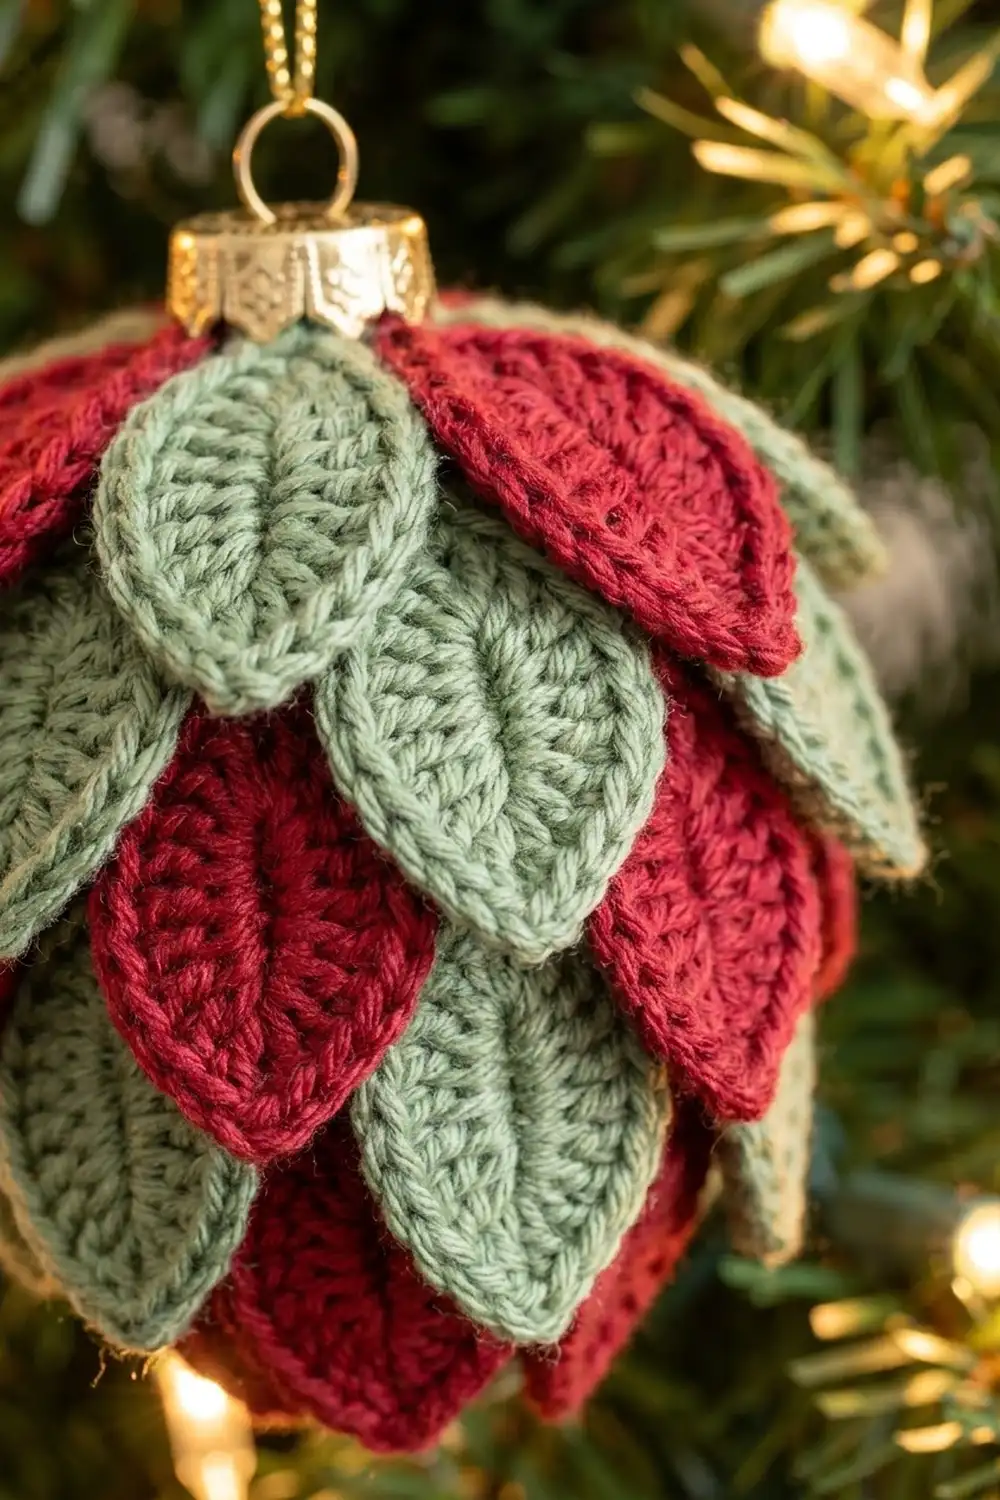
The Yuletide Leaf Bauble is a round Christmas ornament covered in overlapping pointed leaves, like the scales of a pinecone. The rings of leaves alternate between cranberry red and sage green, and every leaf points down. A gold ornament cap and hanging ring sit at the top.
Each leaf has a raised center vein and a crisp single crochet outline, so the rings stay neat even up close. The look is traditional and cozy, and it suits fairy lights and gold baubles.
The pattern uses US crochet terms. The finished ornament measures about 3.5 in (8.9 cm) across and 4 in (10.2 cm) tall including the cap. That doesn’t count the hanging loop.
The construction is simple. First you crochet a fitted single crochet cover around a 3 in (7.6 cm) shatterproof ornament. Then you make 28 leaves. Each one is worked around a foundation chain and finished with one outline round. Last, you sew the leaves on in four tiers (rings), starting at the bottom, so each tier hides the sewn ends of the tier below.
Finished Size and Construction
- Finished size: about 3.5 in (8.9 cm) wide x 4 in (10.2 cm) tall with the cap
- Skill level: Intermediate (easy stitches, careful finishing)
- Terminology: US crochet terms
- Yarn weight: Sport weight (#2) cotton or cotton blend
- Hook: 2.5 mm
- Number of pieces: 29 (1 ball cover + 28 leaves)
- Layout: 4 tiers of leaves, 6 / 8 / 8 / 6 from bottom to top, all tips pointing down
- Piece size: large leaf 1.75 in x 1.25 in (4.4 cm x 3.2 cm); small leaf 1.5 in x 1.25 in (3.8 cm x 3.2 cm)
- Size before border: large leaf 1.5 in x 1 in (3.8 cm x 2.5 cm); small leaf 1.25 in x 1 in (3.2 cm x 2.5 cm)
- Border depth: one sc outline round, about 0.125 in (0.3 cm) on each edge
Materials
Choose a smooth, mercerized sport weight cotton. It shows the stitches clearly, holds the leaf points, and won’t fuzz. Any yarn with about 155 m per 50 g should match the gauge.
- Sage green: 20 g (about 62 m) for the ball cover and 14 green leaves
- Cranberry red: 10 g (about 31 m) for 14 red leaves
Tools:
- 2.5 mm crochet hook
- 3 in (7.6 cm) shatterproof ball ornament with a removable gold cap and ring
- Tapestry needle with a sharp tip
- 1 stitch marker
- Sewing pins
- Scissors
- 6 in (15.2 cm) of gold thread for hanging
The quantities include extra yarn for a gauge test, long sewing tails, and a leaf or two you may want to redo.
Abbreviations (US Terms)
- ch – chain
- sl st – slip stitch
- sc – single crochet
- hdc – half double crochet
- dc – double crochet
- sc2tog – single crochet 2 together
- inc – 2 sc in the same stitch
- sp – space
- st(s) – stitch(es)
- rnd(s) – round(s)
Special stitch – surface slip stitch vein: Hold the yarn behind the leaf with the right side facing you. Insert the hook from front to back between two stitches, pull up a loop, and draw it through the loop on the hook. Repeat along a line to make a raised chain on the surface.
Gauge and Checkpoints
Gauge in sc worked in the round: 24 sts and 26 rnds = 4 in (10.2 cm). That is 6 sts and 6.5 rnds per 1 in (2.5 cm).
Make one large leaf first. It’s the quickest test piece.
- After leaf Rnd 1: 1.5 in (3.8 cm) long x 1 in (2.5 cm) wide.
- After the leaf border: 1.75 in (4.4 cm) long x 1.25 in (3.2 cm) wide.
- Ball cover after Rnd 9 (54 sts): a flat circle about 2.75 in (7.0 cm) across.
- Ball cover after Rnd 20: an open cup that fits snugly around the ornament. Its 54 sts measure about 9 in (22.9 cm) unstretched and stretch to the ornament’s circumference of 9.4 in (23.9 cm).
If your leaf is too big, use a hook 0.25 mm smaller. If it’s too small, use one 0.25 mm larger. A slightly tight cover is good. If the cover won’t stretch to the widest part of the ball, go up one hook size for the cover only.
Ball Cover (make 1, green)
Work in continuous spiral rounds from the bottom pole upward. Put a marker in the first st of each rnd and move it up as you go.
Rnd 1: Make a magic ring and work 6 sc into it. (6 sts)
Rnd 2: Inc in each st around. (12 sts)
Rnd 3: [Sc in next st, inc] 6 times. (18 sts)
Rnd 4: [Sc in next 2 sts, inc] 6 times. (24 sts)
Rnd 5: [Sc in next 3 sts, inc] 6 times. (30 sts)
Rnd 6: [Sc in next 4 sts, inc] 6 times. (36 sts)
Rnd 7: [Sc in next 5 sts, inc] 6 times. (42 sts)
Rnd 8: [Sc in next 6 sts, inc] 6 times. (48 sts)
Rnd 9: [Sc in next 7 sts, inc] 6 times. (54 sts)
Checkpoint: the circle is about 2.75 in (7.0 cm) across.
Rnds 10–20: Sc in each st around. (54 sts in each of these 11 rnds)
Try the cup on the ornament. The top edge should sit just above the widest point.
Rnd 21: [Sc in next 7 sts, sc2tog] 6 times. (48 sts)
Rnd 22: [Sc in next 6 sts, sc2tog] 6 times. (42 sts)
Rnd 23: [Sc in next 5 sts, sc2tog] 6 times. (36 sts)
Rnd 24: [Sc in next 4 sts, sc2tog] 6 times. (30 sts)
Take the cap off the ornament. Slide the ornament into the cover with the neck pointing up.
Rnd 25: [Sc in next 3 sts, sc2tog] 6 times. (24 sts)
Rnd 26: [Sc in next 2 sts, sc2tog] 6 times. (18 sts)
Rnd 27: [Sc in next st, sc2tog] 6 times. (12 sts)
Sl st in the next st and fasten off, leaving a 12 in (30.5 cm) tail. The 12-st opening is about 2 in (5.1 cm) around and should hug the ornament’s neck. If your ornament has a wider neck, stop after Rnd 26.
Weave the tail through the 12 sts, pull gently so they grip the neck, and secure it. Push the cap back on over the yarn.
Large Leaf (make 16: 8 red, 8 green)
Each leaf is worked around both sides of a foundation chain.
Ch 10.
Rnd 1: Sc in 2nd ch from hook, hdc in next ch, dc in next 5 ch, hdc in next ch, then (sc, ch 2, sc) in last ch for the tip. Turn the piece and work along the other side of the foundation chain: hdc in next ch, dc in next 5 ch, hdc in next ch, then sc in the same ch as the first sc. Ch 2 and join with a sl st to the first sc.
Count: Side A = sc, hdc, 5 dc, hdc, sc = 9 sts. Side B = sc, hdc, 5 dc, hdc, sc = 9 sts. Total: 18 sts plus 2 ch-2 points.
The dc stitches form the widest part of the leaf. The hdc and sc stitches taper it toward each point. Don’t fasten off. Go straight on to the border.
Small Leaf (make 12: 6 red, 6 green)
Ch 8.
Rnd 1: Sc in 2nd ch from hook, hdc in next ch, dc in next 3 ch, hdc in next ch, then (sc, ch 2, sc) in last ch for the tip. Working along the other side of the chain: hdc in next ch, dc in next 3 ch, hdc in next ch, then sc in the same ch as the first sc. Ch 2 and join with a sl st to the first sc.
Count: 7 sts per side, 14 sts total plus 2 ch-2 points. Go straight on to the border.
Make All Pieces
| Piece | Red | Green | Total |
|---|---|---|---|
| Ball cover | 0 | 1 | 1 |
| Large leaf | 8 | 8 | 16 |
| Small leaf | 6 | 6 | 12 |
Text layout grid (side view, top to bottom). Each tier is shifted half a leaf from the tier below.
            [ gold cap ]
Tier 4:   G  G  G  G  G  G         6 small green, top ends on Rnd 24
Tier 3:  R  R  R  R  R  R  R  R    8 large red, top ends on Rnd 18
Tier 2:   G  G  G  G  G  G  G  G   8 large green, top ends on Rnd 13
Tier 1:    R  R  R  R  R  R        6 small red, top ends on Rnd 8
            ( bottom pole )
The cover rounds are numbered from the bottom pole. Rnd 8 is near the bottom, and Rnd 24 is just under the cap.
Joining
Each leaf is sewn on by its upper point (the end where the round was joined), with the tip hanging down. Only the top 0.5 in (1.3 cm) of each leaf is sewn down. The rest hangs free so it can lift and overlap like a scale.
- Pin a leaf so its upper point sits on the guide round and its tip points straight down toward the bottom pole.
- Using the sewing tail, whipstitch through 5 points on the leaf: the ch-2 point plus the 2 border sc on each side of it. Sew each one to its own cover st, using 5 cover sts side by side.
- Knot the tail on the underside of the leaf and hide the end.
- Tier 1: Sew 6 small red leaves around Rnd 8, one every 8 sts (6 x 8 = 48).
- Tier 2: Sew 8 large green leaves around Rnd 13, spaced 7, 7, 7, 6, 7, 7, 7, 6 sts apart (total 54). Center each one between two red leaves below.
- Tier 3: Sew 8 large red leaves around Rnd 18 with the same spacing, each centered between two green leaves below.
- Tier 4: Sew 6 small green leaves around Rnd 24, one every 5 sts (6 x 5 = 30), with their upper points tucked under the cap.
Tension: Pull each stitch just snug. If you pull too hard, the cover puckers and the leaves tilt. Neighboring leaves should touch or overlap by about 0.125 in (0.3 cm).
Size checkpoint: After Tier 3, the ornament should measure about 3.5 in (8.9 cm) across at the widest point. Eight large leaves at 1.25 in (3.2 cm) each add up to 10 in (25.4 cm). That covers the 9.4 in (23.9 cm) circumference with a slight overlap.
Border (Leaf Edging)
Work this border on every leaf right after Rnd 1. It adds 0.125 in (0.3 cm) to each edge and sharpens both points.
Border gauge: 1 sc in each st along the sides, worked through both loops with firm tension, so the edge lies flat without ruffling.
Large leaf border: Ch 1. Sc in the same st as the join and in the next 8 sts along Side A. Work (sc, ch 2, sc) in the tip ch-2 sp. Sc in the next 9 sts along Side B. Work (sc, ch 2, sc) in the end ch-2 sp. Join with a sl st to the first sc.
Count: Side A = 1 end-point sc + 9 + 1 tip sc = 11. Side B = 1 tip sc + 9 + 1 end-point sc = 11. Total: 22 sc plus 2 ch-2 points.
Small leaf border: Ch 1. Sc in the same st as the join and in the next 6 sts. Work (sc, ch 2, sc) in the tip ch-2 sp. Sc in the next 7 sts. Work (sc, ch 2, sc) in the end ch-2 sp. Join.
Count: 7 + 2 = 9 sc per side. Total: 18 sc plus 2 ch-2 points.
Fasten off, leaving a 10 in (25.4 cm) tail for sewing. The tail comes out right next to the end point that gets sewn to the cover.
Why the math works: Each side gets one sc per Rnd 1 stitch, so the edge stays the same length and lies flat. The only extra stitches are the 2 sc at each point. That gives 18 + 4 = 22 for the large leaf and 14 + 4 = 18 for the small leaf. Putting the extras only at the points, with a ch-2 between them, creates sharp tips instead of a rounded oval.
Vein: Join a separate 12 in (30.5 cm) strand of the same color at the sewn end. Work a surface slip stitch vein along the foundation chain to the tip: 9 sl sts on a large leaf, 7 on a small leaf. Fasten off at the tip and weave the end in on the back.
Final Blocking
- Before sewing, pin each leaf flat on a foam board, with a pin at each point.
- Mist lightly with water until damp, not wet.
- Pinch the vein gently so it stands up slightly.
- Let the leaves dry completely, about 2 hours.
- After sewing, steam the finished ornament lightly from 2 in (5.1 cm) away. Don’t let the iron touch the yarn.
- While the yarn is warm, press each leaf against the ball with your fingers so the tiers curve with the surface.
Final Quality-Control Checklist
- The cover fits snugly, and no plastic shows through the stitches.
- The cap sits firmly over the 12-st opening.
- There are 28 leaves: 14 red and 14 green.
- Each large leaf has 11 sc per side, and each small leaf has 9.
- Both ends of every leaf come to a clear point.
- Each vein runs straight from end to tip.
- The tiers alternate red, green, red, green from the bottom up, each shifted half a leaf.
- No sewn leaf ends show; each one is hidden under the tier above.
- All tails are woven in on the underside.
Troubleshooting
Leaf curls into a tube: Your dc stitches are too tight. Relax your tension, or use a hook 0.25 mm larger for the leaves only.
Leaf edge ruffles: There’s an extra sc along a side. Recount: before the point sc, a large leaf has 9 sc per side and a small leaf has 7.
Points look rounded: The ch-2 is too loose or was skipped. Keep the ch-2 tight and block with a pin in each point.
Cover is loose on the ball: Use a smaller hook, or work 10 even rounds instead of 11.
Cover doesn’t reach the top: Add one more even round of 54 sts before the decreases.
Leaves stick out instead of lying down: Too much of the leaf is sewn down. Sew only the top 0.5 in (1.3 cm).
Care
Dust gently with a soft brush, and store the ornament in a box wrapped in tissue. If needed, spot clean with a damp cloth and reshape the leaves while they’re damp.

Final Notes
Here is how the measurements connect. A gauge of 6 sc per 1 in (2.5 cm) gives a large leaf of 1.5 in x 1 in (3.8 cm x 2.5 cm) after Rnd 1 and 1.75 in x 1.25 in (4.4 cm x 3.2 cm) after the border. The same gauge gives a 54-st cover of 9 in (22.9 cm) that stretches snugly over a 3 in (7.6 cm) ornament. Eight leaves in each middle tier cover the widest part of the ball. Four tiers of 6 / 8 / 8 / 6 leaves finish the bauble at about 3.5 in (8.9 cm) across.
Check one leaf, check the cover at Rnd 9 and Rnd 20, and sew from the bottom up. The tiers will fall into place.
Happy crocheting!