

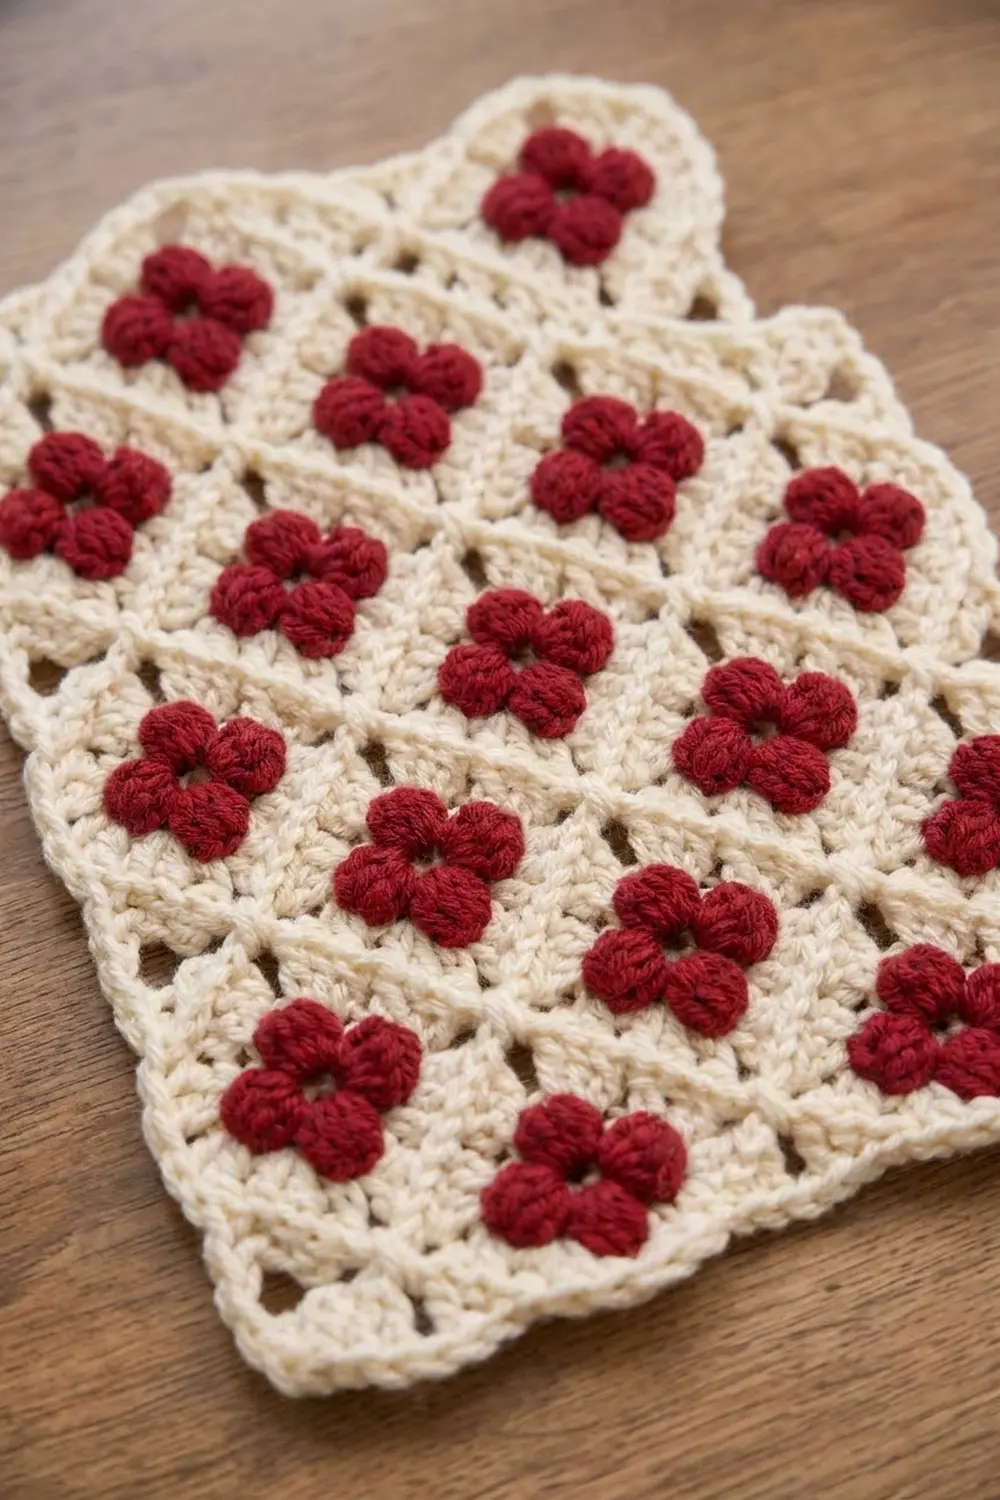
The Rosy Trellis Panel is a small cream rectangle scattered with deep red four-petal flowers. Each flower sits inside its own cream diamond, and the diamonds link into a raised trellis that covers the whole surface. A soft scalloped edge frames everything.
The panel uses just two colors: warm cream for the background, trellis and border, and a rich cranberry red for the flowers. The style is classic and cottage-like. You can use it as a table mat, a dresser panel, or a sampler you keep for reference.
This pattern uses US crochet terms. After blocking, the finished panel measures 8.75 x 12.8 in (22.2 x 32.5 cm).
You make the panel as one single piece in rows of single crochet. The red puff stitches go on wrong-side rows so they pop to the front, and the red yarn is carried inside the stitches. Once the body is done, you add raised cream lines with surface slip stitch to form the diamond trellis. Two border rounds finish the edge with scallops.
Finished Size and Construction
- Finished size: 8.75 x 12.8 in (22.2 x 32.5 cm)
- Skill level: Intermediate
- Terminology: US crochet terms
- Yarn weight: Worsted (medium #4) cotton
- Hook: 4.5 mm (US 7)
- Number of pieces: 1 (single panel, no joining)
- Layout: 9 flower rows, alternating 3 flowers and 2 flowers (23 flowers total)
- Piece size before border: 31 sts x 59 rows = 7.75 x 11.8 in (19.7 x 30.0 cm)
- Border depth: 0.5 in (1.3 cm) on every side
Materials
Choose a smooth cotton in worsted weight, either mercerized or matte. Cotton gives crisp puff stitches and holds the trellis lines well. Avoid fuzzy or splitty yarn, because surface slip stitch needs clean stitches to travel through.
- Cream (main color): 70 g, about 120 m
- Cranberry red (flowers): 25 g, about 43 m
These amounts include a margin of roughly 20 percent to cover your gauge swatch, the carried strands and weaving in.
Tools:
- 4.5 mm (US 7) crochet hook
- Tapestry needle
- 6 to 10 locking stitch markers
- Scissors
- Measuring tape or ruler
- Blocking mat and rust-proof pins
- Spray bottle with water
Abbreviations (US Terms)
- ch – chain
- sc – single crochet
- dc – double crochet
- sl st – slip stitch
- sk – skip
- st(s) – stitch(es)
- sp – space
- RS / WS – right side / wrong side
- rnd – round
Puff (special stitch): (Yarn over, insert hook in the indicated st, yarn over and pull up a loop to about 0.5 in / 1.3 cm) 4 times, giving 9 loops on the hook. Yarn over and pull through all 9 loops. One puff counts as 1 st. When you work it on a WS row, it pushes out to the RS.
Color change: Switch colors on the last yarn over of the stitch before the new color is needed. Lay the unused color along the top of the row and work over it so it stays hidden inside the stitches.
Gauge and Checkpoints
Gauge: 16 sc and 20 rows = 4 in (10.2 cm) in single crochet rows. One flower-and-diamond repeat is 10 sts x 12 rows = 2.5 x 2.4 in (6.4 x 6.1 cm).
Test a swatch first. Ch 22 and work 21 sc per row for 20 rows, carrying red through Rows 4 to 16. On Row 8 (WS), work sc in the first 9 sts, puff, red sc, puff, then sc in the last 9 sts. Measure the central area: you want 16 sts and 20 rows in 4 in (10.2 cm). Check that the puffs pop to the front and that no red shows through the cream.
If your swatch is too big, go down to a 4 mm hook. If it is too small, go up to a 5 mm hook. Row gauge matters as much as stitch gauge here, because the diamond shape depends on the 10-st x 12-row ratio.
Checkpoints for the body (measure height without stretching):
- After Row 15: 3 in (7.6 cm)
- After Row 27: 5.4 in (13.7 cm)
- After Row 39: 7.8 in (19.8 cm)
- After Row 51: 10.2 in (25.9 cm)
- After Row 59: 11.8 in (30.0 cm) tall and 7.75 in (19.7 cm) wide
The Body
The body is 31 sts wide. The flower positions are symmetrical, so you count the same way from either edge on every row.
- A rows hold 3 flowers, centered on sts 6, 16 and 26.
- B rows hold 2 flowers, centered on sts 11 and 21.
Each flower uses 3 WS rows: a top petal, a middle row (two side petals plus a red sc center) and a bottom petal. The plain RS rows between them space the petals into a rounded four-petal shape. The red sc in the middle sits lower than the puffs, so it reads as a small, darker center.
Every row begins with ch 1, which does not count as a st. Every row ends with 31 sts.
Bottom Margin
With cream, ch 32.
Row 1 (RS): Sc in 2nd ch from hook and in each ch across, turn. (31 sc)
Rows 2–3: Ch 1, sc in each st across, turn. (31 sc)
At the start of Row 4, join red by laying it along the top of the row and working over it. Carry red through every row from Row 4 to Row 56.
Flower Repeat (Rows 4–15)
Row 4 (WS, A top): Ch 1, sc in first 5 sts, puff in next st, [sc in next 9 sts, puff in next st] 2 times, sc in last 5 sts, turn. (28 sc + 3 puffs = 31 sts)
Row 5 (RS): Ch 1, sc in each st across, turn. (31 sc)
Row 6 (WS, A middle): Ch 1, sc in first 4 sts, [puff in next st, red sc in next st, puff in next st, sc in next 7 sts] 2 times, puff in next st, red sc in next st, puff in next st, sc in last 4 sts, turn. (22 cream sc + 3 red sc + 6 puffs = 31 sts)
Row 7 (RS): Ch 1, sc in each st across, turn. (31 sc)
Row 8 (WS, A bottom): Work as Row 4. (28 sc + 3 puffs = 31 sts)
Row 9 (RS): Ch 1, sc in each st across, turn. (31 sc)
Row 10 (WS, B top): Ch 1, sc in first 10 sts, puff in next st, sc in next 9 sts, puff in next st, sc in last 10 sts, turn. (29 sc + 2 puffs = 31 sts)
Row 11 (RS): Ch 1, sc in each st across, turn. (31 sc)
Row 12 (WS, B middle): Ch 1, sc in first 9 sts, puff in next st, red sc in next st, puff in next st, sc in next 7 sts, puff in next st, red sc in next st, puff in next st, sc in last 9 sts, turn. (25 cream sc + 2 red sc + 4 puffs = 31 sts)
Row 13 (RS): Ch 1, sc in each st across, turn. (31 sc)
Row 14 (WS, B bottom): Work as Row 10. (29 sc + 2 puffs = 31 sts)
Row 15 (RS): Ch 1, sc in each st across, turn. (31 sc)
Rows 16–51: Repeat Rows 4–15 three more times. You now have 4 A flower rows and 4 B flower rows.
Final Flower Row and Top Margin
Rows 52–56: Repeat Rows 4–8 once more (A top, plain, A middle, plain, A bottom). This makes the fifth A flower row. Cut red after Row 56, leaving a 4 in (10.2 cm) tail.
Rows 57–59: With cream only, ch 1, sc in each st across, turn. (31 sc) Fasten off.
The body now has 23 flowers: 5 rows of 3 alternating with 4 rows of 2. The 3 plain rows at the top match the 3 plain rows at the bottom.
The Raised Trellis
With the RS facing, add diagonal lines of cream surface slip stitch. Hold the yarn behind the work. Insert the hook from front to back between stitches, pull up a loop and draw it through the loop on the hook. Keep each sl st as loose as the fabric so the panel does not pucker.
Slope: Each line climbs 6 rows for every 5 sts it moves across. In practice, move up 1 row and over 1 st five times, then up 1 row without moving over.
Anchor points: Each line passes through these cream points:
- On every A middle row (6, 18, 30, 42, 54): sts 1, 11, 21 and 31.
- On every B middle row (12, 24, 36, 48): sts 6, 16 and 26.
- On every plain row between an A flower and its diagonal B neighbor (Rows 9, 15, 21, 27, 33, 39, 45, 51): the gap halfway between the two facing petals.
Work 8 lines leaning right and 8 lines leaning left, each running from one edge to another. The corner lines are short, and the middle lines cross almost the whole panel. Together they outline a diamond around each flower, 10 sts wide and 12 rows tall. Weave in the ends on the WS.
Checkpoint: Each flower should sit in the center of its own diamond, with an even band of cream on all four sides.
Border
The border is worked in rounds around the body.
Border gauge: Rnd 1 uses 1 sc per st on the top and bottom edges and 1 sc per row end on the sides. A few increases make each side a multiple of 4, plus 1. The corners are ch-2 spaces and are not counted in the side totals.
Rnd 1 (RS, conversion round): With RS facing, join cream in the first st of Row 59.
- Top edge: sc in first 10 sts, 2 sc in next st, sc in next 9 sts, 2 sc in next st, sc in last 10 sts. (31 sc + 2 extra = 33 sc)
- Ch 2 for the corner.
- First side, working in row ends: sc in first 19 row ends, 2 sc in next, sc in next 19, 2 sc in next, sc in last 19. (59 sc + 2 extra = 61 sc)
- Ch 2. Bottom edge: work across the foundation chain as for the top edge. (31 sc + 2 extra = 33 sc)
- Ch 2. Second side: work as for the first side. (59 sc + 2 extra = 61 sc)
- Ch 2, sl st in first sc to join.
Total: 188 sc and 4 ch-2 corner spaces. The panel now measures 8.15 in (20.7 cm) wide and 12.2 in (31.0 cm) tall.
Rnd 2 (scallops): Ch 1. Work each side as follows: sc in first sc, [sk next sc, 5 dc in next sc, sk next sc, sc in next sc] across. In each ch-2 corner space, work 7 dc.
- Top and bottom: 9 sc and 8 shells each.
- Sides: 16 sc and 15 shells each.
- Corners: 4 shells of 7 dc.
Join with sl st to first sc. Fasten off. Total: 50 sc, 46 side shells and 4 corner shells.
Why the math works: Each scallop repeat uses 4 sts (sk, shell st, sk, sc). Rnd 1 makes each side 1 + (4 x a whole number): 33 = 1 + (4 x 8) and 61 = 1 + (4 x 15). So every side starts and ends on a sc, and the corner shell fits neatly between them. Rnd 1 adds 0.2 in (0.5 cm) per side and Rnd 2 adds 0.3 in (0.8 cm), for a 0.5 in (1.3 cm) border.
Final Blocking
- Weave in all remaining ends through matching colors on the WS.
- Mist the panel lightly until it is damp but not soaked.
- Lay it RS up on the blocking mat.
- Pin the four corners to 8.75 x 12.8 in (22.2 x 32.5 cm).
- Pin along each edge so the body edges run straight, then pin the tip of each scallop shell outward.
- Press each puff gently from behind with a fingertip so the petals stand up.
- Let the panel dry completely before you unpin it.
Final Quality-Control Checklist
- 23 flowers: 5 rows of 3 alternating with 4 rows of 2.
- Each flower has 4 red puff petals and a red sc center.
- No red shows through the cream rows.
- Each body row had 31 sts, and the body measured 7.75 x 11.8 in (19.7 x 30.0 cm).
- 16 trellis lines, each centered between flowers.
- Rnd 1 counts: 33, 61, 33, 61 sc.
- Rnd 2: 8 shells on the top and bottom, 15 on each side, 4 corner shells.
- Blocked size: 8.75 x 12.8 in (22.2 x 32.5 cm).
Troubleshooting
Puffs sink to the back. You worked them on a RS row. Puffs go only on WS rows (4, 6, 8, 10, 12, 14 and their repeats).
Red peeks through the cream. Keep the carried strand snug along the top of the row and tighten your sc slightly. A smaller hook for the carried rows can also help.
Diamonds look squashed. Your rows are too short. Loosen your tension on RS rows or go up a hook size, then recheck the 10-st x 12-row repeat.
The panel puckers along the trellis. Your surface sl sts are too tight. Pull out the line and rework it with longer loops.
The border ruffles or cups. Recount Rnd 1. Each side must have exactly 61 sc, and the top and bottom 33 sc each.
Care
Hand wash in cool water with mild soap. Press out the water in a towel, dry flat, and reshape the scallops while damp.

Final Notes
The whole panel depends on one chain of measurements. A gauge of 16 sc and 20 rows = 4 in (10.2 cm) gives a 10-st x 12-row diamond of 2.5 x 2.4 in (6.4 x 6.1 cm). Thirty-one stitches and 59 rows make a body of 7.75 x 11.8 in (19.7 x 30.0 cm). The 0.5 in (1.3 cm) scalloped border brings it to 8.75 x 12.8 in (22.2 x 32.5 cm). Check each measurement as you go and the finished panel will lie flat and square.
Happy crocheting!