
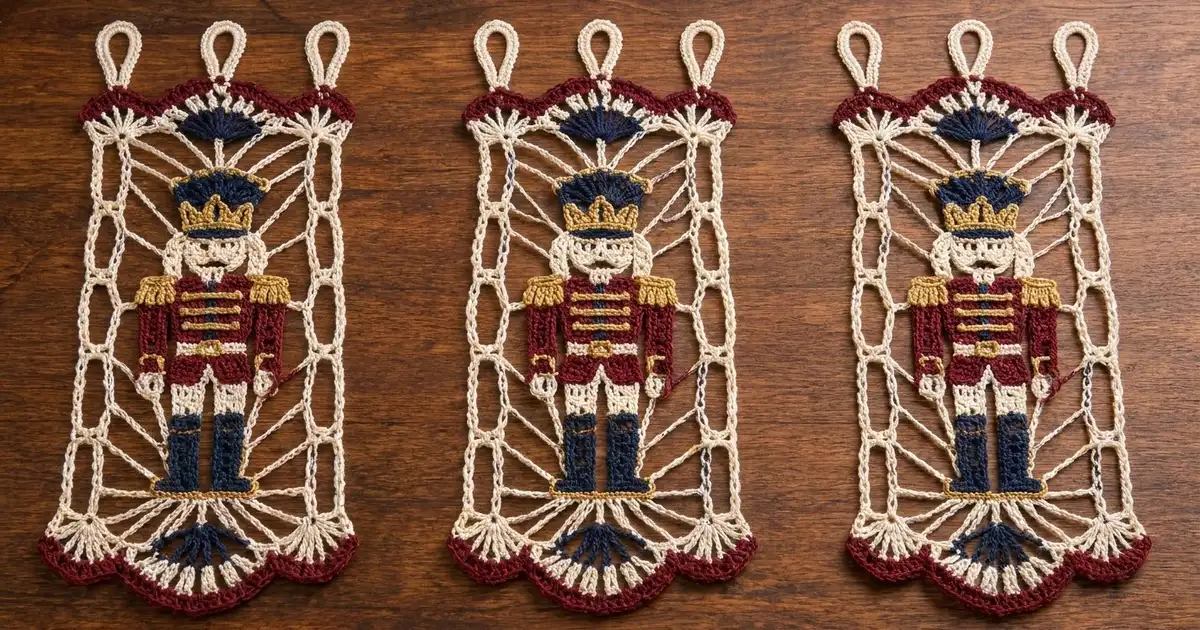
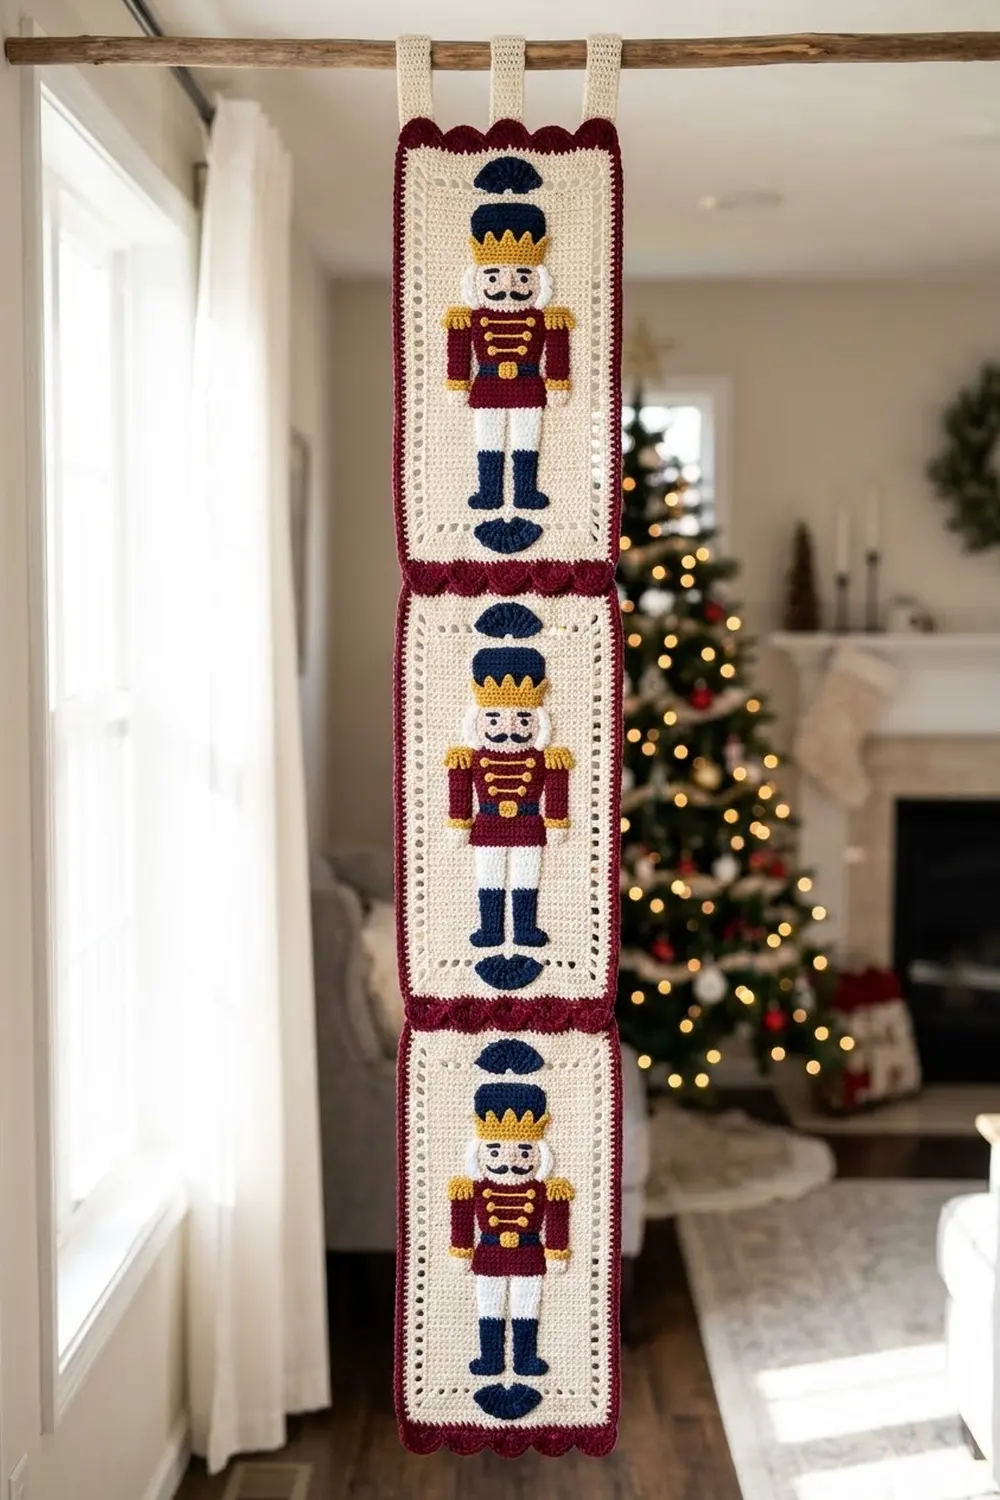
This hanging strip is made of three identical lace panels. In the middle of each panel stands a small colorwork nutcracker soldier, framed by ecru chain lace that radiates out from the figure. He wears a navy hat with a gold crown band, a burgundy jacket with gold frogging and epaulets, a gold belt, and tall navy boots. There’s a small navy fan above his hat and another below his boots. Both short ends of each panel finish with three burgundy scallops.
The colors are classic holiday ecru, burgundy, navy, and gold, and the style sits halfway between vintage thread lace and a toy-soldier ornament. The pattern uses US crochet terms throughout.
The finished strip measures 5.8 in (14.7 cm) wide and 28.2 in (71.6 cm) long from scallop tip to scallop tip. With the hanging loops, it’s 29.7 in (75.4 cm) long. Each panel measures 5.0 x 9.4 in (12.7 x 23.9 cm).
Here’s the construction. You crochet the soldier flat in rows of single crochet, then work five lace rounds around him to square the panel, and add scallops to both short ends. After that, you join the three panels tip to tip, add a two-row border to the long sides, and finish with hanging loops.
Finished Size and Construction
- Finished size: 5.8 x 28.2 in (14.7 x 71.6 cm), or 29.7 in (75.4 cm) long including the loops
- Skill level: Intermediate
- Terminology: US
- Yarn weight: Sport (#2) mercerized cotton
- Hook: 3.5 mm (E-4)
- Number of pieces: 3 panels, plus 6 small fan appliqués
- Layout: 1 panel wide x 3 panels tall
- Panel size: 5.0 x 9.4 in (12.7 x 23.9 cm)
- Strip size before border: 5.0 x 28.2 in (12.7 x 71.6 cm)
- Border depth: 2 rows, about 0.4 in (1.0 cm) on each long side
Materials
Choose a smooth mercerized cotton in sport weight. It blocks crisply and holds the lace open. Fuzzy or stretchy fibers will make the chain loops sag.
- Ecru (main color): 50 g / 155 m
- Burgundy: 25 g / 78 m
- Navy: 15 g / 47 m
- Gold: 10 g / 31 m
Tools:
- 3.5 mm (E-4) hook
- Tapestry needle
- 4 stitch markers
- Scissors
- Blocking mat, rustproof pins, and a spray bottle
- Optional: a 7 in (17.8 cm) dowel for hanging
The quantities include a margin of about 20%.
Abbreviations (US Terms)
- ch: chain
- sl st: slip stitch
- sc: single crochet
- dc: double crochet
- tr: treble crochet
- fsc: foundation single crochet
- sk: skip
- sp: space
- FL: front loop only
- st(s): stitch(es)
Special stitch, fsc: Insert your hook into the base of the previous stitch, yarn over and pull up a loop, yarn over and draw through 1 loop, then yarn over and draw through 2 loops.
Color changes: Finish the last stitch in the old color using the new color. Carry the unused colors up the side edge.
Gauge and Checkpoints
Gauge: 10 sc and 11 rows = 2 in (5.1 cm), which is 5 sc per inch.
Make one complete panel and check it before you start the others. Measure it flat and unstretched at each stage:
- Figure, after Row 30: 2.6 x 5.5 in (6.6 x 14.0 cm)
- After Round 1: 3.0 x 5.9 in (7.6 x 15.0 cm)
- After Round 3: about 4.2 x 7.4 in (10.7 x 18.8 cm)
- After Round 5: 5.0 x 8.4 in (12.7 x 21.3 cm)
- After the scallops: 5.0 x 9.4 in (12.7 x 23.9 cm)
If the panel is more than 0.25 in (0.6 cm) too big, go down half a hook size. If it’s too small, go up half a size. Change the hook, never the stitch counts, because the border math depends on them.
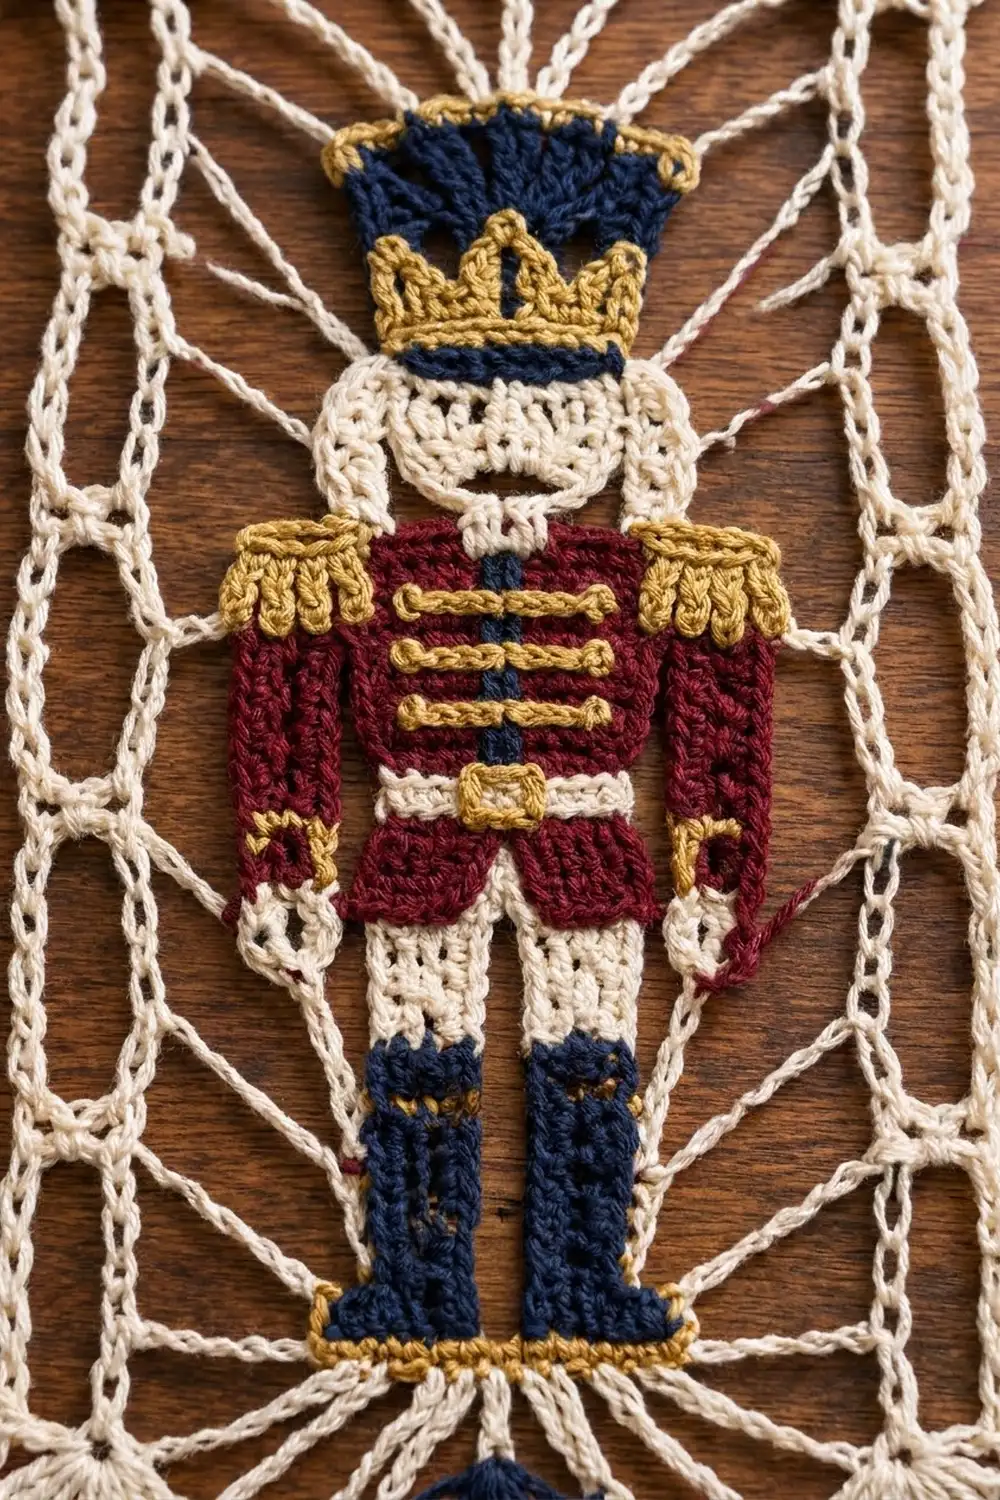
Nutcracker Figure
With navy, ch 10.
Row 1 (navy): Sc in the 2nd ch from the hook and the next 3 ch, ch 1, sk 1 ch, sc in the last 4 ch. (8 sc + 1 ch-1 sp = 9 sts)
Rows 2–6 (navy): Ch 1, turn, sc in the next 4 sc, ch 1, sk the ch-1 sp, sc in the next 4 sc. (9 sts) The stacked ch-1 sps form the gap between the boots.
Rows 7–8 (ecru): Repeat Row 2 for the trousers. (9 sts)
Row 9 (gold): Ch 1, turn, sc in the next 4 sc, sc in the ch-1 sp, sc in the next 4 sc. (9 sc) This is the belt. Change to burgundy and ch 3.
Row 10 (burgundy): Turn, sc in the 2nd ch from the hook and the next ch (2 arm sts), sc in the next 9 sc, then 2 fsc. (13 sc)
Rows 11–17 (burgundy): Ch 1, turn, sc in each st. (13 sc)
Row 18 (ecru): Turn, sl st in the first 2 sts, ch 1, sc in the next 9 sts, and leave 2 sts unworked. (9 sc; the sl sts aren’t counted)
Rows 19–23 (ecru): Ch 1, turn, sc in each st. (9 sc) These rows are the face.
Row 24 (gold): Ch 1, turn, sc in each st. (9 sc) This is the crown band.
Rows 25–30 (navy): Ch 1, turn, sc in each st. (9 sc) These rows are the hat. Fasten off.
Epaulets: With gold, sl st in the FL of the outer arm st of Row 17. Work 5 dc in the FL of the next st, then sl st in the FL of the first body st. Repeat on the other shoulder.
Embroidery: With gold, work straight stitches across the center 5 sts of Rows 11, 13, and 15 for the frogging, and 3 upright stitches rising from Row 24 for the crown points. Add 2 navy French knot eyes on Row 21 and a burgundy mustache on Row 20.
Lace Frame
Join ecru at the bottom-right corner of the figure.
Round 1: Ch 1 and work sc evenly around the figure.
- Bottom edge: 9 sc into the foundation ch.
- Each side: 9 sc over the row-ends of Rows 1–9, 2 sc under the arm, 8 sc over the arm row-ends, 2 sc in the back loops across the top of the arm, and 13 sc over the row-ends of Rows 18–30.
- Top edge: 9 sc.
- Corners: 1 extra sc at each of the 4 outer corners.
Sl st to the first sc. (9 + 9 + 34 + 34 + 4 = 90 sc)
Round 2: Ch 1, sc in the same st, ch 5, sk 2, sc in the next st. Repeat around, ending with ch 5, sk 2, sl st to the first sc. (30 ch-5 loops)
Round 3: Sl st into the first 3 ch, ch 1, sc in the same loop, ch 7, sc in the next loop. Repeat around, ending with ch 7, sl st to the first sc. (30 ch-7 loops)
Mark the 6 loops centered above the hat (top) and the 6 loops centered below the boots (bottom). That leaves 9 loops on each side. (6 + 6 + 9 + 9 = 30)
Round 4: Sl st to the center of the first side loop, then ch 1. Work 1 sc in each Round 3 loop (30 sc), with these chains between them:
- Between side loops: ch 7 (8 per side).
- Between top or bottom loops: ch 5 (5 per edge).
- From a side loop to a top or bottom loop: ch 9. These are the 4 corner loops.
Sl st to the first sc. (16 ch-7 + 10 ch-5 + 4 ch-9 = 30 loops)
Round 5: Sl st into the first loop and ch 1.
- Work 4 sc in each ch-7 loop.
- Work 3 sc in each ch-5 loop.
- In each ch-9 corner loop, work sc, 2 dc, tr, tr, tr, 2 dc, sc. The middle tr is the corner st.
Sl st to the first sc. (64 + 30 + 36 = 130 sts) Fasten off.
Here’s how those 130 sts break down by side:
- Long side: 2 corner tr + 4 + 32 + 4 = 42 sts.
- Short side: 2 corner tr + 4 + 15 + 4 = 25 sts.
- Total: The corners are shared, so 42 + 42 + 25 + 25 − 4 = 130.
Fans (navy, make 2 per panel): Ch 4, then work 8 dc in the 4th ch from the hook. (9 dc, counting the skipped ch) Each fan measures about 1.2 x 0.7 in (3.0 x 1.8 cm). Sew one fan centered above the hat, with its base on Round 1 so it spreads over the Round 2–3 loops. Sew the other upside down below the boots.
Scallop Edges
Scallop Row (burgundy, worked on each short side): Sc in the corner tr, sk 3, 9 dc in the next st, sk 3, sc in the next st. Repeat 3 times in total, ending in the opposite corner tr. (4 sc + 27 dc = 31 sts, covering 1 + 3 x 8 = 25 sts) Fasten off.
Each scallop edge adds 0.5 in (1.3 cm), which brings the panel to 5.0 x 9.4 in (12.7 x 23.9 cm).
Make All Pieces
Make 3 panels (A, B, and C), each with 2 fans, for 6 fans in total. Each panel uses about 12 g of ecru, 6 g of burgundy, 4 g of navy, and 2 g of gold. Save about 6 g of ecru for the border and loops. Block each panel to 5.0 x 9.4 in (12.7 x 23.9 cm) before joining.
Layout, with all the soldiers facing up:
[ loop   loop   loop ]
[      Panel A       ]  top
[      Panel B       ]  middle
[      Panel C       ]  bottom
Joining
Method: Tip-to-tip whipstitch with burgundy.
Place Panel A’s bottom scallops against Panel B’s top scallops. Each scallop has 9 dc, and the 5th dc is the tip. Match the scallops in order (first to first, second to second, third to third). Whipstitch through the 4th, 5th, and 6th dc of each facing pair, which gives 3 join points per seam. Leave the sc between the scallops free so they form small diamond openings. Join Panel B to Panel C the same way.
Tension: Pull just until the tips touch. Pulling harder makes the scallops cup.
Checkpoint: The joined strip should measure 5.0 x 28.2 in (12.7 x 71.6 cm), which is 3 x 9.4 in.
Border
Border gauge: 5 sc per inch.
Each panel’s long side has 42 sts, including its corners. Every seam leaves a notch about 1.0 in (2.5 cm) deep at each side, which is 2 scallop depths of 0.5 in. Work the border along the long sides only.
Row 1 (ecru): Join in Panel C’s bottom corner tr. Sc in each of Panel C’s 42 side sts, ch 5 across the notch, sc in Panel B’s 42 sts, ch 5, then sc in Panel A’s 42 sts. (3 x 42 = 126 sc + 2 ch-5 bridges)
Row 2: Ch 1, turn, sc in each sc and work 5 sc in each ch-5 bridge. (126 + 10 = 136 sc) Fasten off.
Repeat both rows on the other long side.
Why the math works: 126 sc at 5 per inch is 25.2 in (64.0 cm), which equals 3 x 8.4 in. Each 5-ch bridge measures 1.0 in, which is exactly one notch. So the border spans 27.2 in (69.1 cm), corner to corner, with no extra stitches to make it ripple.
Hanging loops (ecru): Sl st in the 5th dc of a top scallop on Panel A, ch 15 (about 3 in or 7.6 cm), and sl st in the same dc. Work 22 sc into the loop, sl st, and fasten off. Make one loop on each of the 3 top scallops. Each loop stands about 1.5 in (3.8 cm) tall.
Final Blocking
- Weave in the ends through stitches of the same color.
- Soak the strip in cool water and roll it in a towel.
- Pin it to 5.8 x 28.2 in (14.7 x 71.6 cm).
- Pin out every scallop tip, and straighten the side loops so the lace radiates evenly.
- Flatten the fans and open the epaulets.
- Let it dry completely before unpinning.
Final Quality-Control Checklist
- Each panel has 130 sts in Round 5 and 31 sts in each scallop row.
- All the soldiers face up.
- Each seam has 3 tip-to-tip joins.
- Each border Row 2 has 136 sc.
- The strip measures 5.8 x 28.2 in (14.7 x 71.6 cm) and lies flat.
- The loops sit centered on the top scallops.
Troubleshooting
- The figure is wider than 2.6 in (6.6 cm): Go down a hook size for the figure only.
- Round 5 ruffles: Work the Round 4 chains with a smaller hook.
- The frame is lopsided: Recount the Round 3 markers as 6/9/6/9.
- The scallops cup: Re-block them with the tips pinned outward.
- The border waves: Check that each bridge has exactly 5 sc.
- Color shows through: Carry unused yarn along the edge, not across the back.
Care
Hand wash in cool water with mild soap, then lay flat to dry. Re-block lightly if the lace loosens.
Final Notes
The measurement chain goes like this. The figure measures 2.6 x 5.5 in (6.6 x 14.0 cm). Five rounds take the panel to 5.0 x 8.4 in (12.7 x 21.3 cm), and the scallops bring it to 5.0 x 9.4 in (12.7 x 23.9 cm). Three panels make 28.2 in (71.6 cm), and the border widens the strip to 5.8 in (14.7 cm). When each checkpoint matches, the next stage will too.
Happy crocheting!