

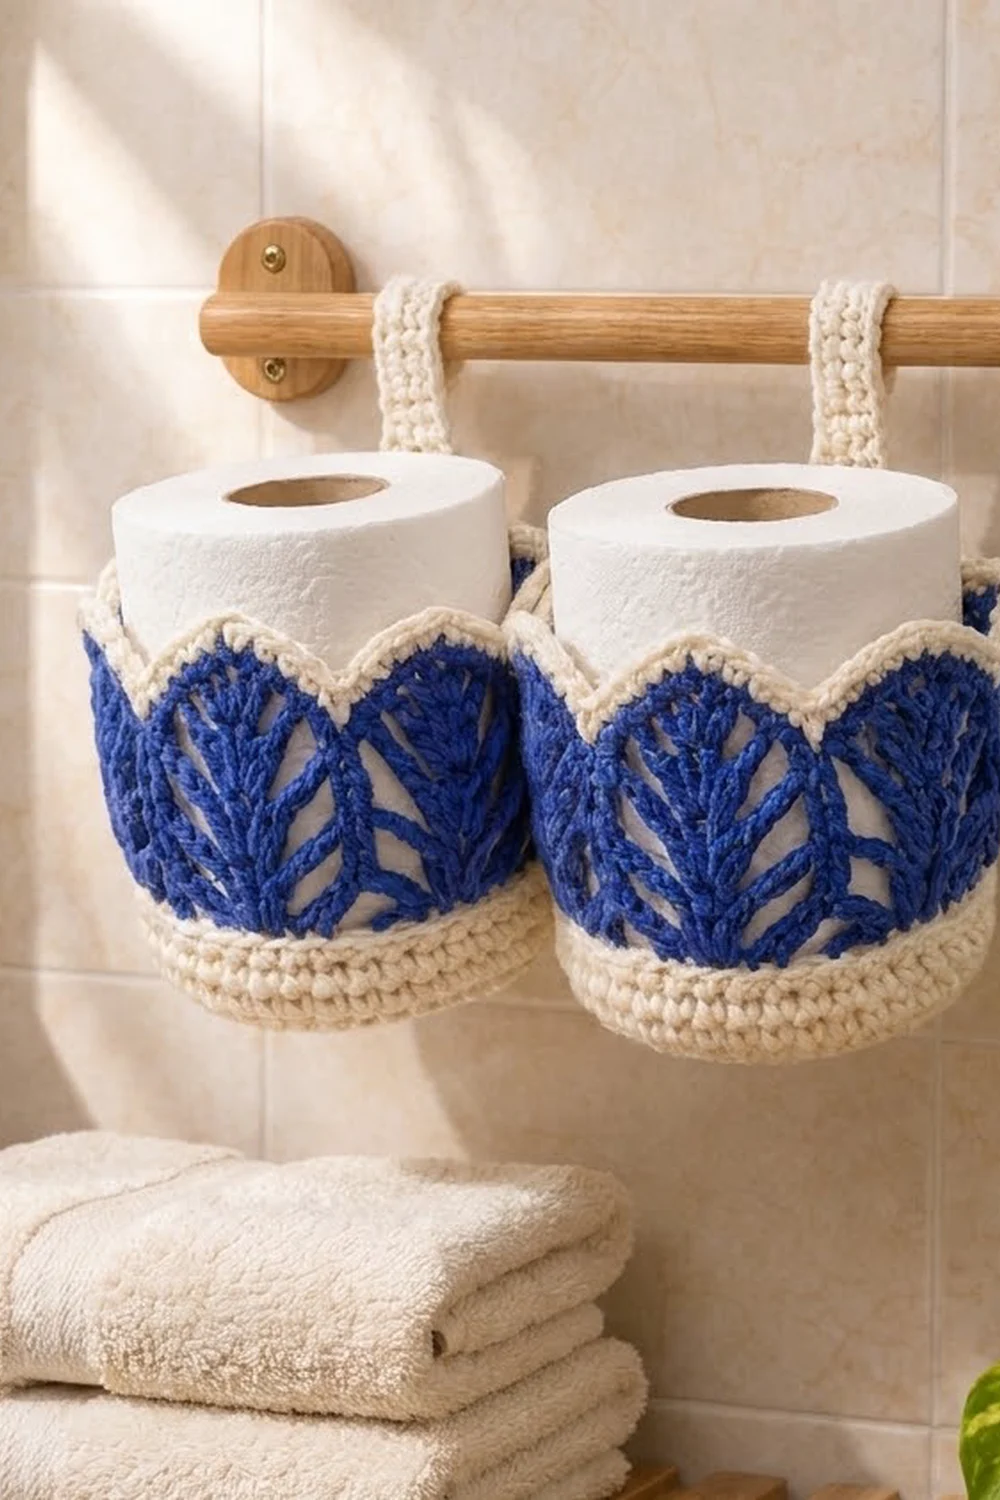
These two round baskets hang side by side from a towel bar, and each one holds a toilet roll. Each basket has a solid cream base and a royal blue lace band of pointed leaves. The top edge is a crown of peaks and curved valleys, trimmed in cream.
The colors are a classic pair: cream for the base, rim and strap, and royal blue for the leaves. Each leaf has a raised center spine. The decreases on either side of the spine lean inward like veins, and the open spaces between the leaves let the roll show through.
The pattern uses US crochet terms. Each basket is 5.5 in (14.0 cm) across and 5 in (12.7 cm) tall at the peaks. Joined, the pair is 11 in (27.9 cm) wide.
Here’s how it goes together. You crochet a flat cream circle for the base, turn up the wall with one back-loop round, and add five more cream rounds. Then you switch to blue for five lace rounds and a peak round. Two cream border rounds finish the rim, and you work a strap straight up from the back peak. Make two baskets, sew them together at one side, and sew each strap into a loop over the bar.
Finished Size and Construction
- Finished size (joined pair): 11 in (27.9 cm) wide x 5 in (12.7 cm) tall at the peaks x 5.5 in (14.0 cm) deep
- Skill level: Intermediate
- Terminology: US
- Yarn weight: Worsted (#4) cotton
- Hook: 5 mm (H-8)
- Number of pieces: 2 baskets, each with an attached strap
- Layout: 2 baskets side by side (1 row of 2)
- Piece size: each basket is 5.5 in (14.0 cm) across and 17.1 in (43.4 cm) around
- Size before border: 4.5 in (11.4 cm) tall at the peaks
- Border depth: 2 rounds, 0.5 in (1.3 cm)
- Strap: 5 sts wide (about 1.4 in / 3.6 cm) x 7 in (17.8 cm) long
Materials
Use a smooth worsted-weight cotton or cotton blend. Cotton holds its shape, copes with bathroom humidity and shows the leaf texture clearly. Avoid fuzzy or very stretchy yarns, because the lace will sag under the weight of a roll.
- Cream: 110 g / 185 m (about 202 yd)
- Royal blue: 70 g / 120 m (about 131 yd)
These quantities include about 20 percent extra for swatching and joining.
Tools:
- 5 mm (H-8) crochet hook
- Tapestry needle
- 6 locking stitch markers
- Measuring tape
- Scissors
- Rust-proof pins and a blocking surface
- Optional: two 5.25 in (13.3 cm) plastic canvas circles to stiffen the bases
Abbreviations (US Terms)
- ch – chain
- sl st – slip stitch
- sc – single crochet
- hdc – half double crochet
- dc – double crochet
- tr – treble crochet
- BLO – back loop only
- sp – space
- st(s) – stitch(es)
- rep – repeat
- dc2tog – double crochet 2 together
- sc3tog – single crochet 3 together
Special stitch – FPdc (front post double crochet): Yarn over and insert the hook from front to back to front around the post of the stitch below. Yarn over and pull up a loop, then [yarn over, pull through 2 loops] twice. The FPdc sits on the front of the fabric and forms each leaf’s center spine.
Gauge and Checkpoints
- Single crochet: 14 sc x 16 rounds = 4 in (10.2 cm)
- Double crochet: 14 dc x 8 rounds = 4 in (10.2 cm)
Make one complete basket before you start the second, and check it at each of these points:
- After Round 5: the base is 2.75 in (7.0 cm) across.
- After Round 10: the base is 5.5 in (14.0 cm) across.
- After Round 16: the cream wall is 1.5 in (3.8 cm) tall.
- After Round 21: the basket is 4 in (10.2 cm) tall.
- After Round 24: the basket is 5 in (12.7 cm) tall at the peaks.
If the base is wider than 5.75 in (14.6 cm), go down one hook size. If it’s narrower than 5.25 in (13.3 cm), go up one hook size. A basket that’s too small won’t fit a standard roll, and one that’s too big lets the roll tip over. Fix size by changing hooks and starting again, not by adding or skipping stitches.
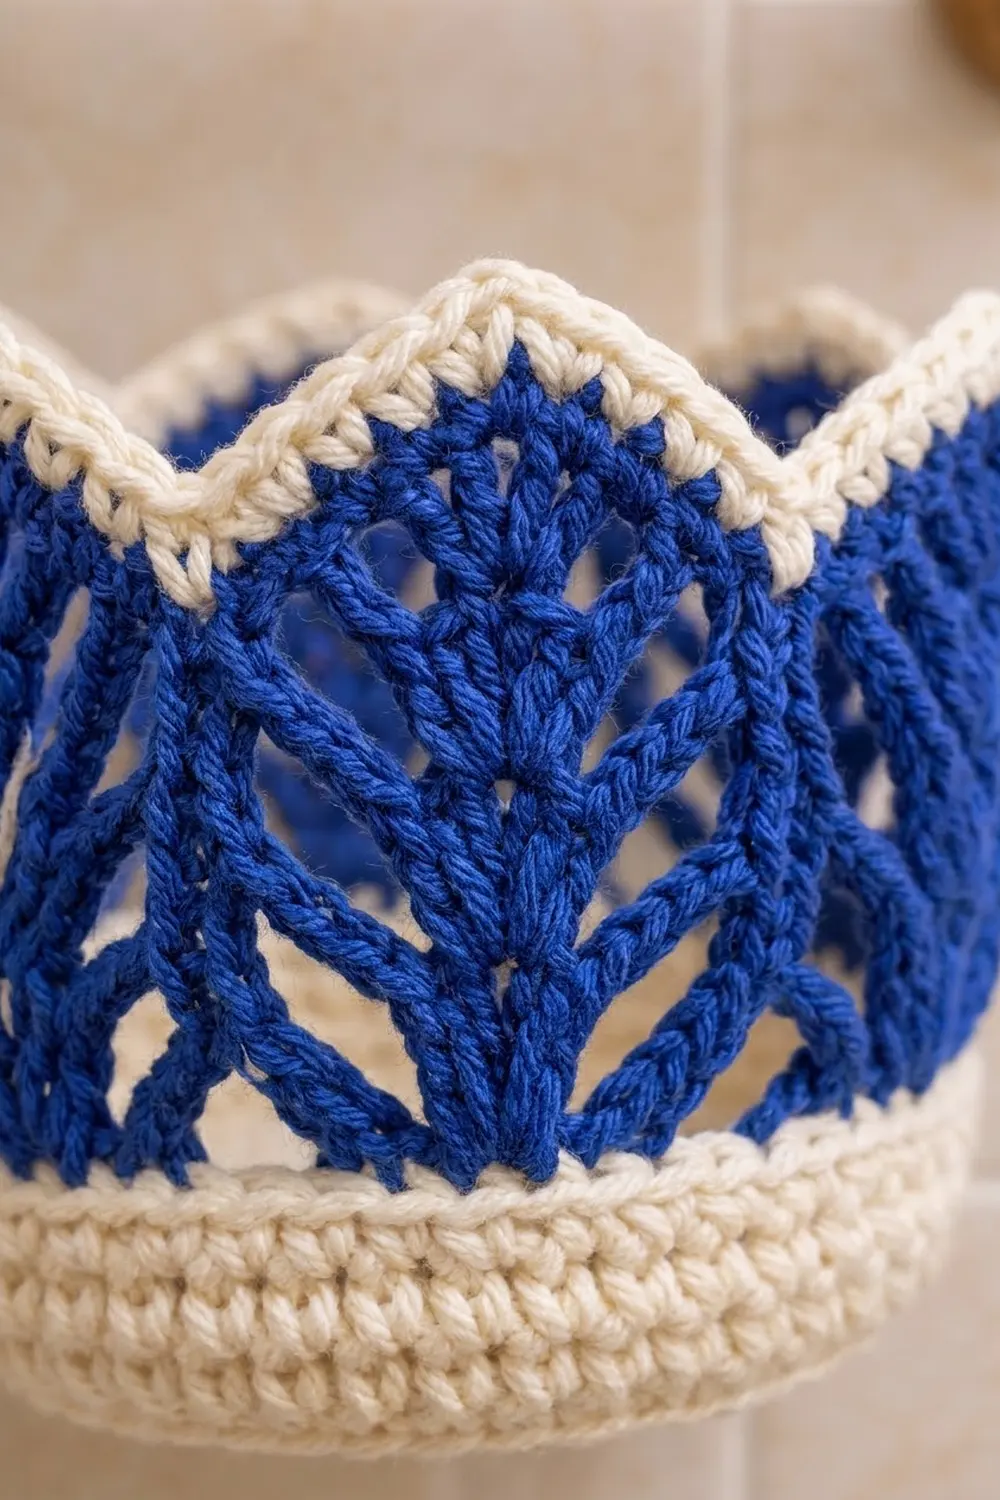
Basket (Make 2)
Work in joined rounds without turning. The beginning ch 1 doesn’t count as a stitch. When you see ch 3, it counts as a dc.
Base (Cream)
Round 1: Make a magic ring, ch 1, work 6 sc in the ring, sl st to the first sc to join. (6 sts)
Round 2: Ch 1, 2 sc in each st around, join. (12 sts)
Round 3: Ch 1, sc in next st, 2 sc in next st; rep from * around, join. (18 sts)
Round 4: Ch 1, sc in next 2 sts, 2 sc in next st; rep around, join. (24 sts)
Round 5: Ch 1, sc in next 3 sts, 2 sc in next st; rep around, join. (30 sts)
Round 6: Ch 1, sc in next 4 sts, 2 sc in next st; rep around, join. (36 sts)
Round 7: Ch 1, sc in next 5 sts, 2 sc in next st; rep around, join. (42 sts)
Round 8: Ch 1, sc in next 6 sts, 2 sc in next st; rep around, join. (48 sts)
Round 9: Ch 1, sc in next 7 sts, 2 sc in next st; rep around, join. (54 sts)
Round 10: Ch 1, sc in next 8 sts, 2 sc in next st; rep around, join. (60 sts)
The base should lie flat. If it ruffles, your tension is too loose. If it cups, it’s too tight.
Wall (Cream)
Round 11: Ch 1, sc in BLO of each st around, join. (60 sts) The front loops you skip make a crisp ridge where the base turns up into the wall.
Rounds 12–16: Ch 1, sc in each st around, join. (60 sts each round)
Fasten off cream. The wall is now 1.5 in (3.8 cm) tall.
Leaf Lace Band (Royal Blue)
Each basket has 6 leaves. Each leaf uses 10 stitches, so 6 x 10 = 60.
Round 17: Join blue in any st. Ch 3, dc in each st around, join to the top of the ch-3. (60 sts)
Round 18: Ch 3, dc in next 3 sts, FPdc around next st, dc in next 4 sts, ch 1, sk 1 st, dc in next 4 sts, FPdc around next st, dc in next 4 sts, ch 1, sk 1 st; rep from * 4 more times, join. (54 sts + 6 ch-1 sps = 60 positions)
Round 19: Ch 2, dc in next st (counts as dc2tog), dc in next 2 sts, FPdc around FPdc, dc in next 2 sts, dc2tog, ch 3, sk ch-1 sp, dc2tog, dc in next 2 sts, FPdc around FPdc, dc in next 2 sts, dc2tog, ch 3, sk ch-1 sp; rep from * 4 more times, join. (42 sts + 6 ch-3 sps = 60 positions)
Round 20: Ch 2, dc in next st (counts as dc2tog), dc in next st, FPdc around FPdc, dc in next st, dc2tog, ch 5, sk ch-3 sp, dc2tog, dc in next st, FPdc around FPdc, dc in next st, dc2tog, ch 5, sk ch-3 sp; rep from * 4 more times, join. (30 sts + 6 ch-5 sps = 60 positions)
Round 21: Ch 2, dc in next st (counts as dc2tog), FPdc around FPdc, dc2tog, ch 7, sk ch-5 sp, dc2tog, FPdc around FPdc, dc2tog, ch 7, sk ch-5 sp; rep from * 4 more times, join. (18 sts + 6 ch-7 sps = 60 positions)
The dc2tog stitches pull each leaf in toward its FPdc spine, and that slant makes the diagonal veins. The chains get longer each round, which opens up the gaps between leaves. The basket is now 4 in (10.2 cm) tall.
Round 22 (peak round): Ch 3 (counts as dc), (tr, ch 2, tr) in next FPdc, dc in next dc2tog, (2 hdc, 3 sc, 2 hdc) in next ch-7 sp, dc in next dc2tog, (tr, ch 2, tr) in next FPdc, dc in next dc2tog, (2 hdc, 3 sc, 2 hdc) in next ch-7 sp; rep from * 4 more times, join. (66 sts + 6 ch-2 sps)
Each repeat has 11 sts and 1 ch-2 sp: 7 sts in the valley, plus 2 dc and 2 tr in the leaf. The stitches get taller from sc to hdc to dc to tr, so each leaf tip rises to a point and each valley curves down. Fasten off blue. The basket is 4.5 in (11.4 cm) tall at the peaks.
Pick one peak to be the back of the basket and put a marker in its ch-2 sp. The peak directly opposite is the front center.
Make All Pieces
Make 2 baskets exactly as written.
- Per basket: about 45 g cream and 30 g royal blue
- Both baskets: about 90 g cream and 60 g royal blue, plus the extra listed in Materials
Work the border and strap (see the Border section) on both baskets before you join them. The seam runs along the sides, so the straps at the back won’t get in the way.
Layout (seen from the front, straps at the back):
+-----------+-----------+
| Basket A  | Basket B  |
|  strap ^  |  strap ^  |
+-----------+-----------+
       seam at center
Joining
Method: Whipstitch with cream yarn and a tapestry needle.
Stitch-to-stitch logic: On Round 16, count 15 sts (a quarter of 60) from the back center to find the side column. Mark the right-side column on Basket A and the left-side column on Basket B. Each of these columns sits below a valley, because valleys fall halfway between peaks. Set the baskets side by side with the bases level and both straps at the back.
- Starting at Round 11, whipstitch the marked stitch on Basket A to the marked stitch on Basket B. Repeat on every round up to Round 16, for 6 pairs, one stitch from each basket per pair.
- Make 2 tacking stitches through the matching dc of Round 17.
- Make 2 tacking stitches through the sc3tog valley stitches of Round 24 so the rims touch.
Joining doesn’t add or remove any stitches. You don’t sew through the open lace rounds, so the leaves stay clear.
Tension: Pull each stitch just snug enough that the walls touch. If you pull too tight, the baskets turn toward each other and the rims tilt.
Size checkpoint: The joined pair is 11 in (27.9 cm) wide, and the strap centers are 5.5 in (14.0 cm) apart.
Hanging: Fold each strap over the bar toward the inside of its basket. Sew the last row to the inside back wall at Round 21, 1 in (2.5 cm) below the peak of the border. This leaves a loop about 2 in (5.1 cm) high above the rim, which fits a bar up to 1.25 in (3.2 cm) thick. Weave in all ends.
Border (Cream)
Border gauge: 14 sc = 4 in (10.2 cm), the same as the base. On a round basket there are no straight sides, so the counts are given per leaf repeat (one peak to the next), 6 repeats per basket.
Round 23: Join cream in the marked back ch-2 sp. Ch 1, (sc, ch 2, sc) in ch-2 sp, sc in next tr, sc in next dc, sc in next 2 hdc, sc3tog over next 3 sc, sc in next 2 hdc, sc in next dc, sc in next tr; rep from * around, join. (11 sc + 1 ch-2 sp per repeat; 66 sc + 6 ch-2 sps total)
Here’s the count: 66 sts worked one into each existing stitch, plus 12 added (2 in each ch-2 sp), minus 12 removed (2 by each sc3tog), for 66 sc. The sc3tog sharpens the bottom of each valley.
Round 24: Ch 1, 3 sc in ch-2 sp, sc in next 5 sts, sc in sc3tog, sc in next 5 sts; rep from * around, join. (14 sc per repeat; 84 sc total)
Here’s the count: 66 sc worked one into each existing stitch, plus 18 added (3 in each of the 6 ch-2 sps), for 84 sc.
Why the math works: The peaks need extra stitches because their outer edge is longer, so each peak gets 2 added stitches in Round 23 and 3 in Round 24. The valleys are inside curves and need fewer, so each sc3tog takes away 2 in Round 23. These changes happen in the same place in all 6 repeats, so the rim stays even and lies flat. Don’t fasten off.
Strap
The middle sc of the 3 sc at the back peak is the back center. Ch 1 and turn, so you’re working across the top of Round 24. The strap uses 5 sts: the sc before the peak, the 3 peak sc, and the sc after.
Row 1: Sc in those 5 sts. (5 sts)
Rows 2–28: Ch 1, turn, sc in each st across. (5 sts each row)
The strap is 7 in (17.8 cm) long. Fasten off, leaving a 12 in (30.5 cm) tail for sewing.
Final Blocking
- Soak the joined pair in cool water and gently press out the extra water. Don’t wring it.
- Roll it in a towel to soak up more water.
- Stand a toilet roll inside each basket so the walls dry round. A 5.5 in (14.0 cm) jar wrapped in plastic also works.
- Pin each leaf tip upward and slightly outward so the peaks dry pointed.
- Straighten each FPdc spine with your fingers so it runs straight up.
- Leave it to dry completely, which takes 24–48 hours.
- If you’re using plastic canvas circles, place them in the bases now.
Final Quality-Control Checklist
- Each base has exactly 60 sts and lies flat.
- Each basket has 6 leaves with straight spines.
- There are 6 peaks and 6 valleys, all even in height.
- Round 24 has 84 sc on each basket.
- Each strap is 5 sts wide and 28 rows long.
- The seam lines up under the valleys and runs from Round 11 to Round 16.
- The pair measures 11 in (27.9 cm) wide and 5 in (12.7 cm) tall at the peaks.
- All ends are woven in on the inside.
Troubleshooting
- The base ruffles: Your tension is loose. Go down one hook size.
- The base cups before Round 11: Your tension is tight. Go up one hook size.
- The spines lean: Work each FPdc around the FPdc directly below it.
- You have the wrong number of leaves: Recount Round 18. It needs exactly 6 ch-1 sps.
- The peaks are flat: Make sure you used tr at the tips, not dc, and pin the tips when blocking.
- The roll is loose: Remake the basket with a smaller hook, or work a round of sl sts on Round 16 to tighten it.
- The strap stretches: Use 100 percent cotton, or work sl sts along both long edges of the strap.
Care
Hand wash in cool water, reshape each basket around a roll, and dry flat. Don’t tumble dry, because heat can shrink the cotton.
Final Notes
Every measurement follows from gauge. At 14 sc = 4 in (10.2 cm), the 60-st base is 5.5 in (14.0 cm) across. The six wall rounds add 1.5 in (3.8 cm), and the five dc rounds bring the basket to 4 in (10.2 cm). The peak round adds 0.5 in (1.3 cm) and the border adds another 0.5 in (1.3 cm), for 5 in (12.7 cm) at the peaks. Two baskets side by side make 11 in (27.9 cm). If your gauge matches, every other measurement will match too.
Happy crocheting!