

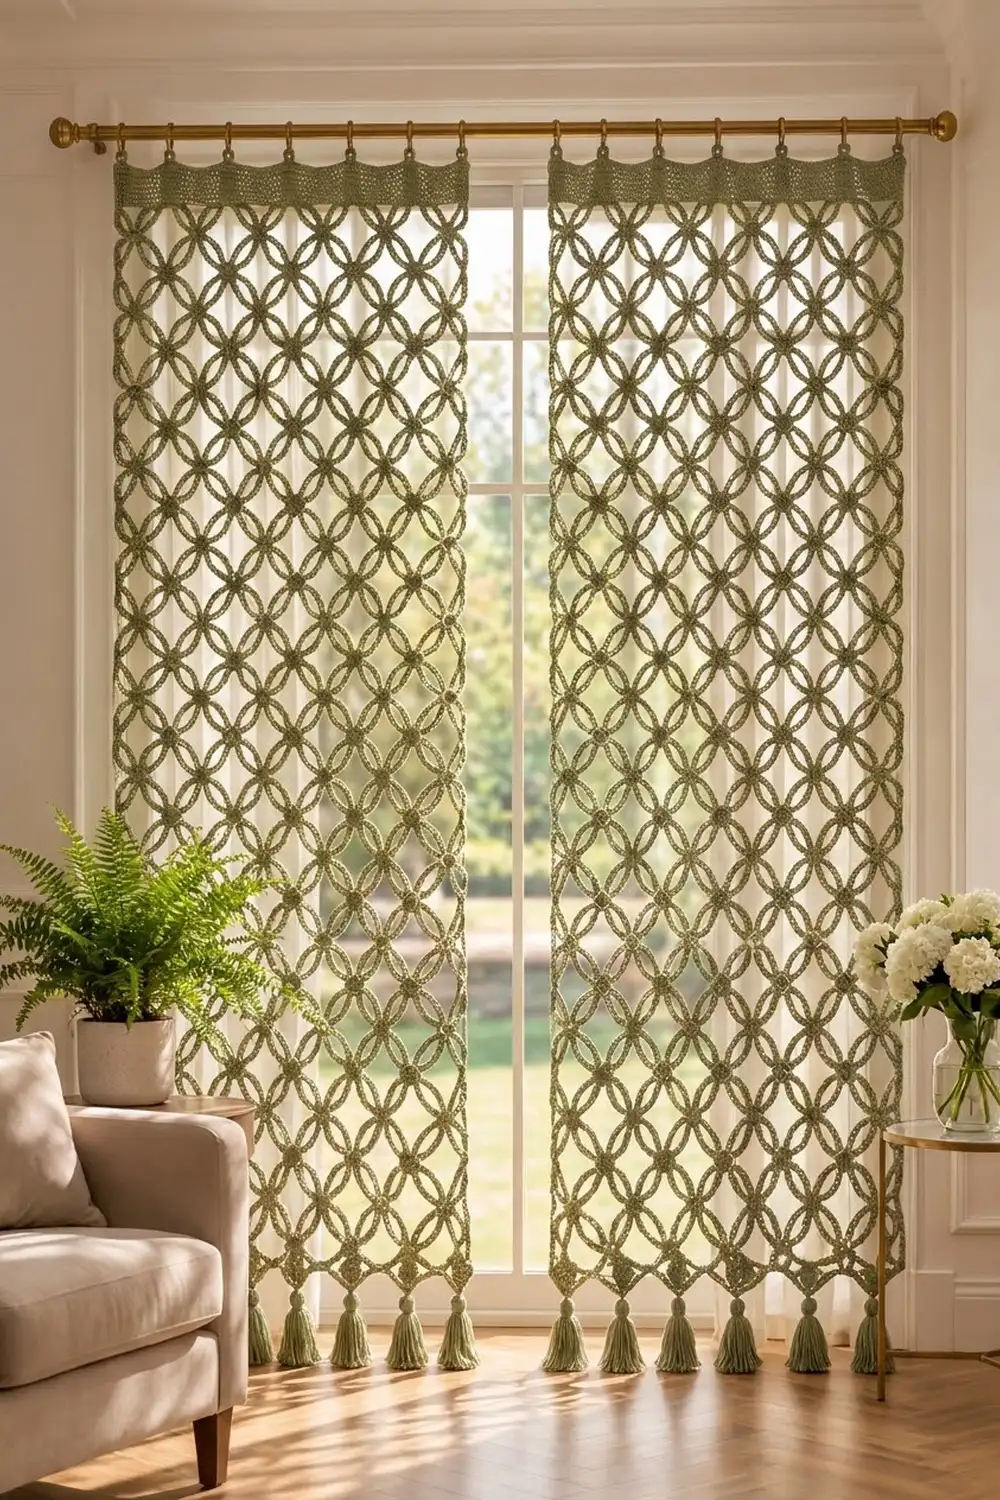
The Sage Bloom Lattice Curtain is an airy lace panel made of four-petal flower circles linked by tiny solid diamonds. Each line in the design has a rope-like texture because every chain loop is fully covered in single crochet. The result looks like a carved garden trellis softened into yarn.
The sample uses a single color, a soft sage green, so the light and shadow do the decorating. A solid single crochet header with hanging tabs runs across the top, and plump tassels finish the bottom. The style is botanical, calm, and modern-vintage.
This pattern uses US crochet terms. One finished panel is 29 in (73.7 cm) wide and 75 in (190.5 cm) long from the top of the header to the bottom diamond tips. The tassels add 4 in (10.2 cm). The photo shows a pair of panels, so make two.
You build each panel in modules. First crochet all the flower circles. Then join them with small diamonds worked join-as-you-go. Crochet the header band separately and attach it with a row of diamonds. Add the tassels last.
Finished Size and Construction
- Panel size: 29 in (73.7 cm) x 75 in (190.5 cm), plus 4 in (10.2 cm) tassels
- Skill level: Intermediate
- Terminology: US
- Yarn weight: DK (#3) cotton or cotton blend
- Hook: 4.0 mm (G-6)
- Pieces per panel: 60 flower circles, 113 diamonds, 1 header band, 9 tassels
- Layout: 5 circles wide x 12 circles tall
- Circle size: 5 in (12.7 cm) tip to tip
- Diamond size: 1 in (2.5 cm) tip to tip
- Grid size before border: 29 in (73.7 cm) x 71 in (180.3 cm)
- Border depth: top is a 2 in (5.1 cm) header plus a 1 in (2.5 cm) row of diamonds; bottom is a 1 in (2.5 cm) row of diamonds plus tassels
Materials
Choose a smooth cotton in DK weight, either mercerized or matte. Cotton keeps the petal outlines crisp and hangs straight. Avoid fuzzy or stretchy yarns, because they blur the rope texture and can make the panel stretch longer over time.
- Sage green DK cotton: 350 g / 805 m (880 yd) per panel, or 7 balls of 50 g / 115 m (126 yd) each
- For the pair shown: 700 g / 1610 m (1761 yd), or 14 balls
These amounts include about 15% extra to cover gauge differences, yarn tails, and a test motif.
Tools:
– 4.0 mm (G-6) crochet hook
– Tapestry needle
– Stitch markers
– Scissors
– Stiff card, 4.5 in (11.4 cm) wide, for tassels
– Rust-proof pins, blocking mats, spray bottle
– Measuring tape
Abbreviations (US Terms)
- ch – chain
- sl st – slip stitch
- sc – single crochet
- sp – space
- MR – magic ring
- st(s) – stitch(es)
Special stitch – Joining corner (jc): Work this in place of the ch 2 at a diamond corner: ch 1, sl st into the given ch-3 tip loop or header stitch, ch 1. The corner stays the same size as a regular ch-2 corner.
Gauge and Checkpoints
Gauge: 20 sc x 22 rows = 4 in (10.2 cm) in sc rows. Each sc is 0.2 in (0.5 cm) wide.
Before starting the panel, make one circle and two diamonds. Block them lightly and measure them.
- Circle after Rnd 1: 0.75 in (1.9 cm) across
- Circle after Rnd 3: 4.5 in (11.4 cm) from one petal tip to the opposite tip
- Circle after Rnd 5: 5 in (12.7 cm) tip to tip, not counting the ch-3 loops
- Diamond after Rnd 2: 1 in (2.5 cm) tip to tip, 0.7 in (1.8 cm) per side
If your circle is bigger than 5 in (12.7 cm), switch to a 3.5 mm hook. If it is smaller, switch to a 4.5 mm hook. Being off by just 0.25 in (0.6 cm) per circle adds up to 3 in (7.6 cm) over 12 rows.
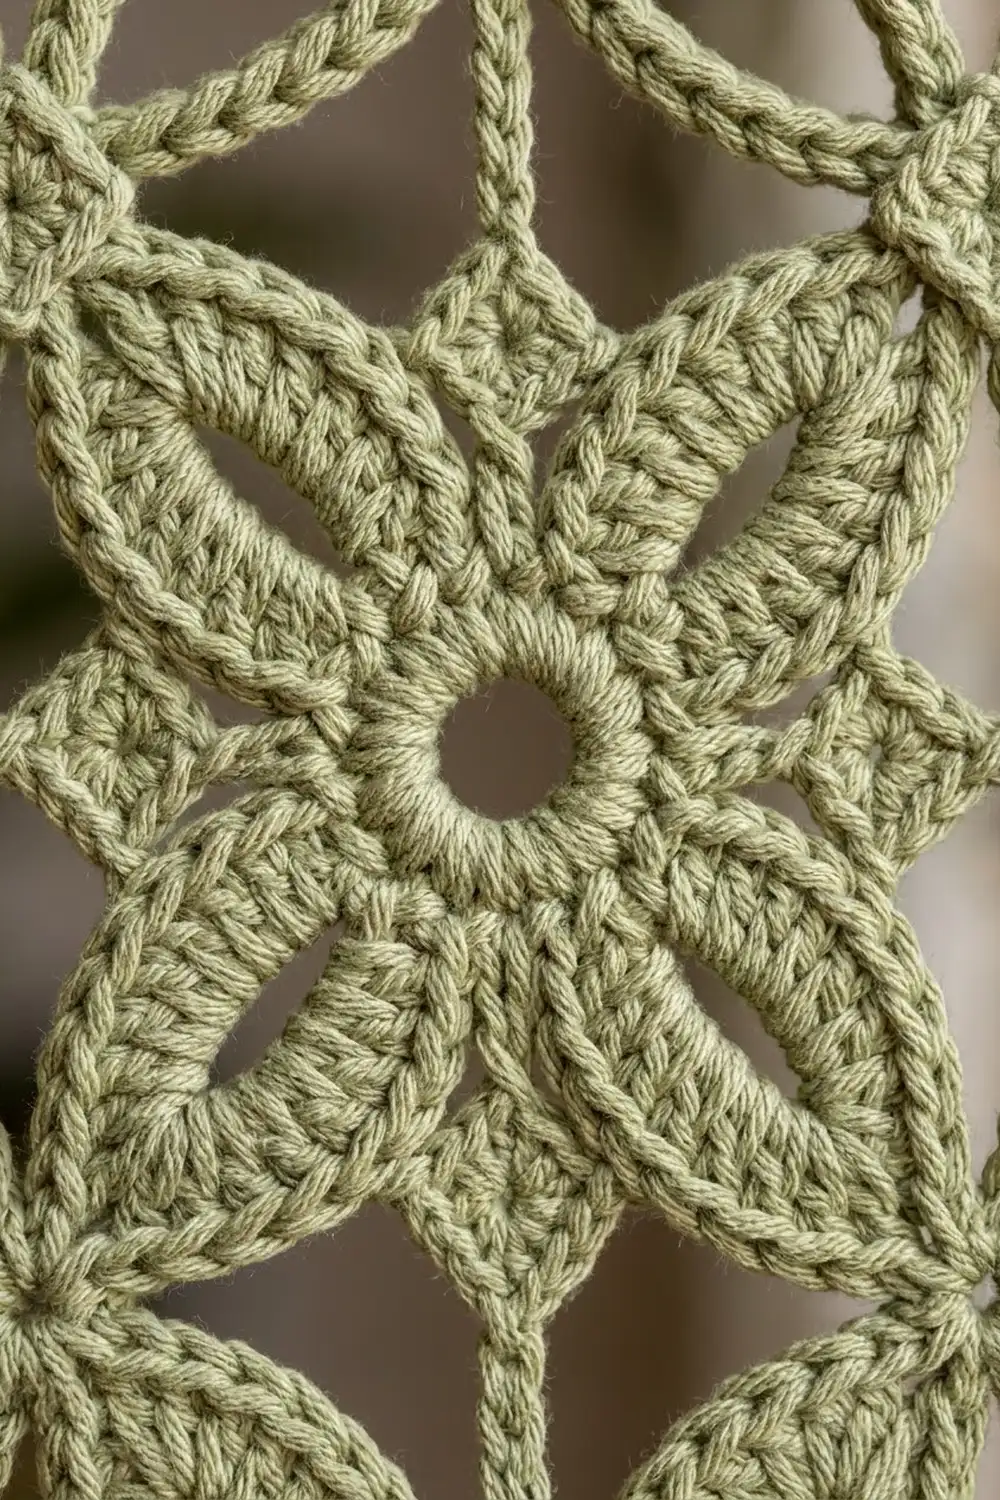
Flower Circle (make 60 per panel)
Rnd 1: MR, ch 1, 8 sc in ring, sl st in first sc. Pull the ring closed. (8 sc)
Rnd 2 (petal loops): *Sl st in next sc, ch 16, sl st in same sc, sl st in next sc; rep from * 3 more times. (4 ch-16 loops, 8 sl sts)
The loops come out of the 1st, 3rd, 5th, and 7th sc. The sl sts in the 2nd, 4th, 6th, and 8th sc sit between the petals.
Rnd 3 (cover petals): *Into the next ch-16 loop, work 10 sc, ch 2, 10 sc; sl st in the next between-petal sl st; rep from * 3 more times. (80 sc, 4 ch-2 tip sps)
This is a conversion round. Each loop holds (16 sc, 1 per chain) + (4 extra sc) = 20 sc. The extra stitches fold the loop into a pointed lens shape with a rope-like surface. Check: 4.5 in (11.4 cm) tip to tip.
Rnd 4 (outer frame): Sl st in each of the next 10 sc and into the first ch-2 tip sp. Ch 1, sc in the same sp, *ch 14, sc in next ch-2 tip sp; rep from * 2 more times, ch 14, sl st in first sc. (4 sc, 4 ch-14 arcs)
Rnd 5 (cover frame): Ch 1, *(sc, ch 3, sc) in next sc, 18 sc in next ch-14 arc; rep from * 3 more times, sl st in first sc. Fasten off. (80 sc, 4 ch-3 tip loops)
This is also a conversion round: (4 sc worked 1 per sc + 56 sc worked 1 per chain) + (4 extra at the tips + 16 extra across the arcs) = 60 + 20 = 80 sc. Each arc has 18 sc, and each tip has 2 sc on either side of a ch-3 loop.
The finished circle is a ring with four lens-shaped petals inside it. Hold it so the tip loops point up, down, left, and right. Check: 5 in (12.7 cm) tip to tip.
Diamond (make 113 per panel)
Each diamond is a tiny solid square turned on point. You work Rnd 1 on its own, and Rnd 2 joins it to the circles.
Rnd 1: MR, ch 1, 8 sc in ring, sl st in first sc. (8 sc)
Rnd 2 (unjoined version): Ch 1, *(sc, ch 2, sc) in next sc, sc in next sc; rep from * 3 more times, sl st in first sc. Fasten off. (12 sc, 4 ch-2 corner sps)
This is a growth round: (8 sc worked 1 per sc) + (4 extra corner sc) = 12 sc. Each side has 3 sc, and that count includes the side’s 2 corner sc. Four sides x 3 sc = 12 sc. Check: 1 in (2.5 cm) tip to tip.
Number the corners in the order you work them: Corner 1, 2, 3, and 4. Corners 1 and 3 are opposite each other. On joined diamonds, Corners 1 and 3 are jc, and Corners 2 and 4 stay regular ch-2 corners.
Make All Pieces
For each panel, all in sage green:
- 60 flower circles
- 48 horizontal diamonds (4 per row x 12 rows)
- 55 vertical diamonds (5 columns x 11 gaps)
- 5 top diamonds
- 5 bottom diamonds
- 1 header band
- 9 tassels
Double everything for the pair. Finish all 60 circles before you start joining.
Layout grid (C = circle, h = horizontal diamond, v = vertical diamond, T = top diamond, B = bottom diamond):
HEADER BAND (145 sts)
   T     T     T     T     T
   C  h  C  h  C  h  C  h  C    Row 1
   v     v     v     v     v
   C  h  C  h  C  h  C  h  C    Row 2
   v     v     v     v     v
   ... repeat to Row 12 ...
   C  h  C  h  C  h  C  h  C    Row 12
   B     B     B     B     B
Joining
All joins happen in Rnd 2 of a diamond. Work Rnd 1 first, then work Rnd 2 with a jc at Corners 1 and 3.
Horizontal diamond: Lay two circles side by side. Make Corner 1 a jc into the right tip loop of the left circle. Work the side and Corner 2 as usual. Make Corner 3 a jc into the left tip loop of the right circle. Finish Corner 4 as usual.
Vertical diamond: Use the same method. Corner 1 joins the bottom tip loop of the upper circle, and Corner 3 joins the top tip loop of the lower circle.
Stitch-to-stitch logic: Each circle tip loop gets exactly one sl st from one diamond. Interior circles use all 4 tips. On the edge circles, the outside tips stay free, which gives the side edges their scalloped look. Joining doesn’t change the diamond’s count: it still has 12 sc and 4 corners.
Order: Join Row 1 first (5 circles and 4 horizontal diamonds). Add 5 vertical diamonds below it, join the Row 2 circles to them, and then add Row 2’s horizontal diamonds. Keep going to Row 12.
Tension: Keep each jc sl st snug but not tight. A tight join pinches the tip, and a loose one lets the circles drift.
Size checkpoint: Row 1 is 29 in (73.7 cm) wide: 5 circles x 5 in + 4 diamonds x 1 in. Circle centers are 6 in (15.2 cm) apart. After 2 rows, the height is 11 in (27.9 cm). After all 12 rows, the grid is 71 in (180.3 cm) tall: 12 circles x 5 in + 11 diamonds x 1 in.
Border: Header Band and Tassel Edge
Border gauge: 20 sc x 22 rows = 4 in (10.2 cm), the same as the main gauge.
Header Band
Row 1: Ch 146, sc in 2nd ch from hook and in each ch across, turn. (145 sc)
Rows 2–11: Ch 1, sc in each sc across, turn. (145 sc)
The band now measures 29 in (73.7 cm) wide and 2 in (5.1 cm) deep. Don’t fasten off.
Tabs: On the last row, mark sts 1–5, 29–33, 57–61, 85–89, 113–117, and 141–145. That gives 6 tabs x 5 sts + 5 gaps x 23 sts = 145. For each tab, sc in the 5 marked sts, then work 23 more rows of 5 sc, for 24 rows in all. Each tab is 1 in (2.5 cm) wide and 4.4 in (11.2 cm) long. Fold each tab to the back and sew its end to Row 6. The loops fit a rod up to 1.25 in (3.2 cm) thick.
Why the math works: The grid is 5 circles x 25 sts (5 in each) + 4 horizontal diamonds x 5 sts (1 in each) = 125 + 20 = 145 sts. The header matches the grid exactly, and no stitches are added at the seams.
Top Diamonds
On the foundation edge of the header, mark sts 13, 43, 73, 103, and 133. These are the circle centers: 30 sts (6 in / 15.2 cm) apart, with 12 sts beyond each end mark.
Make 5 top diamonds. Corner 1 is a jc into a marked header st, and Corner 3 is a jc into the top tip loop of the Row 1 circle below it. This row adds 1 in (2.5 cm).
Bottom Diamonds and Tassels
Make 5 bottom diamonds. Corner 1 is a jc into the bottom tip loop of each Row 12 circle. Corner 3 stays a regular ch-2 corner and holds a tassel.
Tassels (make 9): Wrap yarn 20 times around the 4.5 in (11.4 cm) card, then cut along one edge to get 20 strands of 9 in (22.9 cm). Fold the bundle in half through the ch-2 sp. Wrap a neck 0.5 in (1.3 cm) below the fold, then trim the tassel to 4 in (10.2 cm).
Tie 5 tassels to the bottom diamonds. For the other 4, join yarn in the free bottom corner of each Row 12 horizontal diamond, ch 15 (3 in / 7.6 cm), and fasten off. Tie a tassel to the end of each chain. The chain makes up the 3 in (7.6 cm) height difference, so all 9 tassels end at the same level.
Side edges: No border is added here. The free circle tips and arcs form a scalloped edge.
Final length: 2 in header + 1 in top diamonds + 71 in grid + 1 in bottom diamonds = 75 in (190.5 cm), plus 4 in (10.2 cm) tassels.
Final Blocking
- Weave in all ends, hiding them inside the sc coverings.
- Lay the panel flat, or block it a few rows at a time.
- Pin each circle at its 4 tips: 5 in (12.7 cm) tip to tip and 6 in (15.2 cm) center to center.
- Pin the petal tips so each lens points straight toward a circle tip.
- Pin the header straight at 29 in (73.7 cm).
- Spray until damp but not soaked, then let it dry completely.
- Move on to the next section and repeat.
- Comb the tassels with a damp comb and trim them evenly.
Final Quality-Control Checklist
- Every circle has 80 sc and 4 ch-3 tip loops on Rnd 5
- Every diamond has 12 sc and 4 corners
- No circle tip has two diamonds joined to it
- The grid is 29 in (73.7 cm) x 71 in (180.3 cm)
- The header has 145 sts and 6 evenly spaced tabs
- All 9 tassels end at the same level
- Both panels match in length to within 0.5 in (1.3 cm)
Troubleshooting
Petals look twisted. The ch-16 loop twisted before Rnd 3. Untwist it before you work the first sc.
The circle cups or ruffles. Recount 18 sc per arc. If the count is right, change your hook size.
Diamonds pucker. The jc sl st is too tight. Loosen it.
The panel grows longer. Cotton relaxes as it hangs. Re-block the panel, and use a smaller hook for the second one.
The header is wider than the grid. Check your gauge, and try a 3.5 mm hook for the band.
Care
Hand wash in cool water with mild soap. Roll in a towel to press out the water, dry flat, and re-pin the circles if needed.
Final Notes
Each circle is 5 in (12.7 cm), each diamond is 1 in (2.5 cm), and circle centers are 6 in (15.2 cm) apart. Five circles and four diamonds make 29 in (73.7 cm), which matches the 145-stitch header. Twelve rows of circles and eleven rows of diamonds make 71 in (180.3 cm). Adding the header and the top and bottom diamond rows brings the panel to 75 in (190.5 cm), plus 4 in (10.2 cm) tassels. Check your test circle first, and the rest of the measurements will follow.
Happy crocheting!