

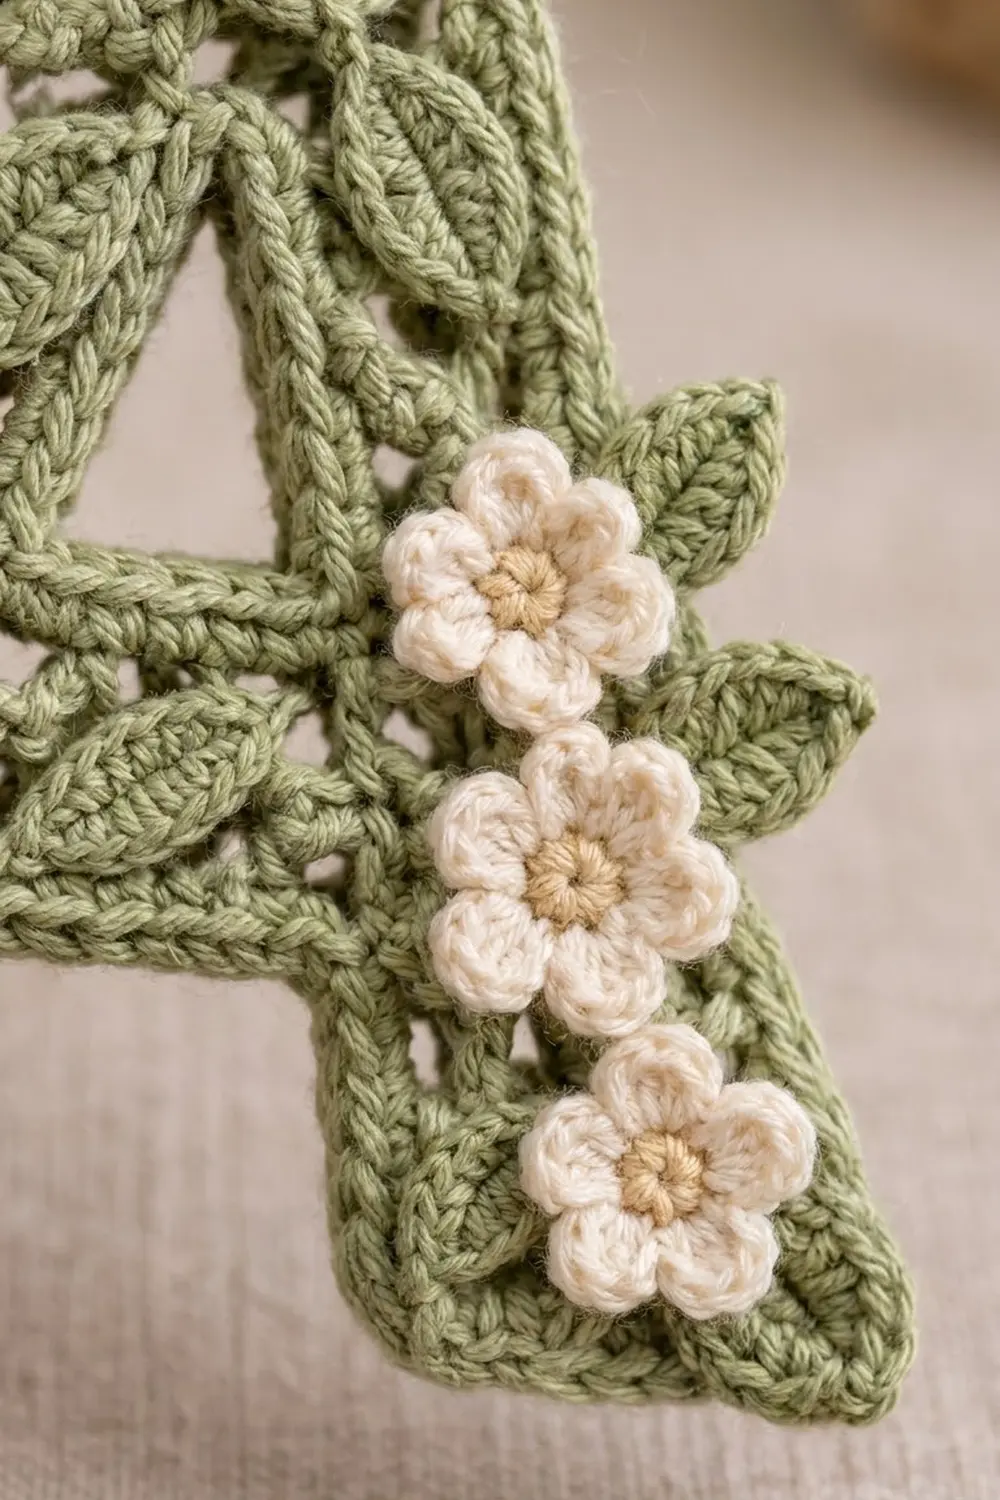
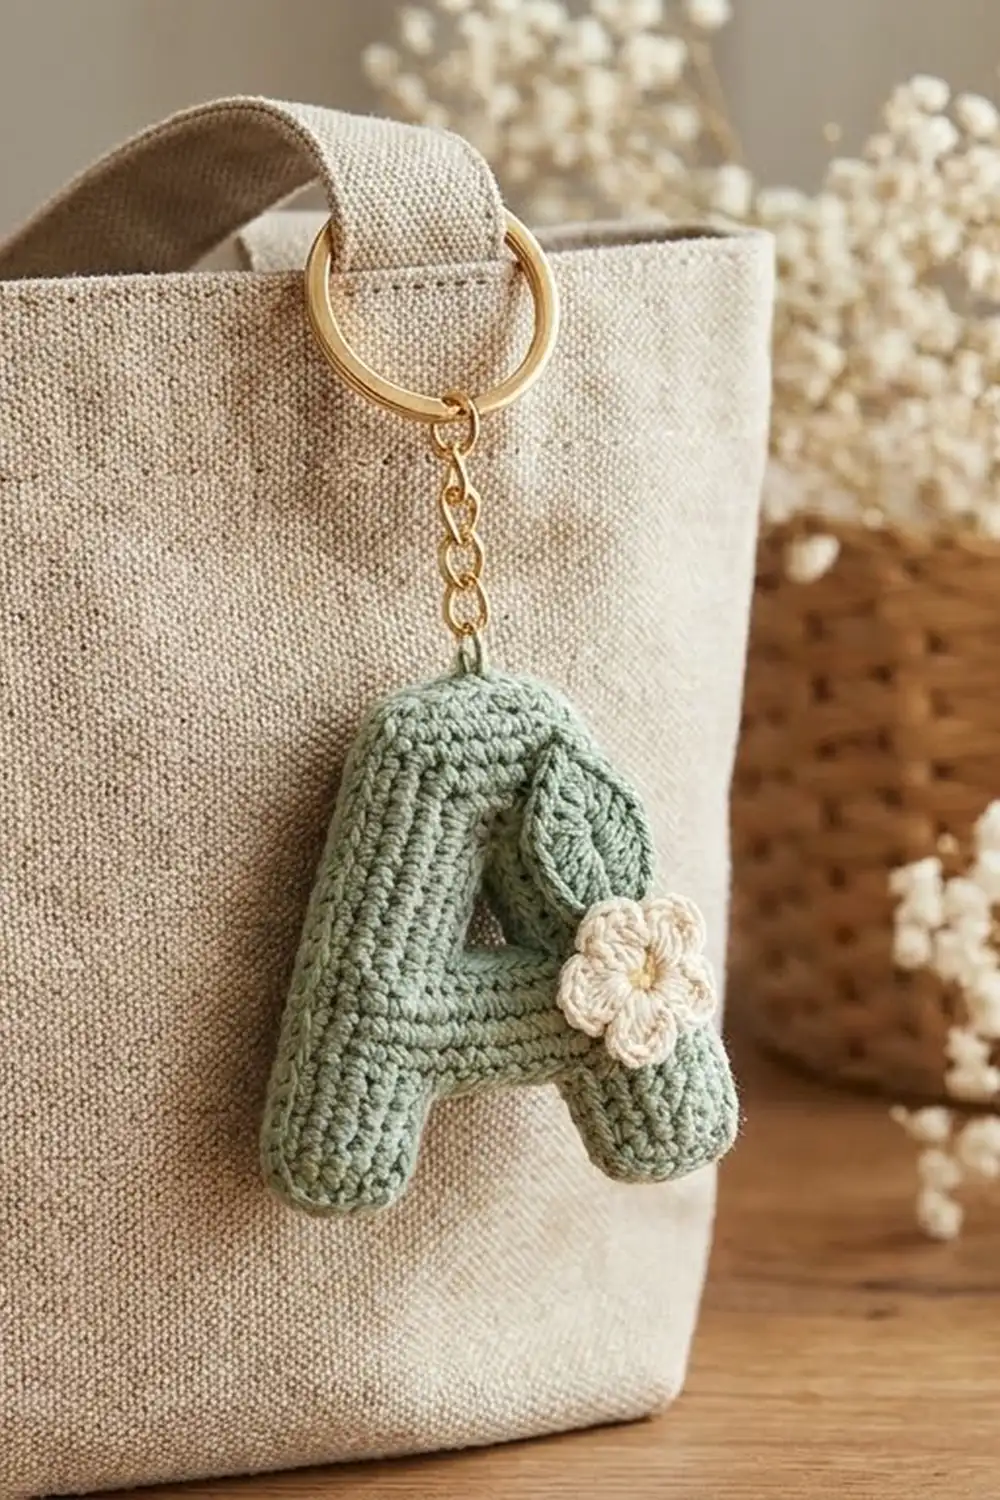
This little letter A keychain is a sage green openwork initial covered in tiny sewn-on leaves. Three cream blossoms run down its right leg. A corded outline frames the shape, and it hangs from a gold chain and key ring. It works as a bag charm, a gift tag, or a quick personalized present.
The palette is soft and botanical: sage green for the letter and leaves, cream for the petals, and tan for the flower centers. The style is cottage-garden with a light, lacy base, so the leaves stand out in gentle relief.
The pattern uses US crochet terms. The finished keychain measures 3.67 in (9.3 cm) wide at the base and 3.83 in (9.7 cm) tall, not counting the hardware.
You’ll work the letter flat in rows from the bottom up. Each leg starts on its own chain. The two legs join with a chain crossbar, split again around a small triangular window, and then rejoin for the top. Two border rounds give the outline its corded look. Last, you’ll make 12 leaves and 3 flowers, sew them on, and attach the hardware.
Finished Size and Construction
- Finished size: 3.67 in (9.3 cm) wide × 3.83 in (9.7 cm) tall
- Skill level: Intermediate (shaped rows, standing stitches, reverse sc)
- Terminology: US
- Yarn weight: Sport (#2) cotton
- Hook: 2.5 mm
- Number of pieces: One letter base, plus 12 leaf and 3 flower appliqués sewn onto it
- Layout: Single piece; no grid or joining
- Letter size before border: 3.17 in (8.1 cm) wide × 3.33 in (8.5 cm) tall
- Border depth: 0.25 in (0.6 cm) on every outer edge
- Leaf size: about 0.75 in (1.9 cm) long
- Flower size: about 0.6 in (1.5 cm) across
Materials
Use a smooth, mercerized sport-weight cotton. It shows the eyelets, holds the leaf points crisply, and stands up to life on a keyring. Avoid fuzzy or very stretchy yarns, because the letter will lose its shape.
- Sage green: 8 g, about 27 m (letter, border, leaves)
- Cream: 2 g, about 7 m (petals)
- Tan: 1 g, about 3 m (flower centers)
All quantities include a margin for a gauge swatch and sewing tails.
Tools:
– 2.5 mm crochet hook
– Tapestry needle with a sharp-ish tip
– Removable stitch markers
– 1 gold split key ring, 1 in (2.5 cm) across, with a 1.5 in (3.8 cm) chain
– 1 gold jump ring, 6 mm, and two pairs of flat-nose pliers
– Blocking mat, rust-proof pins, and a spray bottle
Abbreviations (US Terms)
- ch – chain
- sl st – slip stitch
- sc – single crochet
- hdc – half double crochet
- dc – double crochet
- dc2tog – double crochet 2 together
- sk – skip
- st(s) – stitch(es)
- sp – space
- tch – turning chain
- RS / WS – right side / wrong side
- rev sc – reverse single crochet
Special stitches
- Standing dc: Start with a slip knot on the hook. Yarn over, insert the hook into the stitch, and finish a normal dc.
- Rev sc (crab stitch): Work sc from left to right. Insert the hook into the next stitch to the right, pull up a loop, then yarn over and pull through both loops.
Counting rule: Every ch-1 space counts as 1 stitch. In the next row, work into it like any other stitch. A ch-3 at the start of a row counts as a dc. A ch-2 before a dc2tog does not count.
Gauge and Checkpoints
Gauge: 6 sts and 3 dc rows = 1 in (2.5 cm).
Test with the first leg before you go on. After Row 3 of the right leg, it should measure 0.83 in (2.1 cm) wide and 1 in (2.5 cm) tall.
Checkpoints:
– After Row 1, both legs placed side by side: 3.17 in (8.1 cm) total width, including the 1.5 in (3.8 cm) gap.
– After Row 10: 3.33 in (8.5 cm) tall, with a top edge of 1.5 in (3.8 cm).
– After the border: 3.67 in (9.3 cm) × 3.83 in (9.7 cm).
Adjusting gauge:
– Leg too wide or rows too tall: go down to a 2.25 mm hook.
– Leg too narrow: go up to a 2.75 mm hook.
Change the hook, not the stitch counts. All the shaping depends on the counts.
Letter Base
Each leg is 5 stitches wide. The base pattern within a leg is dc, dc, ch 1, dc, dc, so the eyelet sits in the middle. On shaping rows, each leg moves 1 stitch inward: you decrease 1 at the outer edge and add 1 at the inner edge. Because the eyelet moves along with the leg, it follows the slant.
Odd rows are RS rows.
Right Leg
With sage, ch 7.
Row 1 (RS): Dc in 4th ch from hook (skipped chs count as dc), ch 1, sk next ch, dc in last 2 chs. Turn. (5 sts)
Row 2 (WS, inner edge first): Ch 3 (counts as dc), dc in first st, ch 1, sk next st, dc in next st, dc2tog over last 2 sts. (5 sts)
Row 3 (RS): Ch 3, turn, dc in next st, ch 1, sk next st, dc in next st, dc in top of tch. (5 sts)
Fasten off.
Left Leg
With sage, ch 7.
Row 1 (RS): Work as for the right leg Row 1. (5 sts)
Row 2 (WS, outer edge first): Ch 2, turn, dc2tog over first 2 sts, dc in next st, ch 1, sk next st, 2 dc in top of tch. (5 sts)
Row 3 (RS): Ch 3, turn, dc in next st, ch 1, sk next st, dc in next st, dc in last st. (5 sts)
Do not fasten off.
Crossbar
Lay the right leg to the right of the left leg with the RS facing you. The inner edges should face each other with a 1.5 in (3.8 cm) gap between them.
Row 4 (WS):
1. Ch 2, turn, dc2tog over first 2 sts, dc in next st, ch 1, sk next st, dc in last st of the left leg. (4 sts)
2. Ch 7 for the crossbar.
3. On the right leg, starting at its inner edge: dc in first st, ch 1, sk next st, dc in next st, dc2tog over last 2 sts. (4 sts)
Row total: 4 + 7 + 4 = 15 sts. Keep the ch-7 untwisted.
Row 5 (RS, mesh): Ch 3, turn, ch 1, sk next st, dc in next st; repeat from * 6 more times. (15 sts: 8 dc and 7 ch-1 sps)*
Counter Window
Row 6 (WS), left section: Ch 2, turn, dc2tog over first 2 sts, dc in next st, ch 1, sk next st, 2 dc in next st. (5 sts) Leave the remaining sts unworked.
Row 7 (RS), left section: Ch 3, turn, dc in first st, dc in next st, ch 1, sk next st, dc in last 2 sts. (6 sts) Put a marker in the live loop and drop it.
Row 6, right section: With the WS facing, skip 5 unworked sts of Row 5 after the left section. Join sage with a standing dc in the 6th st, then dc in the same st, ch 1, sk next st, dc in next st, dc2tog over last 2 sts. (5 sts)
Row 7, right section: Ch 3, turn, dc in next st, ch 1, sk next st, dc in next st, 2 dc in last st. (6 sts)
Fasten off.
The window is 3 sts wide at Row 6 and 1 st wide at Row 7, so it forms a small triangle about 0.5 in (1.3 cm) wide and 0.67 in (1.7 cm) tall.
Top
Pick up the dropped loop.
Row 8 (WS):
1. Ch 2, turn, dc2tog over first 2 sts, dc in next st, ch 1, sk next st, dc in next 2 sts. (5 sts)
2. Ch 1.
3. On the right section: dc in first 2 sts, ch 1, sk next st, dc in next st, dc2tog over last 2 sts. (5 sts)
Row total: 5 + 1 + 5 = 11 sts.
Row 9 (RS, mesh): Ch 3, turn, ch 1, sk next st, dc in next st; repeat from * 4 more times. (11 sts)*
Row 10 (WS): Ch 2, turn, dc2tog over first 2 sts, ch 1, sk next st, dc in next st; repeat from * 2 more times, ch 1, sk next st, dc2tog over last 2 sts. (9 sts)*
Do not fasten off.
Row-by-row stitch counts:
– Rows 1–3: 5 per leg
– Rows 4–5: 15
– Row 6: 5 + 5
– Row 7: 6 + 6
– Rows 8–9: 11
– Row 10: 9
Border
Border gauge: 6 sc = 1 in (2.5 cm) along every edge.
Work 1 sc in each stitch or chain, and 2 sc in the side of each dc row. One dc row is 0.33 in tall and takes 2 sc, which matches the 6 sc per inch of the stitch edges. That’s why the border lies flat instead of rippling or pulling in.
At the 6 outer corners, work 3 sc in the corner stitch. The two inside corners under the crossbar get no extra stitches.
Round 1 (sc): Ch 1 and turn so the RS faces you. You are at the top right corner.
| Edge | Stitches |
|---|---|
| Top edge (9 sts, 3 sc in first and last st) | 9 + 4 = 13 sc |
| Left outer side (rows 10 to 1) | 10 × 2 = 20 sc |
| Left leg bottom (5 foundation chs, 3 sc in first and last) | 5 + 4 = 9 sc |
| Left leg inner side (rows 1 to 3) | 3 × 2 = 6 sc |
| Underside of crossbar (ch-7) | 7 sc |
| Right leg inner side (rows 3 to 1) | 3 × 2 = 6 sc |
| Right leg bottom (5 + 4) | 9 sc |
| Right outer side (rows 1 to 10) | 10 × 2 = 20 sc |
Round total: 13 + 20 + 9 + 6 + 7 + 6 + 9 + 20 = 90 sc. Sl st to the first sc.
Round 2 (rev sc): Ch 1, rev sc in each sc around. (90 sts)
Sl st to join and fasten off. Reverse sc makes the raised, rope-like cord. Because it sits on top of Round 1, it needs no corner increases.
Window outline: With the RS facing, join sage at the bottom of the window. Work loose sl sts around the opening:
– 1 in each of the 5 unworked Row 5 sts
– 2 in each of the 2 row-ends up the right side
– 1 in the ch-1 at the top
– 2 in each of the 2 row-ends down the left side
Total: 5 + 4 + 1 + 4 = 14 sl sts. Join and fasten off. The outline adds an edge without filling in the small window.
Leaves (Make 12)
With sage, ch 6.
Leaf: Sc in 2nd ch from hook, hdc in next ch, dc in next ch, hdc in next ch, (sc, ch 2, sc) in last ch. Working along the opposite side of the foundation: hdc in next ch, dc in next ch, hdc in next ch, sc in last ch. Sl st to the first sc.
That gives 5 sts on each side plus a ch-2 point. The foundation chain stays visible as the center vein. Fasten off and leave a 6 in (15.2 cm) tail.
Flowers (Make 3)
Center: With tan, make a magic ring and work 5 sc in it. Sl st to the first sc and pull the ring closed. (5 sc) Fasten off.
Petals: Join cream with a sl st in any sc. (Ch 2, 2 dc, ch 2, sl st) in the same st, sl st in next st; repeat 4 more times. (5 petals)*
Fasten off and leave a 6 in (15.2 cm) tail.
Assembly of Appliqués
Sew everything on before blocking. Use the matching tails and small stitches through the back loops only, so nothing shows on the back.
- Left leg: Sew 4 leaves, alternating tips left and right.
- Top: Sew 2 leaves angled toward the key ring point.
- Crossbar: Sew 2 leaves, one on each side of center.
- Right leg, upper part: Sew 2 leaves.
- Flowers: Stack the 3 flowers diagonally down the lower right leg. Each flower overlaps the one below it by about 0.1 in (0.3 cm).
- Flower leaves: Tuck the last 2 leaves out from behind the flowers toward the outer edge.
Final Blocking
- Pin the keychain face up on the mat. Measure 3.67 in (9.3 cm) across the base and 3.83 in (9.7 cm) up the center.
- Pin the outer corners first, then the middle of each slanted side.
- Open the window and the gap between the legs with one pin each.
- Shape each leaf tip with your fingers.
- Spray until damp, not soaked. Let it dry completely.
- Attach the jump ring through both border rounds at the top center. Add the chain and the split ring.
Final Quality-Control Checklist
- [ ] Rows 1–3 each have 5 sts per leg
- [ ] Rows 4 and 5 have 15 sts
- [ ] Row 7 has 6 + 6 sts
- [ ] Row 10 has 9 sts
- [ ] Border Round 1 has 90 sc
- [ ] Border Round 2 has 90 rev sc
- [ ] The window outline has 14 sl sts
- [ ] Both legs slant evenly and are the same width
- [ ] Before border: 3.17 in × 3.33 in (8.1 cm × 8.5 cm)
- [ ] Finished: 3.67 in × 3.83 in (9.3 cm × 9.7 cm)
- [ ] Every appliqué is secure, and no stitches show on the back
- [ ] The jump ring is fully closed
Troubleshooting
- The legs slant unevenly: Check that each shaping row has a dc2tog at the outer edge and 2 dc at the inner edge.
- The crossbar puckers: Your ch-7 is too tight. Redo it one hook size up, or chain more loosely.
- The border ripples: You worked more than 2 sc per row-end. Rework at exactly 2.
- The border pulls in: Loosen your tension, especially on the rev sc round.
- The window closed up: Your sl sts were too tight. Work them loosely or use a larger hook.
- The leaves curl: Steam them lightly and pin the tips while they dry.
Care
Hand wash in cool water, press out the moisture with a towel, and dry flat. Close the jump ring again if it gets pulled open in use.
Final Notes
Everything rests on one measurement chain:
– A gauge of 6 sts and 3 rows per 1 in (2.5 cm) gives 0.83 in (2.1 cm) legs.
– Those legs give a 3.17 in × 3.33 in (8.1 cm × 8.5 cm) letter.
– A 0.25 in (0.6 cm) border brings it to 3.67 in × 3.83 in (9.3 cm × 9.7 cm).
If each checkpoint matches, the leaves and flowers will sit exactly where you planned them.
Happy crocheting!