

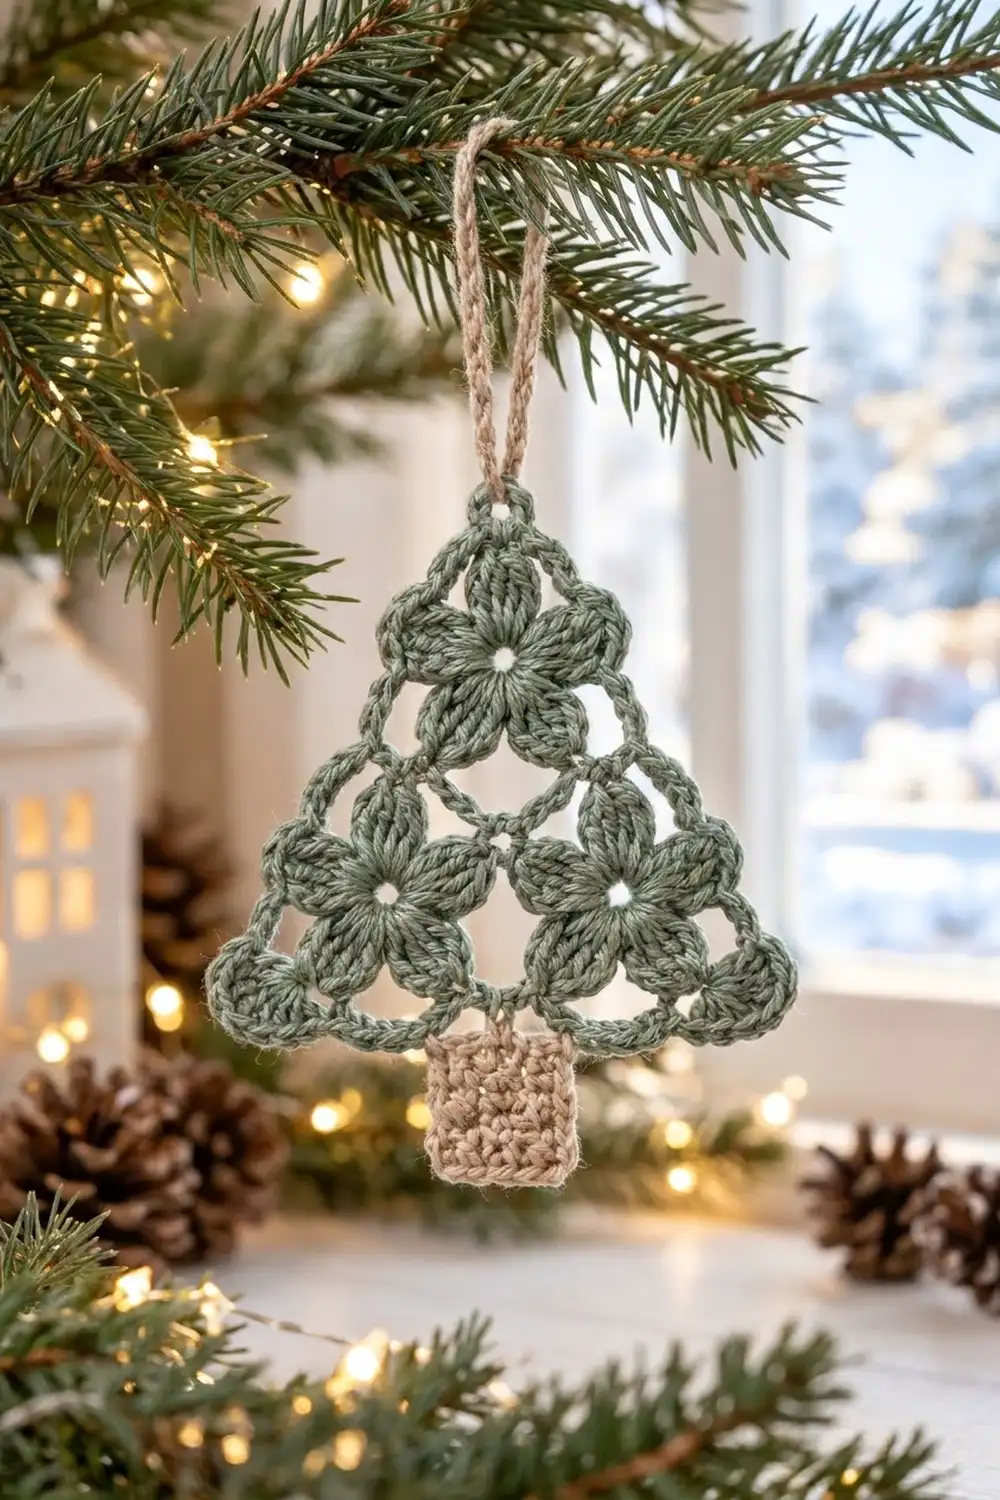
This little tree is made of flowers. Three puffy five-petal blossoms sit inside a crisp triangle of sage green, with a small cream trunk and a matching hanging loop. It looks delicate, but it’s sturdy enough to hang on a real tree year after year.
The colors are soft and wintry: dusty sage for the tree and warm oatmeal beige for the trunk and loop. The style is Scandinavian cottage, so it suits natural wood, eucalyptus and white lights.
This pattern uses US crochet terms. The finished ornament is 4.5 in (11.4 cm) wide along the bottom edge. It is 4.8 in (12.2 cm) tall from the top point to the bottom of the trunk, not counting the hanging loop.
You’ll make three flowers and join them as you go so they lock into a triangle. A chain-mesh frame round then straightens the outline into three sides, and a single crochet round finishes the edge. You work the trunk in rows straight down from the bottom edge and chain the loop at the top point. Everything is one piece, and the only sewing is weaving in ends.
Finished Size and Construction
- Finished size: 4.5 in (11.4 cm) per side; 4.8 in (12.2 cm) tall including the trunk
- Skill level: Easy-intermediate (clusters, join-as-you-go)
- Terminology: US
- Yarn weight: Sport (#2), cotton or cotton blend
- Hook: 3.25 mm (US D/3)
- Number of pieces: 1 finished ornament (three flowers joined as you go)
- Layout: 1 flower on top, 2 flowers side by side below
- Single flower size: 2 in (5.1 cm) across, loop tip to loop tip
- Size before border: 4.2 in (10.7 cm) per side
- Border depth: about 0.15 in (0.4 cm) per edge
Materials
Use a smooth, tightly plied cotton or cotton-blend sport yarn. Cotton gives crisp petals and holds a sharp triangle after blocking. Fuzzy or very splitty yarn hides the clusters and the open mesh.
- Color A, sage green: 8 g, about 24 m (26 yd)
- Color B, oatmeal beige: 3 g, about 9 m (10 yd)
These amounts include a margin of about 30% for your test flower and yarn tails. One 50 g ball of each color makes several ornaments.
Tools:
– 3.25 mm (US D/3) crochet hook
– Tapestry needle
– Scissors
– Stitch markers (2–3)
– Blocking mat and rust-proof pins
– Spray bottle with water
– Ruler or tape measure
Abbreviations (US Terms)
- ch: chain
- sl st: slip stitch
- sc: single crochet
- dc: double crochet
- tr: treble crochet
- sk: skip
- sp(s): space(s)
- st(s): stitch(es)
- RS: right side
Special stitches:
- 4-tr cluster (4trCL): *Yarn over twice, insert the hook in the stitch, yarn over and pull up a loop, then [yarn over and draw through 2 loops] twice. Repeat from * 3 more times in the same stitch (5 loops on hook). Yarn over and draw through all 5 loops.
- Beginning cluster (beg CL): Ch 3, then work a 3-tr cluster in the same stitch. This is the same as 4trCL but with 3 repeats, so you have 4 loops on the hook before the final pull-through. The ch-3 and the 3-tr cluster together count as the first petal.
Gauge and Checkpoints
Gauge: 24 sc and 26 rows = 4 in (10.2 cm), or 6 sc = 1 in (2.5 cm).
Before anything else, make one flower and measure it. That one flower tells you whether the whole ornament will come out right.
Checkpoints:
1. Flower after Round 2: 1.6 in (4.1 cm) across, petal tip to petal tip.
2. Flower after Round 3: 2 in (5.1 cm) across, loop tip to loop tip, lying flat.
3. Two bottom flowers joined: 3.8 in (9.7 cm) wide, outer loop to outer loop.
4. After Frame Round 1: 4.2 in (10.7 cm) per side; 3.6 in (9.1 cm) tall.
5. After Frame Round 2: 4.5 in (11.4 cm) per side; 3.9 in (9.9 cm) tall.
6. With trunk: 4.8 in (12.2 cm) total height.
If your flower is too big (over 2.1 in / 5.3 cm), go down to a 2.75 mm hook. If it’s too small (under 1.9 in / 4.8 cm), go up to a 3.5 mm hook. A small size difference is fine for an ornament. It matters more that all three flowers match each other.
Flower (Make 3, Color A)
All three flowers use the same Rounds 1–2. Round 3 is plain for Flower 1. For Flowers 2 and 3, Round 3 joins them to the flowers you’ve already made.
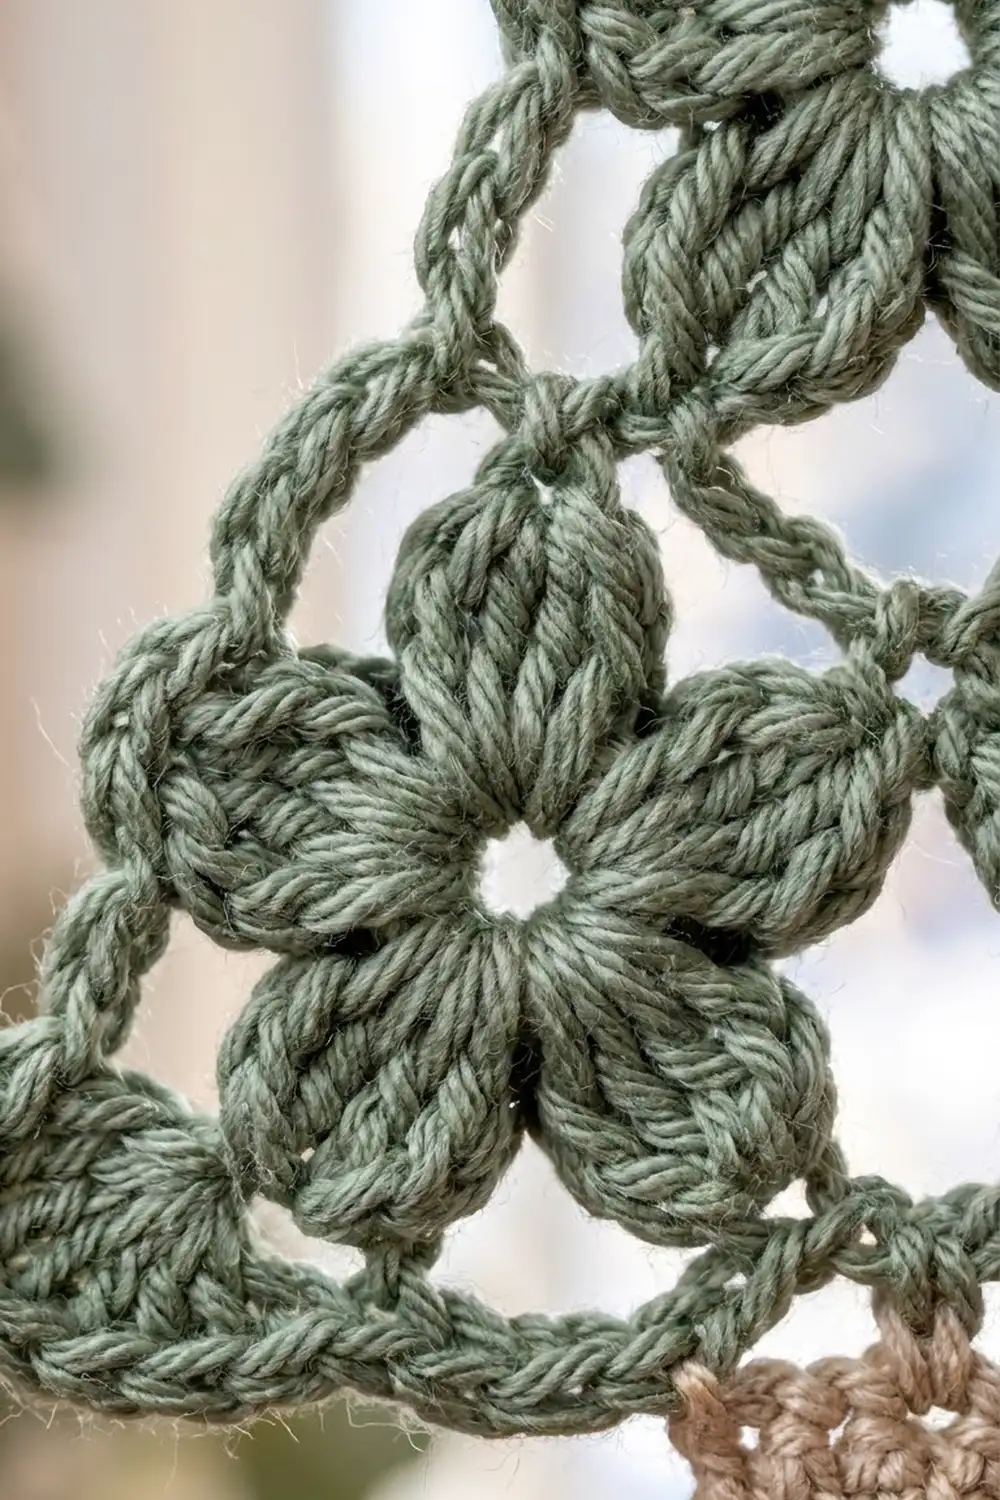
Round 1: Make a magic ring. Ch 3 (counts as first dc), work 9 dc in the ring, then sl st to the top of the beginning ch-3. (10 dc)
Pull the ring snug, but don’t close it completely. Leave a small hole about 0.1 in (0.3 cm) wide at the center. This makes the open eye in each blossom.
Round 2 (petals): Beg CL in the same st as the join, ch 3, sk next dc. 4trCL in next dc, ch 3, sk next dc; repeat from * 3 more times. Sl st to the top of the beg CL. (5 clusters, 5 ch-3 sps)*
Each cluster makes one fat, ridged petal. Push the petals gently toward the RS so they puff forward.
Round 3 (loops), Flower 1: Sl st into the next ch-3 sp, ch 1, sc in the same sp, ch 6. Sc in next ch-3 sp, ch 6; repeat from * 3 more times. Sl st to the first sc. (5 sc, 5 ch-6 loops)*
Each ch-6 loop arches over the tip of one petal. Fasten off, leaving a 6 in (15.2 cm) tail.
Lay Flower 1 RS up with one petal pointing straight up. Going around, its five loops are top, upper right, lower right, lower left and upper left. Place a marker in the lower right loop and another in the lower left loop.
Round 3, Flower 2 (bottom left): Work Rounds 1–2. Work Round 3 exactly as for Flower 1 until you’ve finished 4 loops and worked the 5th sc. For the 5th loop: ch 3, sl st into the marked lower left loop of Flower 1, ch 3, then sl st to the first sc. Fasten off.
The joined loop still counts as a ch-6 loop: it has 6 chains, and the joining sl st isn’t counted. Flower 2 now sits below and to the left of Flower 1.
Look at Flower 2 with RS up. Mark the free loop that points straight to the right, next to its joining loop. Flower 3 will attach here.
Round 3, Flower 3 (bottom right): Work Rounds 1–2. Start Round 3 and work 3 plain loops as for Flower 1. Then work the 4th sc and continue:
– Loop 4: Ch 3, sl st into the marked lower right loop of Flower 1, ch 3.
– Sc in the last ch-3 sp.
– Loop 5: Ch 3, sl st into the marked right-facing loop of Flower 2, ch 3, then sl st to the first sc. Fasten off.
Join tension: Keep the joining chains the same tension as your plain ch-6 loops. If you pull the sl st tight, the flowers bunch together. If you work it loosely, a gap opens between them. The joined flowers should lie flat and just touch at the petal tips.
The three flowers now form a triangle. Checkpoint: the two bottom flowers measure 3.8 in (9.7 cm) across.
Free loop count: Flower 1 has 3 free loops (top, upper right and upper left). Flowers 2 and 3 each have 3 free loops (one outer side, one bottom corner and one bottom). That makes 9 free loops: each triangle side gets 2 side loops, plus the 3 corner loops.
Frame (Color A)
The frame turns the flower outline into a straight-sided triangle. Hold the piece RS up.
Frame Round 1: Join Color A in the top loop of Flower 1. Ch 1, then work:
- Top corner: (2 sc, ch 2, 2 sc) in the top loop of Flower 1
- ch 4, 3 sc in the upper right loop of Flower 1
- ch 5, 3 sc in the outer side loop of Flower 3
- ch 4
- Bottom right corner: (2 sc, ch 2, 2 sc) in the corner loop of Flower 3
- ch 4, 3 sc in the bottom loop of Flower 3
- ch 5, 3 sc in the bottom loop of Flower 2
- ch 4
- Bottom left corner: (2 sc, ch 2, 2 sc) in the corner loop of Flower 2
- ch 4, 3 sc in the outer side loop of Flower 2
- ch 5, 3 sc in the upper left loop of Flower 1
- ch 4, sl st to the first sc.
Count per side, from corner ch-2 sp to corner ch-2 sp: 2 sc + 4 ch + 3 sc + 5 ch + 3 sc + 4 ch + 2 sc = 23 sts.
Total: 3 × 23 = 69 sts (30 sc + 39 ch), plus 3 corner ch-2 sps.
The ch-4 bridges cross the short gaps between loops on the same flower. The ch-5 bridges cross the wider dip between two flowers. These bridges make the open mesh windows. Checkpoint: 4.2 in (10.7 cm) per side. Don’t fasten off.
Border
Border gauge: 6 sc = 1 in (2.5 cm). Work firmly so the chain bridges pull straight.
Frame Round 2: Ch 1. Sc in each sc and in each chain all the way around. Insert the hook into each chain itself, not around it. Work 3 sc in each corner ch-2 sp. Sl st to the first sc. (78 sc)
Count per side, including both corner center stitches: 1 corner center + 1 corner side st + 23 sts + 1 corner side st + 1 corner center = 27 sc.
Why the math works: Three sides of 27 sc make 81, but each corner center belongs to two sides, so subtract 3: 81 − 3 = 78. You get the same total this way: 69 sts + (3 corners × 3 sc) = 78. Fasten off Color A.
Working into each chain locks the bridges to an exact length. That pulls the frame taut, so the sides stay straight instead of scalloping. Checkpoint: 4.5 in (11.4 cm) per side, 3.9 in (9.9 cm) tall.
Trunk (Color B)
Turn the ornament so the bottom edge is at the top, with RS facing. Call the corner center sc at the right end of that edge st 1. Count along the edge to the corner center sc at the left end, which is st 27.
Join Color B in st 11. Because the count is the same from either end, the trunk lands exactly in the center. Nine sc plus the corner center show on each side of it.
Row 1: Ch 1 (doesn’t count as a st), sc in the same st and in the next 6 sts (sts 11–17), turn. (7 sc)
Rows 2–6: Ch 1, sc in each sc across, turn. (7 sc)
Fasten off. The trunk measures 1.2 in (3.0 cm) wide and 0.9 in (2.3 cm) long. Count 7 sc at the end of every row so the sides stay straight.
Hanging Loop (Color B)
Hold Color B double and join with a sl st in the center sc of the top corner. Ch 30, then sl st in the same st. Fasten off and weave the ends back through the chain.
The doubled strand gives the loop a corded look. Folded, the loop rises about 2 in (5.1 cm) above the top point.
Final Blocking
- Weave in all ends before blocking, running each one through stitches of the same color.
- Spray the ornament until it’s evenly damp but not dripping.
- Lay it RS up on the blocking mat.
- Pin the three corners so each side measures 4.5 in (11.4 cm).
- Add pins along each side every 0.5 in (1.3 cm) to keep the edges straight.
- Pin the trunk square at 1.2 in (3.0 cm) by 0.9 in (2.3 cm).
- Gently push each petal forward with a fingertip. Don’t flatten them.
- Let it dry completely, for at least 8 hours, before you unpin it.
For a stiffer ornament, lightly spray it with fabric stiffener or a sugar-water solution before it dries.
Final Quality-Control Checklist
- [ ] All three flowers have 5 petals and a small open center
- [ ] All three flowers are the same size
- [ ] Each flower is joined at one or two loops, with no twists
- [ ] Frame Round 1 has 23 sts per side
- [ ] Frame Round 2 has 78 sc, 27 per side
- [ ] All three sides measure 4.5 in (11.4 cm)
- [ ] Each corner is sharp and has 3 sc
- [ ] The trunk is 7 sc wide, 6 rows long and centered
- [ ] The hanging loop sits exactly at the top point
- [ ] All ends are woven in and hidden on the RS
Troubleshooting
Petals look flat or thin. Make sure each petal is a full 4-tr cluster. Pull up each loop to full height before you close the cluster.
Center hole is too big. Pull the magic ring tighter before you start Round 2. Weave the tail around the center once more to snug it up.
Flowers overlap or leave gaps at the joins. Check that you joined into the correct loop. Make sure you worked ch 3 on each side of the joining sl st.
Sides curve inward. Your chain bridges are too tight. Chain a little more loosely, or go up half a hook size for Frame Round 1 only.
Sides ripple outward. Your chains are too loose. Work Frame Round 2 firmly, into each chain rather than around it.
Trunk is off-center. Recount the bottom edge from the corner center. You should see 9 sc plus the corner center on each side of the trunk.
Trunk flares or narrows. Recount each row. You may have skipped the last sc or worked into the turning chain.
Ornament curls. Block it again with more water and place the pins closer together along the sides.
Care
Hand wash in cool water with mild soap. Roll it in a towel to remove the water, then block it flat to dry again. Between seasons, store it flat or hanging in a dry place.
Final Notes
The measurements build step by step. One 2 in (5.1 cm) flower gives a bottom row of 3.8 in (9.7 cm). Frame Round 1 brings each side to 4.2 in (10.7 cm), with 23 sts per side. Frame Round 2 adds the firm edge, for 4.5 in (11.4 cm) and 27 sc per side. The 7-stitch trunk brings the total height to 4.8 in (12.2 cm).
If your first flower is the right size, the rest follows. Make a few in sage, or try deep forest green or soft cream, and hang them together on a branch.
Happy crocheting!