

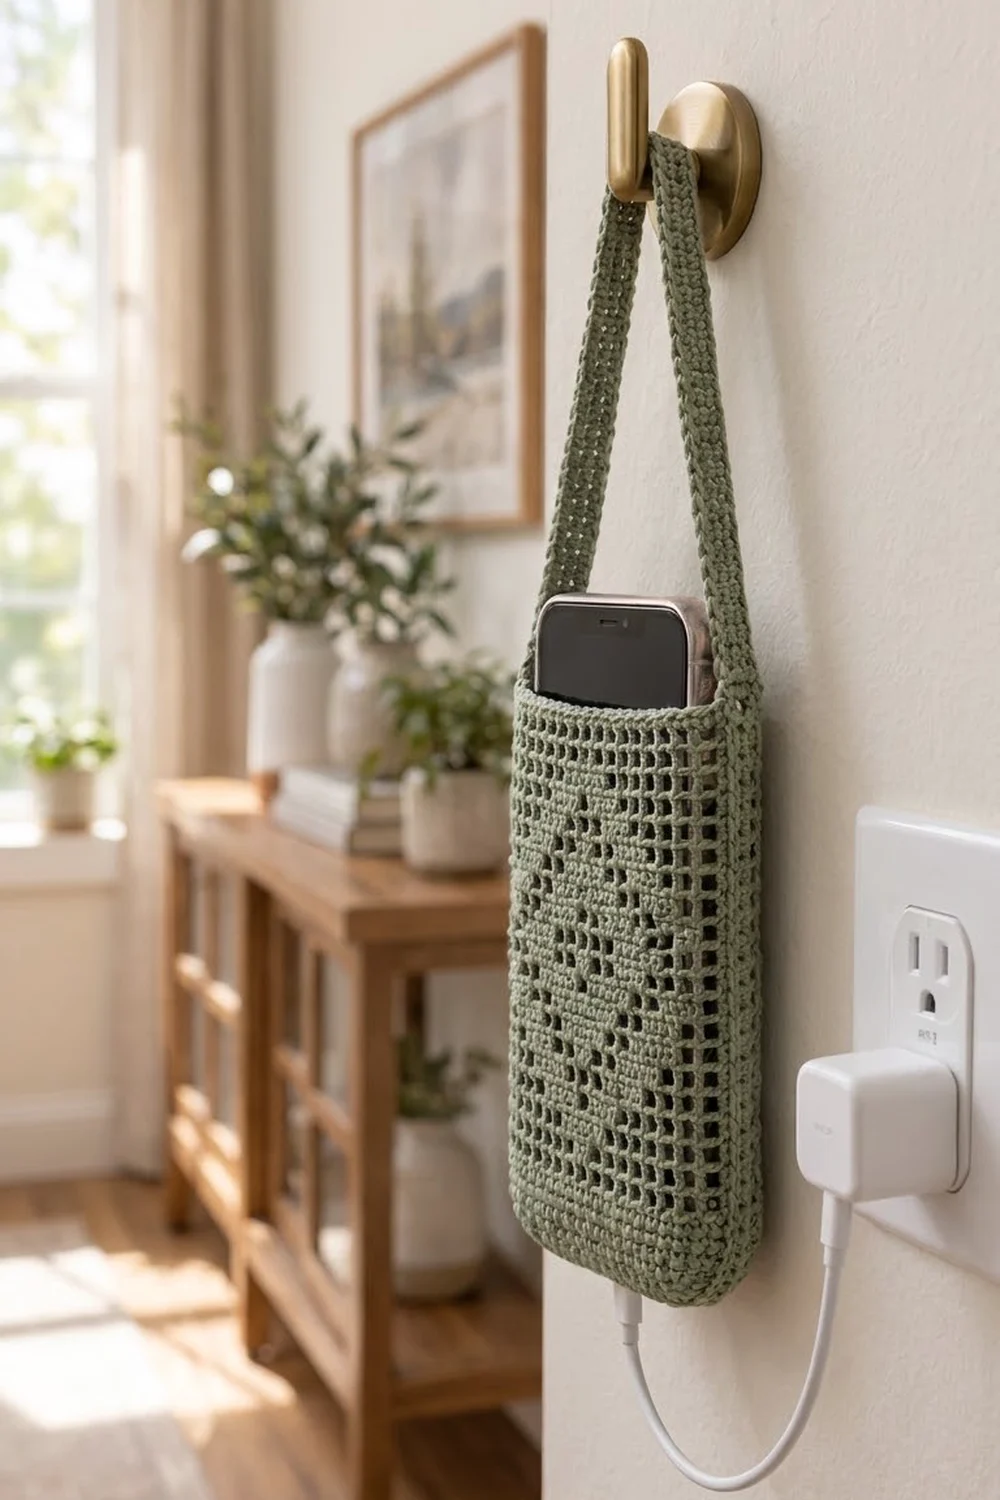
This little wall pouch keeps your phone off the counter while it charges. It hangs by a slim strap from a hook beside the outlet. The cable comes out over the rim or through the mesh, and the phone stays upright and easy to reach.
The holder uses one soft sage green cotton. The body is classic filet mesh, a light grid of open squares. The front has a single diamond made of solid blocks: a thick solid outline, an open ring inside it, and a small solid center. The look is calm, modern and a little vintage, so it suits a hallway, a bedroom or a kitchen.
The pattern uses US crochet terms. The finished pouch measures 4.8 in (12.2 cm) wide and 6.6 in (16.8 cm) tall. The strap adds 10.0 in (25.4 cm).
Construction is simple. You crochet one long filet rectangle and edge it with single crochet. Then you fold it in half and single crochet the two sides closed through both layers. Two rounds of single crochet finish the opening. The strap is worked straight off one side and attached to the other. It’s all one piece, so the only sewing is weaving in ends.
Finished Size and Construction
- Finished size: 4.8 in (12.2 cm) wide x 6.6 in (16.8 cm) tall, not counting the strap
- Strap: 10.0 in (25.4 cm) long x 0.65 in (1.7 cm) wide
- Skill level: Easy-intermediate (you need to read a filet grid)
- Terminology: US crochet terms
- Yarn weight: Sport (#2 fine) cotton
- Hook: 2.75 mm (C)
- Number of pieces: 1 (a single piece, folded and seamed, with the strap worked on)
- Layout: One long strip of 15 blocks x 36 rows, folded at the middle (between Rows 18 and 19)
- Flat strip before border: 4.0 in x 12.0 in (10.2 cm x 30.5 cm)
- Each half before border: 4.0 in x 6.0 in (10.2 cm x 15.2 cm)
- Border depth: 0.2 in (0.5 cm) per single crochet round
Materials
Yarn: Choose a smooth 100% cotton in sport weight, mercerized or matte. Cotton holds the grid shape and doesn’t stretch much under the weight of a phone. Avoid fuzzy or very stretchy yarn: the open squares will blur and the pouch will sag.
- Sage green: 40 g, about 120 m (131 yd)
These quantities include a margin of about 25% for your gauge swatch and small differences in tension.
Tools:
- 2.75 mm (C) crochet hook
- Tapestry needle
- 4 locking stitch markers
- Scissors
- Measuring tape or ruler
- Rust-proof pins and a blocking mat or folded towel
- Spray bottle with water
- Optional: a piece of card cut to 4.5 in x 6.5 in (11.4 cm x 16.5 cm) to use as a blocking form
Abbreviations (US Terms)
- ch – chain
- sl st – slip stitch
- sc – single crochet
- dc – double crochet
- sk – skip
- sp – space
- st(s) – stitch(es)
- RS – right side
- WS – wrong side
Special stitches and terms:
- Open block (O): ch 1, sk next st (or ch-sp), dc in next dc. Each open block uses 2 sts.
- Solid block (S): dc in next ch-sp (or dc), dc in next dc. Each solid block also uses 2 sts.
- Turning ch-4: counts as 1 dc + ch 1 (the first open block of the row).
- Turning ch-3: counts as 1 dc.
Every filet row has 15 blocks = 31 sts (2 sts per block + 1 starting dc). This count never changes.
Gauge and Checkpoints
Gauge: 15 blocks (31 sts) = 4.0 in (10.2 cm) wide, and 6 rows of filet = 2.0 in (5.1 cm) tall. That is 3.75 blocks and 3 rows per 1 in (2.5 cm).
Test first: Before you start the full strip, work a swatch of Row 1 plus 8 rows of open mesh, as written below (9 rows total). After a light steam it should measure 4.0 in x 3.0 in (10.2 cm x 7.6 cm). You can rip it out and reuse the yarn.
Checkpoints:
- After Row 1: the solid row measures 4.0 in (10.2 cm) wide.
- After Row 18: the strip measures 6.0 in (15.2 cm) tall. This is the front half.
- After Row 36: the strip measures 12.0 in (30.5 cm) tall.
- After Border Round 1: 4.4 in x 12.4 in (11.2 cm x 31.5 cm).
- After seaming and the opening rounds: 4.8 in x 6.6 in (12.2 cm x 16.8 cm).
If your swatch is too big, go down to a 2.5 mm hook. If it is too small, go up to a 3.0 mm hook. Row height matters as much as width here. If your rows are too tall, pull the first loop of each dc snug before you yarn over.

The Pattern
Foundation and Row 1 (solid top edge of the front)
Ch 33.
Row 1 (RS): Dc in 4th ch from hook (the skipped ch count as the first dc), dc in each ch across. Turn. (31 sts)
This solid row becomes the top edge of the front.
Row 2 (open)
Row 2: Ch 4 (counts as dc + ch 1), sk next dc, dc in next dc; ch 1, sk next dc, dc in next dc; repeat from * across, working the last dc in the top of the turning ch-3. Turn. (15 open blocks, 31 sts)
From now on, every row starts with ch 4 and ends with a dc in the 3rd ch of the turning ch-4. This works because the first and last blocks of every row are open.
Rows 3–15 (diamond motif)
Read each row as a list of blocks from the start of the row. O = open block, S = solid block. Every row totals 15 blocks (31 sts).
- Row 3: 7 O, 1 S, 7 O.
- Row 4: 6 O, 3 S, 6 O.
- Row 5: 5 O, 2 S, 1 O, 2 S, 5 O.
- Row 6: 4 O, 2 S, 3 O, 2 S, 4 O.
- Row 7: 3 O, 2 S, 5 O, 2 S, 3 O.
- Row 8: 2 O, 2 S, 3 O, 1 S, 3 O, 2 S, 2 O.
- Row 9 (center row): 1 O, 2 S, 3 O, 3 S, 3 O, 2 S, 1 O.
- Row 10: repeat Row 8.
- Row 11: repeat Row 7.
- Row 12: repeat Row 6.
- Row 13: repeat Row 5.
- Row 14: repeat Row 4.
- Row 15: repeat Row 3.
The motif is symmetrical left to right, so it reads the same on both sides of the fabric. Check three things:
- The outer solid band is 2 blocks thick, with a single point block on Rows 3 and 15.
- The open ring sits inside the band.
- The solid center is the 1-3-1 block shape on Rows 8–10.
Stitch count after Row 15: 31 sts.
Rows 16–18 (open, bottom of front)
Rows 16–18: Work as Row 2. (31 sts)
Checkpoint: the strip is 6.0 in (15.2 cm) tall. The fold line will sit between Row 18 and Row 19.
Rows 19–35 (open, back)
Rows 19–35: Work as Row 2. (31 sts in each row) The back is plain mesh.
Row 36 (solid top edge of the back)
Row 36: Ch 3 (counts as dc), dc in next ch-sp, dc in next dc; repeat from * across, ending with a dc in the 3rd ch of the turning ch-4. (31 sts)
Do not fasten off.
Checkpoint: 15 blocks x 36 rows, 4.0 in x 12.0 in (10.2 cm x 30.5 cm).
Border
Border gauge: each round or row of sc adds 0.2 in (0.5 cm) of depth. Along the side edges, work 2 sc per dc row-end. Along the short ends, work 1 sc per st.
Round 1 (edge the flat strip)
Ch 1, do not turn. Work around the whole rectangle:
- 3 sc in first st (corner), sc in next 29 sts, 3 sc in last st (corner).
- Down the long side: 2 sc in each row-end across all 36 rows = 72 sc.
- Along the foundation ch: 3 sc in first ch (corner), sc in next 29 ch, 3 sc in last ch (corner).
- Up the other long side: 2 sc in each row-end = 72 sc.
Sl st to first sc. Fasten off.
Count: 31 + 31 sts on the short ends worked 1 per st, + 144 sc on the long sides, + 8 extra corner sc (2 extra at each of the 4 corners) = 214 sc.
Per side, counting both corner center sts: short sides have 33 sc and long sides have 76 sc. Between the corner centers, short sides have 31 sc and long sides have 74 sc. Check: (31 x 2) + (74 x 2) + 4 corners = 214.
Fold
Fold the strip in half between Row 18 and Row 19, RS out, so Row 1 and Row 36 meet at the top. The diamond is on the front, facing you.
Each long side now splits evenly: 74 sc ÷ 2 = 37 sc on the front half and 37 sc on the back half. That is 36 sc from 18 row-ends plus 1 sc from the corner group. The two layers match stitch for stitch, so no easing is needed.
Side Seams
Right seam: With the front facing, insert the hook through both top-right corner center sc, holding the front and back together. Join yarn, ch 1, sc in the same place. Then sc through both layers in each of the next 37 matching pairs down to the fold. (38 sc) Fasten off.
Left seam: Repeat on the left side. Start at the top-left corner centers and work down to the fold. (38 sc)
Keep the tension firm but not tight. The seam should lie flat as a neat ridge without puckering the mesh. Where the seam meets the fold, the corner stays soft and rounded on its own.
Opening Rounds
Round 3: With the front facing, join yarn in the first sc of the right seam. Ch 1, sc in the same st. Sc in each of the 31 sts across the front between the corners. Sc in the first sc of the left seam, then sc in each of the 31 sts across the back. Sl st to first sc. (64 sc)
Count check: 31 + 31 sts worked 1 per st + 2 seam tops = 64.
Round 4: Ch 1, sc in each st around. Sl st to first sc. (64 sc) Fasten off.
Place markers in two sts: st 1, above the right seam, and st 33, above the left seam. These points are exactly half the round (32 sts) apart, so the strap ends will sit level.
Size check: the width is 4.8 in (12.2 cm), which is the 4.0 in mesh plus 0.2 in from Round 1 and 0.2 in from the seam on each side. The height is 6.6 in (16.8 cm), which is the 6.0 in front half plus 0.2 in from Round 1 and 0.4 in from Rounds 3–4.
Strap
Row 1: Join yarn in st 63 of Round 4. Ch 1, sc in sts 63, 64, 1, 2 and 3. Turn. (5 sc, centered on the right seam)
Rows 2–50: Ch 1, sc in each st across. Turn. (5 sc)
Checkpoint: the strap is 10.0 in (25.4 cm) long and 0.65 in (1.7 cm) wide.
Attach: Bring the strap across the top without twisting it. Line up its last row with sts 31–35 of Round 4, centered on the left seam. Sl st through both layers 5 times. Fasten off and leave a 6 in (15.2 cm) tail. Use the tail to reinforce the join with a few whip stitches on the inside.
Final Blocking
- Weave in all ends inside the seams or along the solid rows, not across the open mesh.
- Spray the holder until it is damp all over, or soak it briefly and squeeze it out in a towel.
- Slide the card form inside, or pin the pouch flat on the mat.
- Pin it to 4.8 in x 6.6 in (12.2 cm x 16.8 cm).
- Line up the grid so the rows are level, the columns run straight up and down, and every open square is the same size.
- Gently round the two bottom corners with your fingers.
- Pin the strap straight at 10.0 in (25.4 cm).
- Let it dry fully before you remove the pins.
Final Quality-Control Checklist
- Every filet row has 31 sts and 15 blocks.
- The diamond is centered, with 1 open block outside each side point on Row 9.
- The solid outline is 2 blocks thick and the center diamond is 1-3-1 blocks.
- Round 1 has 214 sc.
- Each side seam has 38 sc, and both layers match.
- Rounds 3 and 4 each have 64 sc.
- The strap has 5 sc per row and 50 rows, with no twist.
- The pouch measures 4.8 in x 6.6 in (12.2 cm x 16.8 cm).
Troubleshooting
The diamond looks lopsided. You may have started a row with the wrong block. Count blocks, not stitches, and put a marker on the center block (block 8).
The strip slants or narrows. You probably missed the last dc in the turning chain. Count 31 sts at the end of every row.
The open squares look like rectangles. Your dc rows are too tall. Go down a hook size or snug up each dc.
The side seams ripple. You worked too many sc into the row-ends. Rework Round 1 with exactly 2 sc per row-end.
The opening flares. Work Round 4 with a hook one size smaller.
The strap stretches. Work it with a hook one size smaller, or add a sl st along each long edge.
Care
Hand wash in cool water with mild soap, squeeze gently and dry flat. Reshape the grid while it’s damp, and don’t hang it up wet with a phone inside.
Final Notes
Every measurement here comes from one gauge: 15 blocks = 4.0 in (10.2 cm) and 3 rows = 1.0 in (2.5 cm). That gives a strip of 4.0 in x 12.0 in (10.2 cm x 30.5 cm) and a half of 6.0 in (15.2 cm). Each sc round adds 0.2 in (0.5 cm), so the edge, seams and opening bring the pouch to 4.8 in x 6.6 in (12.2 cm x 16.8 cm). The 10.0 in (25.4 cm) strap finishes it. Check your gauge first and count 31 sts in every row, and the pouch will go together cleanly.
Happy crocheting!