

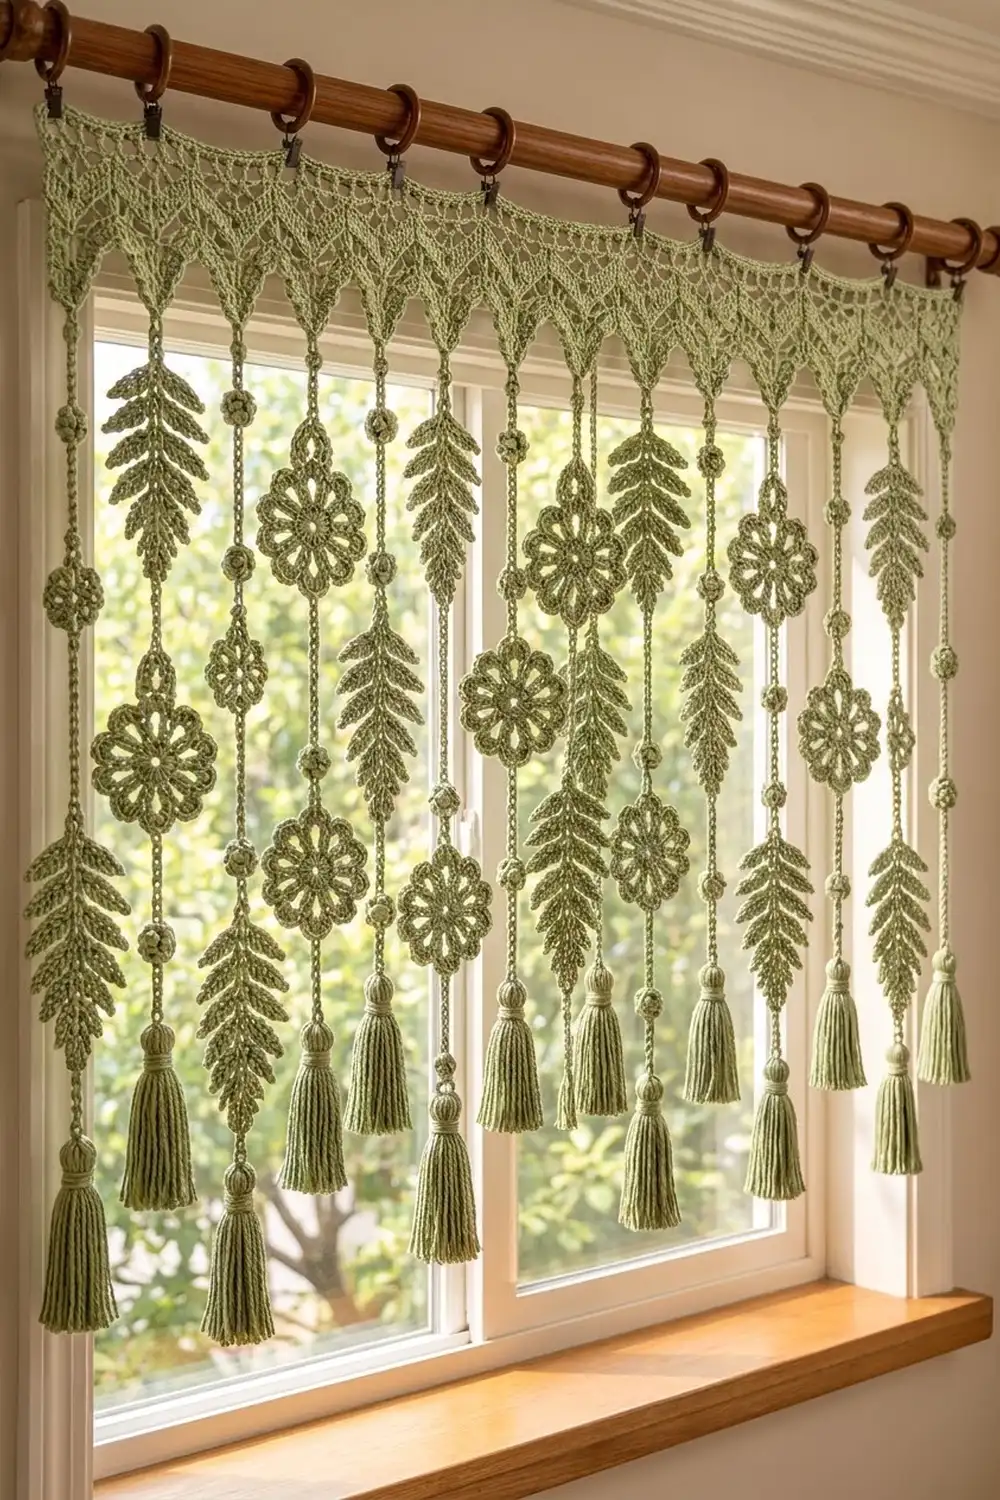
This valance curtain brings a small garden to your window. A lace header ends in a row of pointed triangles, and a beaded cord drops from every point. Each cord carries openwork ten-petal flowers or tapered fern leaves, small round beads, and a plump tassel at the bottom.
The whole curtain is one soft sage green cotton, so the stitches create all the interest: solid and mesh rows in the triangles, open loop petals, and stepped fern fronds. It feels boho and botanical, and it lets light through.
The pattern uses US crochet terms. The finished curtain is 36 in (91.4 cm) wide. Short strands hang 27.3 in (69.3 cm) from the rod and long strands hang 30.9 in (78.5 cm).
Construction overview: make 12 lace triangles, join them at their top corners, then work a 5-row header across the top. Next, make the flowers, leaves, and tassels. Finally, chain a beaded cord down from each triangle tip and attach the motifs as you go.
Finished Size and Construction
- Finished size: 36 in (91.4 cm) wide x 30.9 in (78.5 cm) long at the longest tassel
- Skill level: Intermediate
- Terminology: US
- Yarn weight: DK (#3) cotton
- Hook: 4.0 mm (US G-6)
- Number of pieces: 12 triangles, 12 flowers, 18 fern leaves, 12 tassels. The 42 beads are worked into the cords.
- Layout: 12 triangles in one row, with 1 strand hanging from each triangle
- Piece size: each triangle is 3 in (7.6 cm) across the top and 4 in (10.2 cm) deep
- Size before border: 36 in (91.4 cm) x 4 in (10.2 cm)
- Border depth: 2 in (5.1 cm) header, for a valance 6 in (15.2 cm) deep in total
Materials
Choose a smooth combed or mercerized DK cotton. Cotton keeps the fronds and petal loops crisp and makes the strands hang straight.
- Sage Green: 300 g / about 675 m (225 m per 100 g)
Approximate use: triangles 48 g, header 30 g, flowers 60 g, leaves 72 g, tassels 36 g, cords 10 g. That’s 256 g, so the 300 g total includes a margin of about 17 percent for swatching and trimming.
Tools:
- 4.0 mm (US G-6) hook
- Tapestry needle
- Scissors
- Stiff card, 4.5 in (11.4 cm) tall
- 13 curtain clip rings
- Rust-proof pins, blocking mat, spray bottle
- Tape measure
Abbreviations (US Terms)
- ch – chain
- sl st – slip stitch
- sc – single crochet
- hdc – half double crochet
- dc – double crochet
- tr – treble crochet
- dc2tog / dc3tog – double crochet 2 / 3 together
- sk – skip
- sp – space
- st(s) – stitch(es)
- RS – right side
- bd – bead
Bead (bd): Ch 3. [Yo, insert hook in 3rd ch from hook, yo, pull up a loop, yo, pull through 2 loops] 5 times. Yo, pull through all 6 loops on the hook, then sl st in the same ch. The bobble folds into a small ball on the cord. Each bead adds about 0.5 in (1.3 cm) of length.
Gauge and Checkpoints
Gauge: 20 dc and 8 rows = 4 in (10.2 cm) in alternating solid and mesh rows. That’s 5 sts per 1 in (2.5 cm).
Cord gauge: 5 firm ch = 1 in (2.5 cm).
Make one triangle first and use it as your swatch.
- Triangle Row 1 (15 dc) = 3 in (7.6 cm)
- Finished triangle = 4 in (10.2 cm) deep
- Flower = 3.5 in (8.9 cm) across
- Leaf = 5.5 in (14.0 cm) long x 2.5 in (6.4 cm) wide
If your triangle is too wide, switch to a 3.75 mm hook. If it’s too narrow, switch to a 4.5 mm hook. Never change the stitch counts, because the header relies on exactly 15 sts per triangle.
Lace Triangles (make 12)
Work each triangle from the top edge down to the point. The turning ch-2 does not count as a stitch.
Foundation: Ch 17.
Row 1 (RS): Dc in 3rd ch from hook and in each ch across. Turn. (15 dc)
Row 2 (mesh): Ch 2, dc2tog over the first 2 sts, [ch 1, sk 1, dc in next st] 5 times, ch 1, sk 1, dc2tog over the last 2 sts. Turn. (13 sts: 2 dc2tog, 5 dc, 6 ch-1 sps)
Row 3 (solid): Ch 2, dc2tog, dc in each st and ch-1 sp to the last 2 sts, dc2tog. Turn. (11 sts)
Row 4 (mesh): Ch 2, dc2tog, [ch 1, sk 1, dc in next st] 3 times, ch 1, sk 1, dc2tog. Turn. (9 sts: 2 dc2tog, 3 dc, 4 ch-1 sps)
Row 5: Work as Row 3. Turn. (7 sts)
Row 6 (mesh): Ch 2, dc2tog, ch 1, sk 1, dc in next st, ch 1, sk 1, dc2tog. Turn. (5 sts)
Row 7: Work as Row 3. Turn. (3 sts)
Row 8: Ch 2, dc3tog. Fasten off. (1 st, the point)
Each row loses 1 st at each end, so the sides slope evenly to a sharp point. The mesh rows create the open lace bands.
Checkpoint: 3 in (7.6 cm) wide and 4 in (10.2 cm) deep.
Flowers (make 12)
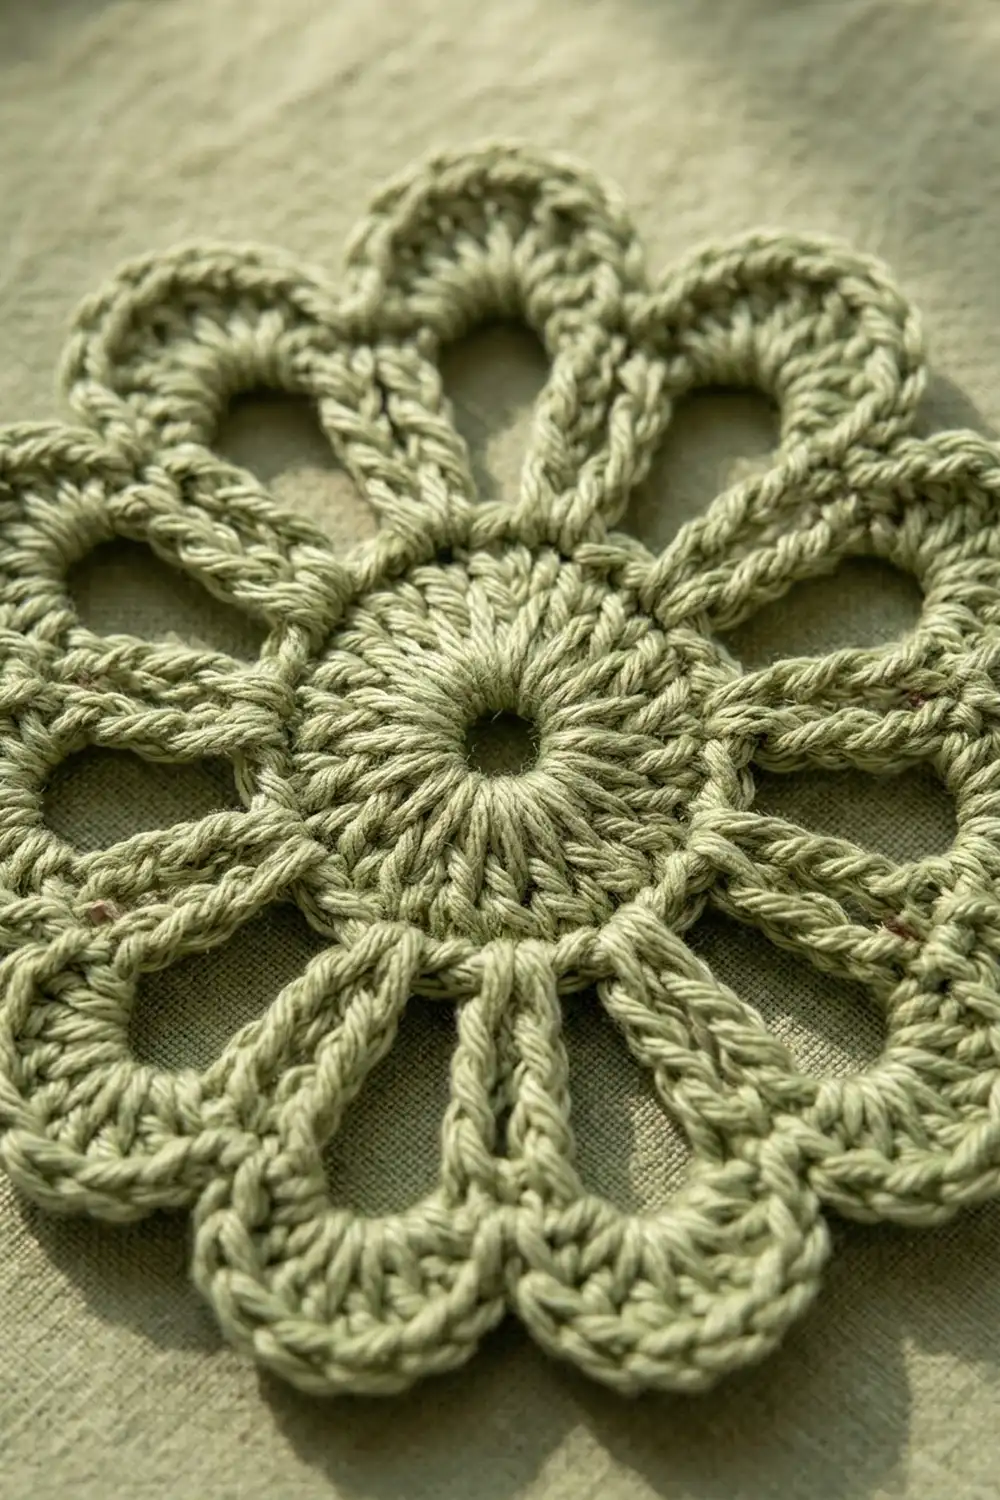
Rnd 1: Ch 4, sl st in the first ch to form a ring. Ch 3 (counts as dc), 19 dc in the ring, sl st in the top of the ch-3. (20 dc) The ring leaves a small open center.
Rnd 2: Ch 1, sc in each st around, sl st in the first sc. (20 sc) This round makes the firm, raised center ring.
Rnd 3: Ch 1, sc in the first st, [ch 6, sk 1, sc in next st] 9 times, ch 6, sk 1, sl st in the first sc. (10 sc, 10 ch-6 loops)
Rnd 4: Sl st into the first loop. In each loop around, work (sc, hdc, 7 dc, hdc, sc). Sl st in the first sc and fasten off. (10 petals of 11 sts = 110 sts)
Each petal arches over its chain loop and keeps an open center. The 4th of the 7 dc is the petal tip.
Checkpoint: 3.5 in (8.9 cm) across.
Fern Leaves (make 18)
Each leaf hangs with its wide base at the top and its point at the bottom.
- Short frond: Ch 4, sc in 2nd ch from hook, hdc in next ch, dc in next ch. (3 sts)
- Medium frond: Ch 6, sc in 2nd ch from hook, hdc in next ch, dc in next 3 ch. (5 sts)
- Long frond: Ch 7, sc in 2nd ch from hook, hdc in next ch, dc in next 2 ch, tr in next 2 ch. (6 sts)
Foundation: Ch 29. This chain is the spine.
Side 1:
1. Sl st in the 2nd ch from hook. This is the leaf tip.
2. [Short frond, sl st in each of the next 3 spine ch] 3 times.
3. [Medium frond, sl st in each of the next 3 spine ch] 3 times.
4. [Long frond, sl st in each of the next 3 spine ch] 3 times.
You finish at the base. (9 fronds; 27 spine ch used)
Side 2: Ch 1 and rotate to work along the other side of the foundation chain. Sl st in the first ch, then:
1. [Sl st in each of the next 3 ch, long frond] 3 times.
2. [Sl st in each of the next 3 ch, medium frond] 3 times.
3. [Sl st in each of the next 3 ch, short frond] 3 times.
4. Sl st in the tip and fasten off. (9 fronds)
Checkpoint: 5.5 in (14.0 cm) long and 2.5 in (6.4 cm) wide.
Tassels (make 12)
- Wrap yarn 30 times around the 4.5 in (11.4 cm) card.
- Slide a 12 in (30.5 cm) tie under the top wraps and knot it tightly. Leave both ends long.
- Cut the bottom wraps.
- Wrap a separate strand 10 times around the bundle, 0.75 in (1.9 cm) below the top, and tie it off.
- Trim the tassel to 4 in (10.2 cm).
Make All Pieces
All pieces use Sage Green: 12 triangles, 12 flowers, 18 leaves, and 12 tassels, plus 42 beads worked into the cords.
Pos:  1  2  3  4  5  6  7  8  9  10 11 12
      A  B  A  B  A  B  A  B  A  B  A  B

Strand A:  bd - LEAF - bd - LEAF - bd - TASSEL
Strand B:  bd - FLOWER - bd - LEAF - bd - FLOWER - bd - TASSEL
Check the totals against this grid:
– Leaves: 6 x 2 + 6 x 1 = 18
– Flowers: 6 x 2 = 12
– Beads: 6 x 3 + 6 x 4 = 42
Joining
Lay the triangles in a row, RS up, with the foundation edges at the top.
Method: Hold two neighboring triangles RS together. Whipstitch through the side edges of Row 1 only, joining the last dc of one triangle to the first dc of the next. The seam is about 0.5 in (1.3 cm) long. Below Row 1 the sloped sides separate, which forms the V-shaped gaps.
Stitch logic: The seams only use row ends. Each triangle keeps its 15 free foundation loops.
Tension: Make the stitches snug but not tight. Tight seams make the top edge cup.
Checkpoint: The joined row is 36 in (91.4 cm) wide (12 x 3 in / 7.6 cm).
Header Border
The header is worked in rows across the top edge at the same gauge, 5 sts per 1 in (2.5 cm).
Row 1 (RS): Join yarn in the first free foundation loop at the right end. Ch 1, sc in each free loop across all 12 triangles. Turn. (12 x 15 = 180 sc)
Row 2: Ch 3 (counts as dc), dc in each st across. Turn. (180 dc)
Row 3 (lace): Ch 3 (counts as dc), [ch 1, sk 1, dc in each of the next 2 sts] 59 times, ch 1, sk 1, dc in the last st. Turn. (1 + 59 x 3 + 2 = 180 sts: 120 dc, 60 ch-1 sps)
Row 4: Ch 3 (counts as dc), dc in each dc and each ch-1 sp across. Turn. (180 dc)
Row 5: Ch 1, sc in each st across. (180 sc)
End finish: Without turning, ch 1 and work 8 sc evenly down the short end (1 per sc row, 2 per dc row). Fasten off. Rejoin at the other short end and work 8 sc there too. (8 sc per short end)
Why the math works:
– 12 triangles x 15 sts = 180, and the seams add nothing.
– Row 3 starts and ends with a dc beside a ch-1 sp, so the lace is symmetrical.
– Every row keeps 180 sts, which is 36 in (91.4 cm) at 5 sts per inch.
– Depth is 2 sc rows x 0.25 in (0.6 cm) plus 3 dc rows x 0.5 in (1.3 cm) = 2 in (5.1 cm).
Building the Strands
A standard segment is ch 4, bd, ch 4. That’s 1.6 in (4.1 cm) of chain plus a 0.5 in (1.3 cm) bead, about 2.1 in (5.3 cm) in total.
To attach a motif: End the segment with a sl st into the top of the motif and fasten off. Rejoin the yarn at the bottom of the motif to start the next segment.
- Leaf: top at the base ch, bottom at the tip sl st
- Flower: top at one petal tip, bottom at the 6th petal tip (the one directly opposite)
- Tassel: thread the tie ends up through the last ch and knot them
Strand A: Join at the triangle point. Work segment, leaf, segment, leaf, segment, tassel. (3 beads; 21.3 in / 54.1 cm)
Strand B: Join at the triangle point. Work segment, flower, segment, leaf, segment, flower, segment, tassel. (4 beads; 24.9 in / 63.2 cm)
With the 6 in (15.2 cm) valance added, Strand A hangs 27.3 in (69.3 cm) and Strand B hangs 30.9 in (78.5 cm). This gives the staggered tassel line.
Final Blocking
- Weave in all ends along the cords and on the backs of the motifs.
- Lay the curtain RS up and pin the top edge straight at 36 in (91.4 cm).
- Pin each triangle point so the valance is 6 in (15.2 cm) deep.
- Pin the flowers to 3.5 in (8.9 cm), with a pin in every petal tip.
- Pin the leaves to 5.5 in (14.0 cm), angling the fronds toward the tip.
- Mist until damp and let everything dry completely.
- Steam and comb the tassels, then trim them level at 4 in (10.2 cm).
- Clip the 13 rings at both ends and over each of the 11 seams, 3 in (7.6 cm) apart.
Final Quality-Control Checklist
- Every triangle has 15 sts in Row 1 and ends in one point.
- Header Rows 1–5 each have 180 sts, and Row 3 has 60 ch-1 spaces.
- Every flower has 10 even petals and an open center.
- Every leaf has 9 fronds on each side.
- The strands follow the A/B order, and the beads are firm and round.
- All ends are secured.
Troubleshooting
- Header ruffles: There are more than 15 sts per triangle. Recount.
- Header pulls in: The seams are too tight. Loosen them, or use a larger hook for Rows 1 and 5.
- Flat beads: Close the 6 loops firmly and sl st into the same ch.
- Curling leaves: Wet-block and pin every frond.
- Twisting strands: Chain more firmly and let the curtain hang for a day after blocking.
Care
Hand wash in cool water with a mild soap and roll the curtain in a towel to remove water. Pin it flat to dry and comb the tassels while they are still damp.
Final Notes
The measurements build on each other:
– One triangle: 15 sts = 3 in (7.6 cm)
– Twelve triangles: 180 sts = 36 in (91.4 cm)
– The header keeps 180 sts and adds 2 in (5.1 cm)
– Each strand’s drop comes from 2.1 in (5.3 cm) segments, 3.5 in (8.9 cm) flowers, 5.5 in (14.0 cm) leaves, and 4 in (10.2 cm) tassels
If each measurement checks out, the curtain will hang straight and even.
Happy crocheting!