

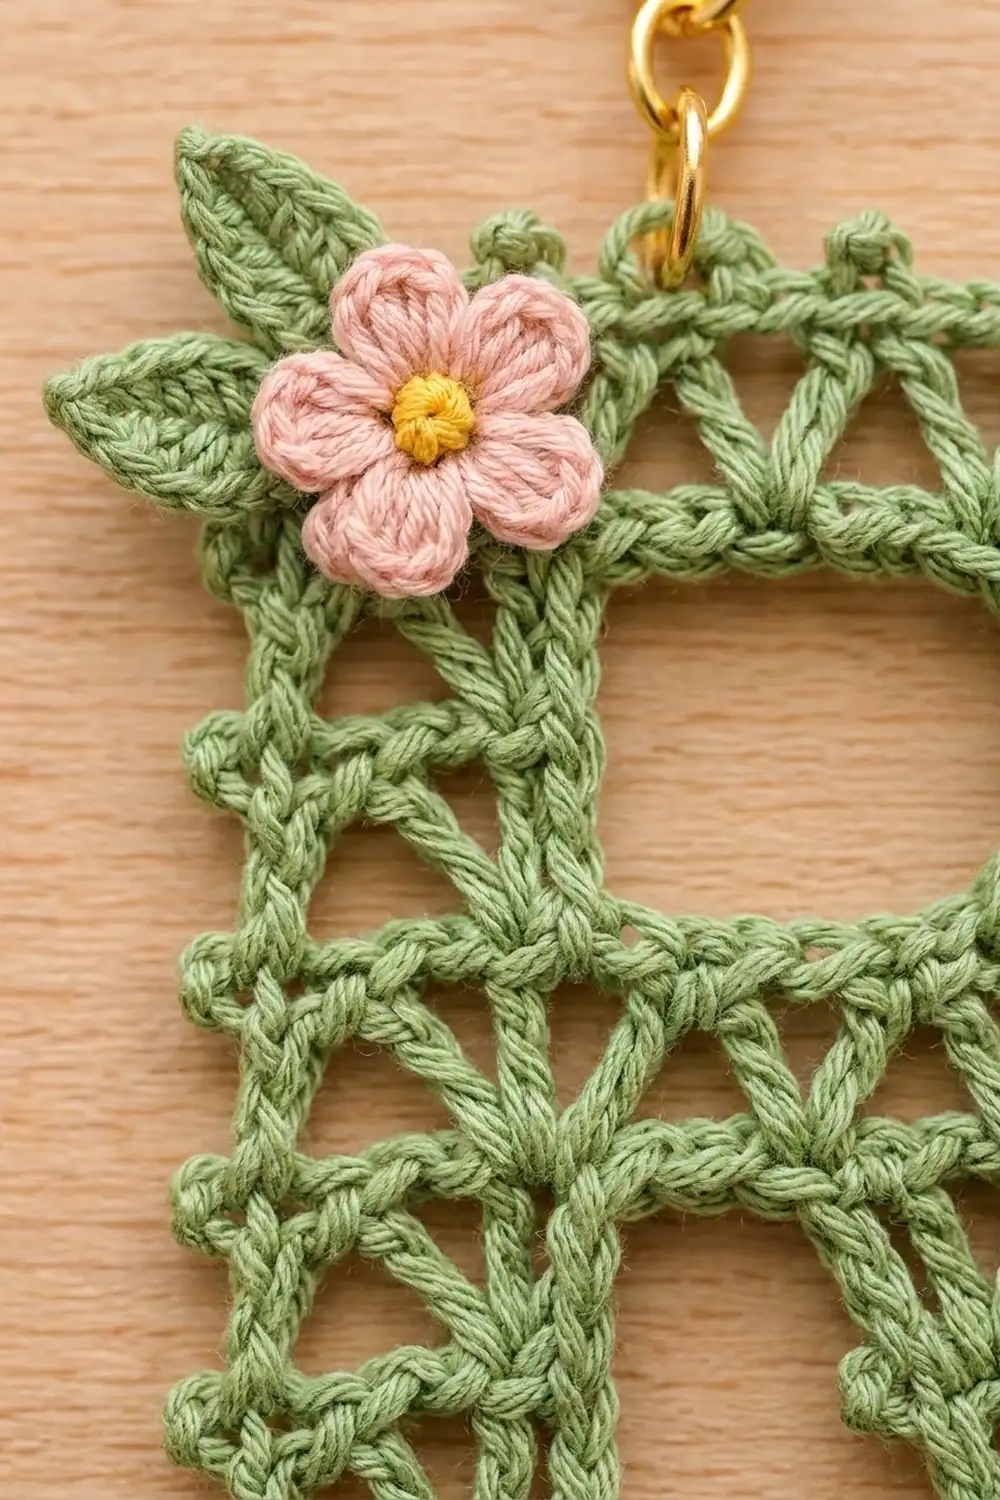
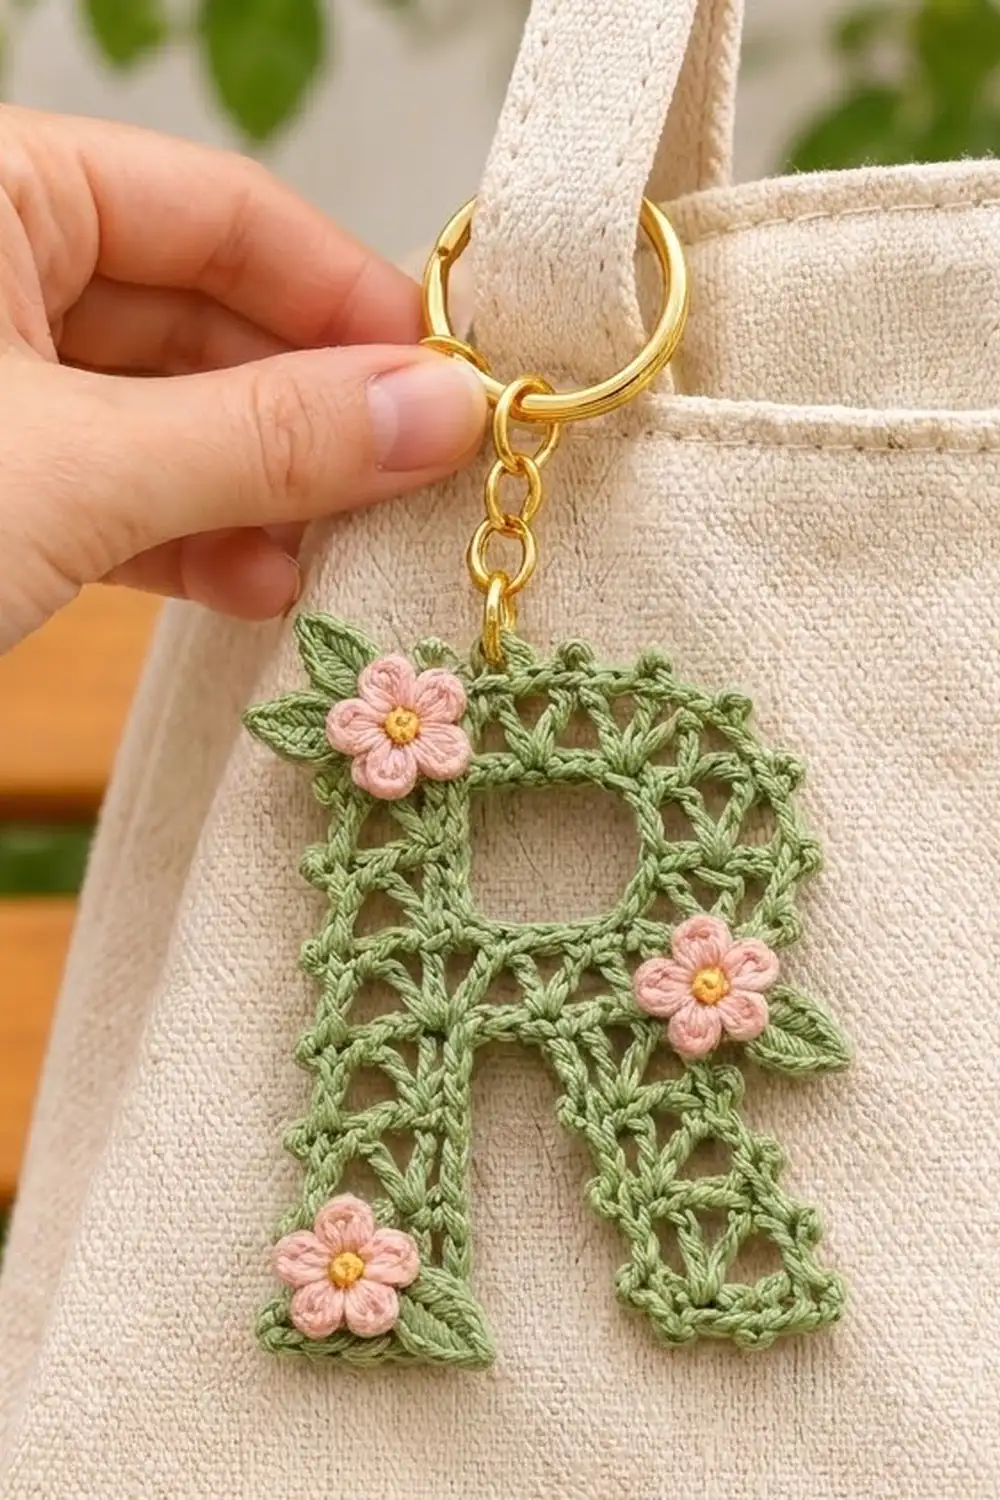
This lacy letter R is a quick, personal accessory for a tote bag, backpack, or set of keys. The letter is an openwork mesh of small fans set between upright double crochet pillars, with single crochet bars in between. It has a tidy picot edge, and three tiny blush flowers with yellow centers and fresh green leaves are sewn on.
The palette is soft and garden-like: sage green for the letter, blush pink for the petals, a touch of yellow for the flower centers, and a slightly deeper green for the leaves. Gold key ring hardware finishes it off.
This pattern uses US crochet terms. The finished letter measures 4.5 in (11.4 cm) wide and 5 in (12.7 cm) tall, including the edging.
The letter is worked flat in rows from the top down as one piece. You start with the top bar, split around the bowl’s hole, bridge the hole with a chain, narrow the piece at the bowl’s lower curve, and split again for the stem and the diagonal leg. A two-round picot edging goes around the outer outline. The flowers and leaves are made separately and sewn on.
Finished Size and Construction
- Finished size: 4.5 in x 5 in (11.4 cm x 12.7 cm)
- Skill level: Advanced beginner to intermediate
- Terminology: US crochet terms
- Yarn weight: DK / light (#3) cotton
- Hook: 3.0 mm (US C/2 or D/3)
- Number of pieces: 1 letter, plus 7 small appliqués (3 flowers, 4 leaves)
- Layout: a single letter R; this is not an assembled project
- Letter grid: 25 stitch positions wide, 15 rows tall
- Size before border: 4 in x 4.5 in (10.2 cm x 11.4 cm)
- Border depth: about 0.25 in (0.6 cm) on every outer edge
Materials
Use a smooth, mercerized DK cotton or cotton blend. It shows the fans clearly and holds its shape on a keychain that gets handled a lot. Avoid fuzzy yarns, because they blur the mesh.
- Sage green (letter): 10 g, about 23 m
- Blush pink (petals): 2 g, about 5 m
- Yellow (flower centers): 1 g, about 2 m
- Leaf green (leaves): 2 g, about 5 m
Tools:
- 3.0 mm crochet hook
- Tapestry needle
- Scissors
- Stitch marker
- 1 in (2.5 cm) gold split key ring with a short chain
- One 6–8 mm gold jump ring
- 2 pairs of flat-nose pliers
- Rust-proof pins and a blocking mat
All quantities include a margin for swatching and weaving in ends.
Abbreviations (US Terms)
- ch – chain
- sl st – slip stitch
- sc – single crochet
- hdc – half double crochet
- dc – double crochet
- sk – skip
- st(s) – stitch(es)
- tch – turning chain
- MR – magic ring
- rep – repeat
Special stitches:
- Fan: 3 dc in the same stitch.
- Picot: ch 3, then sl st in the 3rd ch from the hook.
- Ext-7 (extension chain): ch 7 at the end of a sc row. Four of these chains become new stitch positions, and three act as the turning chain of the next row.
Stitch positions: Positions are numbered 1–25 from the stem edge (position 1) to the bowl edge (position 25). Pillars (single dc) sit at positions 1, 5, 9, 13, 17, 21, and 25. Fans sit in the middle of each four-stitch cell.
Gauge and Checkpoints
Treat Rows 1–3 as your test piece. Work them, lay them flat without stretching, and measure:
- After Row 3: 21 sts = 3.4 in (8.6 cm) wide, and 0.9 in (2.3 cm) tall.
This equals 6.25 sts per inch. One fan row plus one sc row adds 0.6 in (1.5 cm) of height.
- If your piece is too wide: go down 0.25–0.5 mm in hook size.
- If it is too narrow: go up 0.25–0.5 mm.
- If the width is right but the rows are too tall: shorten the yarn-overs and snug each dc before starting the next.
Later checkpoints:
- After Row 7: 2.1 in (5.3 cm) tall. Each split section is about 1.4 in (3.6 cm) wide.
- After Row 11: 3.3 in (8.4 cm) tall.
- After Row 15: 4.5 in (11.4 cm) tall, and 4 in (10.2 cm) wide at the widest point.
Letter Pattern
Use the sage green yarn throughout.
Top Bar (Rows 1–3)
Ch 22.
Row 1: Sc in 2nd ch from hook and in each ch across. Turn. (21 sc)
Row 2: Ch 3 (counts as dc). Sk 1 st, fan in next st, sk 1 st, dc in next st. Rep from * 4 more times. Turn. (21 sts: 5 fans + 6 pillars)
Row 3: Ch 1, sc in each st across, working the last sc into the top of the tch. You now have 21 sc, ending at the bowl edge. Do not turn. Work Ext-7.
Bowl Right Side (Rows 4R–7R)
Row 4R: Fan in 6th ch from hook (position 23). Sk next ch (position 22). Dc in last sc of Row 3 (position 21). Sk 1, fan in next st, sk 1, dc in next st (position 17). Turn. (9 sts: 2 fans + 3 pillars)
The extension chains give this side a softly rounded top-right corner.
Row 5R: Ch 1, sc in each st across. Turn. (9 sc)
Row 6R: Ch 3 (counts as dc). (Sk 1, fan in next st, sk 1, dc in next st) twice. Turn. (9 sts)
Row 7R: Ch 1, sc in each st across. (9 sc) Fasten off.
Bowl Left Side and Hole Bridge (Rows 4L–7L)
Row 4L: With the stem edge on your left, join yarn with a sl st in the 9th sc of Row 3 from the stem edge (position 9). Ch 3 (counts as dc). (Sk 1, fan in next st, sk 1, dc in next st) twice, ending at position 1. Turn. (9 sts)
Row 5L: Ch 1, sc in each st across. Turn. (9 sc)
Row 6L: Work as Row 6R. Turn. (9 sts)
Row 7L: Ch 1, sc in each st across (9 sc). Then work the bridge:
- Ch 7 (positions 10–16).
- Sl st in the first sc of Row 7R (position 17).
- Sl st in the next 4 sc (positions 18–21).
Base for Row 8: 9 sc + 7 ch + 5 sl-st positions = 21. Positions 22–25 of Row 7R stay unworked. Turn.
The space between the two sections, framed below by the 7-ch bridge, is the bowl’s hole: about 1.1 in (2.8 cm) wide and 1.2 in (3.0 cm) tall.
Bowl Bottom and Junction (Rows 8–11)
Row 8: Ch 3 (counts as dc, position 21). Sk 1, fan in next st, sk 1, dc in next st. Rep from * 4 more times. Work into the sl sts and bridge chains as you reach them, with fans landing in ch positions 15 and 11. Turn. (21 sts: 5 fans)
Row 9: Ch 1, sc in the first 17 sts. Leave the last 4 sts unworked to shape the bowl’s lower curve. Turn. (17 sc)
Row 10: Ch 3 (counts as dc). Sk 1, fan in next st, sk 1, dc in next st. Rep from * 3 more times. Turn. (17 sts: 4 fans)
Row 11: Ch 1, sc in each st across (17 sc, ending at position 17). Work Ext-7.
Leg (Rows 12R–15R)
The leg shifts four positions to the right every two rows, which creates the diagonal.
Row 12R: Fan in 6th ch from hook (position 19). Sk next ch. Dc in last sc of Row 11 (position 17). Sk 1, fan in next st, sk 1, dc in next st (position 13). Turn. (9 sts)
Row 13R: Ch 1, sc in each st across (9 sc, ending at position 21). Work Ext-7.
Row 14R: Fan in 6th ch from hook (position 23). Sk next ch. Dc in last sc of Row 13R (position 21). Sk 1, fan in next st, sk 1, dc in next st (position 17). Turn. (9 sts)
Row 15R: Ch 1, sc in each st across. (9 sc) Fasten off.
Lower Stem (Rows 12L–15L)
Row 12L: Join yarn with a sl st in the 9th sc of Row 11 from the stem edge (position 9). Work as Row 4L. (9 sts)
Positions 10–12 of Row 11 stay free; they form the notch between the stem and the leg.
Row 13L: Work as Row 5L. (9 sc)
Row 14L: Work as Row 6L. (9 sts)
Row 15L: Ch 1, sc in each st across. (9 sc) Fasten off.
Check the 4.5 in (11.4 cm) height and 4 in (10.2 cm) width now.
Flowers and Leaves
Flower (make 3)
Rnd 1: With blush pink, make an MR. Ch 1, 5 sc into the ring. Pull the ring closed and join with a sl st to the first sc. (5 sc)
Rnd 2: Work (ch 2, 2 dc, ch 2, sl st) all in the same sc, then sl st in the next sc. Rep from * 4 more times. (5 petals)
Fasten off, leaving an 8 in (20.3 cm) tail. With yellow, work one French knot (3 wraps) in the center.
The flower should measure about 0.8 in (2.0 cm) across.
Leaf (make 4)
With leaf green, ch 6.
- Starting in the 2nd ch from hook, work sc, hdc, dc, hdc, sc.
- Ch 1.
- Rotate the piece and work along the other side of the chain: sc, hdc, dc, hdc, sc.
- Sl st in the tip.
Fasten off, leaving a 6 in (15.2 cm) tail. Each leaf is about 0.8 in (2.0 cm) long.
Border
Use sage green yarn. The border goes around the outer outline only; the inner hole stays plain.
Border gauge: 1 sc per stitch or chain along horizontal edges. Along the sides, work 2 sc around each dc row-end and 1 sc in each sc row-end. Where a row ends in an extension chain, that row has no separate row-end, so skip it.
Round 1 (sc)
With the right side facing (stem on the left), join at the top-left corner. Work around clockwise:
| Segment | Where | Sc |
|---|---|---|
| A | Top edge (2 sc in the first foundation ch, then 1 sc in each of the remaining 20 ch) | 22 |
| B | Row-ends of Rows 1–2 | 3 |
| C | Free loops of the Row 3 extension chain | 4 |
| D | Row-ends of Rows 4R–7R | 6 |
| E | Free sts of Row 7R (positions 25–22) | 4 |
| F | Row-end of Row 8 | 2 |
| G | Free sts of Row 8 (positions 21–18) | 4 |
| H | Row-ends of Rows 9–10 | 3 |
| I | Free loops of the Row 11 extension chain | 4 |
| J | Row-end of Row 12R | 2 |
| K | Free loops of the Row 13R extension chain | 4 |
| L | Row-ends of Rows 14R–15R | 3 |
| M | Bottom of the leg | 9 |
| N | Row-ends of Rows 15R–14R | 3 |
| O | Free sts of Row 13R (positions 16–13) | 4 |
| P | Row-ends of Rows 13R–12R | 3 |
| Q | Notch (positions 12–10 of Row 11) | 3 |
| R | Row-ends of Rows 12L–15L | 6 |
| S | Bottom of the stem | 9 |
| T | Left edge (8 sc row-ends x 1, plus 7 dc row-ends x 2) | 22 |
Join with a sl st to the first sc. Total: 120 sc.
Round 2 (picots)
Ch 1. Sc in next sc, picot, sl st in each of the next 3 sc. Rep from * 29 more times. Join. (30 picots)
Fasten off.
Why the math works: Each repeat uses exactly 4 sc, and 120 ÷ 4 = 30, so the last repeat ends at the join. The extra sc at the top-left corner turns 119 into 120. Each counted row-end follows the 2-per-dc, 1-per-sc rule, so the sides lie flat and don’t ruffle.
Final Blocking
- Weave in all the letter’s ends along sc rows. Leave the flower and leaf tails for sewing.
- Wet the letter in cool water and press it gently in a towel.
- Pin it to 4.5 in x 5 in (11.4 cm x 12.7 cm). Put pins in the corners first, then in the picots.
- Open the hole to a neat rectangle and straighten the leg’s diagonal steps.
- Pin the flowers and leaves flat beside it, opening each petal.
- Let everything dry completely.
- Sew on the appliqués:
- Top flower over the top-left corner, with one leaf pointing up-left and one pointing left.
- Second flower on the right edge of the bowl at the hole’s lower corner, with a leaf below it.
- Third flower at the bottom of the stem, with a leaf to its right.
- Open the jump ring with pliers. Pass it through the Round 1 sc above position 9 and through the end link of the key ring chain, then close it fully.
Final Quality-Control Checklist
- Row counts: 21, 21, 21, 9s, 21, 17, 17, 17, 9s.
- The hole is open and rectangular, and the bridge chain isn’t twisted.
- The leg steps down to the right twice, evenly.
- Round 1 has 120 sc and Round 2 has 30 picots.
- The inner hole edge has no edging.
- The size is 4.5 in x 5 in (11.4 cm x 12.7 cm).
- All three flowers are sewn through the center and at the petal tips.
- The jump ring is closed with no gap.
Troubleshooting
- Hole puckers: The bridge chain is too tight. Redo it with a looser chain, or go up one hook size for those 7 ch only.
- Leg curls: Your extension chains are tight. Chain more loosely, or block it harder.
- Border ruffles: You worked extra sc on the row-ends. Recount each segment against the table.
- Border cups: Too few sc. Make sure every dc row-end got 2 sc.
- Count off in Round 2: Round 1 is not 120. Fix it before working the picots.
- Flower cups: The ring was pulled too tight. Block the flower flat before sewing.
Care
Hand wash in cool water with mild soap, press flat in a towel, and dry flat. Remove the key ring before washing so the gold finish lasts.
Final Notes
The measurements build on each other:
- Rows 1–3: 21 sts = 3.4 in (8.6 cm).
- 25 positions = 4 in (10.2 cm).
- 15 rows = 4.5 in (11.4 cm).
- Edging adds 0.25 in (0.6 cm) per edge, giving 4.5 in x 5 in (11.4 cm x 12.7 cm).
- 120 border sc = 30 picots.
Check your gauge at Row 3 and count every row.
Happy crocheting!