

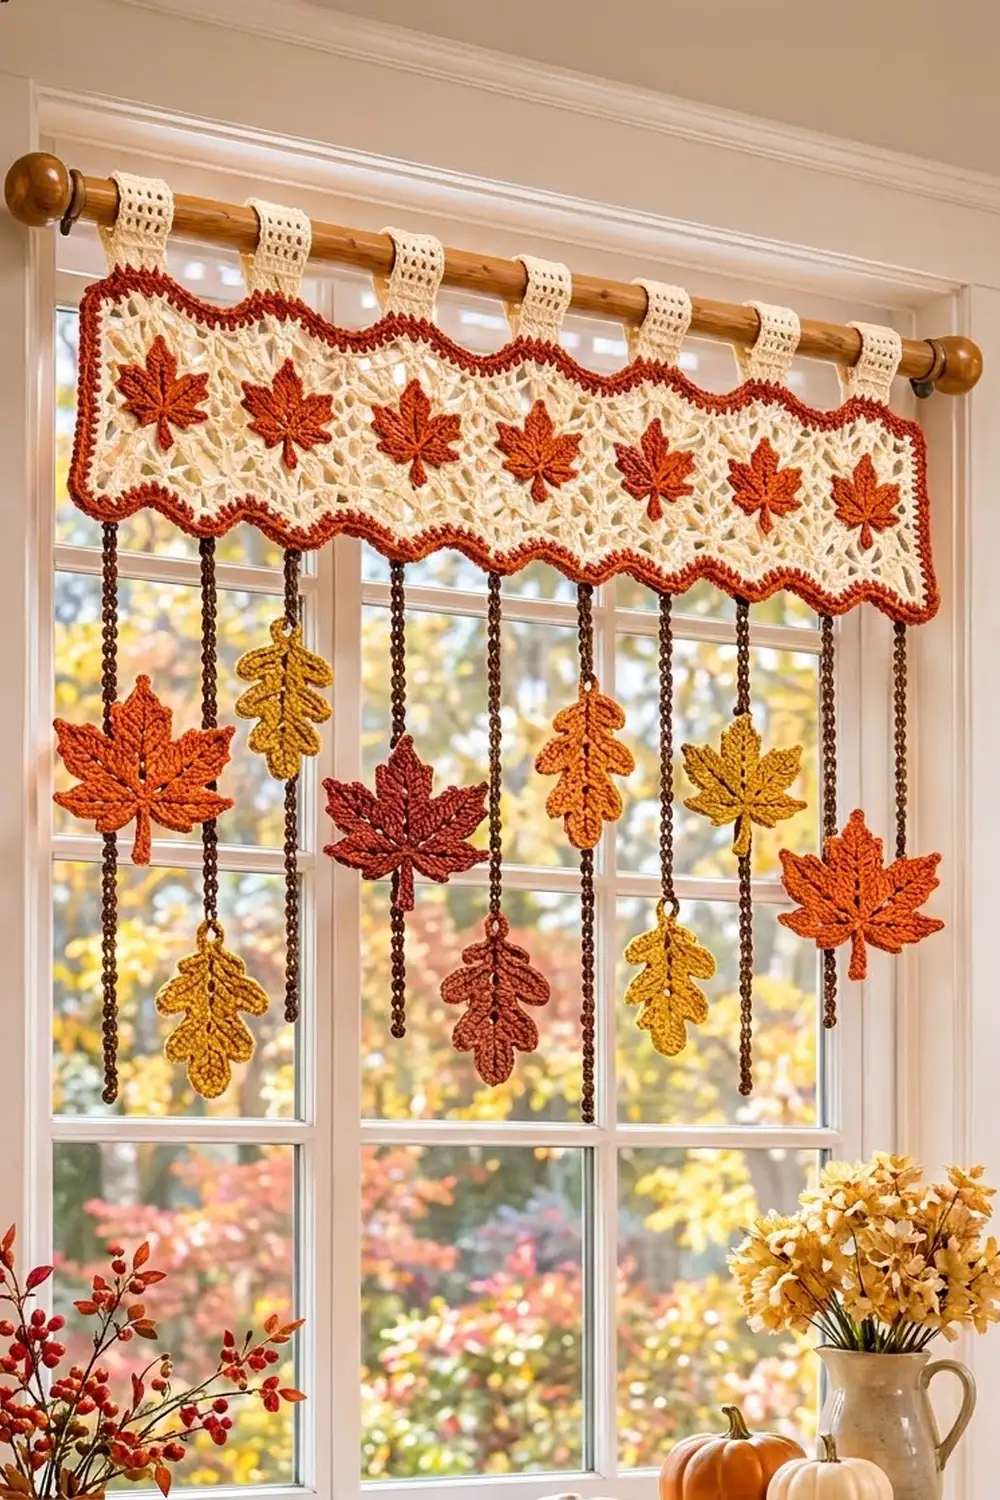
The Maple Drift Valance is a short window topper with a cream lace body, rust maple leaves across the middle, and a rust wave border along the top and bottom. Seven cream tabs hold it on the rod. Nine dark brown cords hang below it, and each cord carries one or two maple or oak leaves.
The colors are cream, rust, dark brown, burnt orange, mustard, and burgundy. It looks cozy and a little vintage, and the open lace lets light through the leaves.
This pattern uses US terms. The panel measures 29 3/4 in (75.6 cm) wide and 8 1/2 in (21.6 cm) tall at the wave peaks. From the top peak to the end of the longest cord, it measures 28 in (71.1 cm).
Here is the order of work. You crochet the lace body in rows and sew on 7 small maples. Then you add a 3-round wave border, attach 7 tabs, and finish with 9 slip-stitch cords and 14 dangling leaves.
Finished Size and Construction
- Finished panel: 29 3/4 in x 8 1/2 in (75.6 cm x 21.6 cm) at the peaks
- Overall length with cords: 28 in (71.1 cm)
- Skill level: Intermediate
- Terminology: US
- Yarn weight: Worsted (#4)
- Hook: 5.0 mm (H-8)
- Pieces: 1 lace panel, 7 appliqué maples, 7 tabs, 9 cords, 14 dangling leaves
- Layout: one horizontal panel, with tabs across the top and cords across the bottom
- Size before border: 28 1/4 in x 6 in (71.8 cm x 15.2 cm)
- Border depth: 3/4 in (1.9 cm) at the valleys and short sides, 1 1/4 in (3.2 cm) at the peaks
Materials
Use a smooth worsted cotton or cotton-acrylic blend. It gives crisp lace and leaves that lie flat.
- A, Cream: 100 g / 183 m (body, tabs)
- B, Rust: 70 g / 128 m (border, 7 small maples, 3 oaks)
- C, Dark Brown: 30 g / 55 m (9 cords)
- D, Burnt Orange: 35 g / 64 m (4 large maples, 1 oak)
- E, Mustard: 25 g / 46 m (5 oaks)
- F, Burgundy: 10 g / 18 m (1 large maple)
Tools: 5.0 mm (H-8) hook, tapestry needle, stitch markers, measuring tape, blocking mats, rust-proof pins, spray bottle.
All quantities include a margin of about 15 percent.
Abbreviations (US Terms)
ch (chain), sl st (slip stitch), sc (single crochet), hdc (half double crochet), dc (double crochet), tr (treble crochet), st(s) (stitch(es)), sp (space), sk (skip), rep (repeat), RS/WS (right side/wrong side).
Special stitches:
- Picot: ch 3, sl st in 3rd ch from hook.
- Wave repeat (14 sts): sc in next 2 sts, hdc in next 2, dc in next 2, tr in next 2, dc in next 2, hdc in next 2, sc in next 2.
- Back-bump cord: chain the stated number, then sl st in the back bump of the 2nd ch from hook and of each ch back to the start.
Gauge and Checkpoints
- 16 sc and 16 rows = 4 in (10.2 cm).
- 4 mesh rows = 2 in (5.1 cm). Each ch-5 loop spans about 1 in (2.5 cm).
- Cord: 7 ch = 2 in (5.1 cm) after slip-stitching back.
Test one piece first. Make one small maple. It should measure about 2 1/2 in (6.4 cm) across. Then chain 17 and work 16 sc. That row should measure 4 in (10.2 cm).
Checkpoints:
- Row 1: 28 1/4 in (71.8 cm) wide
- Row 12: about 5 3/4 in (14.6 cm) tall
- Row 13: 28 1/4 in x 6 in (71.8 cm x 15.2 cm)
- Border: 29 3/4 in x 8 1/2 in (75.6 cm x 21.6 cm)
If your piece is too big, go down 0.5 mm in hook size. If it is too small, go up 0.5 mm. Never change the stitch counts, because the waves, tabs and cords all depend on the 113-stitch width.
Lace Body
With A, ch 114.
Row 1 (RS): Sc in 2nd ch from hook and in each ch across. Turn. (113 sc)
Row 2: Ch 1, sc in first sc, ch 5, sk 3 sc, sc in next sc; rep from * across. Turn. (28 ch-5 loops, 29 sc)*
Row 3: Ch 5 (counts as dc + ch 2), sc in first loop, ch 5, sc in next loop; rep from * across, ch 2, dc in last sc. Turn. (27 loops + 2 half loops)*
Row 4: Ch 1, sc in first dc, ch 5, sc in next loop; rep from * 26 more times, ch 5, sc in 3rd ch of turning ch. Turn. (28 loops)*
The loops shift by half a loop each row, which makes the diamond pattern.
Rows 5–12: Rep Rows 3–4 four more times. Row 12 has 28 full loops.
Row 13: Ch 1, sc in first sc, 3 sc in next loop, sc in next sc; rep from * across. (113 sc)* Fasten off.
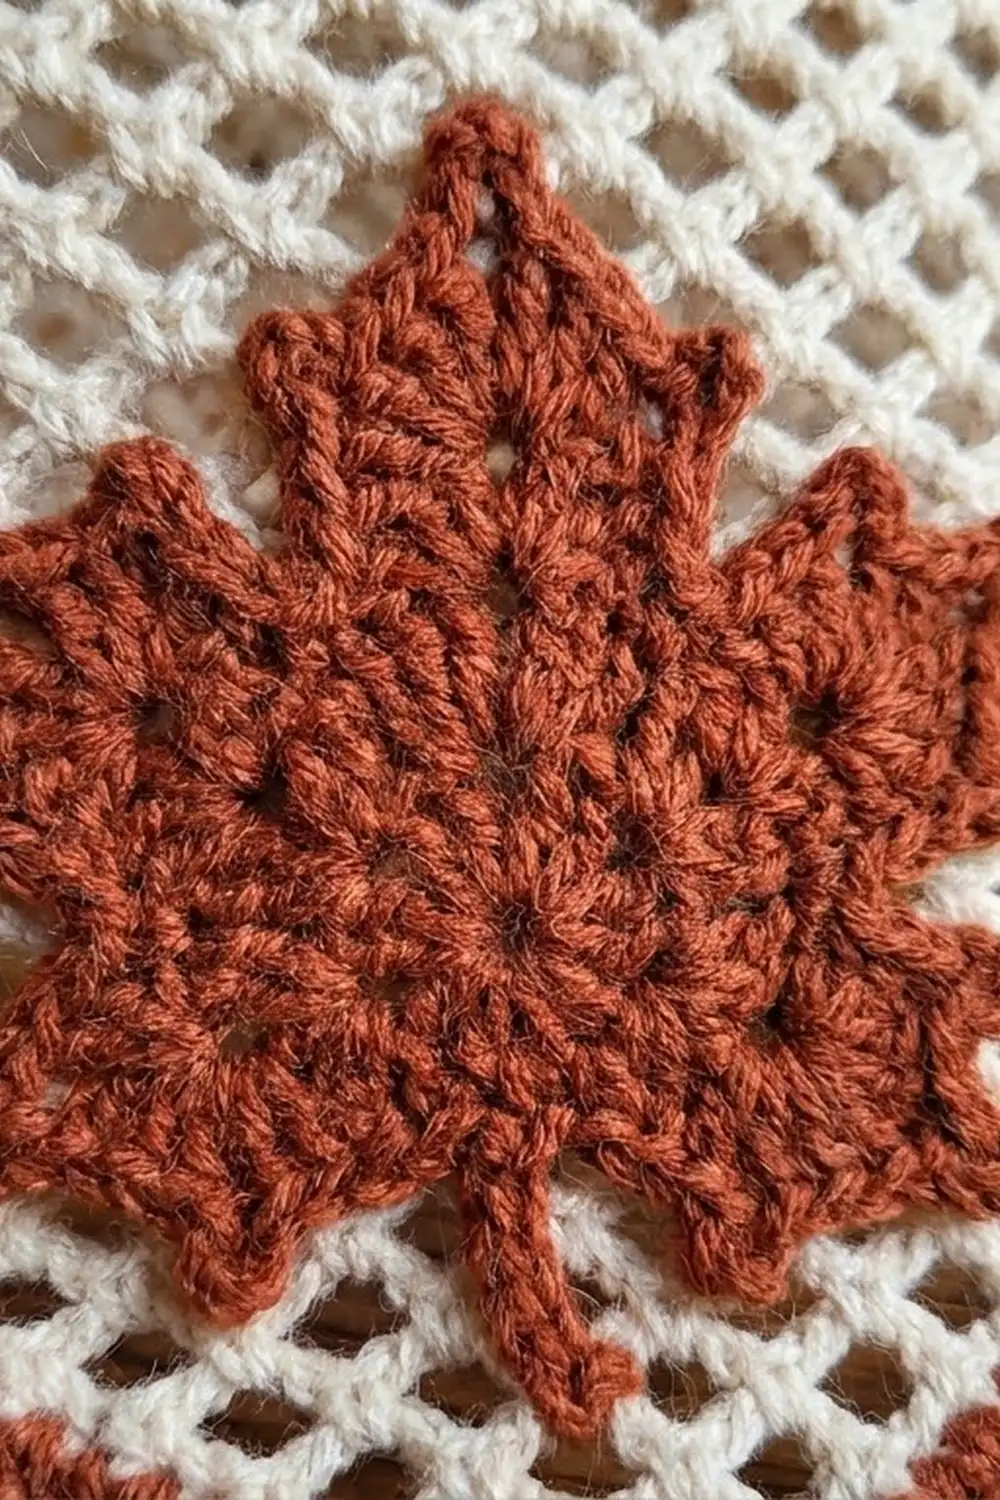
Small Appliqué Maple (make 7 in B)
Rnd 1: Make a magic ring. Ch 2 (does not count), 10 hdc in ring, sl st to first hdc. (10 hdc)
Rnd 2: Each point is worked into one st.
- Small point: (sc, hdc, picot, hdc, sc)
- Medium point: (hdc, dc, picot, dc, hdc)
- Large point: (dc, tr, picot, tr, dc)
Work [point in next st, sl st in next st] five times, in this order: small, medium, large, medium, small. (5 points + 5 sl sts = 10 sts used)
Stem: Ch 5, sl st in 2nd ch from hook and in next 3 ch, sl st in base. Fasten off, leaving a 12 in (30.5 cm) tail. The stem sits between the two small points, opposite the large point.
Large Dangling Maple (make 4 in D, 1 in F)
Rnd 1: Make a magic ring. Ch 2 (does not count), 10 hdc in ring, sl st to first hdc. (10 hdc)
Rnd 2: Ch 2 (does not count), 2 hdc in each st around, sl st to first hdc. (20 hdc)
Rnd 3: Each point spans 2 sts.
- Small point: (sc, hdc, dc) in next st, picot, (dc, hdc, sc) in next st
- Medium point: (hdc, dc, tr) in next st, picot, (tr, dc, hdc) in next st
- Large point: (dc, tr, tr) in next st, picot, (tr, tr, dc) in next st
Work [sl st in next st, point over next 2 sts, sl st in next st] five times, in this order: small, medium, large, medium, small. (5 points + 10 sl sts = 20 sts used)
Stem: Ch 7, sl st in 2nd ch from hook and in next 5 ch, sl st in base. Fasten off, leaving a 12 in (30.5 cm) tail. The leaf measures about 3 1/2 in (8.9 cm) wide and 4 in (10.2 cm) tall, including the stem.
Oak Leaf (make 5 in E, 3 in B, 1 in D)
Ch 15.
Stem: Sl st in 2nd ch from hook and in next 3 ch. (4 sl sts; 10 ch remain)
- Small lobe: sc in next ch, (hdc, dc, hdc) in next ch, sc in next ch
- Large lobe: sc in next ch, (dc, tr, dc) in next ch, sc in next ch
Side 1: Work a small lobe, a large lobe, then a small lobe. (9 ch used)
Tip: (hdc, dc, picot, dc, hdc) in last ch.
Side 2: Work into the free loops of the same 9 ch: small lobe, large lobe, small lobe. Sl st in the base of the stem. (30 lobe sts + 4 tip sts + picot)
Fasten off, leaving a 12 in (30.5 cm) tail. The leaf measures about 2 in (5.1 cm) wide and 4 in (10.2 cm) long, including the stem.
Tabs (make 7 in A)
Ch 8.
Row 1: Sc in 2nd ch from hook and in each ch across. Turn. (7 sc)
Row 2: Ch 4 (counts as dc + ch 1), sk next st, dc in next st, [ch 1, sk next st, dc in next st] twice. Turn. (4 dc + 3 ch-1 sps = 7 sts)
Row 3: Ch 1, sc in each dc and ch-1 sp across, ending with sc in 3rd ch of turning ch. Turn. (7 sc)
Rows 4–17: Rep Rows 2–3 seven more times. Fasten off, leaving a 16 in (40.6 cm) tail. Each tab is 1 3/4 in x 6 1/4 in (4.4 cm x 15.9 cm).
Make All Pieces
- A: 1 lace body, 7 tabs
- B: border, 7 small maples, 3 oaks
- C: 9 cords (5 long, 4 short)
- D: 4 large maples, 1 oak
- E: 5 oaks
- F: 1 large maple
Cord layout from left to right (M = maple, O = oak, letter = color):
Cord:    1    2    3    4    5    6    7    8    9
Length: 20"  14"  20"  14"  20"  14"  20"  14"  20"
Upper:  M-D  O-E  M-F  O-D  O-E  O-B  M-D  O-E  O-E
Lower:  O-E  ---  O-B  ---  M-D  ---  O-B  ---  M-D
20 in = 50.8 cm and 14 in = 35.6 cm. That makes 5 maples + 9 oaks = 14 leaves.
Joining the Appliqués
Placement: Center the small maples over Row 13 sts 15, 29, 43, 57, 71, 85 and 99. That puts them 14 sts, or 3 1/2 in (8.9 cm), apart. St 57 is the exact center of 113, so the layout is symmetrical. Center each maple vertically on the body with its stem pointing down.
Method: Whipstitch with the B tail around the edge of Rnd 2, catching the mesh strands behind it. Take one stitch at each picot and one in each sl st valley. Tack the stem down flat.
Tension: Keep stitches snug but relaxed. Pulling hard puckers the mesh and narrows the body.
Size checkpoint: The body should still measure 28 1/4 in x 6 in (71.8 cm x 15.2 cm).
Border
Border gauge: 16 sc = 4 in (10.2 cm). One wave repeat measures 3 1/2 in (8.9 cm).
Rnd 1 (B): With RS facing, join in the first st of Row 13. Ch 1, 3 sc in same st (corner), sc in next 111 sts, 3 sc in last st (corner). Down the short side, work 2 sc in each row end of Rows 2–12, for 22 sc. Along the foundation, work 3 sc in first ch, sc in next 111 ch, 3 sc in last ch. Up the other short side, work 22 sc the same way. Sl st to first sc. (278 sc)
Per side, counting both corner centers: long sides 115, short sides 26. Check: 2 x 115 + 2 x 26 – 4 shared corners = 278.
Rnd 2 (wave): Sl st in next sc (corner center). Ch 1, 3 sc in same st. On the long side, sc in next st and work the wave repeat 8 times (113 sts). Work 3 sc in the corner center. On the short side, sc in next 24 sts, then 3 sc in the corner center. Work the second long side and short side the same way. Sl st to first sc.
Count: 278 worked 1 per st + 8 extra corner sts = 286 sts. Per side: long sides 117, short sides 28. Check: 2 x 117 + 2 x 28 – 4 = 286.
Rnd 3: Ch 1, sc in each st around, with 3 sc in each corner center. Sl st to first sc and fasten off.
Count: 286 worked 1 per st + 8 extra corner sts = 294 sc. Per side: long sides 119, short sides 30. Check: 2 x 119 + 2 x 30 – 4 = 294.
Why the math works: Each long side of Rnd 1 has 113 sts between the corner centers. That equals 8 waves x 14 sts + 1, so the waves fit exactly and leave 7 inner valleys per edge. Each round adds 2 sts per corner so the corners lie flat. An sc round adds 1/4 in (0.6 cm) and the tr peaks add 3/4 in (1.9 cm). The width becomes 28 1/4 in + 2 x 3/4 in = 29 3/4 in (75.6 cm). The height becomes 6 in + 2 x 1 1/4 in = 8 1/2 in (21.6 cm).
Attach the Tabs
Each top valley is a run of 4 sc. Center one tab over each of the 7 top valleys. Sew one end to the RS so it overlaps the border by 1/2 in (1.3 cm). Fold the tab to the WS and sew the other end in the same place. Each loop fits a rod up to 1 1/2 in (3.8 cm) in diameter.
Make the Cords
Cord 1 starts at the bottom-left corner center, cords 2–8 start in the 2nd sc of each bottom valley, and cord 9 starts at the bottom-right corner center. For each cord, join C with a sl st.
- Long cords (odd numbers): Ch 70, work the back-bump cord back up (69 sl sts), sl st into the border and fasten off. Each one is 20 in (50.8 cm) long.
- Short cords (even numbers): Ch 49 and work back (48 sl sts). Each one is 14 in (35.6 cm) long.
Leaves: Measure from the border to the top of each stem. On long cords, place one leaf at 4 in (10.2 cm) and one at 13 in (33.0 cm). On short cords, place the leaf at 7 in (17.8 cm). Whipstitch each stem along the cord for 1 in (2.5 cm), then tack the leaf to the cord from behind. Each cord ends 3 in (7.6 cm) below its last leaf.
Final Blocking
- Weave in all ends.
- Pin the panel RS up to 29 3/4 in x 8 1/2 in (75.6 cm x 21.6 cm).
- Pin each wave peak so the peaks are 3 1/2 in (8.9 cm) apart, and open the mesh evenly.
- Pin the picot tips of every dangling leaf outward.
- Mist until damp, then let dry completely. Do not pin the cords.
- Hang the valance for a day so the cords settle.
Final Quality-Control Checklist
- Body: 113 sts and 13 rows, 28 1/4 in x 6 in (71.8 cm x 15.2 cm)
- 7 maples spaced 3 1/2 in (8.9 cm) apart
- Border Rnd 3: 294 sc, with 8 waves per long edge
- Panel: 29 3/4 in x 8 1/2 in (75.6 cm x 21.6 cm)
- 7 tabs of equal length
- 9 cords alternating 20 in (50.8 cm) and 14 in (35.6 cm)
- 14 leaves placed as in the layout
Troubleshooting
- The body flares: Your foundation chain is too loose. Rework it with a smaller hook.
- The foundation edge pulls in: Chain with a hook one size larger.
- The waves look flat: Recount each 14-st repeat and check that it has 2 tr.
- The border cups: Check that each corner has 3 sc in every round.
- The leaves curl: Wet-block them and pin the picots.
- The cords spiral: Work only into the back bumps, and hang the cords damp to dry.
Care
Hand wash in cool water with mild soap. Roll in a towel to remove water, then lay flat to dry with the cords hanging straight.
Final Notes
The measurement chain works like this. A gauge of 16 sc = 4 in (10.2 cm) gives a 113-stitch body that measures 28 1/4 in x 6 in (71.8 cm x 15.2 cm) and holds 7 maples. The 294-stitch wave border brings the panel to 29 3/4 in x 8 1/2 in (75.6 cm x 21.6 cm). The 9 cords bring the full length to 28 in (71.1 cm). If each stage matches its checkpoint, the valance will hang straight and even.
Happy crocheting!