

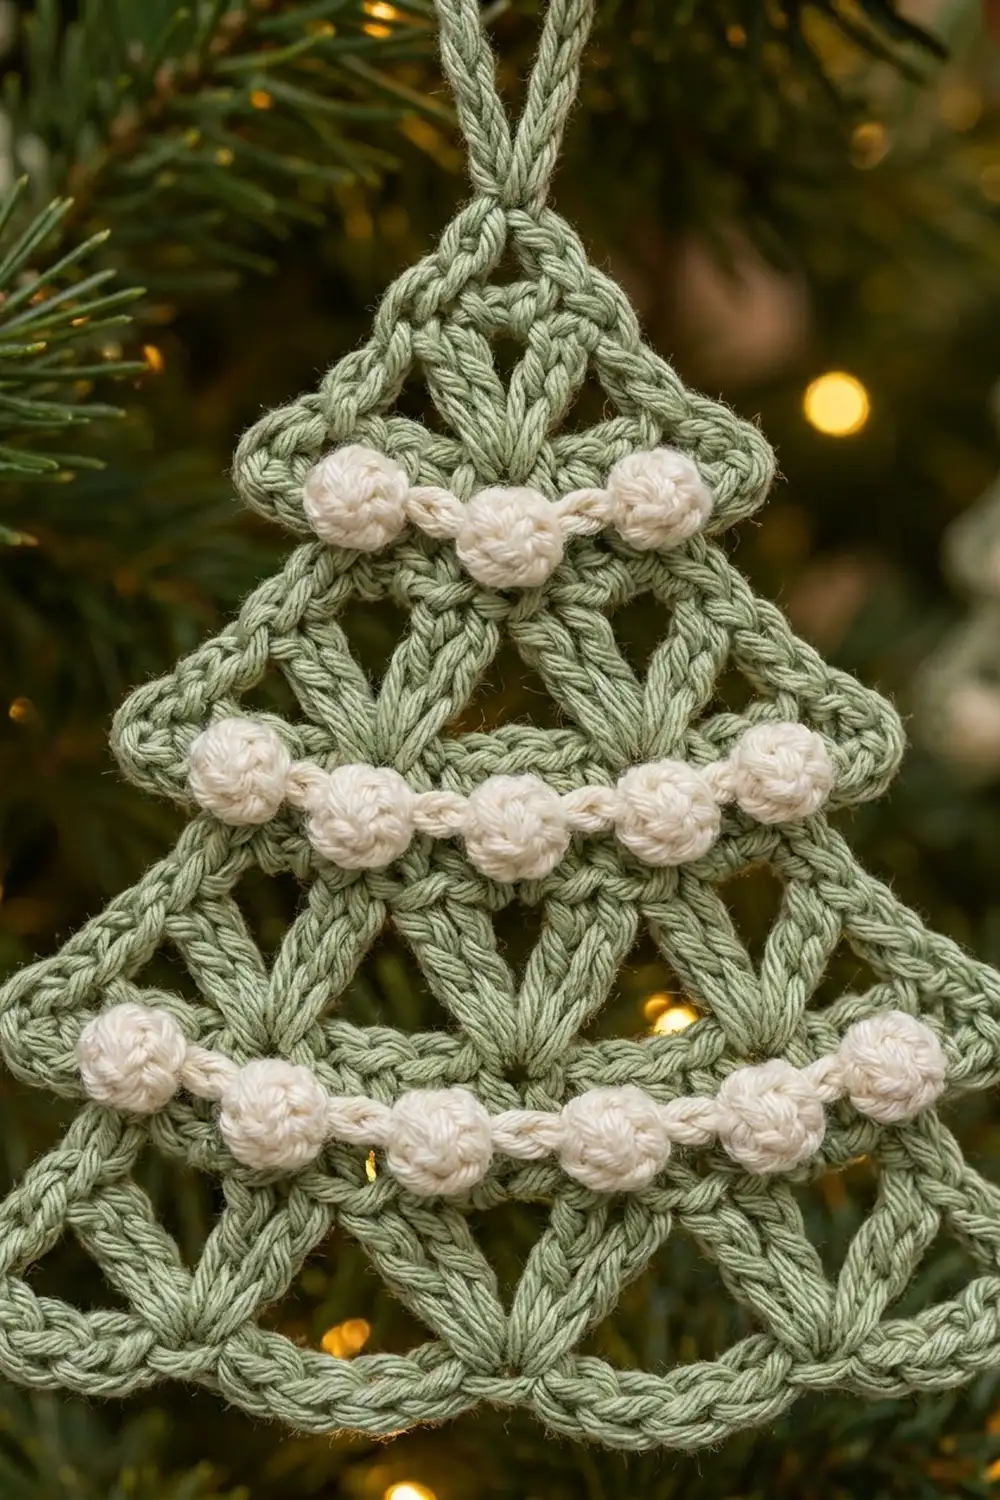
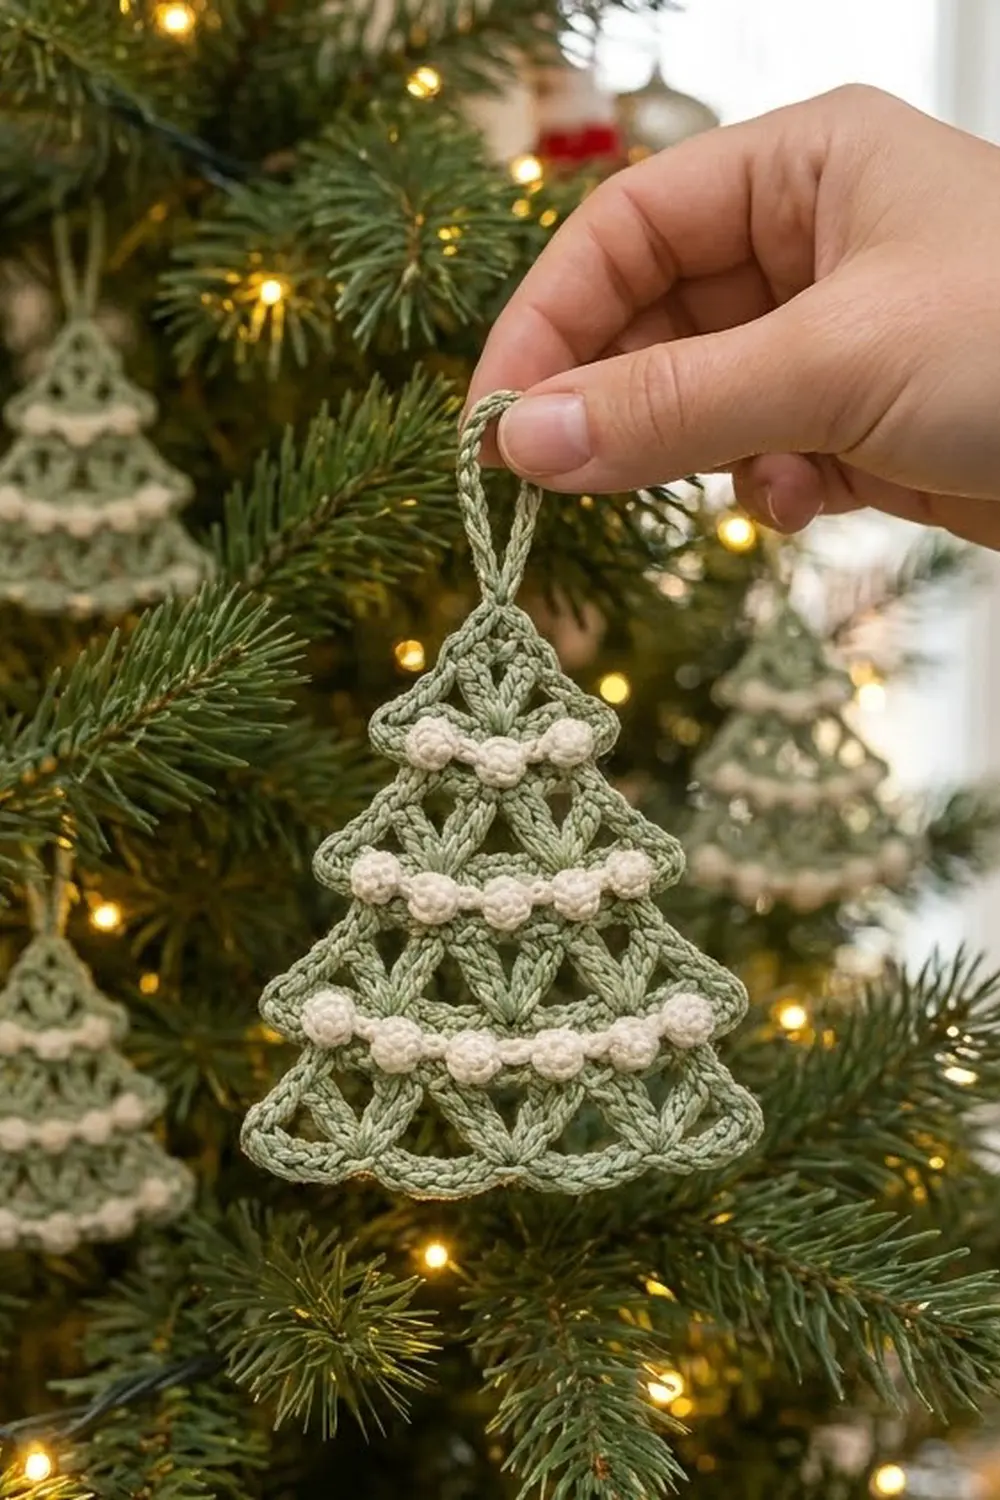
This little tree is open and lacy. The body is sage green mesh made of double-crochet fans, set in offset rows so triangular windows appear between them. Three tiers step outward, and each one has a flared base. A strand of cream bobbles crosses each tier like a string of pearls or snowballs.
The colors are soft and muted: sage green and warm cream. They suit a Scandinavian-style or farmhouse tree, and also look good tied on a gift or hung in a window. All instructions use US crochet terms.
The finished ornament measures 5 in (12.7 cm) wide by 5 in (12.7 cm) tall, plus a hanging loop of about 1.5 in (3.8 cm).
Construction is simple. You work the tree in turned rows from the tip down, adding one fan per row. Between tiers you step in once to create the flare. Next, a two-round border adds a scalloped edge and the hanging loop. Finally, you crochet three short bobble garlands and sew them on.
Finished Size and Construction
- Finished size: 5 in x 5 in (12.7 cm x 12.7 cm), not counting the loop
- Hanging loop: about 1.5 in (3.8 cm) tall
- Skill level: Easy-intermediate
- Terminology: US terms
- Yarn weight: Sport (#2), cotton or cotton blend
- Hook: 3.5 mm (E-4)
- Number of pieces: 1 tree body, plus 3 small garland strips sewn onto it
- Layout: One single ornament; no joining
- Body size before border: 4.5 in x 4.5 in (11.4 cm x 11.4 cm)
- Border depth: 0.25 in (0.6 cm) on every edge
Materials
Use a smooth, mercerized or matte cotton in sport weight. Cotton shows off the stitch definition in the fans and holds its shape after blocking. Avoid fuzzy yarns, because the triangular windows will fill in.
- Sage green (body and border): 15 g, about 45 m (49 yd)
- Cream (garlands): 5 g, about 15 m (16 yd)
These quantities include a safety margin of about 20 percent.
Tools:
– 3.5 mm (E-4) crochet hook
– Tapestry needle
– Scissors
– Stitch markers (2)
– Rustproof pins and a blocking mat
– Spray bottle with water
– Ruler or tape measure
Abbreviations (US Terms)
- ch – chain
- sl st – slip stitch
- sc – single crochet
- dc – double crochet
- sp(s) – space(s)
- tch – turning chain
- st(s) – stitch(es)
Special stitches
- Fan: 3 dc worked in the same stitch or space.
- Bobble (bob): Work this 5 times in the same stitch: yarn over, insert hook, pull up a loop, yarn over, pull through 2 loops. Then yarn over and pull through all 6 loops on the hook.
Gauge and Checkpoints
Gauge: 8 rows of the fan pattern = 3 in (7.6 cm) tall. One repeat (fan + ch 2) is 0.6 in (1.5 cm) wide, so a single fan and a single ch-2 space are each about 0.3 in (0.8 cm).
The tree is small, so the first tier works as your gauge swatch. Work Rows 1–4 and measure before you continue.
Checkpoints (measured flat, before blocking):
– After Row 4: 2.1 in (5.3 cm) wide across the last row, 1.5 in (3.8 cm) tall
– After Row 8: 3.3 in (8.4 cm) wide, 3 in (7.6 cm) tall
– After Row 12: 4.5 in (11.4 cm) wide, 4.5 in (11.4 cm) tall
– After the border: 5 in x 5 in (12.7 cm x 12.7 cm)
If your piece is too big, go down to a 3.25 mm (D-3) hook, or keep your ch-2 spaces snug. If it is too small, go up to a 3.75 mm (F-5) hook. A difference of 0.25 in (0.6 cm) at Row 4 becomes about 0.5 in (1.3 cm) by Row 12, so fix it early.
Tree Body
Use sage green. The beginning ch 3 counts as a dc throughout. Turn at the end of every row.
Tip: Ch 4 and sl st to the first ch to form a ring.
Tier 1
Row 1: Ch 3, work 2 dc in the ring. Turn. (1 fan: 3 dc)
Row 2: Ch 3, work 2 dc in the first dc (edge fan). Ch 2, then work 3 dc in the top of the tch (edge fan). Turn. (2 fans: 6 dc, 1 ch-2 sp)
Row 3: Ch 3, 2 dc in the first dc, ch 2. Work 1 fan in the next ch-2 sp, ch 2. Work 3 dc in the top of the tch. Turn. (3 fans: 9 dc, 2 ch-2 sps)
Row 4: Ch 3, 2 dc in the first dc, ch 2. Work 1 fan in the next ch-2 sp, ch 2; repeat once more. Work 3 dc in the top of the tch. Turn. (4 fans: 12 dc, 3 ch-2 sps)
Every increase row adds exactly one fan and one ch-2 space. The two edge fans are new. Every inner fan sits in a space from the row before, so the fans stay offset and the triangular windows form between them.
Tier 2
Row 5 (step-in row): Sl st in the next 2 dc and in the first ch-2 sp. Ch 3, work 2 dc in the same sp. Ch 2, work 1 fan in the next ch-2 sp; repeat once more. Leave the last edge fan unworked. Turn. (3 fans: 9 dc, 2 ch-2 sps)
This row has one fan fewer than Row 4 because it works only into the 3 spaces and skips both edge fans. Those two unworked edge fans of Row 4 stay exposed and form the flared base of Tier 1.
Row 6: Work as Row 3, but repeat the inner fan across both ch-2 sps. In full: ch 3, 2 dc in the first dc, ch 2, fan in the next ch-2 sp, ch 2 twice, 3 dc in the top of the tch. (4 fans: 12 dc, 3 ch-2 sps)
Row 7: Ch 3, 2 dc in the first dc, ch 2, fan in the next ch-2 sp, ch 2 3 times, 3 dc in the top of the tch. (5 fans: 15 dc, 4 ch-2 sps)
Row 8: Ch 3, 2 dc in the first dc, ch 2, fan in the next ch-2 sp, ch 2 4 times, 3 dc in the top of the tch. (6 fans: 18 dc, 5 ch-2 sps)
Checkpoint: the piece should be 3.3 in (8.4 cm) wide and 3 in (7.6 cm) tall.
Tier 3
Row 9 (step-in row): Sl st in the next 2 dc and in the first ch-2 sp. Ch 3, 2 dc in the same sp, ch 2, fan in the next ch-2 sp 4 times. Leave the edge fan unworked. (5 fans: 15 dc, 4 ch-2 sps)
Row 10: Ch 3, 2 dc in the first dc, ch 2, fan in the next ch-2 sp, ch 2 4 times, 3 dc in the top of the tch. (6 fans: 18 dc, 5 ch-2 sps)
Row 11: Work as Row 10, repeating the inner fan 5 times. (7 fans: 21 dc, 6 ch-2 sps)
Row 12: Work as Row 10, repeating the inner fan 6 times. (8 fans: 24 dc, 7 ch-2 sps)
Do not fasten off. The body should now measure 4.5 in x 4.5 in (11.4 cm x 11.4 cm).
Fan totals per row: 1, 2, 3, 4 | 3, 4, 5, 6 | 5, 6, 7, 8.
Border
Border gauge: In Round 1, 2 sc fit around each dc row-end, and 1 sc fits in the top of each dc. Each round adds about 0.125 in (0.3 cm), so the two rounds add 0.25 in (0.6 cm) on every edge.
Round 1 (sage green): Ch 1 and turn. Work the edges in this order:
- Bottom edge: Work 1 sc in each of the 24 dc and 2 sc in each of the 7 ch-2 sps. (38 sc) Ch 1 for the corner.
- Side A, working upward:
- 2 sc around each row-end of Rows 12, 11, 10 and 9. (8 sc)
- 1 sc in the top of each of the 3 dc of the exposed Row 8 edge fan. (3 sc)
- 2 sc around each row-end of Rows 8 through 5. (8 sc)
- 1 sc in each of the 3 dc of the exposed Row 4 edge fan. (3 sc)
- 2 sc around each row-end of Rows 4 through 1. (8 sc)
- Side total: 30 sc.
- Tip: In the ring, work sc, ch 14, sc. This ch-14 becomes the hanging loop.
- Side B, working downward: Mirror Side A for 30 sc. On this side, the slip stitches from Rows 5 and 9 lie over the exposed fan tops. Insert your hook under the slip stitches as well, so the 3 sc still sit in the 3 dc tops.
- Close the round: Ch 1 for the second corner, then sl st to the first sc.
Round 1 total: 38 + 30 + 30 + 2 tip sc = 100 sc, plus 2 corner ch-1 sps and 1 ch-14 loop.
Round 2 (scalloped edge): Sl st in the first sc, then work the edges in this order:
- Bottom edge: Ch 1, sc in the same sc. Ch 3, skip 1 sc, sc in the next sc; repeat 18 times. Ch 3, skip the last sc. (19 ch-3 loops; 38 sc used)
- Corner: Work (sc, ch 3, sc) in the ch-1 sp. (1 loop)
- Side A: Ch 3, skip 1 sc, sc in the next sc; repeat 15 times. (15 loops; 30 sc used)
- Tip: Sc in the tip sc. Work 22 sc over the ch-14 loop, packed tightly. Sc in the second tip sc.
- Side B: Ch 3, skip 1 sc, sc in the next sc; repeat 15 times. (15 loops)
- Corner: Work (sc, ch 3, sc) in the ch-1 sp. (1 loop)
- Finish: Sl st to the first sc and fasten off.
Round 2 total: 19 + 1 + 15 + 15 + 1 = 51 ch-3 loops.
Why the math works: Every side count in Round 1 is even (38, 30 and 30). Round 2 uses 2 sc per loop, so each side splits evenly into 19, 15 and 15 loops with nothing left over. The corners are separate ch-1 spaces, not counted in any side, so they are never counted twice. Packing 22 sc onto 14 ch makes the hanging loop firm, so it keeps its rounded shape.
Bobble Garlands
Use cream and make 3 garlands.
Garland gauge: One repeat (bobble + ch 1) is about 0.5 in (1.3 cm).
Basic garland: Ch 2. Ch 3, work a bob in the 3rd ch from the hook, ch 1. Repeat from * for the number of bobbles listed below. Fasten off, leaving an 8 in (20.3 cm) tail.
- Garland 1: 3 bobbles, about 1.5 in (3.8 cm), for Tier 1
- Garland 2: 5 bobbles, about 2.5 in (6.4 cm), for Tier 2
- Garland 3: 7 bobbles, about 3.5 in (8.9 cm), for Tier 3
Push each bobble so its rounded side faces you.
Placement: Pin each garland across the second-to-last row of its tier:
- Garland 1 on Row 3, which is 1.5 in (3.8 cm) wide
- Garland 2 on Row 7, which is 2.7 in (6.9 cm) wide
- Garland 3 on Row 11, which is 3.9 in (9.9 cm) wide
Garland 1 runs edge to edge. Garlands 2 and 3 end about 0.1 in (0.3 cm) inside the side edges. Let the middle of each garland droop by about 0.1 in (0.3 cm).
Sewing: Use the tails to whipstitch through the chain between the bobbles and into the dc posts behind them. Leave the bobbles themselves free. Weave in all ends on the back.
Final Blocking
- Lightly spritz the ornament until it is damp, but not soaked.
- Lay it face up on the blocking mat.
- Pin the two bottom corners 5 in (12.7 cm) apart.
- Pin the tip 5 in (12.7 cm) above the center of the bottom edge.
- Pin out each tier’s flare so the steps line up evenly on both sides.
- Open each triangular window with a fingertip.
- Pin every third ch-3 loop on the scalloped edge to round it out.
- Shape the hanging loop into a neat teardrop.
- Let it dry completely, at least 4 hours.
Final Quality-Control Checklist
- Row fan counts: 1–4 / 3–6 / 5–8
- Row 12 has 24 dc and 7 ch-2 spaces
- Round 1 has 100 sc: 38 on the bottom and 30 on each side
- Round 2 has 51 ch-3 loops
- The ornament measures 5 in x 5 in (12.7 cm x 12.7 cm) and the hanging loop is about 1.5 in (3.8 cm)
- Both sides step out at the same rows
- The garlands hold 3, 5 and 7 bobbles and are centered on their tiers
- All ends are hidden on the back
Troubleshooting
- The tree leans to one side: Your “2 dc in first dc” probably went into the wrong stitch. It belongs in the dc at the base of the ch 3, not in the next one.
- The windows look closed: Your fans are too tight or your ch-2 spaces too short. Loosen the chains, or go up half a hook size.
- The tiers don’t flare: On the step-in rows, make sure you skipped both edge fans completely.
- The border ripples: Work 2 sc per row-end, not 3, and check your side totals of 30 sc.
- The bobbles are flat: Pull the final loop snug, and push each bobble to the front before sewing.
- The hanging loop is floppy: Pack in all 22 sc, or use 24 if your stitches are small.
Care
Hand wash in cool water and press the water out in a towel; do not wring. Reshape and dry flat, then store flat so the hanging loop and flares keep their shape.
Final Notes
Here is the full measurement chain:
- Tier 1 should be 2.1 in (5.3 cm) wide.
- Tier 2 should be 3.3 in (8.4 cm) wide.
- Row 12 should be 4.5 in (11.4 cm) wide.
- The border adds 0.25 in (0.6 cm) all around, for a finished size of 5 in x 5 in (12.7 cm x 12.7 cm).
Check each stage before moving on, and the garlands will fit across their rows. Make one ornament, then make a few more for the tree.
Happy crocheting!