

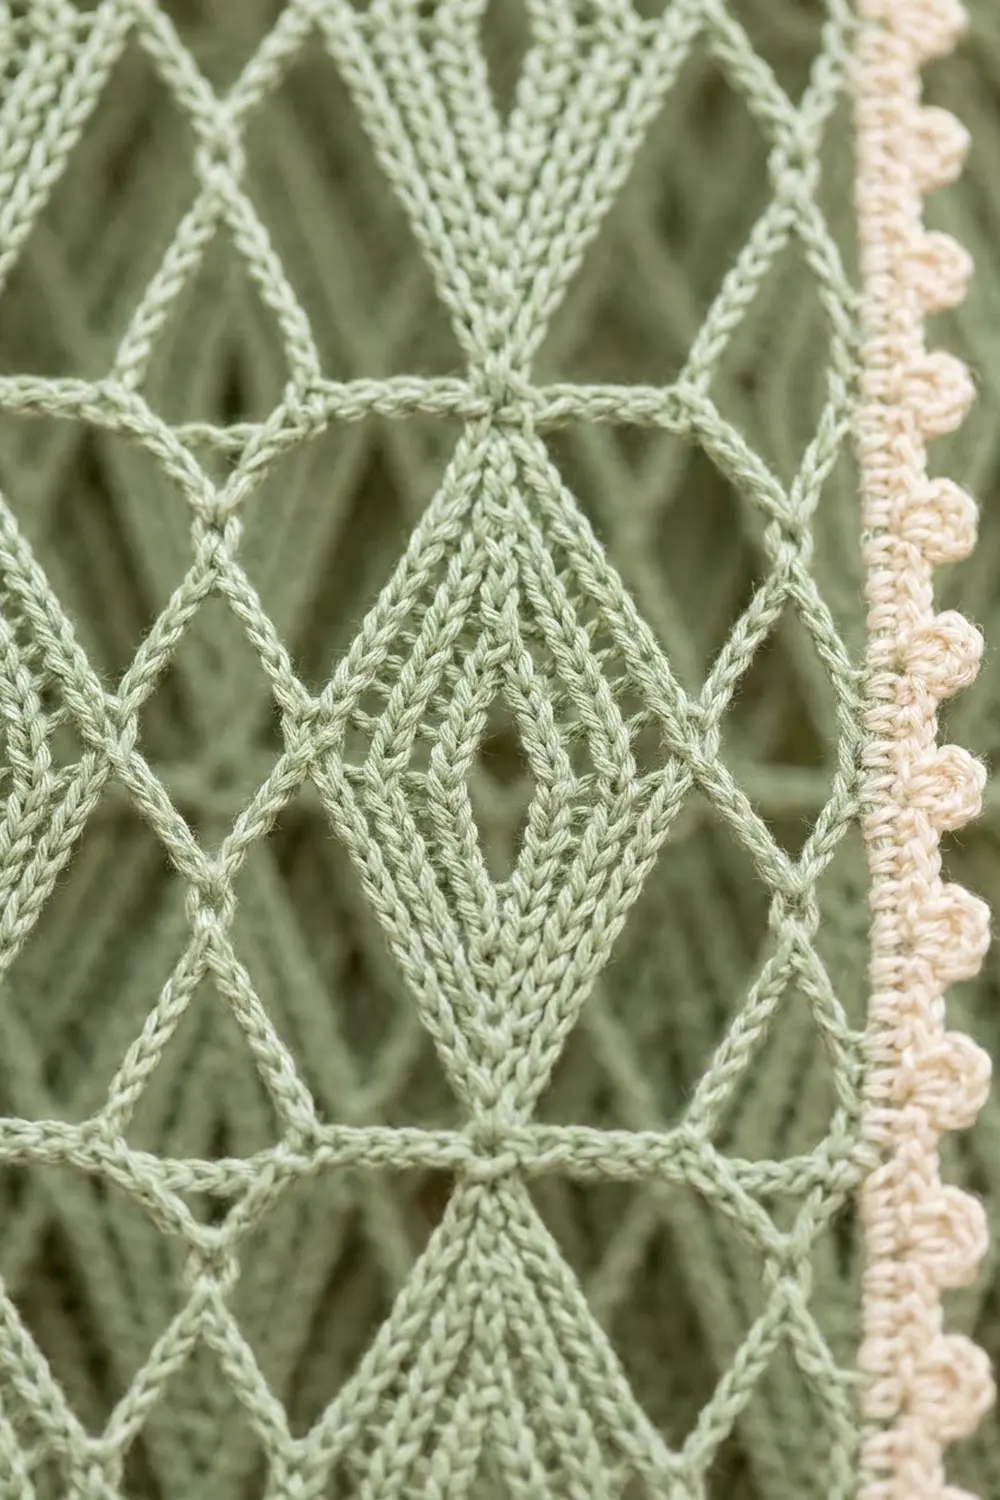
This lace curtain panel has columns of textured diamonds set inside an airy chain lattice. Small knots mark the points where the lattice chains meet, and every diamond has a little open eye at its widest point. When the panel hangs, light comes through the lattice and the diamonds show up as soft sage stripes.
The body is worked in a soft sage green cotton. A cream border with a picot edge frames it. The style is calm cottage-modern lace, simple enough for a living room or bedroom window.
The pattern uses US crochet terms. One finished panel measures 29¼ x 62½ in (74.3 x 158.8 cm) after blocking. Each panel is made separately and is complete on its own. For a pair, make two identical panels.
Construction: a foundation row of single crochet, then an 8-row lace repeat worked 15 times, and a single crochet top row. After that, three rounds of cream border are worked all the way around. Nothing needs joining.
Finished Size and Construction
- Finished size: 29¼ x 62½ in (74.3 x 158.8 cm)
- Skill level: Intermediate
- Terminology: US crochet terms
- Yarn weight: DK / light (#3) cotton or cotton blend
- Hook: 4.0 mm (US G-6)
- Number of pieces: 1 panel (make 2 for a pair)
- Layout: 9 diamond columns across, 15 diamonds tall
- Pattern repeat size: 12 sts = 3 in (7.6 cm) wide; 8 rows = 4 in (10.2 cm) tall
- Size before border: 27¼ x 60½ in (69.2 x 153.7 cm)
- Border depth: 1 in (2.5 cm) on every side
Materials
Yarn: Use a smooth mercerized or combed DK cotton. It gives crisp stitch definition, blocks well, and does not stretch much under its own weight. Stay away from fuzzy or very drapey yarns, which hide the lattice and can lengthen once hung.
- Color A, sage green (body): 250 g, about 550 m
- Color B, cream (border): 50 g, about 110 m
These amounts are for one panel and already include a safety margin. For a pair, double them, and buy all yarn from the same dye lot.
Tools:
- 4.0 mm (US G-6) crochet hook
- Tapestry needle
- Stitch markers
- Measuring tape
- Blocking mats or a clean carpet covered with a towel, plus rust-proof pins
- Spray bottle
- 10 curtain clip rings per panel
Abbreviations (US Terms)
- ch – chain
- sl st – slip stitch
- sc – single crochet
- dc – double crochet
- sk – skip
- st(s) – stitch(es)
- sp – space
- RS / WS – right side / wrong side
- rep – repeat
Special stitch, picot: ch 3, sl st in the 3rd ch from hook.
Stitch counting: In the body, every chain counts as one stitch, and so does every dc, every sc and every turning ch-3. Each body row therefore has 109 sts.
Gauge and Checkpoints
Make a gauge swatch first. The panel is large, so a small gauge error grows quickly.
Swatch: Ch 26 and work Rows 1–9 below over 25 sts, which is 2 repeats + 1. Block the swatch the same way you will block the panel.
- Width: 25 sts = 6¼ in (15.9 cm)
- Height: Rows 1–9 = 4¼ in (10.8 cm)
- Border gauge: 4 sc = 1 in (2.5 cm)
If the swatch is too big, use a 3.75 mm hook. If it is too small, use a 4.5 mm hook. If the width is right but the height is off, check your dc height and avoid pulling up tall loops.
Checkpoints on the panel:
- After Row 1: 27¼ in (69.2 cm) wide.
- After Row 9: 4¼ in (10.8 cm) tall.
- After Row 65 (8 repeats): 32¼ in (81.9 cm) tall.
- After Row 122: 27¼ x 60½ in (69.2 x 153.7 cm).
- After the border: 29¼ x 62½ in (74.3 x 158.8 cm).
Measure the panel flat and lightly relaxed, not stretched.
Panel Body
Use Color A. The pattern is a multiple of 12 sts + 1. Count stitch positions 1–13 in each repeat: position 1 is a lattice node, position 7 is the diamond center, and position 13 is the node that starts the next repeat.
Foundation: Ch 110.
Row 1 (RS): Sc in 2nd ch from hook and in each ch across, turn. (109 sc)
Row 2 (diamond tip): Ch 3 (counts as dc), ch 5, sk 5 sts, dc in next st, ch 5, sk 5 sts, dc in next st; rep from * 8 more times, turn. (109 sts: 19 dc + 90 ch)*
Row 3 (3-dc row): Ch 3, ch 4, sk 4 ch, dc in next ch, dc in next dc, dc in next ch, ch 4, sk 4 ch, dc in next dc; rep from * 8 more times, working the last dc into the top of the turning ch, turn. (109 sts: 37 dc + 72 ch)*
Row 4 (5-dc row): Ch 3, ch 3, sk 3 ch, dc in next ch, dc in next 3 dc, dc in next ch, ch 3, sk 3 ch, dc in next dc; rep from * 8 more times, turn. (109 sts: 55 dc + 54 ch)*
Row 5 (eye row, widest): Ch 3, ch 2, sk 2 ch, dc in next ch, dc in next 2 dc, ch 1, sk next dc, dc in next 2 dc, dc in next ch, ch 2, sk 2 ch, dc in next dc; rep from * 8 more times, turn. (109 sts: 64 dc + 45 ch)*
The ch-1 above the center dc makes the open eye of the diamond.
Row 6 (5-dc row): Ch 3, ch 3, sk 2 ch and next dc, dc in next 2 dc, dc in ch-1 sp, dc in next 2 dc, ch 3, sk next dc and 2 ch, dc in next dc; rep from * 8 more times, turn. (109 sts: 55 dc + 54 ch)*
Row 7 (3-dc row): Ch 3, ch 4, sk 3 ch and next dc, dc in next 3 dc, ch 4, sk next dc and 3 ch, dc in next dc; rep from * 8 more times, turn. (109 sts: 37 dc + 72 ch)*
Row 8 (diamond tip): Ch 3, ch 5, sk 4 ch and next dc, dc in next dc, ch 5, sk next dc and 4 ch, dc in next dc; rep from * 8 more times, turn. (109 sts: 19 dc + 90 ch)*
Row 9 (node row): Ch 1 (does not count), sc in first dc, ch 5, sk 5 ch, sc in next dc, ch 5, sk 5 ch, sc in next dc; rep from * 8 more times, working the last sc into the top of the turning ch, turn. (109 sts: 19 sc + 90 ch)*
The sc in this row form the small knots in the lattice. The diamond widens 1, 3, 5, then 7 sts (3 + eye + 3), then narrows 5, 3, 1. The stepped edges give it the ribbed diamond outline.
Rows 10–121: Work Rows 2–9 another 14 times. In the first Row 2 of each new repeat, the dc go into the sc of the node row below. When you finish you will have 15 diamonds in each column.
Row 122 (top edge): Ch 1, sc in each st and ch across. (109 sc) Fasten off and weave in ends.
Row math check: 1 foundation row + (15 repeats × 8 rows) + 1 top row = 122 rows. That is 105 dc rows and 17 sc rows.
Border
Join Color B with RS facing. The border is worked in rounds around all four sides.
Border gauge: 4 sc = 1 in (2.5 cm) across the top and bottom. Along the sides, each 4 in (10.2 cm) repeat gets 15 sc, which is a little firmer, so the long lace edges stay straight and do not ruffle.
Round 1 (sc): Join with sc in the first st of Row 122. Work in this order:
- Top: 2 more sc in the same first st (corner group of 3), sc in the next 107 sts, 3 sc in the last st.
- Side: Working in row ends, 2 sc in each dc row end and 1 sc in each sc row end down to Row 2. That is 105 × 2 + 15 × 1 = 225 sc.
- Bottom: 3 sc in the first st of Row 1, sc in the next 107 sts, 3 sc in the last st.
- Second side: 225 sc as before.
Join with sl st to the first sc. (676 sc) The middle sc of each 3-sc group is the corner st.
Per side, counting both corner sts: top/bottom = 1 + 1 + 107 + 1 + 1 = 111 sc; long sides = 1 + 1 + 225 + 1 + 1 = 229 sc.
Check: 2 × 111 + 2 × 229 − 4 shared corners = 676.
Round 2 (dc): Ch 3 (counts as dc), dc in each st around, working 3 dc in each corner st. Join with sl st to the top of the ch-3.
Count: 676 sts worked 1 per st + 8 extra at the corners = 684 dc.
Per side, with corners: top/bottom 113, long sides 231.
Round 3 (picot): Ch 1. Work (sc, picot, sc) in each corner dc. Between corners:
- Top/bottom (111 sts between corners): sc in next 3 sts, picot, sc in next 4 sts; rep from * 26 more times. (27 picots)*
- Long sides (229 sts between corners): sc in next st, picot, sc in next 4 sts; rep from * 56 more times. (57 picots)*
Join with sl st to the first sc and fasten off.
Count: 680 sts worked 1 per st + 8 extra sc at the corners = 688 sc, plus 172 picots (27 × 2 + 57 × 2 + 4 corners).
Why the math works: the three rounds add ¼ in (0.6 cm), ½ in (1.3 cm) and ¼ in (0.6 cm), so the border is 1 in (2.5 cm) deep. The width becomes 27¼ + 2 = 29¼ in (74.3 cm) and the length 60½ + 2 = 62½ in (158.8 cm). The picot repeats use 4 sts each and fit exactly into 111 = 3 + 4 × 27 and 229 = 1 + 4 × 57.
Final Blocking
- Weave in all ends along solid dc or sc, never across open chains.
- Soak the panel in cool water with a little wool wash for 15 minutes.
- Press out the water. Do not wring. Roll the panel in a towel.
- Lay it flat on mats and pin it to 29¼ x 62½ in (74.3 x 158.8 cm).
- Pin along the straight border edges first, then pin out each picot.
- Ease the diamonds into straight vertical columns, and center each eye.
- Let it dry completely before you unpin it, ideally for 24 hours.
- Clip 10 rings along the top border, one above each lattice node (position 1 of each repeat and the last st). They will be 3 in (7.6 cm) apart.
Final Quality-Control Checklist
- Body rows each hold 109 sts.
- There are 9 diamond columns and 15 diamonds per column.
- Each diamond has one centered eye.
- Every node-row sc lines up above a node dc.
- The border has 688 sc and 172 picots.
- The corners are square and lie flat.
- The finished size is 29¼ x 62½ in (74.3 x 158.8 cm).
- The ends are invisible from both sides.
Troubleshooting
Diamonds lean to one side: you have probably miscounted chains on one side. Each row’s chain runs must match: 5/5, 4/4, 3/3, 2/2.
Row count off by one: the turning ch-3 is skipped or doubled at the edge. Mark the top of every turning ch.
Panel too narrow or too short: check blocked gauge and change hook size. Don’t add or remove repeats.
Sides ruffle: you are using too many border sts. Stick to 2 sc per dc row end.
Sides pull in: go up a hook size for border Round 1 only.
Eye closes up: make sure you skipped the center dc in Row 5.
Panel lengthens when hung: block it again and dry it flat. A firmer cotton will help.
Care
Hand wash cool or use a gentle machine cycle in a mesh laundry bag, then reshape and dry flat. Avoid hot dryers, and keep the panel away from long hours of direct, strong sun to protect the sage color.

Final Notes
The measurement chain: 12 sts = 3 in (7.6 cm) and 8 rows = 4 in (10.2 cm), so 109 sts give a width of 27¼ in (69.2 cm). Fifteen repeats plus two sc rows give a height of 60½ in (153.7 cm). A 1 in (2.5 cm) border brings the panel to 29¼ x 62½ in (74.3 x 158.8 cm). Hit each checkpoint and the panel will hang straight and even. For a pair, make a second panel to the same counts.
Happy crocheting!