

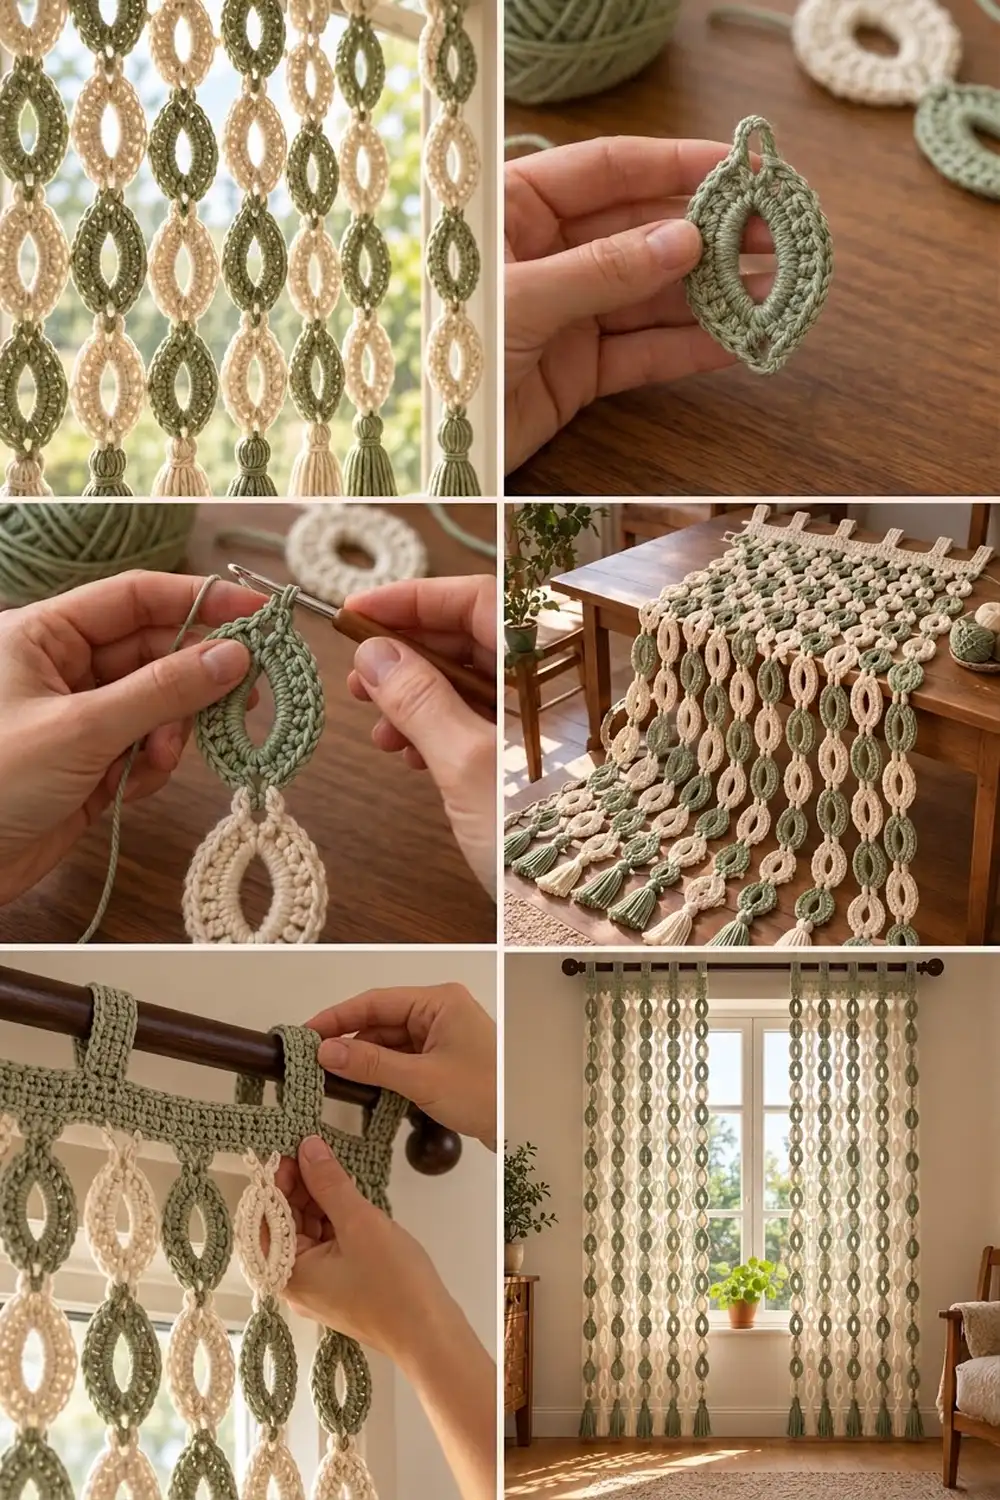
The Sage Meadow curtain is a light, airy panel made from rows of almond-shaped rings. Each ring has a pointed top and bottom, a thick rounded band, and an open center that lets the daylight through. The rings link point to point into long strands, and every strand finishes with a full tassel.
The palette is calm and natural: sage green and soft cream. The rings alternate colors down each strand, and neighboring strands start on opposite colors, so the panel reads as a gentle staggered checkerboard. A solid sage header band with seven tab loops holds everything level on the rod.
This pattern uses US crochet terms. One finished panel measures 24.25 in (61.6 cm) wide and 79 in (200.7 cm) long from the top of the tabs to the tips of the tassels. The final photo shows two panels on one rod, so make two if you want the full window look.
Construction is simple and modular. You crochet the header band first, then build each of the 8 strands from the top down, joining every new ring to the one above it on its last round. Tassels go on last, followed by blocking.
Finished Size and Construction
- Finished panel size: 24.25 in (61.6 cm) wide x 79 in (200.7 cm) long, tab top to tassel tip
- Skill level: Easy intermediate
- Terminology: US crochet terms
- Yarn weight: Worsted (weight 4), cotton or cotton blend
- Hook: 5.0 mm (H-8)
- Number of pieces: 160 ring motifs, 1 header band with 7 tabs, 8 tassels
- Layout: 8 strands of 20 rings each, hanging from the header
- Single ring size: 2.25 in (5.7 cm) wide x 3.5 in (8.9 cm) tall, point to point
- Ring size before final round: 2 in (5.1 cm) wide x 3.25 in (8.3 cm) tall
- Header (“border”) depth: 2 in (5.1 cm), plus tabs that form 3 in (7.6 cm) loops
- Strand length: 70 in (177.8 cm) of rings, plus a 4 in (10.2 cm) tassel
Materials
Choose a smooth, mercerized or matte worsted cotton. Cotton holds the pointed ring shape well, hangs straight, and does not stretch much over time. Avoid very fuzzy yarns, which blur the almond opening.
The amounts below assume a yarn with about 180 m per 100 g.
- Sage green: 400 g (720 m) for 80 rings, the header band, the tabs, and 4 tassels
- Cream: 350 g (630 m) for 80 rings and 4 tassels
These quantities include a margin of roughly 25 percent for gauge differences and tassel trimming. If you are making a pair of panels, double both amounts.
Tools:
- 5.0 mm (H-8) crochet hook
- Tapestry needle
- Scissors
- Stitch markers (at least 8)
- A stiff card 4.5 in (11.4 cm) wide for tassels
- Measuring tape
- Rust-proof pins and a blocking surface
- Spray bottle
Abbreviations (US Terms)
- ch – chain
- sl st – slip stitch
- sc – single crochet
- hdc – half double crochet
- dc – double crochet
- st(s) – stitch(es)
- sp – space
- rnd – round
Special technique – Point Join: Work (sc, ch 1) in the ch-2 sp, sl st into the ch-2 sp at the bottom point of the ring above (or into the marked header stitch), ch 1, then sc in the same ch-2 sp of the current ring. This replaces the ch-2 point and links the two pieces without adding bulk.
Gauge and Checkpoints
Header gauge: 16 sc and 18 rows = 4 in (10.2 cm) in rows of sc.
Ring gauge: One finished ring = 2.25 in (5.7 cm) wide x 3.5 in (8.9 cm) tall, measured point to point and laid flat.
Make one test ring before anything else, and check it at each stage:
- After Rnd 1: When you pinch the flattened ring into an almond, it measures about 1 in (2.5 cm) wide x 2 in (5.1 cm) tall.
- After Rnd 2: About 2 in (5.1 cm) wide x 3.25 in (8.3 cm) tall, with clear points at top and bottom.
- After Rnd 3: 2.25 in (5.7 cm) x 3.5 in (8.9 cm).
If your test ring is too big, go down 0.5 mm in hook size. If it is too small, go up 0.5 mm. Use the same hook for the header as for the rings so the strand spacing stays correct.
Ring Motif
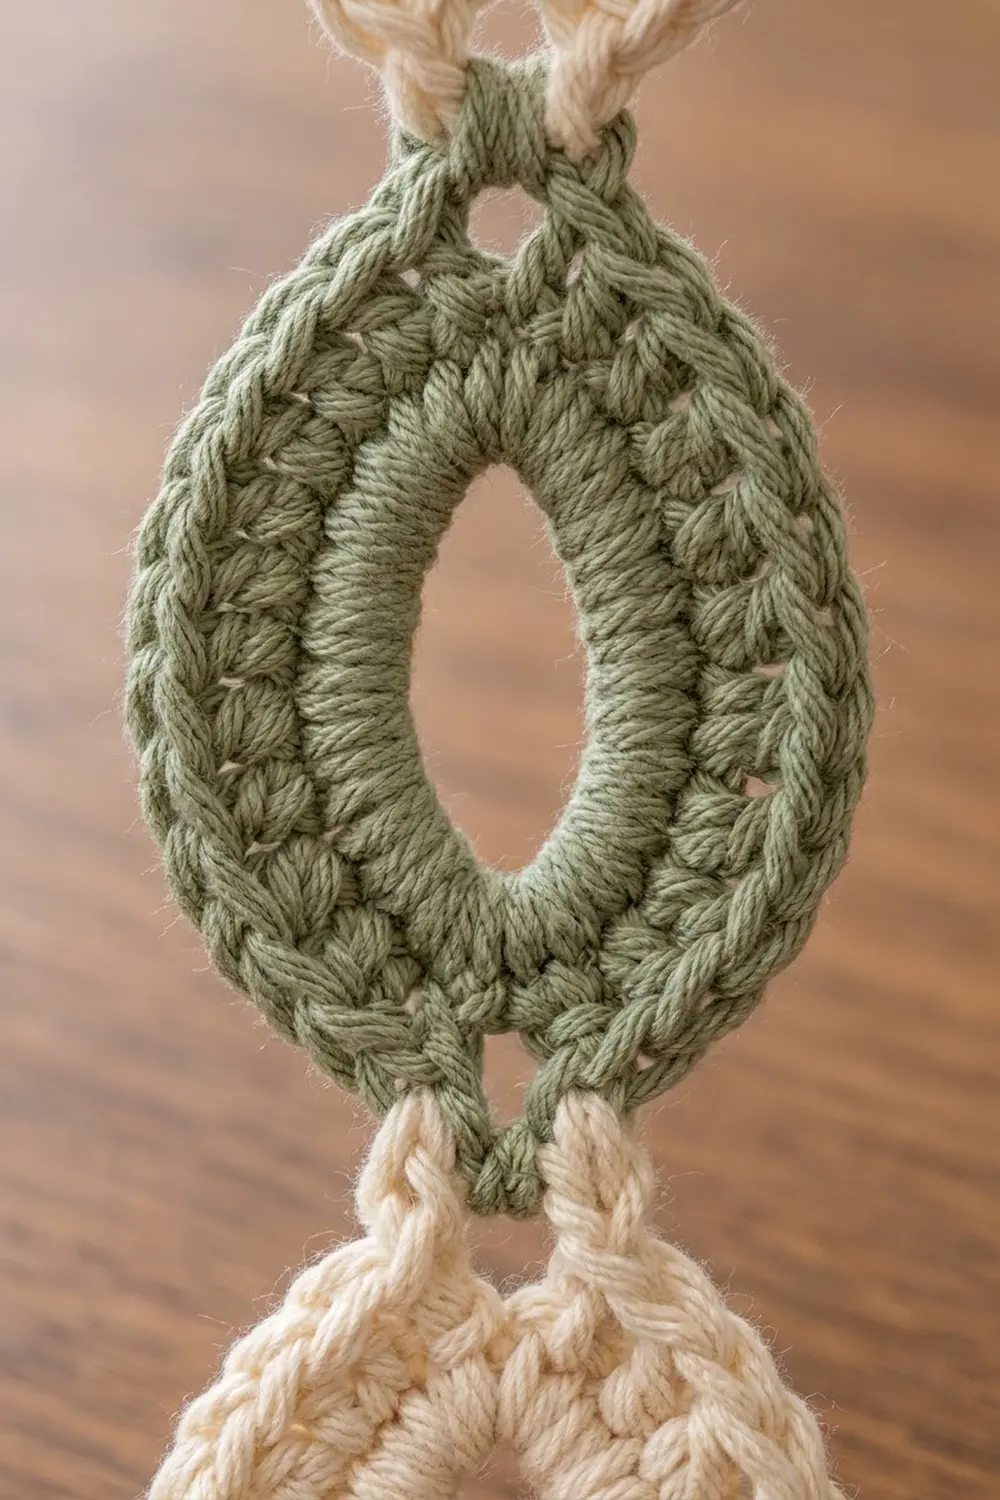
Each ring is worked in the round from a chain loop. The graded stitches in Rnd 2 make the sides tall and the ends short, which creates the almond shape.
Rnd 1: Ch 24, sl st in first ch to form a ring, taking care not to twist. Ch 1, sc in each ch around, working into the chains themselves (not into the center). Join with sl st to first sc. (24 sc)
Place a marker in the first sc (st 1) and another in st 13. These are the top and bottom points.
Rnd 2 (shaping round): Ch 1. (Sc, ch 2, sc) in the marked point st, sc in next st, hdc in next 2 sts, dc in next 5 sts, hdc in next 2 sts, sc in next st; repeat from * once more (the second repeat begins in st 13). Join with sl st to first sc. (26 sts and 2 ch-2 sps)*
Each side now has 13 sts: the point sc, the 11 graded sts, and the next point sc. The dc stitches sit at the widest part of the ring, and the sc stitches sit beside the points.
Rnd 3 (trim round): Sl st into the first ch-2 sp. Ch 1, (sc, ch 2, sc) in ch-2 sp, sc in each of next 13 sts; repeat from * once more. Join with sl st to first sc. Fasten off and weave in ends. (26 sc worked 1 per stitch + 4 sc added at the points = 30 sc, plus 2 ch-2 sps)*
The trim round smooths the edge into a rounded band while keeping the points crisp. When a ring is joined, its top ch-2 point is replaced by a Point Join, described below.
Make All Pieces
Each strand holds 20 rings. There are two strand types, which alternate across the panel:
- Strand A: starts with a sage ring, then alternates cream, sage, and so on. Ring 20 is cream. Finish with a sage tassel.
- Strand B: starts with a cream ring, then alternates sage, cream, and so on. Ring 20 is sage. Finish with a cream tassel.
Totals for one panel:
- Sage rings: 80 (10 per strand x 8 strands)
- Cream rings: 80 (10 per strand x 8 strands)
- Sage tassels: 4
- Cream tassels: 4
Layout grid (S = sage, C = cream; strands read left to right, rings read top to bottom):
Strand:   1  2  3  4  5  6  7  8
Type:     A  B  A  B  A  B  A  B
Ring 1:   S  C  S  C  S  C  S  C
Ring 2:   C  S  C  S  C  S  C  S
Ring 3:   S  C  S  C  S  C  S  C
Ring 4:   C  S  C  S  C  S  C  S
...repeat this 2-row pattern to Ring 20...
Ring 20:  C  S  C  S  C  S  C  S
Tassel:   S  C  S  C  S  C  S  C
Header Band
The header band is the panel’s border. It sets the width and spaces the strands evenly.
Foundation: With sage, ch 98.
Row 1: Sc in 2nd ch from hook and in each ch across. Turn. (97 sc)
Rows 2–9: Ch 1, sc in each st across. Turn. (97 sc each row)
Checkpoint: the band measures 24.25 in (61.6 cm) wide x 2 in (5.1 cm) tall. Do not fasten off.
Tabs: The tabs are worked off Row 9 in 7 groups of 7 sts, with 8 sts skipped between groups.
Tab 1: Ch 1, sc in first 7 sts. Turn. Work 26 more rows of 7 sc. (27 rows total, 6 in / 15.2 cm long) Fasten off, leaving a 12 in (30.5 cm) tail.
Tabs 2–7: Skip 8 sts after the previous tab, join sage in the next st, and repeat Tab 1. The tabs sit on sts 1–7, 16–22, 31–37, 46–52, 61–67, 76–82, and 91–97.
Fold each tab to the back and whipstitch its end to the back of Row 2 with the long tail. Each finished loop is 3 in (7.6 cm) tall.
Strand markers: On the free loops of the foundation chain (the bottom edge), place a marker in sts 7, 19, 31, 43, 55, 67, 79, and 91. These are the hanging points for strands 1–8.
Why the math works: Each strand gets a 12-stitch slot, which is 3 in (7.6 cm) at 4 sc per inch. Eight slots use 8 x 12 = 96 sts. One balancing stitch brings the total to 97, so the first and last strands each have exactly 6 sts of margin (sts 1–6 and 92–97). The tabs use 7 x 7 = 49 sts and the six gaps use 6 x 8 = 48 sts, for 49 + 48 = 97. Every count adds up exactly.
Joining the Rings
All joining is done as you go, on Rnd 3, with the Point Join.
Ring 1 of each strand: Work Rnds 1 and 2 as usual. On Rnd 3, sl st into the first ch-2 sp, ch 1, and replace the first (sc, ch 2, sc) with a Point Join into the marked header stitch for that strand. Finish Rnd 3 as normal, including the bottom (sc, ch 2, sc).
Rings 2–20: Work Rnds 1 and 2 in the next color. On Rnd 3, Point Join the top point into the bottom ch-2 sp of the ring above. Finish the round as normal.
The stitch logic stays one to one. Each Point Join still contains 2 sc, so every ring keeps exactly 30 sc. The ch 1 + sl st + ch 1 replaces the ch-2, so the strand gains no extra length at the joins.
Tension advice: Keep the sl st snug but not tight. A tight join pinches the points and shortens the strand. A loose join lets rings twist. Let the work hang from the header while you crochet, and check that each ring lies flat and faces forward before you join the next one.
Size checkpoint: After 10 rings, the strand measures 35 in (88.9 cm) from the header edge. After 20 rings, it measures 70 in (177.8 cm). If you are more than 1 in (2.5 cm) off at Ring 10, change your hook size before going further.
Tassels: Wrap yarn around the 4.5 in (11.4 cm) card 30 times. Slide a 9 in (22.9 cm) strand under the top wraps and tie tightly. Cut the bottom loops. Wrap a second strand around the bundle 6 times, 0.5 in (1.3 cm) below the top, and tie it off inside. Trim the tassel to 4 in (10.2 cm). Tie each tassel to the bottom ch-2 sp of Ring 20 with its top ties, then hide the ends inside the tassel.
Final Blocking
- Lay the panel flat on a clean surface large enough for its full length, or block it in two halves.
- Mist the rings and header with water until damp, not soaked.
- Pin the header straight at 24.25 in (61.6 cm) wide.
- Pin each strand straight down so the strands are 3 in (7.6 cm) apart, center to center.
- Shape each ring to 2.25 in (5.7 cm) x 3.5 in (8.9 cm), pinning the top and bottom points.
- Comb the tassels straight and smooth them with a damp hand.
- Let everything dry completely before unpinning.
- Hang the panel on the rod and trim any uneven tassels back to 4 in (10.2 cm).
Final Quality-Control Checklist
- Header measures 24.25 in (61.6 cm) wide and 2 in (5.1 cm) deep.
- All 7 tabs are evenly spaced and form 3 in (7.6 cm) loops.
- Each strand has 20 rings that alternate colors and start with the correct color.
- Every ring has 30 sc on Rnd 3 and two crisp points.
- No ring is twisted at a join.
- Each strand measures 70 in (177.8 cm) of rings.
- All 8 tassels are 4 in (10.2 cm) long and alternate sage and cream.
- All ends are woven in securely.
Troubleshooting
Rings look round instead of almond-shaped. Check that the dc stitches are in the middle of each side and the sc stitches are at the points. Starting Rnd 2 in the wrong stitch moves the height to the ends.
Points curl forward. Your ch-2 points are too tight. Loosen them, or use a ch-3 instead of the ch-2 on Rnd 2 only.
Ring edge ruffles. Your Rnd 3 tension is loose. Go down 0.5 mm for Rnd 3 only.
Strands twist when hanging. Make sure every ring faces right side forward before you join it. Blocking with pinned points also helps.
Header pulls into a curve. The strands are heavy, so the header needs firm sc. Work the header with slightly tighter tension, or add one extra row.
Strand too short or too long. Add or remove rings in pairs so each strand still ends with the correct color. Each pair changes the length by 7 in (17.8 cm).
Care
Hand wash in cool water with mild soap, press out the water in a towel, and dry flat. Do not hang the panel while it is wet, because the weight of the damp rings will stretch the strands.
Final Notes
The whole panel rests on a short chain of measurements. One ring is 2.25 in (5.7 cm) x 3.5 in (8.9 cm). Twenty rings make a 70 in (177.8 cm) strand. Each strand takes a 12-stitch, 3 in (7.6 cm) slot, and 8 slots plus 1 balancing stitch give a 97-stitch header that is 24.25 in (61.6 cm) wide. Add 3 in (7.6 cm) tabs, a 2 in (5.1 cm) header, and 4 in (10.2 cm) tassels, and the panel hangs 79 in (200.7 cm) from tab top to tassel tip.
Check your first ring, check each strand at 10 rings, and the rest will fall into place.
Happy crocheting!