

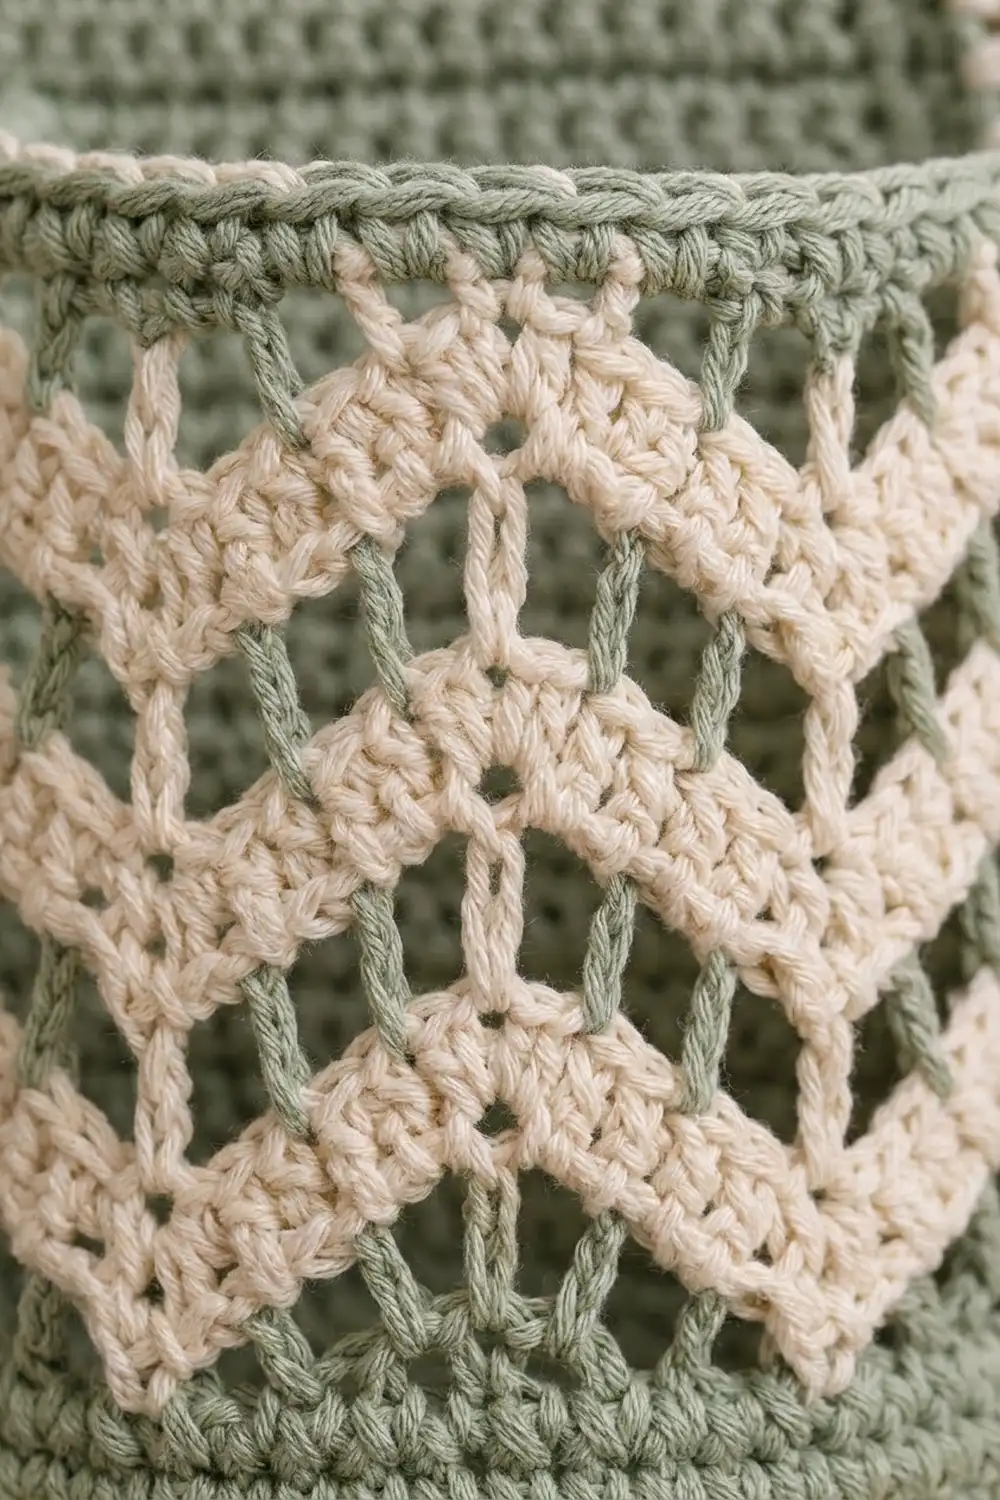
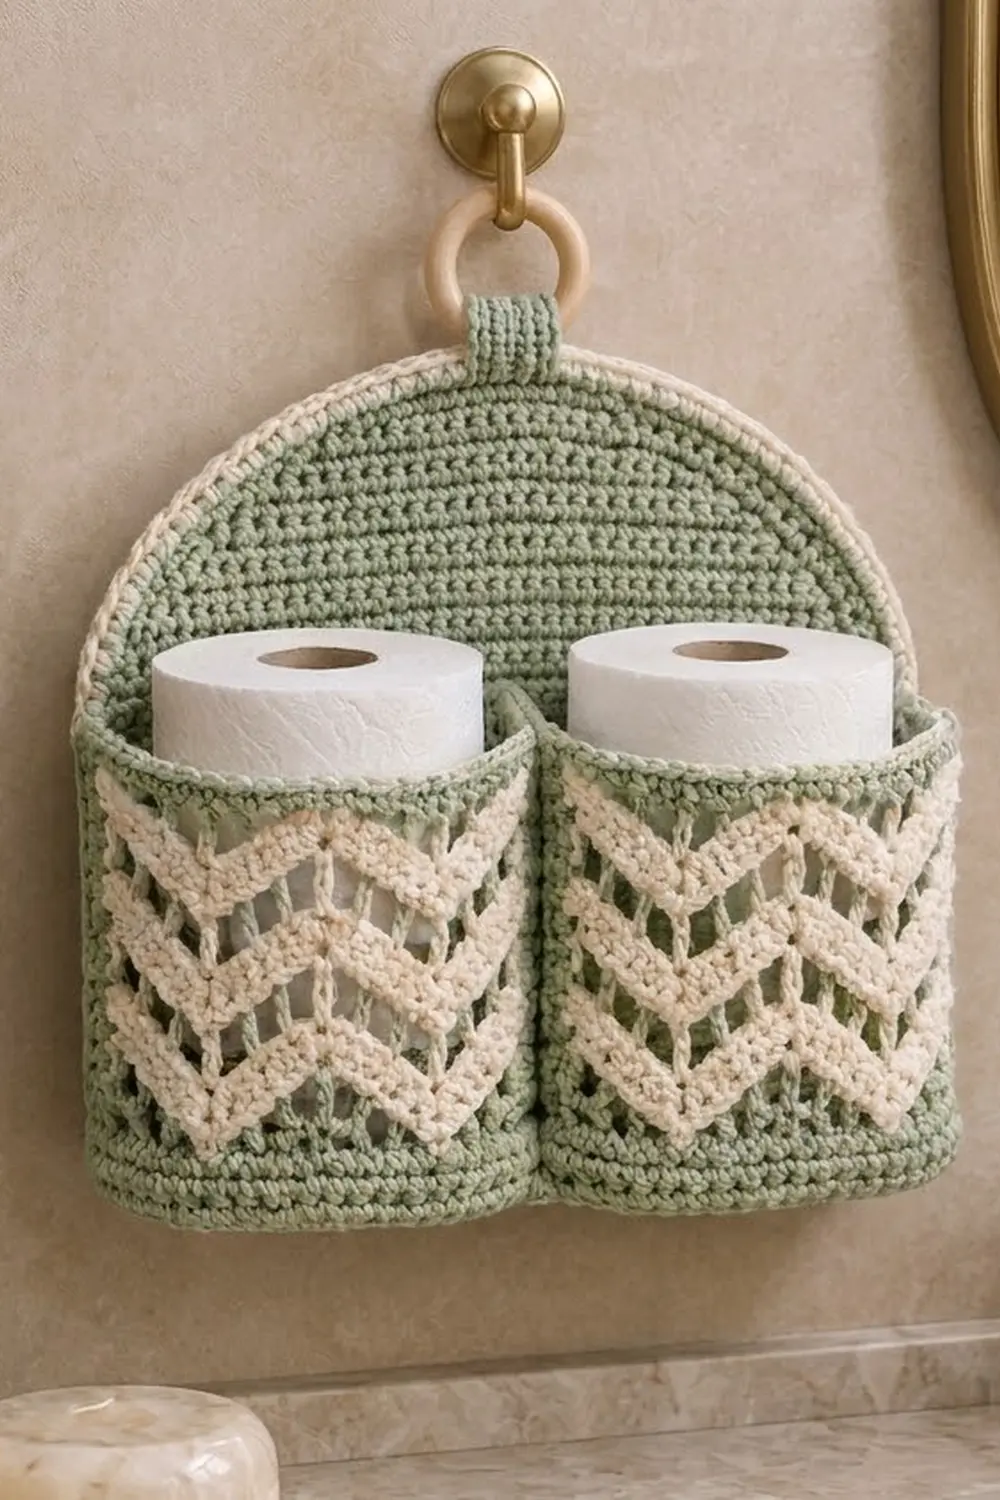
This hanging holder keeps two spare rolls in reach and looks like part of the bathroom decor. A soft sage back panel rises into a gentle arch, and two deep pockets sit side by side across the bottom, each faced with cream chevron lace.
The palette is calm and natural: sage green for the structure, cream for the zigzag bands and the corded edging, and a plain wooden ring for hanging. The open mesh rows between the chevrons let the sage show through, so the lace reads as light and airy even though the pockets are sturdy.
The pattern uses US crochet terms. The finished holder measures 12.75 in (32.4 cm) wide by 10.5 in (26.7 cm) tall, not counting the tab and ring. Each pocket is 6 in (15.2 cm) wide, 6 in (15.2 cm) tall and 4 in (10.2 cm) deep.
You’ll crochet the back panel in rows and give it a two-round cream border. Each pocket front is worked flat in chevron rows and then joined to a long sage gusset strip that forms the pocket’s sides and bottom. Finally, you sew the pockets to the panel and add the tab and ring.
Finished Size and Construction
- Finished size: 12.75 in × 10.5 in (32.4 × 26.7 cm)
- Skill level: Intermediate
- Terminology: US
- Yarn weight: Worsted (#4) cotton
- Hook: 4.5 mm (US 7)
- Number of pieces: 6 (1 back panel, 2 pocket fronts, 2 gussets, 1 tab)
- Layout: 2 pockets side by side across the bottom of the back panel
- Pocket size: 6 × 6 × 4 in (15.2 × 15.2 × 10.2 cm)
- Back panel before border: 12 in × 9.75 in (30.5 × 24.8 cm)
- Border depth: 3/8 in (1.0 cm), 2 rounds
Materials
Choose a smooth worsted cotton or cotton blend, roughly 186 yd (170 m) per 3.5 oz (100 g). Cotton holds its shape in a humid bathroom and gives the chevrons crisp edges.
- Sage green (MC): 220 g, about 374 m
- Cream (CC): 50 g, about 85 m
These quantities include a margin of roughly 10–15%.
Tools:
– 4.5 mm (US 7) crochet hook
– 2 in (5.1 cm) wooden ring
– Tapestry needle
– Stitch markers
– Rust-proof pins and a blocking mat
– Measuring tape
Abbreviations (US Terms)
- ch – chain
- sc – single crochet
- hdc – half double crochet
- dc – double crochet
- tr – treble crochet
- sc2tog – single crochet 2 together
- dc2tog – double crochet 2 together
- rev sc – reverse single crochet (crab stitch)
- st(s) – stitch(es)
- sp – space
- RS / WS – right side / wrong side
Reverse sc (crab stitch): working from left to right (right-handers), insert the hook in the next stitch to the right, yarn over, pull up a loop, yarn over and pull through both loops.
Counting rule for chevron rows: each ch-1 counts as 1 stitch and each ch-2 counts as 2 stitches. A dc2tog counts as 1 stitch. The turning chain never counts.
Gauge and Checkpoints
- Single crochet: 16 sts × 16 rows = 4 in (10.2 cm)
- Double crochet: 16 sts × 8 rows = 4 in (10.2 cm)
Make one pocket front first, because it is both your test piece and a real part of the holder. After Row 14 it should measure 6 × 6 in (15.2 × 15.2 cm), lightly pinned.
Checkpoints:
– Back panel after Row 24: 12 × 6 in (30.5 × 15.2 cm)
– Back panel after Row 39: 12 × 9.75 in (30.5 × 24.8 cm)
– Gusset after Row 72: 18 × 4 in (45.7 × 10.2 cm)
If your pieces are too big, go down to a 4 mm hook. If they’re too small, go up to a 5 mm hook. The square single-crochet gauge matters most, because every seam works 1 stitch to 1 row.
Back Panel
Use sage throughout. The panel is a 24-row rectangle followed by a 15-row arch. Each row begins with ch 1 (doesn’t count) and a turn.
Foundation: Ch 49.
Row 1: Sc in 2nd ch from hook and in each ch across. (48 sc)
Rows 2–24: Sc in each st. (48 sc)
Checkpoint: 12 × 6 in (30.5 × 15.2 cm).
Shaping the arch. “Dec” means sc2tog at each end of the row. “Double dec” means sc2tog twice at each end.
- Row 25: Dec. (46 sc)
- Rows 26–27: Sc across. (46 sc)
- Row 28: Dec. (44 sc)
- Row 29: Sc across. (44 sc)
- Row 30: Dec. (42 sc)
- Row 31: Sc across. (42 sc)
- Row 32: Dec. (40 sc)
- Row 33: Dec. (38 sc)
- Row 34: Dec. (36 sc)
- Row 35: Dec. (34 sc)
- Row 36: Double dec. (30 sc)
- Row 37: Double dec. (26 sc)
- Row 38: Double dec. (22 sc)
- Row 39: Double dec. (18 sc)
Fasten off. The top edge is flat and measures 4.5 in (11.4 cm).
Checkpoint: 12 × 9.75 in (30.5 × 24.8 cm).
Pocket Front (Chevron Lace)
The front is worked flat over 24 stitches, which is 2 chevron repeats of 12. Carry the unused color loosely up the side; the gusset seam will hide it.
Foundation: With sage, ch 25.
Row 1 (RS): Sc in 2nd ch from hook and across. (24 sc)
Row 2: Ch 1, turn, sc across. (24 sc)
Row 3 (sage open row): Ch 2 (doesn’t count), turn.
– Dc2tog over the next 2 sts, ch 1, skip 1, dc in next st, ch 1, skip 1, dc in next st, ch 2, dc in next st, ch 1, skip 1, dc in next st, ch 1, skip 1, dc2tog over the next 2 sts.
– Repeat from * once more. (24 sts)
Each repeat uses 12 stitches and makes 12: 2 dc2tog + 4 dc + 4 ch-1 + one ch-2 (2) = 12.
Row 4 (cream chevron row): Join cream. Ch 2 (doesn’t count), turn.
– Dc2tog over the next 2 sts, dc in next 3 sts, 2 dc in each of the next 2 sts (on an open row, these are the 2 chains of the ch-2), dc in next 3 sts, dc2tog over the next 2 sts.
– Repeat from * once more. (24 sts)
Each repeat: 1 + 3 + 4 + 3 + 1 = 12. The increases stack at the peaks and the decreases at the valleys, so the zigzag holds its shape.
Row 5: With cream, repeat Row 4. (24 sts)
Row 6: With sage, repeat Row 3. (24 sts)
Rows 7–8: With cream, repeat Row 4. (24 sts each)
Row 9: With sage, repeat Row 3. (24 sts)
Rows 10–11: With cream, repeat Row 4. (24 sts each). Cut cream.
Row 12 (sage leveling row): Ch 3 (doesn’t count), turn.
– Tr in next st, dc in next 2 sts, hdc in next st, sc in next 4 sts, hdc in next st, dc in next 2 sts, tr in next st.
– Repeat from * once more. (24 sts)
The tall stitches fill the valleys and the short stitches sit on the peaks, so the top edge comes out straight.
Rows 13–14: Ch 1, turn, sc across. (24 sc)
Fasten off. You now have 3 cream chevron bands with open sage rows between them.
Checkpoint: 6 × 6 in (15.2 × 15.2 cm).
Gusset
With sage, ch 17.
Row 1: Sc in 2nd ch from hook and across. (16 sc)
Rows 2–72: Ch 1, turn, sc across. (16 sc)
Fasten off.
Checkpoint: 18 × 4 in (45.7 × 10.2 cm). That’s 24 rows for each pocket side and 24 rows for the bottom.
Hanging Tab
With sage, ch 7.
Row 1: Sc in 2nd ch from hook and across. (6 sc)
Rows 2–16: Ch 1, turn, sc across. (6 sc)
Fasten off and leave a long tail. The tab measures 1.5 × 4 in (3.8 × 10.2 cm).
Make All Pieces
- Sage only: 1 back panel, 2 gussets, 1 tab
- Sage and cream: 2 pocket fronts
Layout:
              ( ring )
               [tab]
      .-------------------.
     /     BACK PANEL      \
    |  [Pocket A][Pocket B] |
     '---------------------'
Joining
Step 1 – Gusset to pocket front (sage sc seam).
1. Hold the gusset and pocket front with wrong sides together, front facing you.
2. Starting at the top-right corner, work sc through both layers down the side, across the bottom and up the other side, 1 sc in each gusset row-end:
– Each side (24 sc): 1 sc per row-end on Rows 1, 2, 13 and 14; 2 sc per row-end on Rows 3–12 (10 rows × 2 = 20); 4 + 20 = 24.
– Bottom (24 sc): 1 sc in each foundation ch.
– Total: 72 sc, which matches the gusset’s 72 rows.
This seam creates the raised sage frame around the lace.
Step 2 – Pocket rim. With sage, work 1 row of sc across the top of the gusset end (16), the front (24) and the other gusset end (16). (56 sc) Fasten off.
Step 3 – Border the back panel. Work the border in the next section and block the panel before attaching the pockets.
Step 4 – Pockets to panel.
1. Pin Pocket A over panel sts 1–24 and Pocket B over sts 25–48, with the pocket bottoms on Row 1.
2. Whipstitch the gusset’s free edge to the panel, stitch for stitch:
– Bottom: 24 gusset row-ends to 24 panel sts.
– Each side: 24 gusset row-ends to 24 panel rows (Rows 1–24).
3. The two inner gussets meet at the panel’s center line.
Keep your tension snug but not puckered, and check that the panel stays at 12 in (30.5 cm) across.
Step 5 – Tab.
1. Fold the tab over the wooden ring.
2. Sew one end to the front and one end to the back of the top border at center, overlapping each by 1 in (2.5 cm).
Border
Work the border on the back panel only, with cream.
Border gauge: 16 sc = 4 in (10.2 cm). Because the gauge is square, 1 sc per row-end lies flat on the straight sides.
Round 1:
1. Join at the bottom-right corner and work 3 sc in the corner ch.
2. Work 46 sc across the bottom, then 3 sc in the other corner ch.
3. Up the first side, work 1 sc in each row-end for Rows 1–35 (35 sc), then 2 sc in each row-end for Rows 36–39 (8 sc). (43 sc)
4. Work 1 sc in each of the 18 top sts.
5. Down the second side, work 8 + 35 sc. (43 sc)
6. Slip stitch to the first sc.
Count: 52 (bottom with corners) + 43 + 43 + 18 = 156 sc.
Round 2: Ch 1, rev sc in each st around. (156 sts) Fasten off.
Why the math works: Rows 36–39 each step in by 2 stitches, or 0.5 in (1.3 cm), so 2 sc per row-end follows that diagonal. The 3-sc corners turn neatly. The border adds 3/8 in (1.0 cm) per edge: 12 + 0.75 = 12.75 in (32.4 cm) wide and 9.75 + 0.75 = 10.5 in (26.7 cm) tall.
Final Blocking
- Before Step 4, spray the bordered panel damp.
- Pin it to 12.75 × 10.5 in (32.4 × 26.7 cm), keeping the arch smooth and the sides straight.
- Pin each pocket front flat at 6 × 6 in (15.2 × 15.2 cm), opening up the chevrons and mesh.
- Let everything dry completely.
- After assembly, place a roll in each pocket, mist lightly, and let the pockets dry around the rolls so they hold their shape.
Final Quality-Control Checklist
- Panel is 12.75 × 10.5 in (32.4 × 26.7 cm)
- Border has 156 sts with no ruffling on the arch
- Each pocket front has 3 cream chevron bands, with peaks lined up
- Gusset seams have 72 sc each
- Pockets are 4 in (10.2 cm) deep and sit flush with the panel bottom
- Tab is centered and the ring hangs level
- All ends are woven in on the WS
Troubleshooting
- Chevrons are drifting: You’ve missed a stitch. Recount to 12 per repeat and make sure you work the 4 peak dc into the ch-2.
- Arch is wavy: Your border is too loose. Redo Round 1 with a 4 mm hook.
- Arch looks pointed: Work an extra plain row between Rows 31 and 32.
- Pocket sags: Re-steam the pocket around a roll, or tighten the whipstitch.
- Holder tilts: Re-center the tab over the 18 top sts.
Care
Hand wash in cool water and lay flat to dry, reshaping the pockets while damp. Don’t tumble dry, because heat can shrink the cotton out of square.
Final Notes
Everything comes back to one square gauge of 16 sc = 4 in (10.2 cm):
– 48 sts give a 12 in (30.5 cm) panel.
– 24 rows give 6 in (15.2 cm) pockets.
– 72 gusset rows match three 6 in (15.2 cm) pocket edges.
– 156 border stitches finish the holder at 12.75 × 10.5 in (32.4 × 26.7 cm).
Check each measurement as you go and the pieces will fit together without easing. Happy crocheting!