

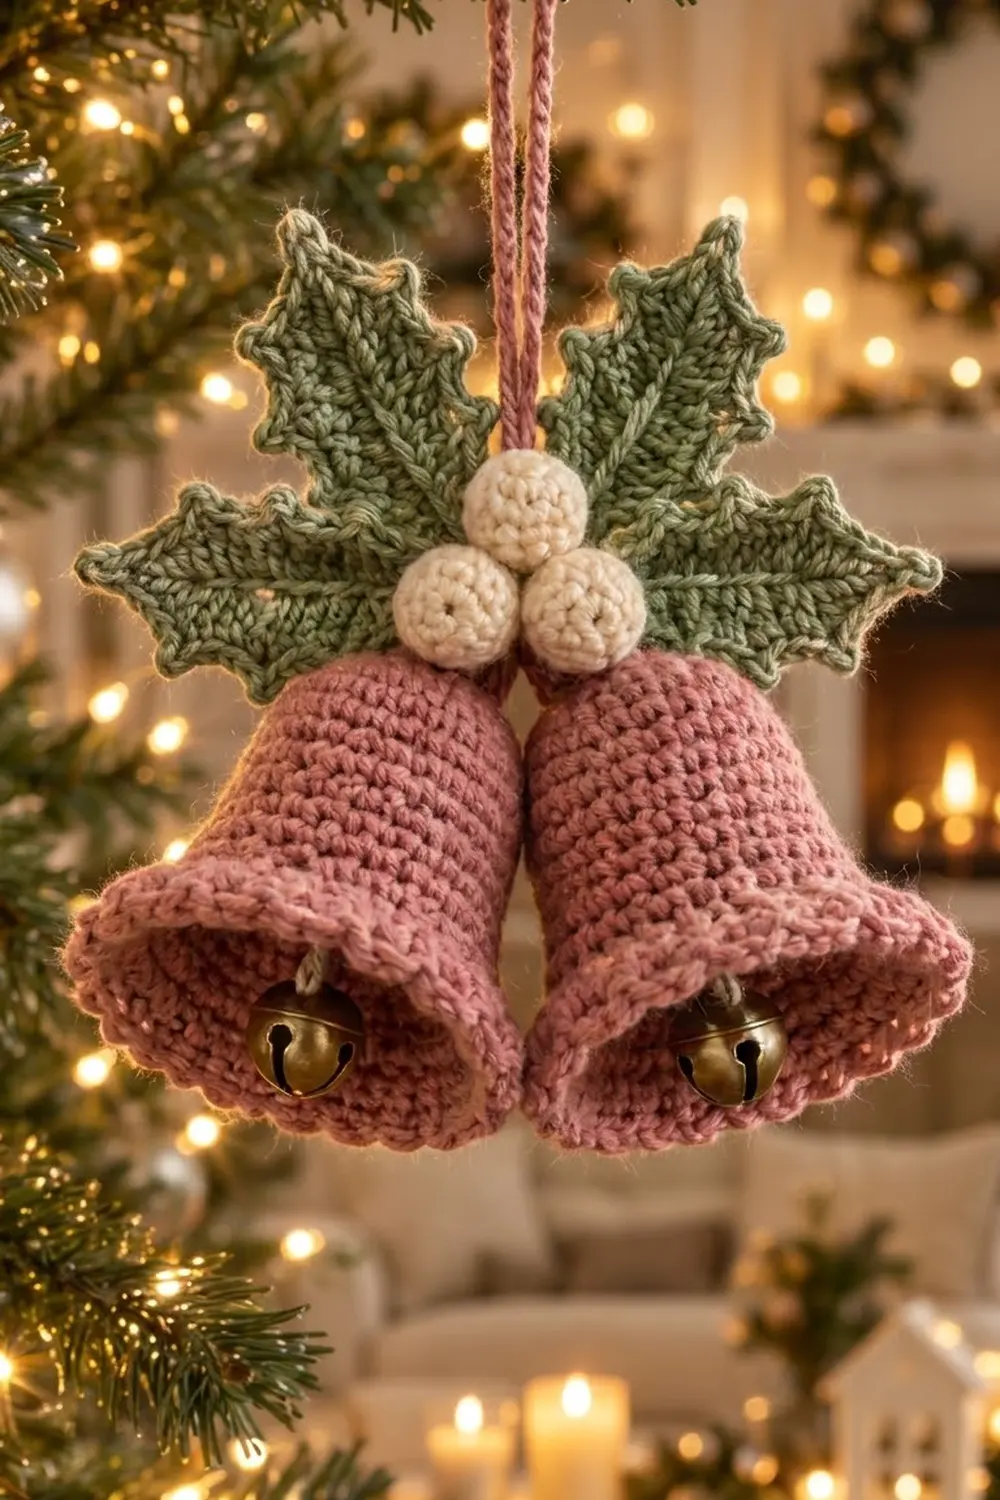
The Rosy Holly Bell Duo is a hanging Christmas ornament with two dusty-rose bells side by side. A small cluster of sage-green holly leaves and three cream berries sits on top. A gold jingle bell inside each bell gives a soft ring when the branch moves.
The colors are muted and vintage: dusty rose, sage green and cream. Dense single crochet makes the bells hold their shape without stiffener. A corded reverse single crochet edge gives each rim a clean, rolled finish.
This pattern uses US crochet terms. The finished ornament is about 6.5 in (16.5 cm) wide and 5.5 in (14.0 cm) tall, plus a 4 in (10.2 cm) hanging loop.
Each bell is worked top-down in a spiral, from the crown to the flared rim. The holly leaves are worked around a foundation chain in one round. The berries are small stuffed balls. You sew everything together at the end and add a twisted cord loop.
Finished Size and Construction
- Finished ornament: about 6.5 in wide x 5.5 in tall (16.5 x 14.0 cm), plus a 4 in (10.2 cm) loop
- Skill level: Easy to intermediate
- Terminology: US crochet terms
- Yarn weight: DK (light #3)
- Hook: 3.25 mm (US D/3)
- Number of pieces: 10 (2 bells, 4 leaves, 3 berries, 1 cord), plus 2 jingle bells
- Layout: two bells side by side, with two leaves on each side and a three-berry triangle at the center top
- Piece sizes: bell 2.75 in (7.0 cm) tall, 3.5 in (8.9 cm) rim; leaf 2.5 x 1.25 in (6.4 x 3.2 cm); berry 0.9 in (2.3 cm)
- Bell size before rim edging: 2.4 in (6.1 cm) tall, about 3.5 in (8.9 cm) across the mouth
- Rim edging depth: about 0.3 in (0.8 cm)
Materials
Use a smooth, matte DK yarn in acrylic, a wool blend, or a cotton blend. A slightly fuzzy wool blend matches the soft look in the photo. Avoid very splitty yarn, because reverse single crochet is easier with a firm ply.
- Dusty rose: 20 g / 46 m (bells, cord, jingle bell strands)
- Sage green: 10 g / 23 m (4 leaves)
- Cream: 5 g / 12 m (3 berries)
These quantities include a safety margin of about 20%.
Tools and notions:
– 3.25 mm (US D/3) crochet hook
– 2 gold jingle bells, 15 mm (0.6 in / 1.5 cm)
– Small amount of fiberfill
– Tapestry needle
– Stitch markers (at least 4)
– Scissors and pins
– Measuring tape
Abbreviations (US Terms)
- ch – chain
- sl st – slip stitch
- sc – single crochet
- hdc – half double crochet
- dc – double crochet
- inc – 2 sc in the same stitch
- dec – invisible decrease (insert hook in front loops of next 2 sts, yarn over, pull through both front loops, yarn over, pull through 2 loops)
- MR – magic ring
- rev sc – reverse single crochet (crab stitch)
- st(s) – stitch(es)
- rnd – round
Special stitches:
Point (P): Ch 3, sl st in the 3rd ch from the hook. This makes one sharp holly point and does not count as a stitch.
Reverse single crochet (rev sc): Work from left to right (right-handers). Insert the hook in the next stitch to the right, yarn over, pull up a loop, yarn over, and pull through both loops.
Gauge and Checkpoints
Gauge: 22 sc x 24 rnds = 4 in (10.2 cm) in sc worked in the round. That works out to 5.5 sts and 6 rnds per inch.
Make one bell first and check it at each stage before making the second bell:
- After Rnd 5: the flat circle measures 1.75 in (4.4 cm) across.
- After Rnd 12: the bell measures 2.1 in (5.3 cm) across.
- After Rnd 16: the bell measures 2.8 in (7.1 cm) across and about 2.1 in (5.3 cm) tall.
- After Rnd 20: the mouth measures 3.5 in (8.9 cm) across and the bell is 2.75 in (7.0 cm) tall.
If your bell is too big, go down one hook size. If it’s too small, or the fabric is stiff and hard to work, go up one hook size. Dense fabric is what you want here, but you should still be able to see a little light through it.
Bell (Make 2, Dusty Rose)
Work in a continuous spiral. Don’t join rounds. Place a marker in the first stitch of each round and move it up as you go.
Rnd 1: 6 sc in MR. (6)
Rnd 2: Inc in each st around. (12)
Rnd 3: (Sc, inc) 6 times. (18)
Rnd 4: (Sc in next 2 sts, inc) 6 times. (24)
Rnd 5: (Sc in next 3 sts, inc) 6 times. (30)
Checkpoint: the flat crown measures 1.75 in (4.4 cm).
Rnds 6–7: Sc in each st around. (30)
The sides now start to curve down to form the domed crown.
Rnd 8: (Sc in next 4 sts, inc) 6 times. (36)
Rnds 9–12: Sc in each st around. (36)
Checkpoint: 2.1 in (5.3 cm) across.
Rnd 13: (Sc in next 5 sts, inc) 6 times. (42)
Rnds 14–15: Sc in each st around. (42)
Rnd 16: (Sc in next 6 sts, inc) 6 times. (48)
Checkpoint: 2.8 in (7.1 cm) across.
Flare:
Rnd 17: (Sc in next 7 sts, inc) 6 times. (54)
Rnd 18: (Sc in next 8 sts, inc) 6 times. (60)
Each repeat in Rnd 17 uses 8 stitches (7 sc + 1 inc stitch), and 6 x 8 = 48 uses the whole previous round. Rnd 18 uses 9 stitches per repeat, and 6 x 9 = 54. Increasing in two back-to-back rounds after the slower increases above is what turns the straight sides into a flared mouth.
Don’t fasten off. Continue straight into the Rim Edging below.
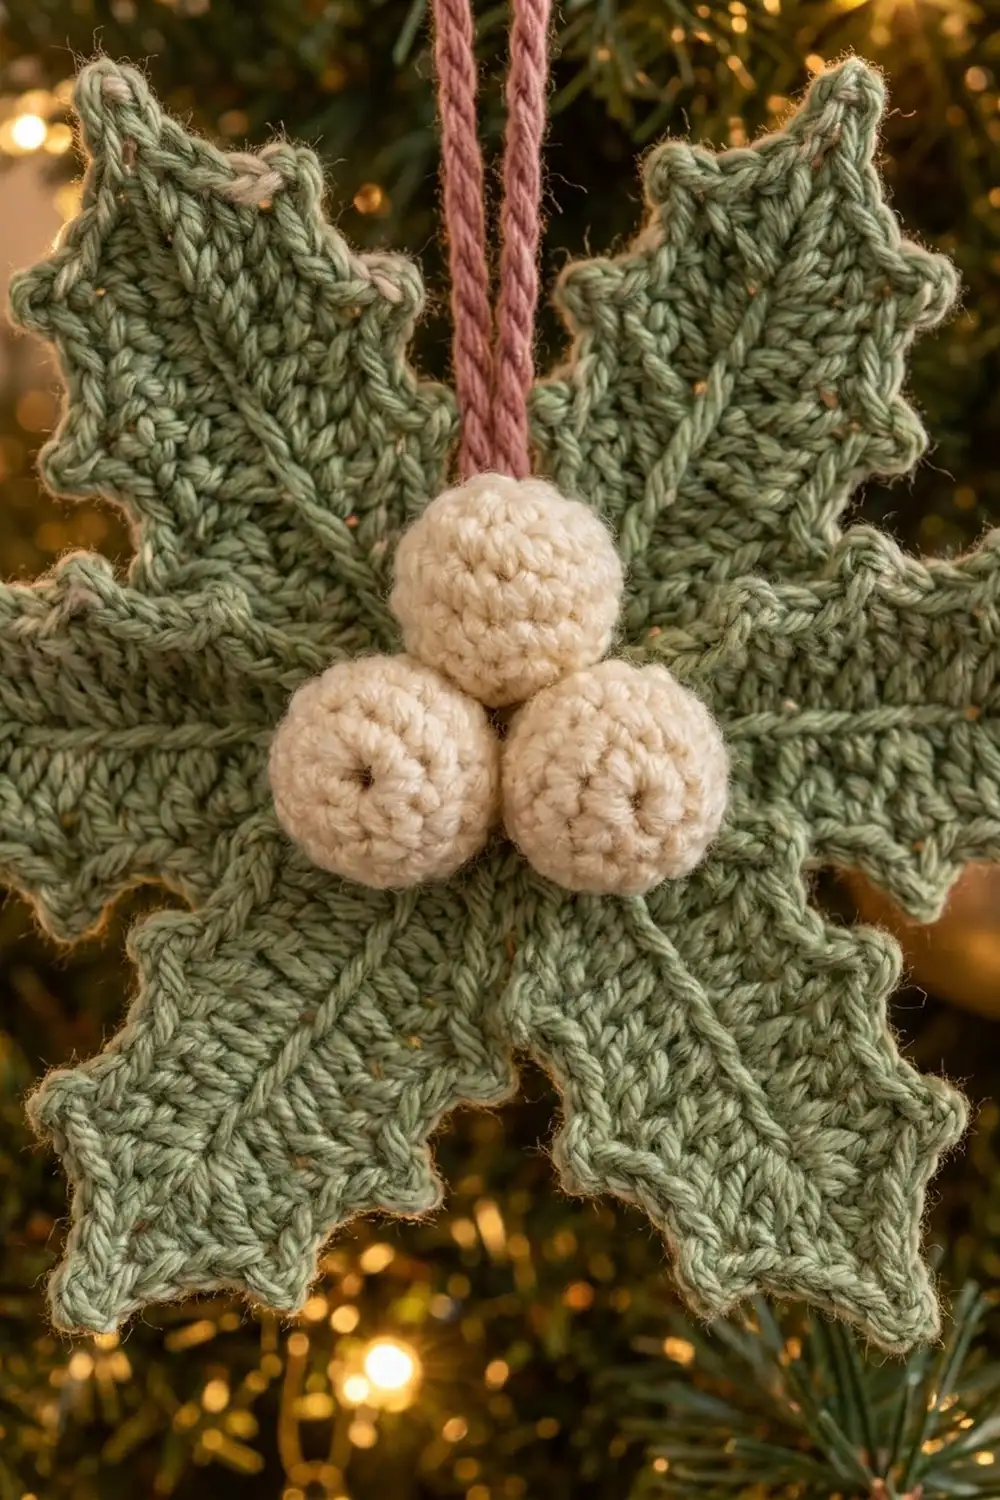
Holly Leaf (Make 4, Sage Green)
Each leaf is worked in one round around a foundation chain. Work Side 1 into the back bumps of the chain, and Side 2 into the free loops on the other side.
Ch 14. Starting from the 2nd ch from the hook, number the 13 working chains 1 to 13 in your head.
Side 1:
– Ch 1: sl st
– Ch 2: sc
– Ch 3: hdc
– Ch 4: dc, then P
– Ch 5–6: dc in each, then P
– Ch 7–8: dc in each, then P
– Ch 9: dc
– Ch 10: hdc
– Ch 11: sc
– Ch 12: sl st
Base: Work 3 sc in ch 13.
Side 2 (rotate and work along the free loops):
– Ch 12: sl st
– Ch 11: sc
– Ch 10: hdc
– Ch 9: dc, then P
– Ch 8–7: dc in each, then P
– Ch 6–5: dc in each, then P
– Ch 4: dc
– Ch 3: hdc
– Ch 2: sc
Tip: In ch 1, work (sl st, P, sl st). Join with a sl st to the first sl st.
Stitch count: 12 + 3 + 11 + 2 = 28 sts, plus 7 points (3 per side and 1 tip).
On each side, the points fall in the same gaps (between ch 4/5, 6/7 and 8/9), so the two sides mirror each other. The dc stitches in the middle make the leaf widest at the center. The taper to sl st at each end gives the classic holly outline.
Fasten off, leaving a 10 in (25.4 cm) tail for sewing. Checkpoint: 2.5 in (6.4 cm) long and 1.25 in (3.2 cm) wide.
Berry (Make 3, Cream)
Rnd 1: 6 sc in MR. (6)
Rnd 2: Inc in each st around. (12)
Rnd 3: (Sc, inc) 6 times. (18)
Rnd 4: Sc in each st around. (18)
Rnd 5: (Sc, dec) 6 times. (12)
Stuff firmly.
Rnd 6: Dec 6 times. (6)
Fasten off, leaving an 8 in (20.3 cm) tail. Weave the tail through the front loops of the last 6 stitches and pull tight. Checkpoint: 0.9 in (2.3 cm) across.
Make All Pieces
- Dusty rose: 2 bells, 1 twisted cord, 2 jingle bell strands
- Sage green: 4 leaves
- Cream: 3 berries
Layout (front view):
      Leaf ↖         ↗ Leaf
  Leaf ←     (B)        → Leaf
           (B) (B)
        [Bell][Bell]
The upper leaves point up and out at about 45°. The lower leaves point straight out to the sides. All four leaf bases meet at the center, just above the bell crowns.
Joining
Jingle bells first: Thread an 8 in (20.3 cm) dusty rose strand through the loop of each jingle bell. Pass both ends up through the center of the bell’s MR from inside and tie them on top. Adjust the strand so the top of the jingle bell hangs 2.1 in (5.3 cm) below the inside crown. At that height its lower edge lines up with the rim, as in the photo.
Joining the bells: Hold the two bells side by side with their markers facing the back. Line up 4 stitches on each bell, along Rnds 6–9 where the crowns touch. Whipstitch them stitch-to-stitch, one stitch on the left bell to one stitch on the right bell.
Keep the seam only at the crown. That lets the lower bodies tilt outward slightly, so the 3.5 in (8.9 cm) rims touch instead of crowding each other. Pull each stitch snug but not tight, or the crowns will pucker.
Size checkpoint: Measure across both rims. You should get about 6.5 in (16.5 cm).
Leaves: Sew the 3-sc base of each leaf to the joined crowns, following the layout grid. Sew through the base and the first 2 stitches of each side, so the leaf doesn’t flop forward.
Berries: Sew the berries in a triangle over the leaf bases, covering the seam. Place one berry on top and two below it, with each berry touching the other two.
Cord: Cut one 36 in (91.4 cm) dusty rose strand. Fold it in half, twist it until it kinks, then fold it again and let it twist back on itself. This gives a cord about 8 in (20.3 cm) long. Fold the cord in half. Sew both ends behind the top berry, so a 4 in (10.2 cm) loop stands above the ornament.
Rim Edging (Border)
The rim edging works as the bell’s border. Work it on each bell straight after Rnd 18.
Border gauge: Both edging rounds are worked 1 st into each st, at the same 5.5 sts per inch as the bell. With 60 stitches, the rim stays 3.5 in (8.9 cm) across. Place 4 markers 15 sts apart to split the rim into quarters.
Rnd 19: Sc in each st around, then sl st to the next st to even out the spiral step. Count 15 sc per quarter. (60)
Rnd 20: Ch 1. Rev sc in each st around, 15 per quarter. Join with a sl st to the first rev sc. (60)
Fasten off and weave in the ends.
Why the math works: Rnd 18 ends with 60 sts, which divides evenly into 6 repeats and 4 quarters of 15. Neither edging round adds or skips stitches, so the edge doesn’t ruffle or pull in.
Rev sc builds a firm, rolled cord that holds the flare open. The ornament gets 2 rounds of edging depth (0.3 in / 0.8 cm), and the total bell height reaches 2.75 in (7.0 cm).
Final Blocking
- Before assembly, pin each leaf flat with the points pulled out sharply. Mist with water and let dry completely.
- Fill each bell firmly with a rolled-up plastic bag or tissue, pushing outward at the rim to set the flare.
- Mist the bells lightly. For wool, you can hover steam about 1 in (2.5 cm) above the fabric instead. Never press acrylic with an iron.
- Let everything dry for at least 6 hours, then remove the filling.
- After assembly, gently shape the berries round and fluff the leaf points with your fingers.
Final Quality-Control Checklist
- Each bell is 2.75 in (7.0 cm) tall with a 3.5 in (8.9 cm) rim.
- Both bells have 60 sts in Rnds 18–20.
- Each leaf has 3 points per side plus a sharp tip, and measures 2.5 x 1.25 in (6.4 x 3.2 cm).
- The berries are 0.9 in (2.3 cm), firm, and closed tightly.
- The jingle bells hang level with the rims and ring freely.
- The crown seam isn’t visible from the front.
- The ornament is about 6.5 in (16.5 cm) wide and 5.5 in (14.0 cm) tall.
- The 4 in (10.2 cm) loop is secure and centered.
- All ends are woven in.
Troubleshooting
- The bell is cone-shaped, not rounded: You may have skipped Rnds 6–7. Those plain rounds are what create the dome.
- The rim ruffles: Your gauge is loose, or you added stitches in Rnds 19–20. Recount, and keep the edging at exactly 60 sts.
- The rim curls inward: Your rev sc is too tight. Pull up a slightly taller loop for each stitch.
- The leaf points are blunt: Pull each P sl st tight, and pin the points out when blocking.
- The leaf is twisted: Make sure Side 1 goes into the back bumps and Side 2 into the free loops. Block flat.
- The bells hang crooked: The crown seam is off-center. Re-sew it over Rnds 6–9 on both bells.
- The jingle bell doesn’t show: Lengthen the strand until the jingle bell is level with the rim.
Care
Spot clean only with a damp cloth and mild soap, then reshape and air dry. Store the ornament flat with tissue inside the bells so the flare keeps its shape.
Final Notes
The measurement chain is simple. A gauge of 5.5 sts per inch gives a 1.75 in (4.4 cm) crown at 30 sts and a 2.1 in (5.3 cm) body at 36 sts. It reaches 2.8 in (7.1 cm) at 48 sts and a 3.5 in (8.9 cm) rim at 60 sts. The 1-to-1 edging keeps that rim size while bringing each bell to 2.75 in (7.0 cm) tall.
Two bells joined at the crown, four 2.5 in (6.4 cm) leaves and three 0.9 in (2.3 cm) berries make one 6.5 x 5.5 in (16.5 x 14.0 cm) ornament. Check your first bell at each checkpoint, and the rest will fall into place.
Happy crocheting!