

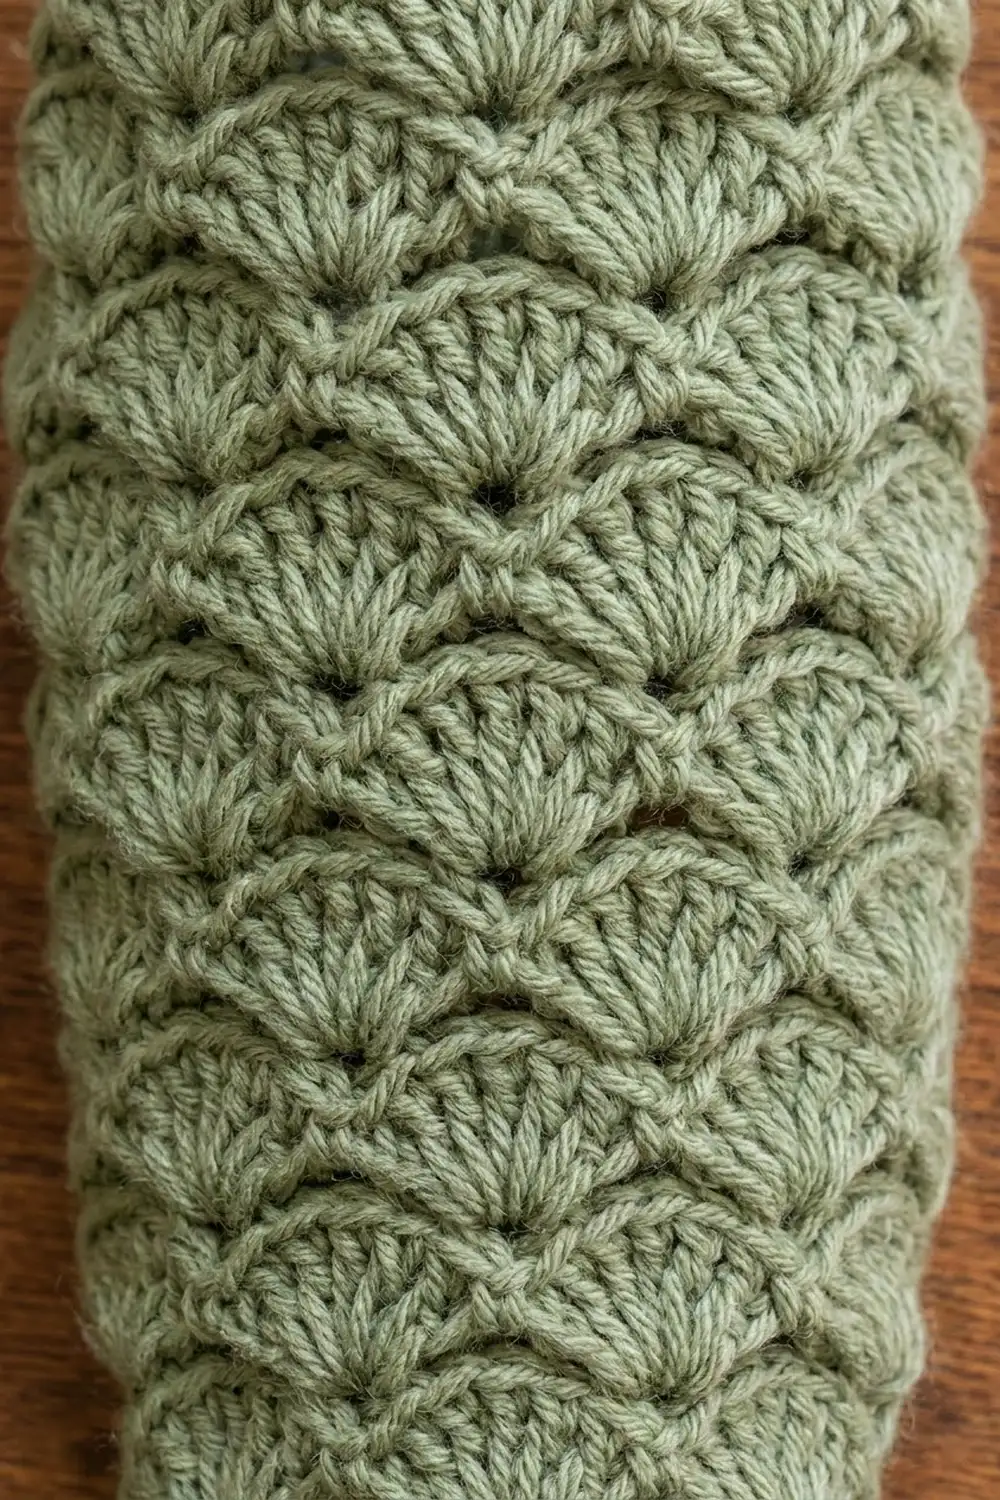
This bag holder is a slim, tapered tube covered in overlapping shell fans. It hangs from a cabinet knob by a slender loop. You stuff plastic grocery bags in at the wide scalloped top and pull them out one at a time through the narrow opening at the bottom.
The sample uses one soft sage green worsted yarn. The shells start small at the bottom and get bigger as you go up, so the holder flares gently from a narrow base to a wide, scalloped mouth. The look is calm and textured, a bit like fish scales or a pinecone, and it suits a farmhouse or plant-filled kitchen.
The pattern uses US crochet terms throughout. The finished body is about 12.25 in (31.1 cm) tall and 7 in (17.8 cm) wide at the top when laid flat. The hanging loop adds about 5.5 in (14.0 cm), so the whole piece hangs about 17.75 in (45.1 cm) long.
Construction is simple. You start with a chain ring and work three rounds of single crochet for the bottom band. Then you work 14 rounds of shell stitch, making the shells bigger in two steps. One round of single crochet outlines the scalloped top. A separate single crochet strip is folded into a loop and sewn to the top edge.
Finished Size and Construction
- Finished size: 12.25 in (31.1 cm) tall x 7 in (17.8 cm) wide at the top, flat
- Bottom opening: 4 in (10.2 cm) wide flat, 8 in (20.3 cm) around
- Skill level: Easy to intermediate
- Terminology: US crochet terms
- Yarn weight: Worsted (#4 medium)
- Hook: 5.0 mm (US H-8)
- Number of pieces: 2 (one body tube and one hanging loop)
- Layout: One seamless tube worked bottom-up in joined rounds, with the loop sewn to the top edge
- Piece size: Body as above; loop strip 11 in (27.9 cm) long, folded to 5.5 in (14.0 cm)
- Size before border: 12 in (30.5 cm) tall x 7 in (17.8 cm) wide
- Border depth: 0.25 in (0.6 cm) top edging round
Materials
Choose a smooth worsted weight yarn so the shell fans stay crisp. Cotton or a cotton blend gives the firmest, clearest shells and holds up to daily use. Soft acrylic also works and gives a slightly plumper fabric, like the sample.
- Sage green worsted yarn: 110 g / 200 m (219 yd)
This amount includes a margin of about 15 percent for checking your gauge and for small differences in tension. The finished holder uses about 95 g / 175 m (191 yd).
Tools:
- 5.0 mm (US H-8) crochet hook
- Stitch marker
- Tapestry needle
- Scissors
- Measuring tape
- Rust-proof pins and a spray bottle for blocking
Abbreviations (US Terms)
- ch – chain
- sl st – slip stitch
- sc – single crochet
- dc – double crochet
- st(s) – stitch(es)
- sk – skip
- rep – repeat
- rnd(s) – round(s)
Special stitches:
- 5-dc shell: Work 5 dc in the same stitch. The center dc is the 3rd dc.
- 7-dc shell: Work 7 dc in the same stitch. The center dc is the 4th dc.
- 9-dc shell: Work 9 dc in the same stitch. The center dc is the 5th dc.
Gauge and Checkpoints
Single crochet gauge: 16 sc and 16 rnds = 4 in (10.2 cm), so 4 sc rnds = 1 in (2.5 cm).
Shell gauge: 5 shell rnds = 4 in (10.2 cm), so each shell rnd adds about 0.8 in (2.0 cm) of height.
There is no separate swatch. Instead, work the bottom band and the first four shell rounds, then stop and measure. This is your test piece. If it matches the checkpoint, keep going.
Checkpoints (measured flat):
- After Rnd 3: 4 in (10.2 cm) wide, 0.75 in (1.9 cm) tall
- After Rnd 7: 4.4 in (11.2 cm) wide across the shells, about 4 in (10.2 cm) tall
- After Rnd 11: 5.6 in (14.2 cm) wide, about 7.2 in (18.3 cm) tall
- After Rnd 17: 7 in (17.8 cm) wide, about 12 in (30.5 cm) tall
- After Rnd 18: 7 in (17.8 cm) wide, 12.25 in (31.1 cm) tall
If your piece is too big: go down one hook size, to 4.5 mm (US 7). If your piece is too small: go up one hook size, to 5.5 mm (US I-9). Use the new hook for the whole project, not just part of it, so the taper stays even.
If the bottom opening is too wide, bags fall out. If it is too tight, they are hard to pull out. Aim for 8 in (20.3 cm) around, which fits two or three fingers comfortably.
Body
The body is worked from the bottom up in joined rounds. Do not turn. Join each round with a sl st to the first st of the round. The ch 1 at the start of a round never counts as a stitch.
Bottom Band
Foundation: Ch 32. Join with a sl st to the first ch to form a ring. Make sure the chain isn’t twisted.
Rnd 1: Ch 1, sc in each ch around, join. (32 sc)
Rnds 2–3: Ch 1, sc in each st around, join. (32 sc)
The band should measure 0.75 in (1.9 cm) tall and 4 in (10.2 cm) wide flat. This firm band is the opening the bags come out of, so keep it snug and even.
Small Shells
Rnd 4 (set-up round): Ch 1, sc in first st, sk 1 st, 5-dc shell in next st, sk 1 st, sc in next st; rep from * 6 more times, then sk 1 st, 5-dc shell in next st, sk last st, join to first sc. (8 shells and 8 sc: 48 sts)
Each repeat uses 4 band stitches. 8 repeats x 4 sts = 32 sts, so the set-up round fits the band exactly.
Rnd 5: Sl st in next 3 dc to reach the center dc of the first shell. Ch 1, sc in same st, 5-dc shell in next sc, sc in center dc of next shell; rep from * 6 more times, 5-dc shell in last sc, join to first sc. (8 shells and 8 sc: 48 sts)
Rnds 6–7: Rep Rnd 5. (48 sts each round)
Each new shell sits in the sc between two shells of the round below. Each new sc is anchored in the center of a shell below. This offset creates the overlapping scale texture.
Checkpoint: 4.4 in (11.2 cm) wide and about 4 in (10.2 cm) tall.
Medium Shells
Rnd 8: Sl st in next 3 dc to reach the center dc of the first 5-dc shell. Ch 1, sc in same st, 7-dc shell in next sc, sc in center dc of next shell; rep from * 6 more times, 7-dc shell in last sc, join to first sc. (8 shells and 8 sc: 64 sts)
This is a growth round. Its count is 8 x 7 dc + 8 sc = 64 sts. There are still 8 shells; only the shells get bigger.
Rnds 9–11: Sl st in next 4 dc to reach the center dc of the first 7-dc shell. Ch 1, sc in same st, 7-dc shell in next sc, sc in center dc of next shell; rep from * 6 more times, 7-dc shell in last sc, join. (64 sts each round)
Checkpoint: 5.6 in (14.2 cm) wide and about 7.2 in (18.3 cm) tall.
Large Shells
Rnd 12: Sl st in next 4 dc to reach the center dc of the first 7-dc shell. Ch 1, sc in same st, 9-dc shell in next sc, sc in center dc of next shell; rep from * 6 more times, 9-dc shell in last sc, join. (8 shells and 8 sc: 80 sts)
This is the second growth round: 8 x 9 dc + 8 sc = 80 sts.
Rnds 13–17: Sl st in next 5 dc to reach the center dc of the first 9-dc shell. Ch 1, sc in same st, 9-dc shell in next sc, sc in center dc of next shell; rep from * 6 more times, 9-dc shell in last sc, join. (80 sts each round)
Do not fasten off. Go straight into the top border.
Checkpoint: 7 in (17.8 cm) wide and about 12 in (30.5 cm) tall. That is 0.75 in (1.9 cm) of band plus 14 shell rounds x 0.8 in (2.0 cm).
Hanging Loop
Foundation: Leaving a 10 in (25.4 cm) tail, ch 45.
Row 1: Sc in 2nd ch from hook and in each ch across. (44 sc)
Fasten off, leaving a 10 in (25.4 cm) tail. The strip measures 11 in (27.9 cm), because 44 sc at 4 sc per inch = 11 in. Folded in half, it makes a loop 5.5 in (14.0 cm) long.
Border
The top border is one round of single crochet that outlines every scallop. Work it right after Rnd 17.
Border gauge: 1 sc per stitch, at the same 4 sc per inch as the bottom band.
Rnd 18: Ch 1, sc in each st around, including every dc of each shell and each sc between shells, join. (80 sc)
Laid flat, the tube has two sides, front and back, with 4 shells on each. Each side has 4 x 9 dc + 4 sc = 40 sc, and 40 sc front + 40 sc back = 80 sc around. A tube has no corners, so you don’t add any corner stitches.
Why the math works: Working exactly one sc into each existing stitch adds no extra fullness and takes none away. The scallops keep their rounded curve and don’t ruffle or cup. The edging just firms up the rim so it holds its shape when you push bags in.
Fasten off and weave in the end.
The bottom band (Rnds 1–3) acts as the lower border. It already has its final count of 32 sc, 16 per flat side, and needs nothing more.
Attaching the Loop
Fold the loop strip in half. Lay the holder flat with the back facing up. Center the two loop ends at the top edge, about 1 in (2.5 cm) apart, overlapping the inside of the rim by 0.5 in (1.3 cm).
Use the tails to whipstitch each end firmly through the border round and the top of Rnd 17. Sew through several stitches so the weight of the bags is spread out. When the holder hangs, the rim draws up into a soft point below the loop.
Final Blocking
- Weave in all remaining ends on the inside of the tube.
- Mist the holder lightly with water until damp, not soaked.
- Lay it flat on a blocking mat with the loop centered at the top.
- Ease the sides to 7 in (17.8 cm) wide at the top and 4 in (10.2 cm) at the band.
- Gently stretch the length to 12.25 in (31.1 cm).
- Pin each top scallop into a smooth, even curve.
- Shape the loop straight and flat to 5.5 in (14.0 cm).
- Let it dry completely before you unpin it.
For acrylic, you can steam block lightly instead. Hold the iron above the fabric and never press it down.
Final Quality-Control Checklist
- The bottom band has 32 sc and lies flat without rippling.
- Every round has exactly 8 shells.
- Shells get bigger at Rnd 8 and Rnd 12 only.
- Round counts are 32, 48, 64, and 80 at each stage.
- Each shell sits over an sc from the round below, offset from the shells there.
- The top edging has 80 sc, 40 per flat side.
- The holder measures 12.25 in (31.1 cm) tall and 7 in (17.8 cm) wide.
- The loop is 5.5 in (14.0 cm) long and firmly sewn.
- All ends are woven in on the inside.
Troubleshooting
The shells lean in a spiral. Make sure you sl st to the center dc at the start of every round. Starting one stitch early or late shifts the shells sideways.
I have 7 or 9 shells instead of 8. Recount Rnd 4. You must skip 1 st on each side of every shell. Pull out the stitches back to the band and redo the set-up round.
The bottom band flares. Your starting chain is too loose. Redo the foundation chain with a smaller hook, then switch back to 5.0 mm (US H-8) for Rnd 1.
The top edge ruffles. You probably added extra sc in the dips between shells. Work exactly one sc per stitch, for 80 total.
Bags fall out of the bottom. Add one more round of sc to the band, or work Rnd 3 with a 4.5 mm (US 7) hook for a firmer opening.
The loop stretches. Sew the ends through more stitches, or make the loop in cotton yarn.
Care
Hand wash in cool water with mild soap and lay flat to dry. Reshape the scallops while the holder is damp.

Final Notes
Each measurement in this holder builds on the one before. The 32-stitch band gives a 4 in (10.2 cm) opening. There are 8 shells in every round, and the shells grow from 5 dc to 7 dc to 9 dc, taking the round counts from 48 to 64 to 80. That growth widens the body from 4.4 in (11.2 cm) to 5.6 in (14.2 cm) to 7 in (17.8 cm). Fourteen shell rounds plus the band bring you to 12 in (30.5 cm), and the edging finishes the body at 12.25 in (31.1 cm). Check each stage as you go, and the finished holder will hang neatly every time.
Happy crocheting!