

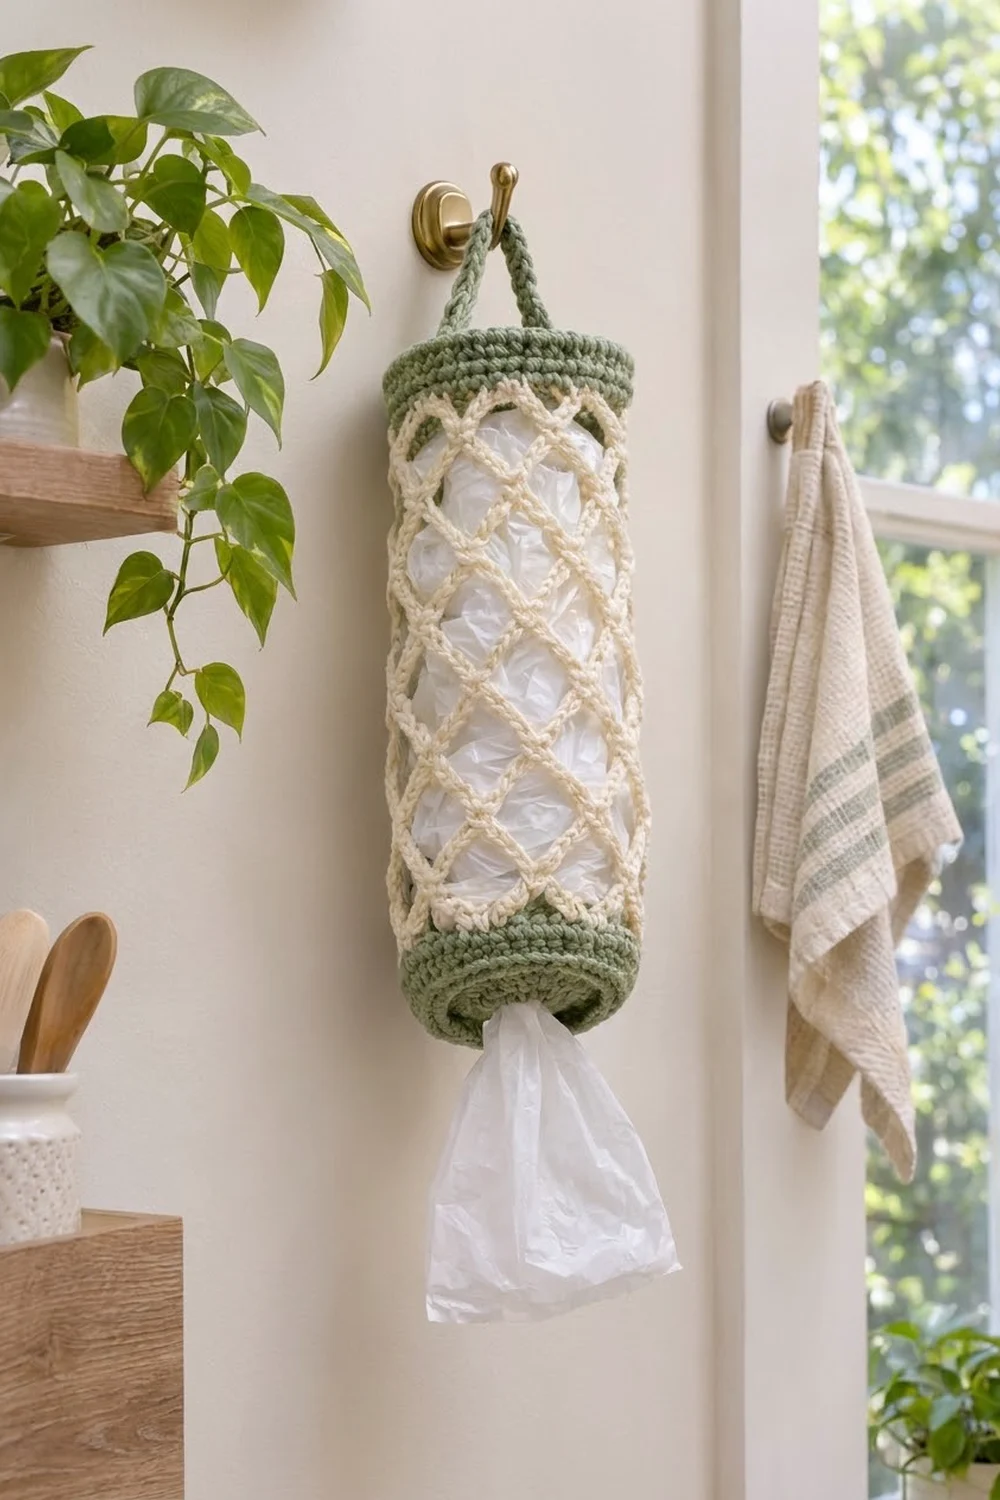
Keep your grocery bags tidy with this sage and cream bag holder. A cream diamond lattice runs over a soft sage green background, and solid green bands at the top and bottom give it a clean, finished look. It hangs from a single hook and suits a kitchen, pantry or laundry room.
The trellis is tapestry crochet: single crochet worked in two colors, with the unused color carried inside the stitches. This makes a dense, sturdy fabric that holds its shape when full of bags. The pattern uses US crochet terms throughout.
The finished holder is 15 in (38.1 cm) long and 6 in (15.2 cm) wide when flat. It measures 12 in (30.5 cm) around, and the bottom opening measures 10 in (25.4 cm) around. The hanging strap adds an arch of about 2.5 in (6.4 cm) above the rim.
You work it from the bottom up as one seamless spiral tube. You start with a chain ring for the bottom opening, increase once, work six repeats of an 8-round lattice, then finish with a green top band. A corded reverse single crochet edge goes around both openings, and the strap is worked directly onto the rim. There is no sewing apart from weaving in ends.
Finished Size and Construction
- Finished size: 15 in (38.1 cm) long × 6 in (15.2 cm) wide when flat, not counting the strap
- Circumference: 12 in (30.5 cm) for the body; 10 in (25.4 cm) at the bottom opening
- Skill level: Intermediate (tapestry color changes)
- Terminology: US
- Yarn weight: Worsted (#4)
- Hook: 5.0 mm (H-8)
- Number of pieces: 1 (one seamless tube with the strap worked on)
- Layout: Vertical tube: bottom band, lattice section, top band
- Piece size: 48 stitches around, 60 rounds tall
- Size before border: 13.5 in (34.3 cm) long after Round 54
- Border depth: Top band 1.5 in (3.8 cm); the bottom edge is one round of reverse single crochet worked into the foundation chain
Materials
Yarn: Worsted-weight cotton or a cotton blend gives the firmest, most washable holder. Acrylic also works but stretches a little more. Choose a smooth yarn so the lattice lines stay crisp.
- Color A, sage green: 90 g / 180 m (197 yd)
- Color B, cream: 55 g / 110 m (120 yd)
These quantities include a margin of about 15% for your gauge swatch and the carried strands.
Tools:
– 5.0 mm (H-8) crochet hook
– 1 stitch marker
– Yarn needle
– Scissors
– Measuring tape
– Rust-proof pins and a rolled towel for blocking
Abbreviations (US Terms)
- ch: chain
- sc: single crochet
- sl st: slip stitch
- st(s): stitch(es)
- rnd(s): round(s)
- rev sc: reverse single crochet (crab stitch)
- A / B: Color A (sage) / Color B (cream)
Tapestry sc: Hold the color you’re not using along the tops of the stitches in the current round. Work each sc over it, so the carried strand is hidden inside the stitch.
Color change: Work the last sc before a color change until 2 loops remain on the hook. Yarn over with the new color and pull it through both loops. Keep carrying the old color.
Reverse single crochet (rev sc): Working from left to right (right-handers), insert the hook into the next stitch to the right. Pull up a loop, yarn over, and pull through both loops on the hook.
Gauge and Checkpoints
Gauge: 16 sts and 16 rnds = 4 in (10.2 cm) in tapestry sc worked in the round.
That works out to 4 sts and 4 rnds per inch, and one lattice repeat of 8 sts × 8 rnds = 2 in × 2 in (5.1 × 5.1 cm). Square repeats keep the diagonal lines at a true 45 degrees.
Test first: Work Rounds 1–14 (the bottom band plus one full lattice repeat), then measure.
Checkpoints:
– After Round 2: circumference 10 in (25.4 cm); flat width 5 in (12.7 cm)
– After Round 6: circumference 12 in (30.5 cm); flat width 6 in (15.2 cm); height 1.5 in (3.8 cm)
– After Round 14: height 3.5 in (8.9 cm)
– After Round 54: height 13.5 in (34.3 cm)
– After Round 60: height 15 in (38.1 cm)
Too big? Go down to a 4.5 mm hook. Too small? Go up to a 5.5 mm hook. Tapestry crochet often works up a little tight, so check the swatch with the carried strand in place, not with plain sc.

Body
Work in a continuous spiral without joining. Place the marker in the first st of each round and move it up as you go.
Foundation: With A, ch 40. Join with a sl st to the first ch to form a ring, taking care not to twist the chain.
Rnd 1: Sc in each ch around. (40 sts)
Rnd 2: Sc in each st around. (40 sts)
Checkpoint: the ring measures 10 in (25.4 cm) around. This is the bottom opening.
Rnd 3 (conversion): [Sc in next 4 sts, 2 sc in next st] 8 times. 40 sts worked + 8 added = 48 sts.
Rnds 4–6: Sc in each st around. (48 sts per round)
On the last st of Rnd 6, change to B. From here on, carry A inside your stitches.
Lattice Section
Each lattice round has 6 repeats of 8 sts, for 48 sts per round. In the bracketed instructions, “B” means cream sts and “A” means sage sts. Change color in the last st before each new color block.
Rnd 7 (L1): [2 B, 5 A, 1 B] 6 times. (48 sts)
Rnd 8 (L2): [1 A, 2 B, 3 A, 2 B] 6 times. (48 sts)
Rnd 9 (L3): [2 A, 2 B, 1 A, 2 B, 1 A] 6 times. (48 sts)
Rnd 10 (L4): [3 A, 3 B, 2 A] 6 times. (48 sts)
Rnd 11 (L5): Same as L4. (48 sts)
Rnd 12 (L6): Same as L3. (48 sts)
Rnd 13 (L7): Same as L2. (48 sts)
Rnd 14 (L8): Same as L1. (48 sts)
How the diamonds form: The cream sts in each repeat (numbered 1–8) shift one st per round in both directions:
– L1 and L8: sts 8, 1, 2 are cream
– L2 and L7: sts 2, 3, 7, 8
– L3 and L6: sts 3, 4, 6, 7
– L4 and L5: sts 4, 5, 6
Two lines 2 sts wide cross at sts 4–6 in Rounds 10–11, and again at sts 8–2 where one repeat meets the next. Each crossing is 2 rounds tall. The sage areas between the lines form diamonds 5 sts wide at their widest point.
Rnds 15–54: Repeat Rnds 7–14 (L1–L8) five more times, for 6 lattice repeats in total. (48 sts per round)
Checkpoint: the piece measures 13.5 in (34.3 cm) from the foundation. Count the diamonds: you should have 6 around and 6 lattice repeats from bottom to top.
On the last st of Rnd 54, change to A. Cut B, leaving a 6 in (15.2 cm) tail. Carry the tail inside the next 6 sts to secure it.
Border
The border has two parts: the solid top band with its corded rim, and a corded edge around the bottom opening.
Border gauge: Same as the body, 4 sts and 4 rnds per inch in plain sc. The rev sc round adds about the height of one round.
When you flatten the tube, each side (front or back) shows half of the round:
– Top band: 48 ÷ 2 = 24 sts per side
– Bottom opening: 40 ÷ 2 = 20 sts per side
A tube has no corners, so no corner stitches are added.
Top Band
Rnds 55–59: With A only, sc in each st around. (48 sts per round; 24 per side)
At the end of Rnd 59, sl st in the next st to smooth the spiral step.
Rnd 60: Ch 1, rev sc in each st around. Join with a sl st to the first rev sc. (48 sts; 24 per side) Fasten off.
Checkpoint: the top band measures 1.5 in (3.8 cm). That’s 6 rounds at 4 rounds per inch. Total length is now 15 in (38.1 cm).
Bottom Edge
Turn the tube upside down. Join A in any free loop of the foundation chain.
Bottom edging round: Ch 1, rev sc in each free loop around. Join with a sl st to the first rev sc. (40 sts; 20 per side) Fasten off.
The bottom edge stays at 40 sts so the opening stays smaller than the body. The 8 increases in Round 3 are what make the body wider.
Why the math works:
– 40 sts at 4 sts per inch = 10 in (25.4 cm) around the opening.
– 48 sts = 12 in (30.5 cm) around the body. That’s 6 lattice repeats × 8 sts, which closes the lattice evenly with no partial repeats.
– 48 lattice rounds = 6 repeats × 8 rounds = 12 in (30.5 cm) tall.
– Bottom band 1.5 in + lattice 12 in = 13.5 in before the border. Add 1.5 in for the top border to get 15 in (38.1 cm).
Hanging Strap
Flatten the holder so the end of the spiral sits at one side edge. Count sts 1–48 along the top of Rnd 60, starting at the join. St 25 is directly opposite st 1.
Row 1: With the right side facing, join A in st 1 of Rnd 60. Ch 1, sc in the same st and in each of the next 3 sts. Turn. (4 sts)
Rows 2–24: Ch 1, sc in each st across. Turn. (4 sts per row)
The strap measures 6 in (15.2 cm), which is 24 rows at 4 rows per inch. It is 1 in (2.5 cm) wide.
Attach: Without twisting the strap, line up its last row with sts 25–28 of Rnd 60. Sl st through both layers 4 times. Fasten off, leaving a 10 in (25.4 cm) tail. Use the tail to whipstitch the strap edges to the rim for extra strength.
Final Blocking
- Weave in all ends inside the tube, following the carried strands.
- Wet the holder in cool water and gently squeeze out the excess. Do not wring it.
- Roll a towel to about 3.8 in (9.7 cm) across and slide it inside. This matches a 12 in (30.5 cm) circumference.
- Lay the holder flat. Gently ease the lattice lines so they run at even diagonals.
- Pin the length to 15 in (38.1 cm), and pin the strap flat to 6 in (15.2 cm).
- Let it dry completely, then remove the towel.
Final Quality-Control Checklist
- 48 sts in every body round; 40 sts at the bottom edge
- 6 diamonds around and 6 lattice repeats from bottom to top
- Lattice lines are 2 sts wide, with no green showing through the cream lines
- No carried strands visible on the outside
- Length is 15 in (38.1 cm); flat width is 6 in (15.2 cm)
- Bottom opening is 10 in (25.4 cm) around and lies smooth
- Strap is centered across the top, attached at opposite points, and not twisted
- All ends woven in securely
Troubleshooting
The lattice lines look jagged. Tapestry sc naturally leans slightly to the right. Keep your tension even, and block with the towel inside to straighten the lines.
The carried color peeks through. Hold the carried strand snugly along the stitch tops. Work each sc firmly enough to hide it.
The tube is puckering. The carried strand is too tight. Stretch your work every few stitches so the strand runs the full width.
A repeat doesn’t close evenly. Your round count is off. Count 48 sts and check that you have exactly 6 brackets.
The bottom flares open. Make sure you have exactly 40 sts in Rounds 1–2 and in the bottom edging round.
The strap stretches. Use cotton, and whipstitch the strap edges to the rim.
Care
Hand wash in cool water with mild soap, then lay flat to dry with the rolled towel inside. Avoid hanging it to dry while wet, because the weight will stretch the tube.
Final Notes
The measurement chain is:
– 40 sts = 10 in (25.4 cm) at the opening
– Increase to 48 sts = 12 in (30.5 cm) around
– 6 lattice repeats of 8 sts × 8 rounds = 12 in (30.5 cm) tall
– Bottom band 1.5 in plus lattice = 13.5 in (34.3 cm) before the border
– Top border 1.5 in (3.8 cm) → finished length 15 in (38.1 cm)
– A 6 in (15.2 cm) strap across the top
Check your gauge once and every other measurement follows from it.
Happy crocheting!